

TL;DR: What this guide covers and the quick path to getting started
Want to capture lectures, turn them into searchable study packs, and save time? This guide walks you through how to record classes, get accurate transcripts, and transform notes into summaries, mind maps, and study-ready materials. It also covers legal, privacy, and accessibility basics for class transcription.
- Record live or upload audio and video.
- Transcribe automatically, then proofread and edit.
- Generate summaries, mind maps, and a study pack you can search.
Rule of thumb: use live transcription for captions or when you need to follow a lecture in real time. Use post-class transcription for long sessions, interviews, or when you want higher accuracy and time to clean up transcripts.
Why record and transcribe classes (benefits for students and faculty)
Recording and transcribing lectures helps students learn more with less friction. Class transcription makes notes searchable, so students can find key concepts fast and spend study time on understanding, not hunting for quotes.
Nkomo and Daniel (2021) Students who accessed lecture recordings reported an enhanced learning experience, stating that the availability of lecture recordings created an inclusive learning environment for students with learning disabilities and fostered flexible learning for those unable to attend lectures due to sickness or work commitments.
For students: study gains
Transcripts cut study time and boost retention. You can skim a transcript, search for terms, and jump back to the exact moment in audio or video. Key benefits:
- Faster review, because you can search keywords.
- Better notes, by editing an accurate transcript.
- Catch-up option for missed classes or illness.
- Support for second-language learners with text and translation.
- Improved accessibility for deaf or hard-of-hearing students.
For instructors and researchers: reuse and reach
Faculty get more than convenience. Transcripts make reuse, assessment, and research easier. You can rework lectures into handouts, check consistent messaging, or analyze class discussions for research. Practical gains include:
- Create review clips and study packs quickly.
- Meet accessibility and accommodation requirements.
- Reuse recorded material across semesters.
- Export searchable data for qualitative research.
Recording and transcribing is a small extra step that scales learning for everyone in a course. It saves time, improves access, and turns classroom talk into reusable teaching assets.
Legal, privacy & security: What students and faculty must know
Recording a lecture or seminar can help learning, but you must handle it properly. Class transcription creates a record of speech, so get consent and check rules before you hit record. Follow your school policy and simple steps to keep recordings private and compliant.
Before you record: consent and policy
Ask for permission every time. Tell participants why you are recording, how you will store the file, and who can access it. Check institutional policy and instructor rules for classroom recordings, accommodation requests, and research approvals. If someone objects, stop or delete the audio.
Secure storage and handling of sensitive data
Use encrypted storage (encryption scrambles data so only authorized users can read it). Keep meeting files in your institution account or a private workspace. Limit downloads and share links with explicit expiration. For class research or minors, get signed consent forms and extra approvals from your ethics board.
Quick checklist:
- Announce recording and state purpose at the start.
- Use campus-approved cloud storage and two-factor authentication.
- Redact or remove sensitive excerpts before wider sharing.
- Archive or delete recordings per school retention rules.
Following these steps protects participants, preserves trust, and keeps your class work usable for study and accessibility.
Legal, privacy & security: What students and faculty must know
If you plan to record and transcribe classes, get consent and follow institutional rules first. Class transcription raises legal and ethical issues. Students and faculty should check university recording policies and ask permission before capturing audio or video.
Get consent and follow policy
- Notify everyone in the room or on the call, verbally and in writing when possible.
- Follow your school’s policy for recorded lectures, accommodations, and data retention.
- Keep a log of permissions, dates, and how recordings will be used.
Secure storage and encryption
Store recordings in encrypted cloud or campus drives, not on personal devices. Use password protection and limit access to the smallest needed group. Delete or archive files when they are no longer required for teaching or research.
Handle sensitive research and minors
For research involving personal data, follow IRB (institutional review board) rules and secure informed consent. For classes with minors, get explicit parental consent and follow state and federal laws. Treat health, legal, and grading discussions as confidential.
Simple steps protect privacy: announce recordings, use encrypted storage, limit sharing, and follow IRB or campus guidance. These practices make class notes and transcripts useful and safe.
Choosing the right tool: Quick comparison (TicNote vs Otter, Rev, Google Speech-to-Text)
This comparison focuses on the practical differences that matter when you record and transcribe lectures. It covers live transcription, translation, templates, exports, accuracy, languages, and privacy. Use it to pick a tool for class transcription or research recordings.
What to care about
- Live transcription: needed for captions and note-taking during class.
- Accuracy and language support: matters for non-native speakers and technical terms.
- Templates and post-processing: speed up summaries and study packs.
- Exports and integrations: move transcripts into LMS or reference managers.
Quick comparison table
| Feature | TicNote Cloud | Otter | Rev | Google Speech-to-Text |
| Live transcription | Yes, web and app, topic-aware | Yes, strong in meetings | No, post-file service | Yes, API only |
| Translation | Built-in 100+ languages | Limited auto-translate | No | API translation via Cloud |
| Templates & summaries | Built-in AI templates and mind maps | Summaries, highlights | Manual transcripts, human cleanup | None built-in |
| Exports | TXT, DOCX, PDF, WAV, PNG, Xmind | TXT, DOCX, SRT | TXT, captions | Text via API only |
| Pricing tiers | Free, Professional, Business, Enterprise | Free and paid tiers | Per-minute paid service | Pay-as-you-go API |
| Privacy stance | Private by default, not used to train models | Uses data for improvement unless opted out | Human providers handle files | Depends on customer config |
When TicNote is the better pick
Choose TicNote when you need an end-to-end academic workflow. It gives live transcription, built-in summarization, mind maps, and ready exports. It also favors privacy by default, useful for research and disability access. For single-file, human-quality transcripts, Rev still helps. For API integration and broad language engines, Google fits developer-heavy setups.
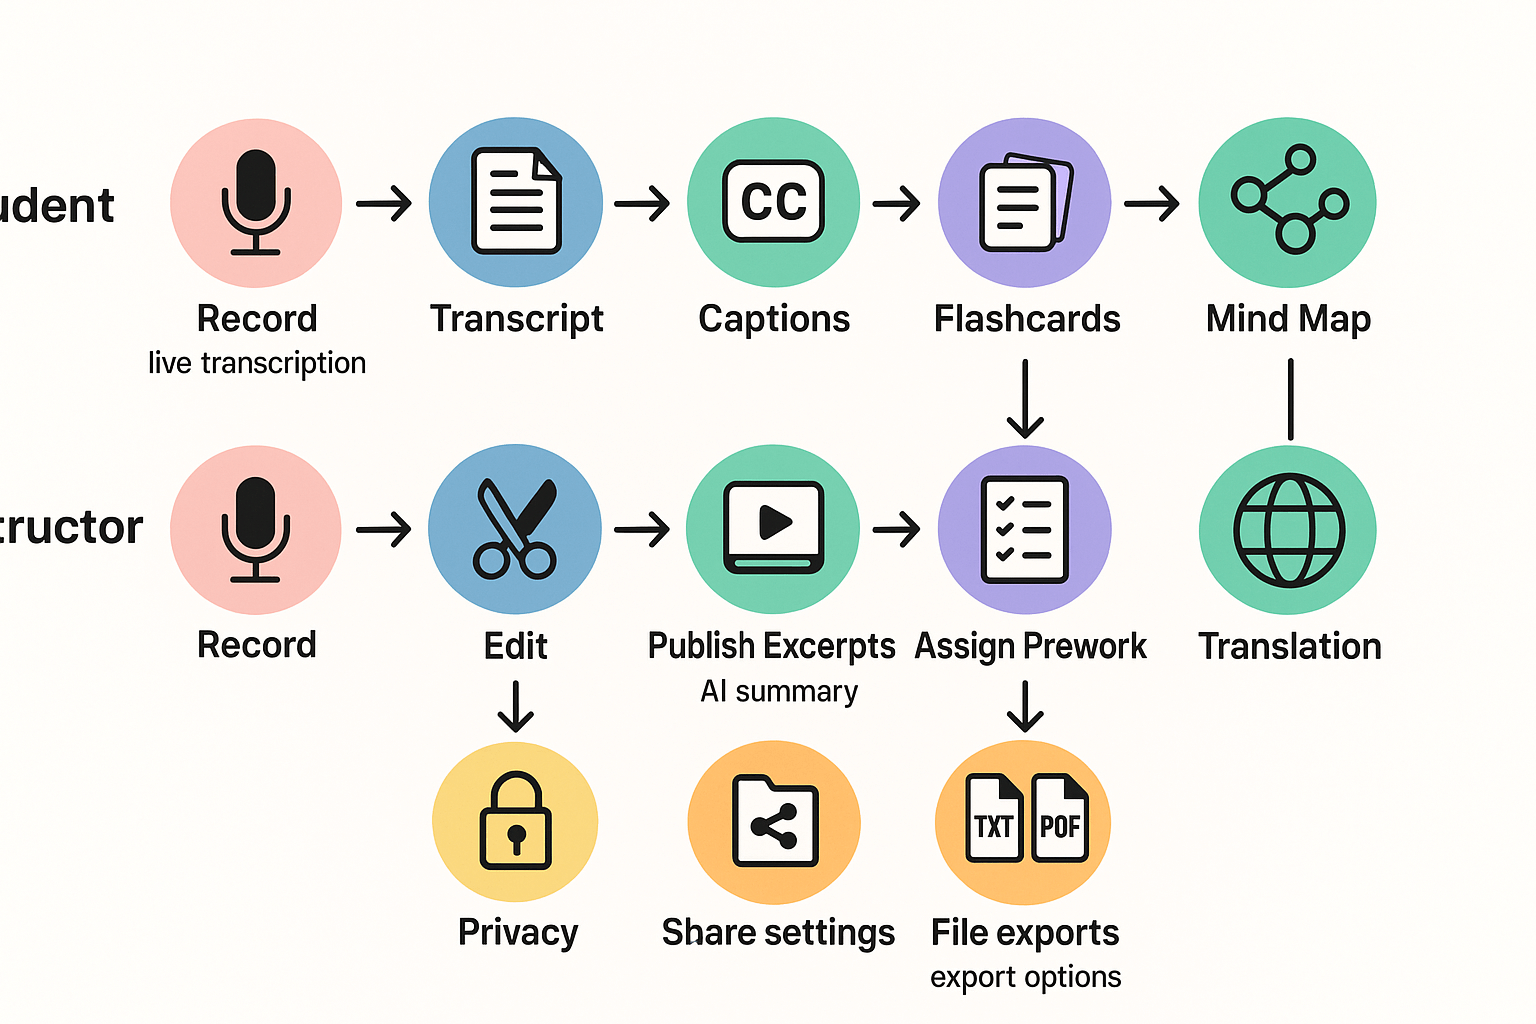
Step-by-step: Recording classes with TicNote (setup, live capture, upload workflows)
Recording and transcribing classes is easier with a dedicated tool. This step-by-step guide shows how to install TicNote, capture live sessions in Meet, Teams, and Zoom, and upload offline audio for post class transcription. Follow the short setup and capture steps to start reliable class transcription in minutes.
Install TicNote: Chrome extension or desktop app
Install TicNote from the Chrome Web Store for browser capture, or download the app for local recording. Grant the microphone permission when prompted. Sign in or create a free account to keep recordings in the cloud. Confirm the default language and audio input in settings before you record.
- Open Chrome and add the TicNote extension, or install the app.
- Click the TicNote icon and sign in with email or SSO.
- Choose your microphone and language under Settings.
- Enable live transcription for meetings.
Start live capture in Meet, Teams, or Zoom
Use the Chrome extension for browser calls, or record directly with the app when you run Zoom locally. Start the extension before your class to avoid missed content. TicNote records audio-only, so the tool won’t join the call as a bot. After class, your audio uploads automatically to the cloud for processing.
- Join the meeting in Meet, Teams, or Zoom.
- Click the TicNote icon, then Start Live Capture.
- Allow tab or system audio if your lecture includes shared video.
- Watch the live transcript panel appear and follow the topics.
- Click Stop to end capture and upload.
Upload offline recordings
If you record audio locally or have lecture videos, upload files to TicNote for post class transcription. Use WAV or MP3 for best results. The platform queues files and generates transcripts automatically. You can batch upload several files for a whole week of lectures.
- Open TicNote Cloud and go to Upload.
- Drag audio or video files into the upload area.
- Choose a language and start transcription.
- Check the transcript once processing finishes.
Mic tips and noise reduction
Good audio improves accuracy a lot. Use a headset or a dedicated USB mic. Sit close to the mic and mute notifications on your device. If rooms are noisy, enable noise reduction in the app settings.
- Use cardioid or headset mics for speech clarity.
- Turn off room fans and close doors when possible.
- Ask presenters to speak slowly and name slides.
- Run a short mic check before important sessions.

Step-by-step: Transcribing, editing & summarizing in TicNote (post-processing & troubleshooting)
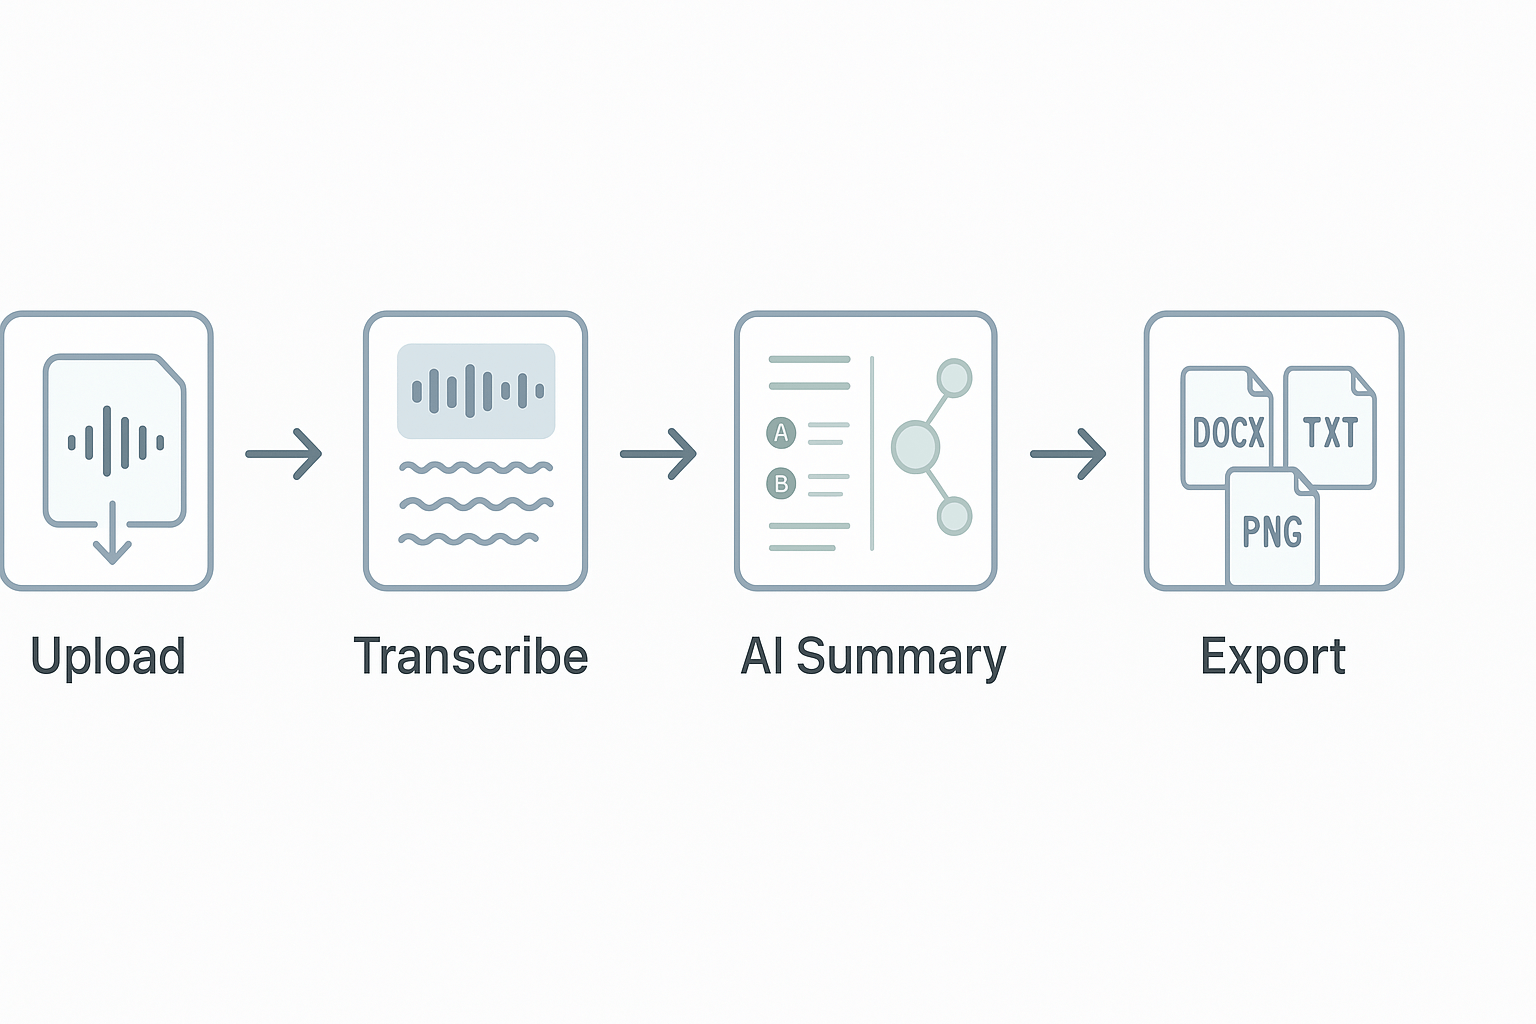
Start by uploading your lecture audio or video to TicNote. This section walks you through the upload to transcript flow, how to fix speaker labels and common speech errors, and how to run AI summarization and Shadow chat for quick insights. You’ll also see export options and quick fixes for poor audio, strong accents, or very long recordings. Use this to turn raw class recordings into usable study material.
1) Upload to the automated transcript
- Click New, then Upload, and pick an audio or video file. TicNote ingests WAV, MP3, MP4, and common formats.
- Select language and speaker count if known. This helps accuracy and speaker splits.
- Start the job and wait for the automated transcript. Small files finish in minutes; long files can take longer.
Use this checklist while you wait:
- Confirm file name and course tag for search later.
- Add class date and instructor name in metadata.
2) Edit, label speakers, and fix common errors
Open the transcript editor and scan for obvious misheard words. TicNote shows a waveform beside text, so you can jump to any phrase and listen. To fix speaker labels:
- Select a block, choose the speaker menu, and assign or create a label.
- Use Find speaker to merge repeated labels across the file.
To correct speech errors, use the inline edit and the playback scrub. Common fixes:
- Replace homophones and technical terms with the correct spelling.
- Expand shorthand like "Q" to "Question" for clarity.
3) Run AI summarization and Shadow chat for insights
Once the transcript is clean, click Summarize. TicNote generates topic bullets, an executive summary, and key takeaways. Want deeper answers? Open Shadow chat and ask questions about the transcript, like, "What are the three main methods discussed?" Shadow will cite timestamps and lines for quick review.
4) Export, share, and create study assets
Export options include TXT for raw transcripts, DOCX or PDF for polished notes, and PNG or Xmind for mind maps. Use the AI mind map to turn a dense lecture into a one-page study guide. Share with classmates or drop into your LMS.
5) Troubleshooting: poor audio, accents, and long files
If audio is noisy, run a simple noise reduction in any audio editor before uploading. For heavy accents, increase the speaker count and correct a few key terms early so the model learns context. For very long files, split uploads into parts, transcribe each, then use Shadow cross-file Q A to pull combined answers.
Try TicNote Cloud for Free and generate your first AI summary in minutes.
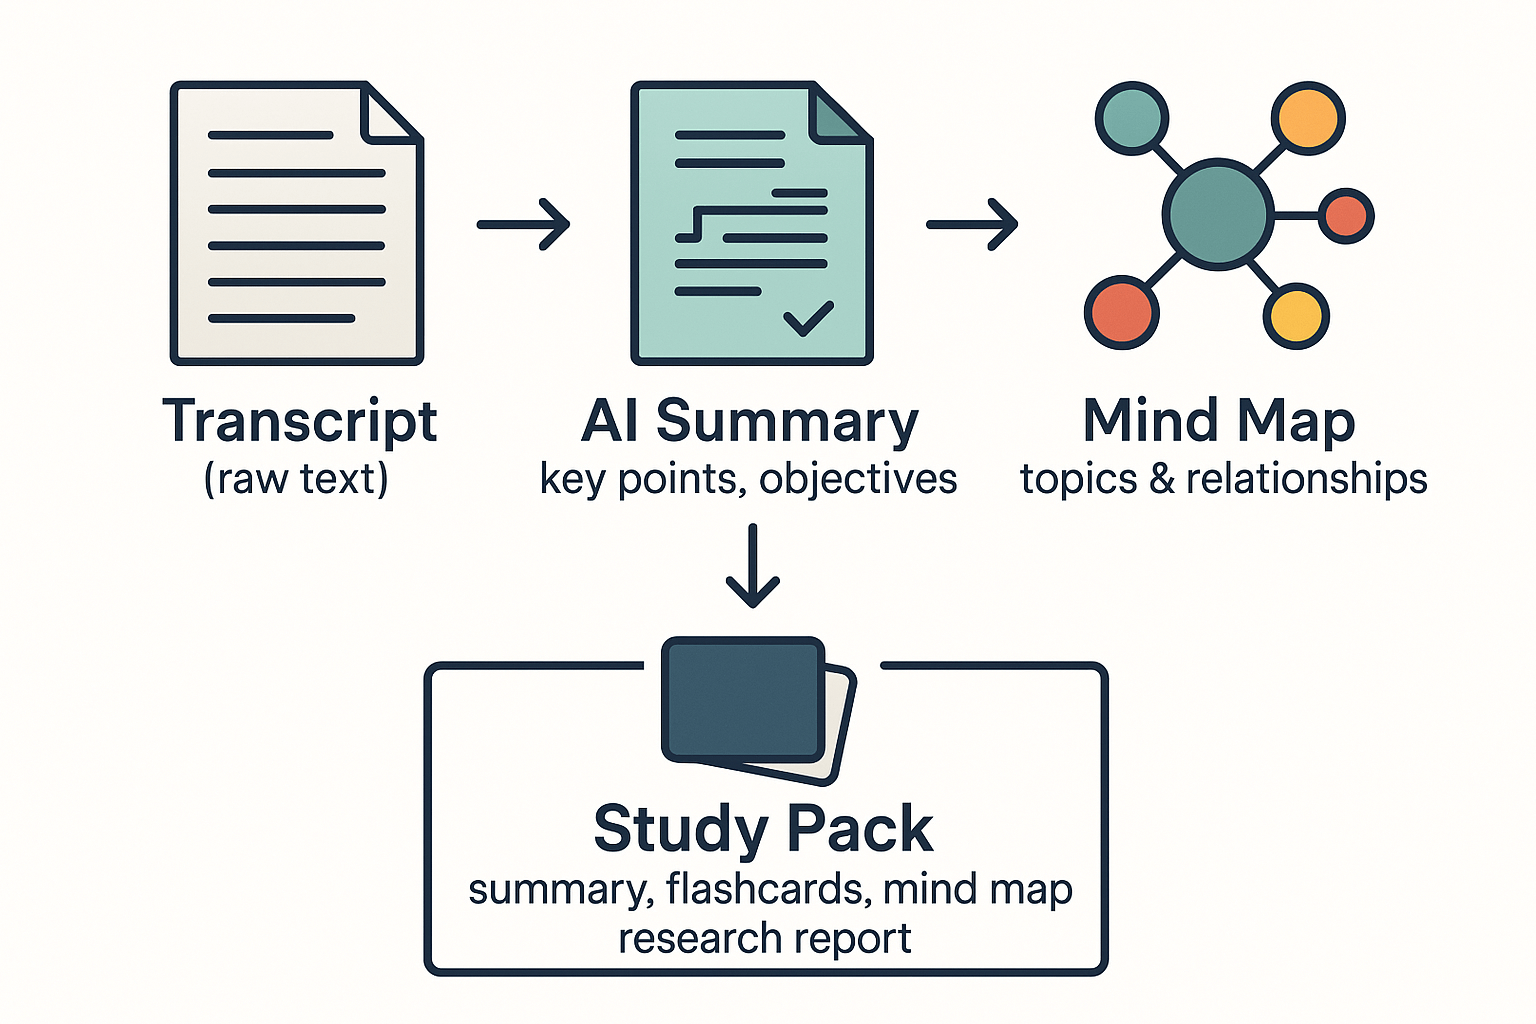
Turning transcripts into study materials: Templates, mind maps & research reports
Start with the transcript and aim for a study pack you can actually use. Class transcription gives you the raw text to summarize, visualize, and quiz from. This section shows which templates to pick and how to shape the output for exams, group study, or a literature review.
Create an editable summary for quick review
Pick a concise summary template that preserves headings and timestamps. Use the AI summary to pull out learning objectives, key facts, and definitions. Then edit the draft to add your lecture notes, examples, and any corrections.
Steps to follow:
- Run the summary template on the transcript.
- Check headings and add course-specific terms.
- Export as DOCX or Markdown and save in your folder.
Generate an AI mind map for visual recall
Turn topics and subtopics into a mind map to boost memory. Let the tool auto-cluster by topic, then drag nodes to match your course layout. Use the mind map in revision sessions or slides.
Mind map tips:
- Keep the main nodes as lecture themes.
- Add one example per node for clarity.
- Export PNG for quick sharing.
Make flashcards and practice questions
Create flashcards from definitions and Q&A segments. Auto-generate question cards, then refine card phrasing for exams. Study in short daily drills and share with classmates for group study.
Build a structured research report for reviews
For a literature review or seminar paper, use the deep research template. It organizes transcript quotes, references, and gaps in the discussion. Export the report as PDF and add citations manually for your bibliography.
Quick export and customization tips
Standardize filenames and tag by course and week. Keep one master transcript and derive multiple copies for different uses. Small edits up front save hours later when you study.
Accessibility & real user cases (student & faculty stories)
Good accessibility starts with reliable class transcription and clear reuse plans. Here we show two short, real use cases: a deaf student who depends on live captions and an instructor who reuses recordings for flipped lessons. Both need fast transcripts, accurate summaries, and safe sharing settings.
Student story: deaf student — quick wins
A third-year student used live captions and post-class transcripts to keep up in lecture. TicNote gave her a live transcript she could search later. She turned highlights into flashcards and a mind map for revision. It cut study time and made group work easier.
Instructor story: flip lessons with edited excerpts
A lecturer records every seminar, then edits highlights into 10-minute clips for a flipped classroom. He uses automatic summarization to make pre-class notes. Students watch clips, then use transcripts for guided tasks. The instructor says, "Short clips and transcripts helped students focus in class."
Accessibility checkpoints to include in course planning
- Share recording and transcript access before week two.
- Offer live captions and downloadable transcripts.
- Provide slide decks and alt text for images.
- Allow extra time for students using transcripts.
These steps keep classes inclusive and make recorded lectures more useful for everyone.
Pricing & plan comparison: Clear breakdown for students, researchers, and institutions
Recording and transcribing classes is easier when you pick the right plan. TicNote Cloud has a clear free tier and stepped upgrades, so you can match minutes, upload limits, and AI features to your workload.
TicNote plans at a glance
- Free ($0/month): 300 transcription minutes per month, max 30-minute web recordings, 3 document imports, 10 AI chats per day, basic templates, live transcription, AI summarization, and mind map export.
- Professional ($$12.99/month or$$79/year): Everything in Free, plus 1,500 mins/month, max 3-hour web recordings, 30 document imports, unlimited AI chat, and advanced templates.
- Business ($$29.99/month or$$239/year): Everything in Professional, plus 6,000 mins/month, max 8-hour web recordings, 100 document imports.
- Enterprise: Custom usage, SSO, AI meeting agent, 7/24 support, contract pricing.
Which plan fits you
- Students: Start on Free. It covers lecture capture and quick summaries, and you can upgrade for longer recordings before finals.
- Researchers and power users: Professional fits long interviews and heavy AI chat. Use Business for department-level archiving or many large files.
- Departments and IT: Contact sales for Enterprise when you need SSO, policy controls, or volume pricing.
Value vs competitors
TicNote focuses on turning transcripts into reusable knowledge: auto mind maps, deep research reports, and a cross-file chat. For institutions that need SSO and enterprise SLAs, Enterprise matches common needs. For solo users, the Free and Professional tiers are competitive on minutes and AI tooling compared with standalone transcription services.
