TL;DR: Quick answers — how to best transcribe interviews and client calls
Here are the fast facts for how to best transcribe interviews and client calls. Use automated transcription for speed, drafts, and searchable notes. Choose human transcription when you need near-perfect accuracy, legal-ready text, or when audio is noisy or multilingual.
Quick decision guide:
- Automated (AI): fastest and cheapest, great for meeting notes, research logs, and episodes with clear audio. Expect small errors that you can fix while editing.
- Human: highest accuracy, best for verbatim quotes, legal records, or published transcripts. It costs more and takes longer.
- Manual (do-it-yourself): only for tiny files or when you must control every edit. It is slow and not cost-efficient.
Fast setup tips to raise accuracy: record in a quiet room, use a dedicated mic, save a backup WAV copy, and note speaker names and timestamps. Clean audio cuts edit time in half and improves automated output.

Why transcribe client calls and interviews (ROI, accessibility & SEO)
Transcribing calls and interviews turns spoken work into searchable text. If you want to know how to best transcribe interviews, start with the upside: searchable notes, faster handoffs, and ready-to-publish content. A transcript gives teams a single source of truth for decisions, quotes, and action items.
Make knowledge findable and speed handoffs
When conversation is text, it becomes discoverable. Teams can search for keywords, pull direct quotes, and link findings to projects. That reduces meeting rework and saves time when people change roles. For client-facing teams, a clear transcript cuts follow-up email time and makes onboarding faster.
Benefits at a glance:
- Searchable records for repeatable answers.
- Faster customer handoffs and fewer missed tasks.
- Clear audit trail for decisions and scope changes.
Repurpose transcripts to increase content velocity
A transcript is raw content you can reuse. Marketers and podcasters can turn interviews into blog posts, social threads, or episode show notes. Researchers can extract quotes and build literature summaries. Content creators get more assets from the same hour of work.
Use this three-step reuse workflow:
- Highlight the best quotes or data points.
- Create an outline from topic markers in the transcript.
- Produce short-form assets: abstracts, tweets, and long posts.
This process speeds up content calendars. It also reduces the time writers spend hunting for source material.
Improve accessibility and inclusivity
Transcripts make audio accessible to readers with hearing loss. They help non-native speakers who prefer reading. They also help anyone working across noisy environments or slow connections. For public-facing content, transcripts meet accessibility expectations and improve user experience.
Make sure transcripts are paired with simple summaries. A short TL;DR and clear timestamps help readers find key moments quickly.
Boost SEO and discoverability
Search engines index text, not audio. A published transcript provides fresh, crawlable content. Search engines can pick up long-tail queries buried in conversations. This improves organic discoverability for niche topics discussed in interviews.
Practical SEO wins:
- Publish a cleaned transcript alongside an episode or article.
- Add structured data and timestamps for featured snippets.
- Use headings and pull quotes to surface intent and questions.
For podcasters and interviewers, transcripts can drive episode traffic. For consultants and product teams, they surface customer language that improves keyword strategy.
Cost savings and measurable ROI
Transcripts reduce time wasted on repetitive tasks. Less time spent on note-taking means more time on analysis and client work. Teams can shorten meeting length when they rely on transcript records. That lowers labor costs over time.
Examples of measurable gains:
- Faster incident resolution for support teams using searchable call logs.
- More content is produced per recording hour for marketing teams.
- Quicker product decisions from aggregated interview insights.
Who benefits most, and how to measure impact
Content creators get more publishable assets. Podcasters gain audience from text search and show notes. Researchers save coding time when analyzing interviews. Sales and customer success teams reduce response times and improve accuracy.
Track these metrics to show impact:
- Content output per hour recorded.
- Average time to first response on customer calls.
- Search traffic to pages that publish transcripts.
- Time saved in meeting follow-ups.
Quick practical examples
- A marketer turns a 45-minute client interview into three blog posts and ten social posts. That multiplies the reach from one recording.
- A researcher uses transcripts to code themes across 20 interviews. The team finishes the analysis in half the time.
- A support manager searches transcripts to find recurring bug reports. They reduce duplicate tickets.
One platform that covers the full workflow
Many tools offer transcription only. For teams that want search, translation, and research output in one place, pick a platform that ties transcripts to notes and analysis. TicNote Cloud provides live transcription, AI summaries, translation, and cross-file search in one workspace. That helps teams move from audio to actionable work faster.
Transcripts are not just records. They are amplifiers. When you capture conversations as text, you unlock search, speed, accessibility, and SEO. Use them to shorten feedback loops, repurpose content, and surface customer language. The result is cleaner handoffs and higher content velocity.
Methods compared: manual, automated, and human transcription — pros, cons, and cost
Transcribing interviews well starts with picking the right method. This section compares manual typing, automated AI transcription, and paid human transcription across accuracy, speed, privacy, and cost. Read on to learn which method fits different use cases, and get a short decision summary to help teams choose between in-house work, an AI platform, or a human vendor.
Quick comparison table
For context, automatic speech recognition systems can vary widely in accuracy. For example, Evaluating the performance of artificial intelligence-based speech recognition for clinical documentation: a systematic review (2025) reports word error rates from as low as 8.7% to over 50% in conversational multi-speaker encounters.
| Method | Accuracy | Turnaround | Typical cost | Privacy | Best when |
| Manual typing (in-house) | Medium to high, depends on skill | Same day to a few days | Low hourly cost | High control | Small teams, sensitive calls |
| Automated AI transcription | Good in clean audio, variable in noisy settings | Minutes | Low per-minute or free tier | Platform dependent | High-volume, quick drafts |
| Human transcription services | Highest accuracy for complex audio | 24–72 hours typical | High per-minute | Vendor policy varies | Legal, medical, or publish-ready audio |
Manual typing: pros, cons, and when to pick it
Manual typing means someone types while listening or replays audio and types. It gives tight control and fast corrections. It works well for short interviews and high-sensitivity calls. You control privacy because data can stay on your device. The downsides are obvious: it is slow and costly in time. Accuracy depends on typing skill and familiarity with subject matter. For recurring, meeting-heavy teams, manual work quickly becomes a time sink.
Use the manual in these cases:
- Short, sensitive client calls that cannot leave internal systems.
- When you need instant highlights during a meeting.
- If you have a trained note‑taker who already captures context and actions.
Automated AI transcription: pros, cons, and when to pick it
Automated transcription uses speech recognition software. It is fast and cheap. You can get a full draft in minutes. Modern tools also offer live transcription, speaker labels, and AI summaries. But quality depends on audio clarity, accents, and cross-talk. Expect errors in noisy or multi‑speaker recordings. Also, check privacy policies before uploading client calls.
Pros:
- Speed at scale, near-instant results.
- Low marginal cost, some free minutes available.
- Useful for searching, indexing, and repurposing content.
Cons:
- Variable accuracy in real-world audio.
- May need human editing for publishable text.
- Platform privacy terms may matter for sensitive client calls.
Pick automated transcription when you need many transcripts fast, want searchable notes, or plan to repurpose content into summaries, show notes, or research.
Human transcription services: pros, cons, and when to pick it
Paid human transcription uses trained transcribers. They handle accents, overlapping speech, and domain jargon. Accuracy is highest. They follow style guides and can deliver verbatim or cleaned transcripts. The tradeoffs are cost and turnaround time. Expect higher per-minute fees and delays versus automated services.
Pros:
- Best accuracy for noisy, multi-speaker, or technical interviews.
- Vendors can apply confidentiality agreements and custom formatting.
- Less editing is needed for publication.
Cons:
- Slower delivery, typically one to three days.
- Higher cost per minute.
- You still need to verify vendor security and compliance.
Use human transcription for legal depositions, medical interviews, or when transcripts will be published verbatim.
Cost and speed at a glance
- Manual: near-zero direct cash cost, high time cost, immediate control. Good for ad-hoc, sensitive needs.
- Automated: low cost per minute, instant turnaround, needs editing. Good for volume and iteration.
- Human vendor: high cost, slower, high accuracy. Good for final, publish-ready transcripts.
Choosing by use case
Match the method to the expected outcome, not the technology. Here are practical rules:
- For rapid internal review and searchable notes, use automated transcription. Pair it with a quick human skim for key sections.
- For client-sensitive or no-cloud policies, keep transcription in-house with manual typing or on-device tools.
- For publish-ready pieces, legal records, or clinical notes, choose a vetted human vendor.
- For hybrid needs, use automated transcription plus a human editor. This reduces cost while keeping quality high.
If you want an automated-first workflow that includes translation, AI summaries, and file exports, consider a platform that supports editing, export formats, and privacy controls. TicNote Cloud, for example, offers live and post-meeting AI transcription, built-in summarization, and exports that speed editing and reuse.
Short decision summary
- If you need speed and volume, go automated and plan for a light edit.
- If privacy or policy is the top priority, transcribe in-house or use a vendor with strict controls.
- If accuracy and publish quality matter most, pay for human transcription.
Choosing the right method saves time and prevents rework. Start by defining accuracy needs, turnaround limits, and privacy requirements. Then pick a solution that balances those priorities and fits your team’s workflow.
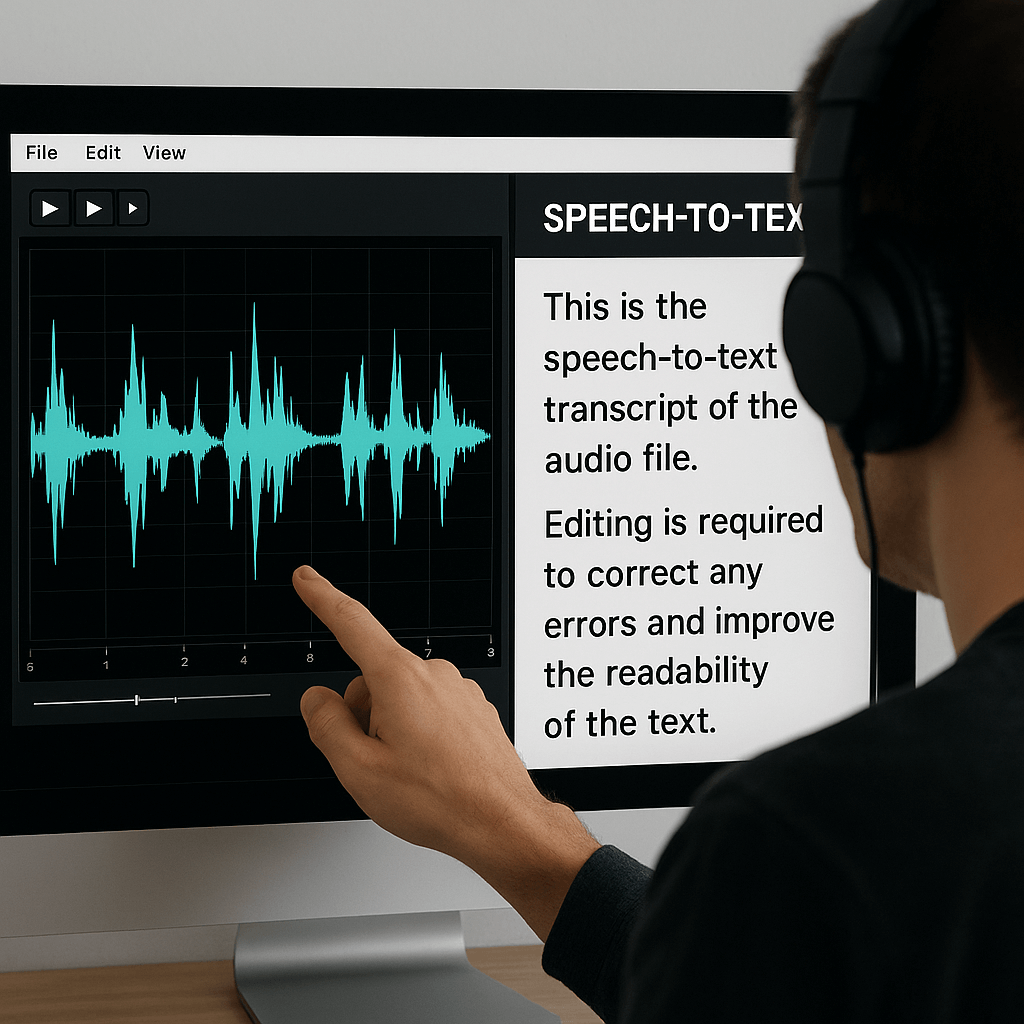
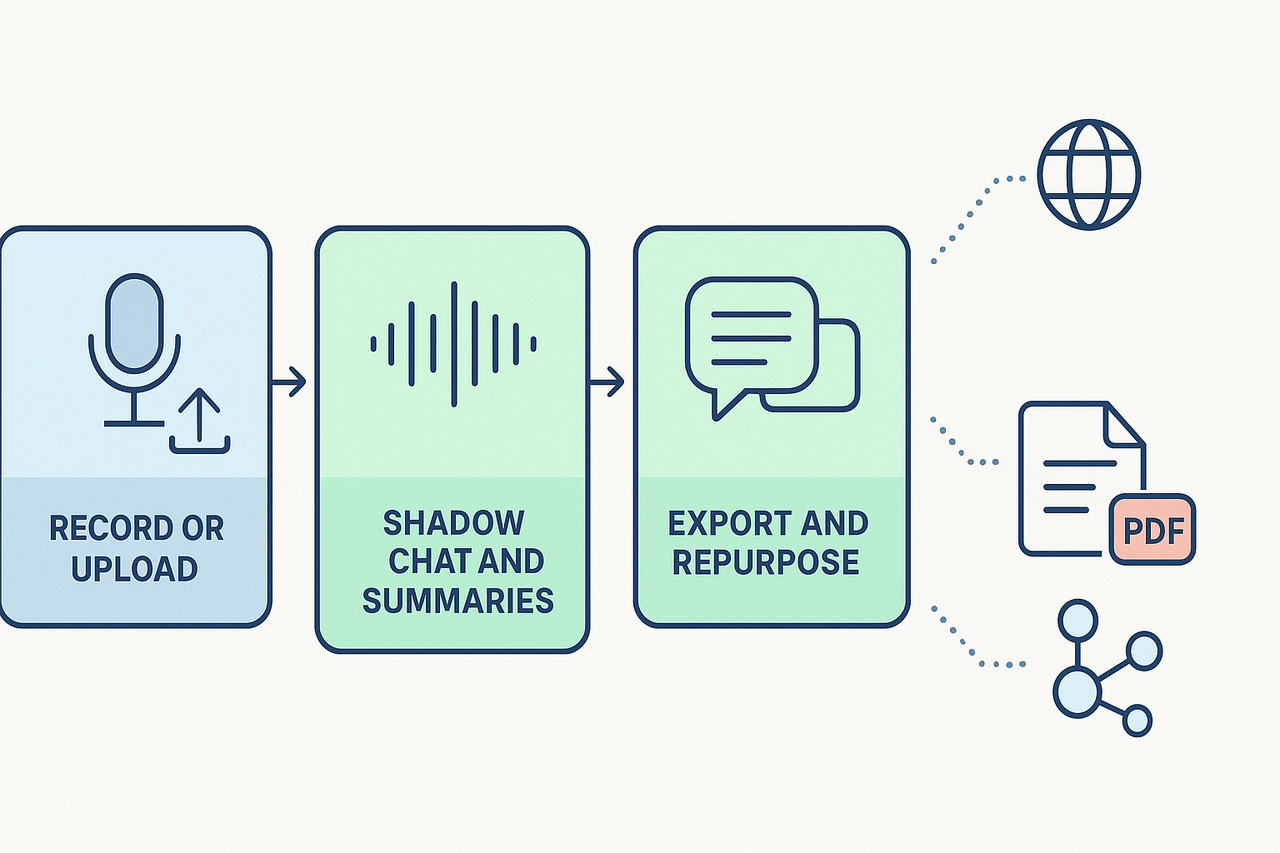
TicNote Cloud walkthrough: transcribing client calls step-by-step
This walkthrough shows how to capture, transcribe, and turn a client call into searchable, reusable notes. It covers live recording vs upload, speaker naming tips for the current feature set, running AI summaries, using Shadow chat for Q&A, and exporting transcripts to TXT, DOCX, or PDF. If you want hands-on, try the platform for free or request a product demo from the sales team.
1) Choose live recording or upload, and when to use each
Pick a live recording when you need a verbatim capture during a meeting. Live works well for interviews, client calls, and quick note capture. Upload a file when you already have audio or a recorded call. Uploads let you transcribe long files and keep the original audio for review.
Steps for live recording:
- Open the web app and tap Record. Use a quiet room and a good microphone.
- Stop when the call ends. The platform uploads the file automatically.
- Wait for AI transcription to finish. Most short calls return results in minutes.
Steps for uploads:
- Click Upload and choose your WAV or audio file.
- Pick the language if the call is in one language, or leave autodetect on.
- Start transcription and move to the editing screen when it completes.
Why pick one over the other:
- Live saves time and captures context immediately.
- Uploads let you edit the original audio first and trim background noise.
- If you work offline, record locally, then upload for higher control.
2) Speaker naming tips given current feature limits
The platform does not auto-diarize speakers. That means it will not always split speech into labeled speakers automatically. You can still get clear speaker labels with a small manual step.
How to add speaker names efficiently:
- Before the call, list expected speakers in a shared doc. Use first names only.
- During the call, use brief prompts: say the speaker's name before a long answer. This makes editing faster.
- After transcription, use the editor to assign speaker tags. The editor shows timestamps next to text.
Quick method to name speakers:
- Search the transcript for a natural cue, like "Hi, I'm Sara."
- Replace the generic label with "Sara, Product Lead."
- Use find and replace for repeated patterns to speed up work.
Tip: Keep labels short. Use roles only when they add value, for example, "PM" or "Client".
3) Run AI summaries and use Shadow chat for research and Q&A
Once the transcript is ready, run an AI summary to surface the call’s decisions, action items, and key quotes. The AI summary groups notes by topic, so you can skim fast.
How to run a summary:
- Open the transcript view.
- Click Summarize or choose a template like Meeting Notes or Interview Highlights.
- Review the summary and edit for tone and accuracy.
Use Shadow chat for deep follow-up questions. Shadow reads the transcript and answers from the file context. Ask for:
- A one-paragraph client brief.
- All action items with owners.
- Quotes to use in a report.
Shadow works across files, too. Ask questions like: "Show me decisions from the last three client calls." The platform returns grounded answers using your workspace content.
4) Exporting, translation, and mind-map outputs
Export options work for both raw transcripts and final summaries. You can export the file you just edited in these formats:
- Transcript: TXT.
- Summary: DOCX or PDF.
- Mind map: PNG or Xmind for visual review.
Export steps:
- Open the Export menu in the transcript or summary view.
- Choose a format, and include timestamps if you need them.
- Download, then share with stakeholders.
If you need translations, run the AI translation to generate a translated transcript. The tool supports many languages and creates a new file you can export.
5) Edit, annotate, and repurpose for content
Edit the transcript to fix names and remove filler words. Use these repurposing ideas:
- Blog post: Pull a three-paragraph narrative from the summary.
- Social quotes: Export short quotes with timestamps.
- Research report: Use the Deep Research feature for structured findings.
Use templates for consistent outputs. Templates map transcript parts into sections like Background, Pain, and Next Steps.
6) Embedded sample transcript to try
Below is a short sample you can paste into the editor to test searching, Shadow, and export flows.
[Sample transcript start]
00:00:02 Client: Hi, thanks for joining. We want faster reporting. 00:00:10 Jane (Consultant): What metrics matter most for you? 00:00:18 Client: Time to insight and monthly active users. 00:00:25 Jane (Consultant): We can run a weekly dashboard and a monthly deep dive. 00:00:32 Client: That works, but can we automate the data pull? 00:00:38 Jane (Consultant): Yes, we will script the ETL and schedule it weekly.
[Sample transcript end]
Paste this into the editor to test Shadow chat, run a summary, and export the result.
7) Quick troubleshooting and speed tips
- If audio is noisy, trim dead air before transcribing.
- If the transcript lags, refresh the project page.
- Use short speaker cues when you need fast labeling.
Checklist before you start a client call:
- Use a dedicated mic or headset.
- Close tabs that play sound.
- Tell participants the call will be recorded.
Using this workflow, you get a tight loop from recording to research. The editor and Shadow chat make it easy to extract decisions and next steps. Try the platform for free to test live capture and uploads, or contact sales to request a product demo.
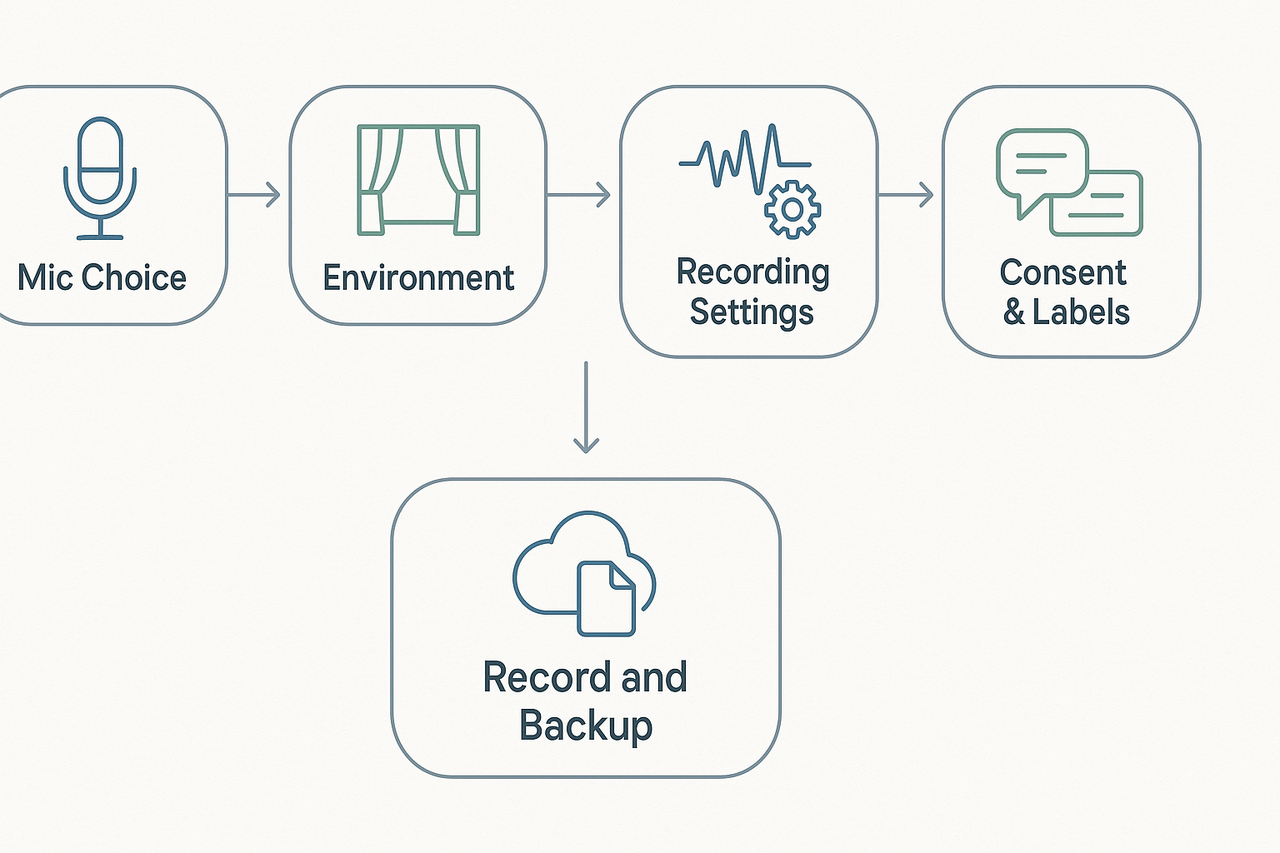
Preparing for accurate transcription: recording & interviewing best practices
Good audio starts before you hit record. This section shows clear, practical pre-meeting checks that raise transcript accuracy and save editing time. It also explains how to set hardware, room, and consent practices so you get usable text fast, and how to send files to the platform that accepts multi-source uploads.
Pick the right microphone
Use the best mic you can. USB condenser mics give full voice detail for podcasters. Lavaliers (lapel mics) are great for interviews on the go. Headset mics work well for noisy locations because they stay close to the mouth. If you want a budget option, a phone’s built-in mic is fine when placed correctly.
Tips for mic placement:
- Keep the mic 6 to 12 inches from the speaker’s mouth.
- Aim slightly off-axis to reduce pops from plosives.
- Use a pop filter for condensers.
- Test audio with a short recording before the session.
Control the room and background noise
Choose a quiet room and reduce hard surfaces that echo. Soft furnishings absorb sound and cut reverb. Turn off noisy devices like fans and phones. If you can, record in a small room with curtains or a rug.
Handling background voices and traffic:
- Close windows to block outside noise.
- Ask others in the household or office to keep quiet.
- Use directional mics to focus on the speaker.
- If unavoidable, record a 10-second room tone for noise reduction later.
Set recording settings for best results
Record at a high enough bitrate and in mono when you only need one clean mix. A 44.1 or 48 kHz sample rate with 16-bit depth is a safe standard. If you have multiple channels, capture separate tracks per speaker when possible. Saving in WAV or uncompressed formats keeps quality before you transcode.
Quick settings checklist:
- Sample rate: 44.1 kHz or 48 kHz.
- Bit depth: 16-bit or 24-bit if available.
- Mono vs stereo: mono for single-mic; stereo for two mics.
- File format: WAV for best fidelity, MP3 only for small files.
Name speakers and prep a brief script
Label speaker tracks or files clearly before upload. Use names like "Client_Jane" or "UX_Participant_01" to speed editing and searching. Send short prompts or a question script to guests so they know how to speak, and whether to state their name at the start of the recording.
Why this helps:
- Clear names aid speaker-attribution in transcripts.
- A short script reduces filler words and corrections.
- Asking speakers to say their names at the start helps diarization later.
Use clear consent language on client calls
Always get permission before recording. Use a short, simple consent line that covers purpose and storage. Say who will access the recording and how long you will keep it. If clients need an alternative, offer note-taking instead of recording.
Sample consent script you can use:
"Hi, I’d like to record this call to capture notes and follow up accurately. The recording stays private, and only our team will access it. Is that OK?"
Role-specific tweaks: podcasters, UX researchers, consultants
Podcasters should run a quick audio test at the start with both hosts. Ask guests to avoid long runs of laughter that overlap speech, and pause before answering. For UX researchers, use a short intro script stating the study name and participant ID at the start. Consultants should confirm client consent and record action items aloud to make post-call summaries easier.
Short role checklist:
- Podcasters: multi-track record, name each track.
- UX researchers: record participant ID, save consent forms.
- Consultants: state decisions and next steps on record.
Uploads, backups, and multi-source support
Keep a backup copy of raw audio. Export a WAV copy before running any edits. If you record video, export the audio track separately for the transcript. The platform accepts multi-source uploads, so you can add audio, video, and text files to the same workspace for richer context.
How to package files:
- Rename files with date and project tags.
- Include a small README text that lists speakers and the recording device.
- Upload raw audio first, then any edited clips or notes.
Quick pre-meeting checklist
- Test the mic and record a 30-second sample. 2. Close windows and mute notifications. 3. Set sample rate and file format. 4. Name the session and speakers. 5. Read the short consent script and confirm. 6. Start backup recording if possible.
Following these steps cuts edit time and improves transcript accuracy. You’ll get clearer speaker attribution, fewer mis-transcriptions, and faster repurposing for articles or research notes. If you use an AI note tool, upload raw and edited files together so the tool can link audio, transcript, and notes in one place.
Editing, formatting, and repurposing transcripts for SEO and content production
Good transcripts are raw material, not finished content. This section shows how to best transcribe interviews and then edit, format, and turn the output into shareable assets. You’ll get a short cleanup checklist, a repeatable process for posts, social clips, show notes, and long articles, plus SEO-friendly heading examples.
Quick editing checklist
- Remove filler words and false starts (um, uh, you know). Keep only useful phrasing.
- Fix obvious misheard words and homophones (their, there, they’re).
- Add timestamps at regular intervals and at every quotable moment. Use the format [00:04:32].
- Label speakers clearly: Name (Role) or Interviewer / Guest. Consistency matters.
- Insert paragraph breaks for topic shifts and natural pauses. Short paragraphs help scanning.
- Mark or bold pull quotes and key soundbites for reuse.
- Flag action items, decisions, and resources mentioned in the call. Put them in a separate highlights box.
- Normalize names, acronyms, and technical terms. Add a short glossary if needed.
- Save a verified copy after a quick listen pass to confirm proper nouns and numbers.
Step-by-step: from raw transcript to publishable interview post
- Clean the text (15–30 minutes). Remove filler, correct errors, and add timestamps. Keep the voice natural.
- Generate an outline. Use AI or a manual pass to split the transcript into themes and key points. Each theme becomes a section.
- Pull quotes and highlights. Pick 5–10 quotable lines that work as social hooks or tweetable snippets. Add timestamps next to each.
- Write a short summary (50–140 words) for social and show notes. Focus on the main insight and one compelling quote.
- Build the interview post. Use the outline to write an intro, context paragraph, and the edited Q&A or narrative. Keep quotes intact and attribute them.
- Produce derivative assets: audiograms, short video clips, quote cards, and a podcast episode description. Export timecodes for editors.
- Final quality check. Verify facts, names, and attributions with the speaker if needed. Export the final transcript as TXT or Markdown.
Formatting rules that boost readability and reuse
- Use H2 for main sections and H3 for subsections. Keep H4 for micro notes only.
- Break quoted answers into short paragraphs. Readers scan better this way.
- Use bold for takeaways and italics for emphasis. Keep it consistent.
- Add named anchor links for each major timestamp so you can deep link into the recording.
- Export a clean Markdown/HTML file for CMS import to avoid manual formatting.
SEO-friendly heading structure: an example
- H1: Inside the Product Team: How We Ship Faster with Short Experiments
- H2: Key Takeaways from the Interview
- H2: Interview Transcript
- H3: Intro and Context
- H3: Question 1: How do you define an experiment?
- H3: Answer: [Guest Name, Role]
- H2: Actionable Tips and Resources
- H2: Related Episodes and Further Reading
Use clear, intent-focused headings. Put the target phrase into one H2 or H3 where natural. For example, a heading like “Client call transcription tips for consultants” will rank for related queries.
Turning a transcript into a long-form article
- Start with an angle, not the raw Q&A. Pick the strongest lesson.
- Use short narrative sections that stitch quotes into context.
- Add data, links, and inline examples to support claims.
- Create a lead paragraph with the main benefit and one key quote.
- End with a short checklist or next steps readers can act on.
Fast repurposing with AI summaries and mind maps
Use the platform’s AI summaries to generate concise abstracts and topic bullets in seconds. Then export an auto-generated mind map to see themes and structure. That outline gives you: a post skeleton, a list of pull quotes, suggested timestamps, and sections to expand into a long article. This cuts editing time by half in most workflows.
Best practices for show notes and social clips
- Show notes: 3–5 bullets, 1-line episode summary, 3 timestamps with short labels, resource links, and guest bio.
- Social clips: pick 10–30 second soundbites, add captions and a visual waveform or audiogram. Include a direct timestamp in the caption for deep linking.
- Evergreen quotes: Save a bank of 20 shareable lines per interview for later campaigns.
Quality control and accessibility
- Add an editorial pass for accuracy, then a second pass for tone.
- Add alt text for images and a plain-text summary for screen readers.
- Provide downloadable transcript files (TXT, DOCX) and a short audio clip for verification.
Follow this checklist and process to convert a raw transcript into multiple assets fast. Use consistent headings, timecodes, and a short editorial workflow to keep content fresh and searchable. Mentioning client call transcription in headings or the intro helps with relevant search intent, especially for consultants and CX audiences.
Nail your first repurpose: export a summary and mind map, then write the lead paragraph.
Handling difficult audio, accents & multi-language interviews
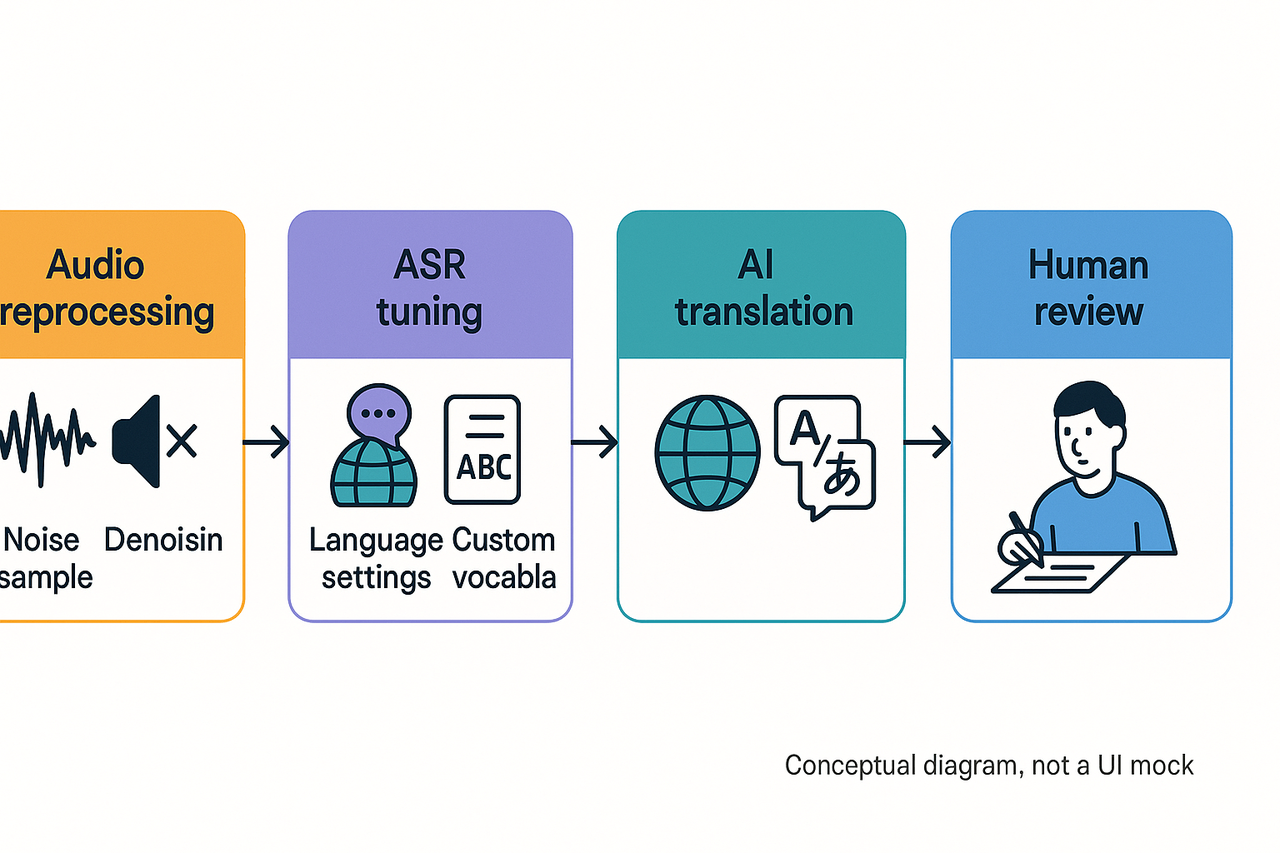
Good audio starts with good habits. If you want to know how to best transcribe interviews, plan for noise, low volume, and language variety before you hit record. This section shows a practical workflow for cleaning audio, tuning automatic speech recognition (ASR), and using human review when needed. You’ll also get a clear rule set for when to add professional post-editing for translated transcripts.
Prep audio first: noise reduction workflow
Noise kills ASR accuracy fast. Record a short noise profile before each session when possible. Use a dedicated noise-reduction pass in your editor to remove steady hums and room hiss. Save a copy of the raw audio before you apply processing so you can revert if needed.
Key steps for noise reduction:
- Capture a 5 to 10-second ambient noise sample at the start. This trains many denoising tools.
- High-pass filter at 80–120 Hz to remove rumble and mic handling noise.
- Use spectral denoising or machine learning denoisers for intermittent sounds.
- Normalize gain so speech sits at a consistent loudness around -18 LUFS.
Fix low-volume speakers with mic placement and settings
Mic placement matters more than gear. Ask low-volume speakers to speak across the mic, not into it. For interviews with multiple people, use lavalier mics for each speaker when possible. If you must use one mic, place it midway between voices and favor cardioid patterns to reduce room noise.
Practical checklist for low-volume speakers:
- Set input gain so loud speech peaks around -6 dBFS.
- Use a pop filter and keep the mic 6–12 inches from the mouth.
- Record local backups on phones when the connection is spotty.
- Meter and monitor audio during the session with headphones.
Tune ASR for accents and dialects
ASR performance drops with unfamiliar accents and nonstandard pronunciations. You can improve accuracy with a few settings and prep steps. Tell the ASR the main language, add a regional variant if available, and upload a short sample audio for adaptation when the tool supports it. A study showed that a multilingual ASR system trained on seven geographically proximal languages outperformed monolingual models, achieving substantial performance improvements, as documented in Proceedings of the 1st Joint Workshop on Spoken Language Technologies for Under-resourced languages (SLTU) and Collaboration and Computing for Under-Resourced Languages (CCURL) (2020).
ASR tuning tips:
- Provide language hints or set the target language explicitly.
- Add a custom vocabulary list of names, jargon, and product terms.
- Use a higher sample rate if you recorded in 48 kHz; most ASR works best at 16 or 24 kHz, but check platform guidance.
- Run speaker separation if channels allow it, then align and merge text during editing.
When to use human review or hybrid workflows
Automated transcripts are fast but not perfect, especially with noise or heavy accents. Use human editors for accuracy-critical work like quotes, legal notes, or published content. Hybrid workflows combine ASR first, then human post-edit to correct errors and add timestamps. This approach saves time and often cuts costs compared to full human transcription.
Hybrid workflow (recommended):
- Run automated transcription and auto-generated timecodes.
- Run noise-reduction and rerun ASR if needed.
- Deliver the draft transcript to an editor for correction and QA.
- Finalize punctuation, speaker labels, and verbatim checks.
Translation pipeline and when to post-edit
TicNote Cloud supports translation into 100-plus languages with an automated pipeline. The tool auto-translates your cleaned transcript, preserves timestamps, and maps speaker labels. Use automated translation for quick comprehension and drafts. Always apply human post-editing when you need publish-ready text or legal accuracy.
When to add human post-editing:
- Publishable articles and marketing copy.
- Legal, medical, or compliance-sensitive content.
- Localized UX copy that must follow cultural norms.
- High-stakes client deliverables or quoted speech.
If you need both accuracy and scale, follow this sequence: clean audio, run ASR, auto-translate, then have a bilingual editor post-edit the translation. This preserves speed while ensuring idiomatic quality.
Handling mixed languages and code-switching
Multilingual interviews need a clear strategy before recording. Set primary and fallback language settings in your transcription tool. If multiple languages are common, split the audio by language segments when possible. Use a bilingual reviewer to fix segments where the ASR confused languages or dropped words.
Quick triage checklist
- Did you capture a noise sample? Yes or no.
- Are speakers recorded separately? Prefer yes.
- Did you provide a custom vocabulary? Do it now.
- Is the transcript for publication? Add human post-edit.
Following these steps cuts error rates and speeds time to usable text. If you need a scalable place to run this pipeline and translate transcripts, try the platform that supports live ASR, multi-language translation, and human-in-the-loop review.
Privacy, compliance & security checklist for client call transcription
Recording and storing client calls is powerful, but it carries legal and security duties. This section explains how to best transcribe interviews while protecting data, meeting consent rules, and keeping transcripts secure. You’ll get a copyable client-consent script and a practical internal policy checklist for teams that handle sensitive client call transcription.
Consent and recording laws: US and EU highlights
Start every call with a clear notice and a chance to opt out. In the EU, consent rules are strict: According to Data protection under GDPR - Your Europe, "Under the General Data Protection Regulation (GDPR), consent must be freely given, specific, informed, and unambiguous, provided by an affirmative act such as checking a box online or signing a form." That means you may need explicit consent for processing personal data from a recording.
In the US, recording laws vary by state. Most states accept one-party consent; one state party can consent, but several states require all-party consent. Always check the recipient’s state law before recording. For international calls, follow the strictest applicable rule.
Storage, retention, and access controls
Follow these practical rules for transcripts and audio files:
- Encrypt data in transit and at rest using strong standards like AES-256.
- Keep recordings private by default, then grant access by role.
- Store transcripts in a central, searchable location with audit logs.
- Apply retention windows, then permanently delete files when they’re not needed.
- Use redaction for sensitive fields, like financial or health data.
Retention examples: keep short notes for 30 to 90 days, keep final transcripts for 1 to 7 years, depending on compliance needs. If a legal hold applies, suspend deletion and record the hold in your audit log.
TicNote Cloud privacy features
TicNote Cloud includes private-by-default settings and industry-standard encryption for stored files. The platform also keeps data private by default and does not use customer data to train models. Use the platform’s export controls and workspace permissions to limit who can download transcripts. For enterprise teams, enable SSO and centralized admin controls to meet stricter policy needs.
Client-consent script (copy and paste)
Hello, I want to record and transcribe this call so we can share notes and action items. Recording helps us create accurate minutes and follow up faster. Do I have your permission to record and transcribe this call now? If the client agrees, say “yes, I consent.” If they decline, pause recording and switch to manual notes.
How to log consent:
- Note the date, time, participants, and the person who gave consent.
- Store the consent record with the transcript in the same secure folder.
- If consent was given by email or form, attach that proof to the recorded file.
Internal policy checklist for transcribing sensitive client calls
Use this checklist as your minimum policy. Customize it for your industry and legal advice.
- Classification, scope, and owners
- Classify calls by sensitivity: public, internal, confidential, restricted.
- Assign a data owner for each category.
- Notice and consent procedures
- Use the standard consent script on every call.
- Require written consent for high-risk data (health, financial, legal).
- Minimum capture principle
- Only record what you need. Turn off recording for off-topic personal content.
- Access control and role-based permissions
- Limit transcript downloads to those who need them.
- Use group roles, not individual allowances, to simplify audits.
- Encryption and storage
- Enforce encryption at rest and in transit.
- Store files in an approved cloud or on-prem vault.
- Retention and deletion
- Define retention windows by sensitivity class.
- Automate deletion after the retention period unless a legal hold exists.
- Redaction and masking
- Redact or mask PII (personally identifiable information) before sharing.
- Keep a locked, unredacted archive if legally required.
- Vendor and third-party review
- Vet transcription vendors for encryption, data use, and location.
- Include security SLAs in vendor contracts.
- Incident response and breach notifications
- Define procedures, roles, and legal timelines for data breaches.
- Test the plan annually.
- Training and auditing
- Train staff on the consent script, storage rules, and redaction.
- Run quarterly audits and keep an audit trail for access and exports.
What if a client refuses to record?
If a client declines, stop recording immediately. Offer to take manual notes and send a follow-up summary. If the call must be captured, ask whether the client will accept a written summary, a redacted transcript, or a short meeting note instead.
Use these steps to reduce risk and keep client trust. Clear notice, strict access controls, and short retention windows cut exposure and make compliance easier. Follow internal policy, and escalate any unusual requests to legal or security.