

TL;DR: The fastest way to transcribe a Reel (and what to do if you can't download it)
Try TicNote Cloud for free to capture the audio, get a clean transcript, and save it for reuse. Here's the quickest way to handle how to transcribe Instagram Reels without getting stuck.
- Confirm permission to use the Reel audio and text.
- Get the video or audio: download if it's yours, or screen record what you're allowed to capture.
- Upload the file to a transcription tool and generate text.
- Clean the transcript: names, brand terms, numbers, and punctuation.
- Convert to what you need: a plain transcript for records, or timed captions (SRT or VTT).
- Export and store it in a folder or project so you can reuse it.
If there's no download option, screen record the Reel, then trim the clip. If the audio is noisy or mixed with music, lower the volume, use headphones, and record in a quiet room to help the transcript come out cleaner.
Copying text from Reels gets messy fast when files live in random folders, and you can't find the clean version later. That slows down edits, translations, and caption exports when you're on a deadline. Keeping everything in one workspace, like TicNote Cloud makes transcripts searchable and ready to reuse.
How to transcribe Instagram Reels step by step
This walkthrough shows how to transcribe Instagram Reels using TicNote Cloud as an example. The same logic applies to most upload-based tools: get usable audio, generate a transcript, clean it up, then export captions or reusable text. The main flow below is web-first, with the app as a follow-up option when you need precise edits or trimming.
Step 1: Capture a Reel you're allowed to use
Start with a Reel you own, or one you have permission to reuse.
- If it's your Reel, export or save the original video file when possible.
- If it's someone else's Reel, only proceed if you have consent or you're using it for an allowed purpose (study, internal research, drafts).
- If direct download is blocked, record your screen with audio as a fallback. This works on iPhone, Android, and desktop.
The cleaner the audio, the better the transcript—but even screen recordings usually work fine for Reels.
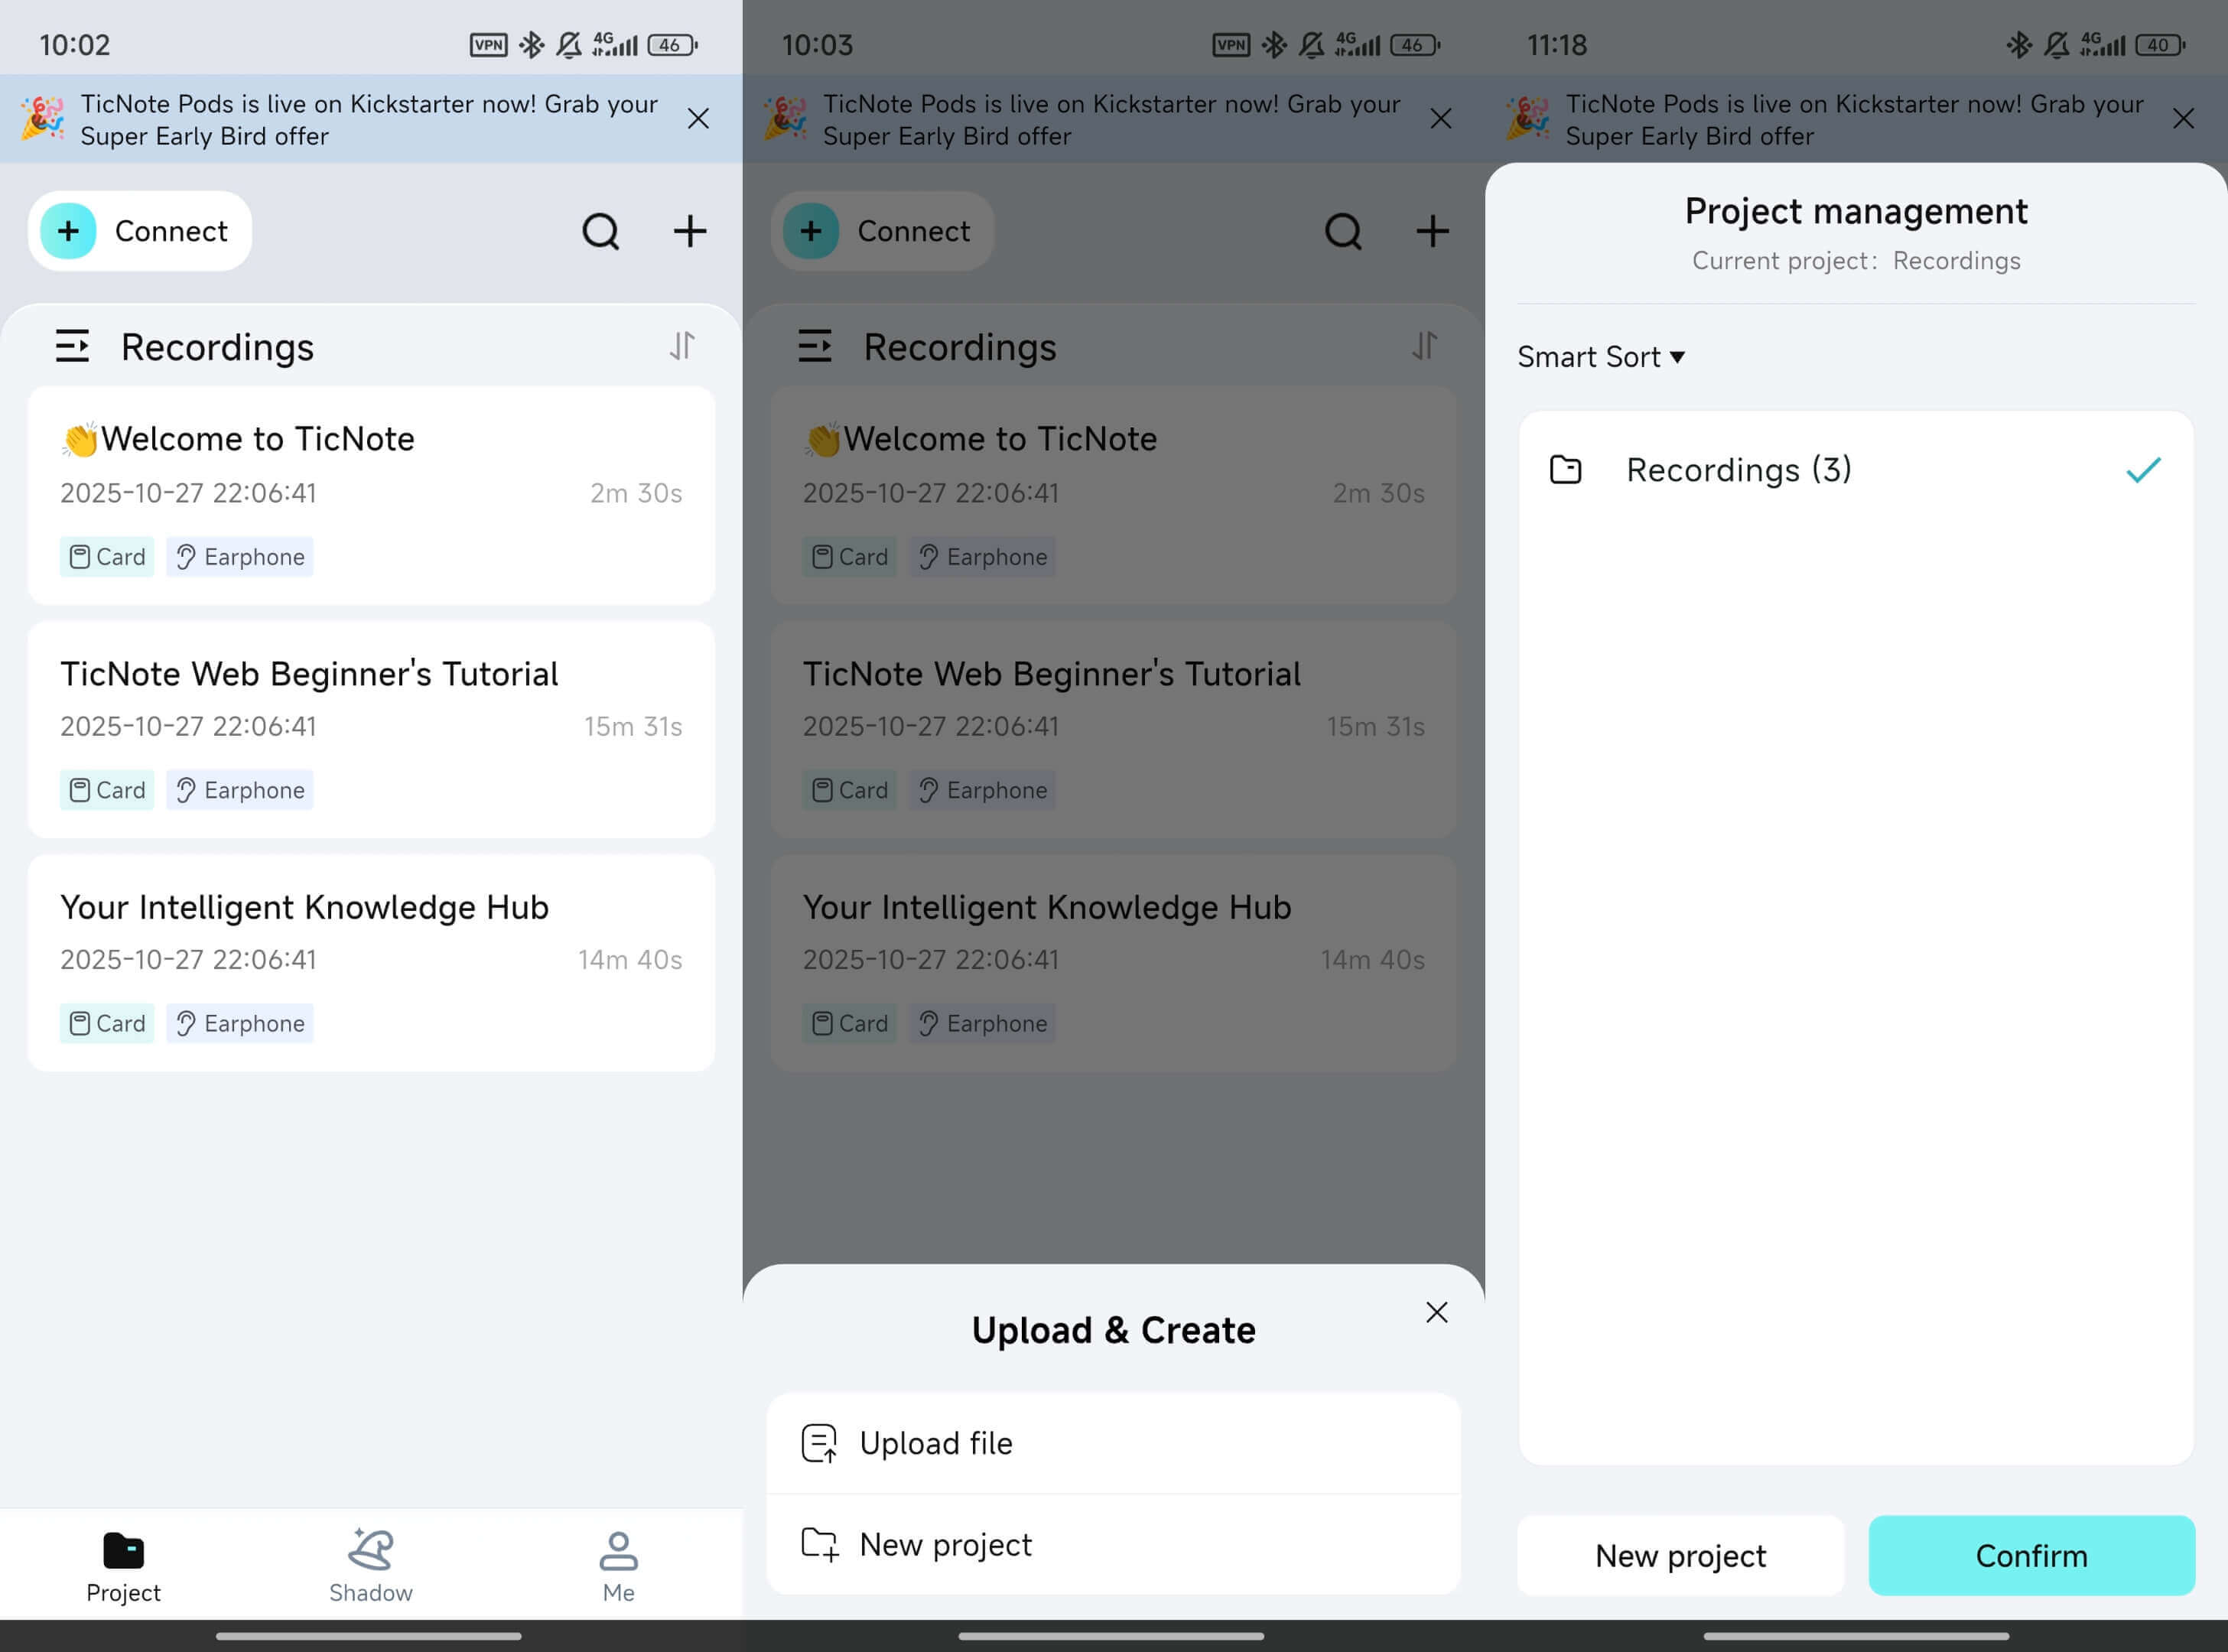
Step 2: Upload the Reel to TicNote Cloud (Web)
Open the TicNote Cloud Web Studio and create a project for your Reels (for example, "IG Reels, Q1"). Upload the video or the extracted audio file into that project.

Projects keep your transcript, captions, and exports together so you can reuse them later without re-uploading.
Step 3: Generate the transcript and set the language
Select the uploaded Reel from the left panel, switch to the Transcript tab, and click Generate.
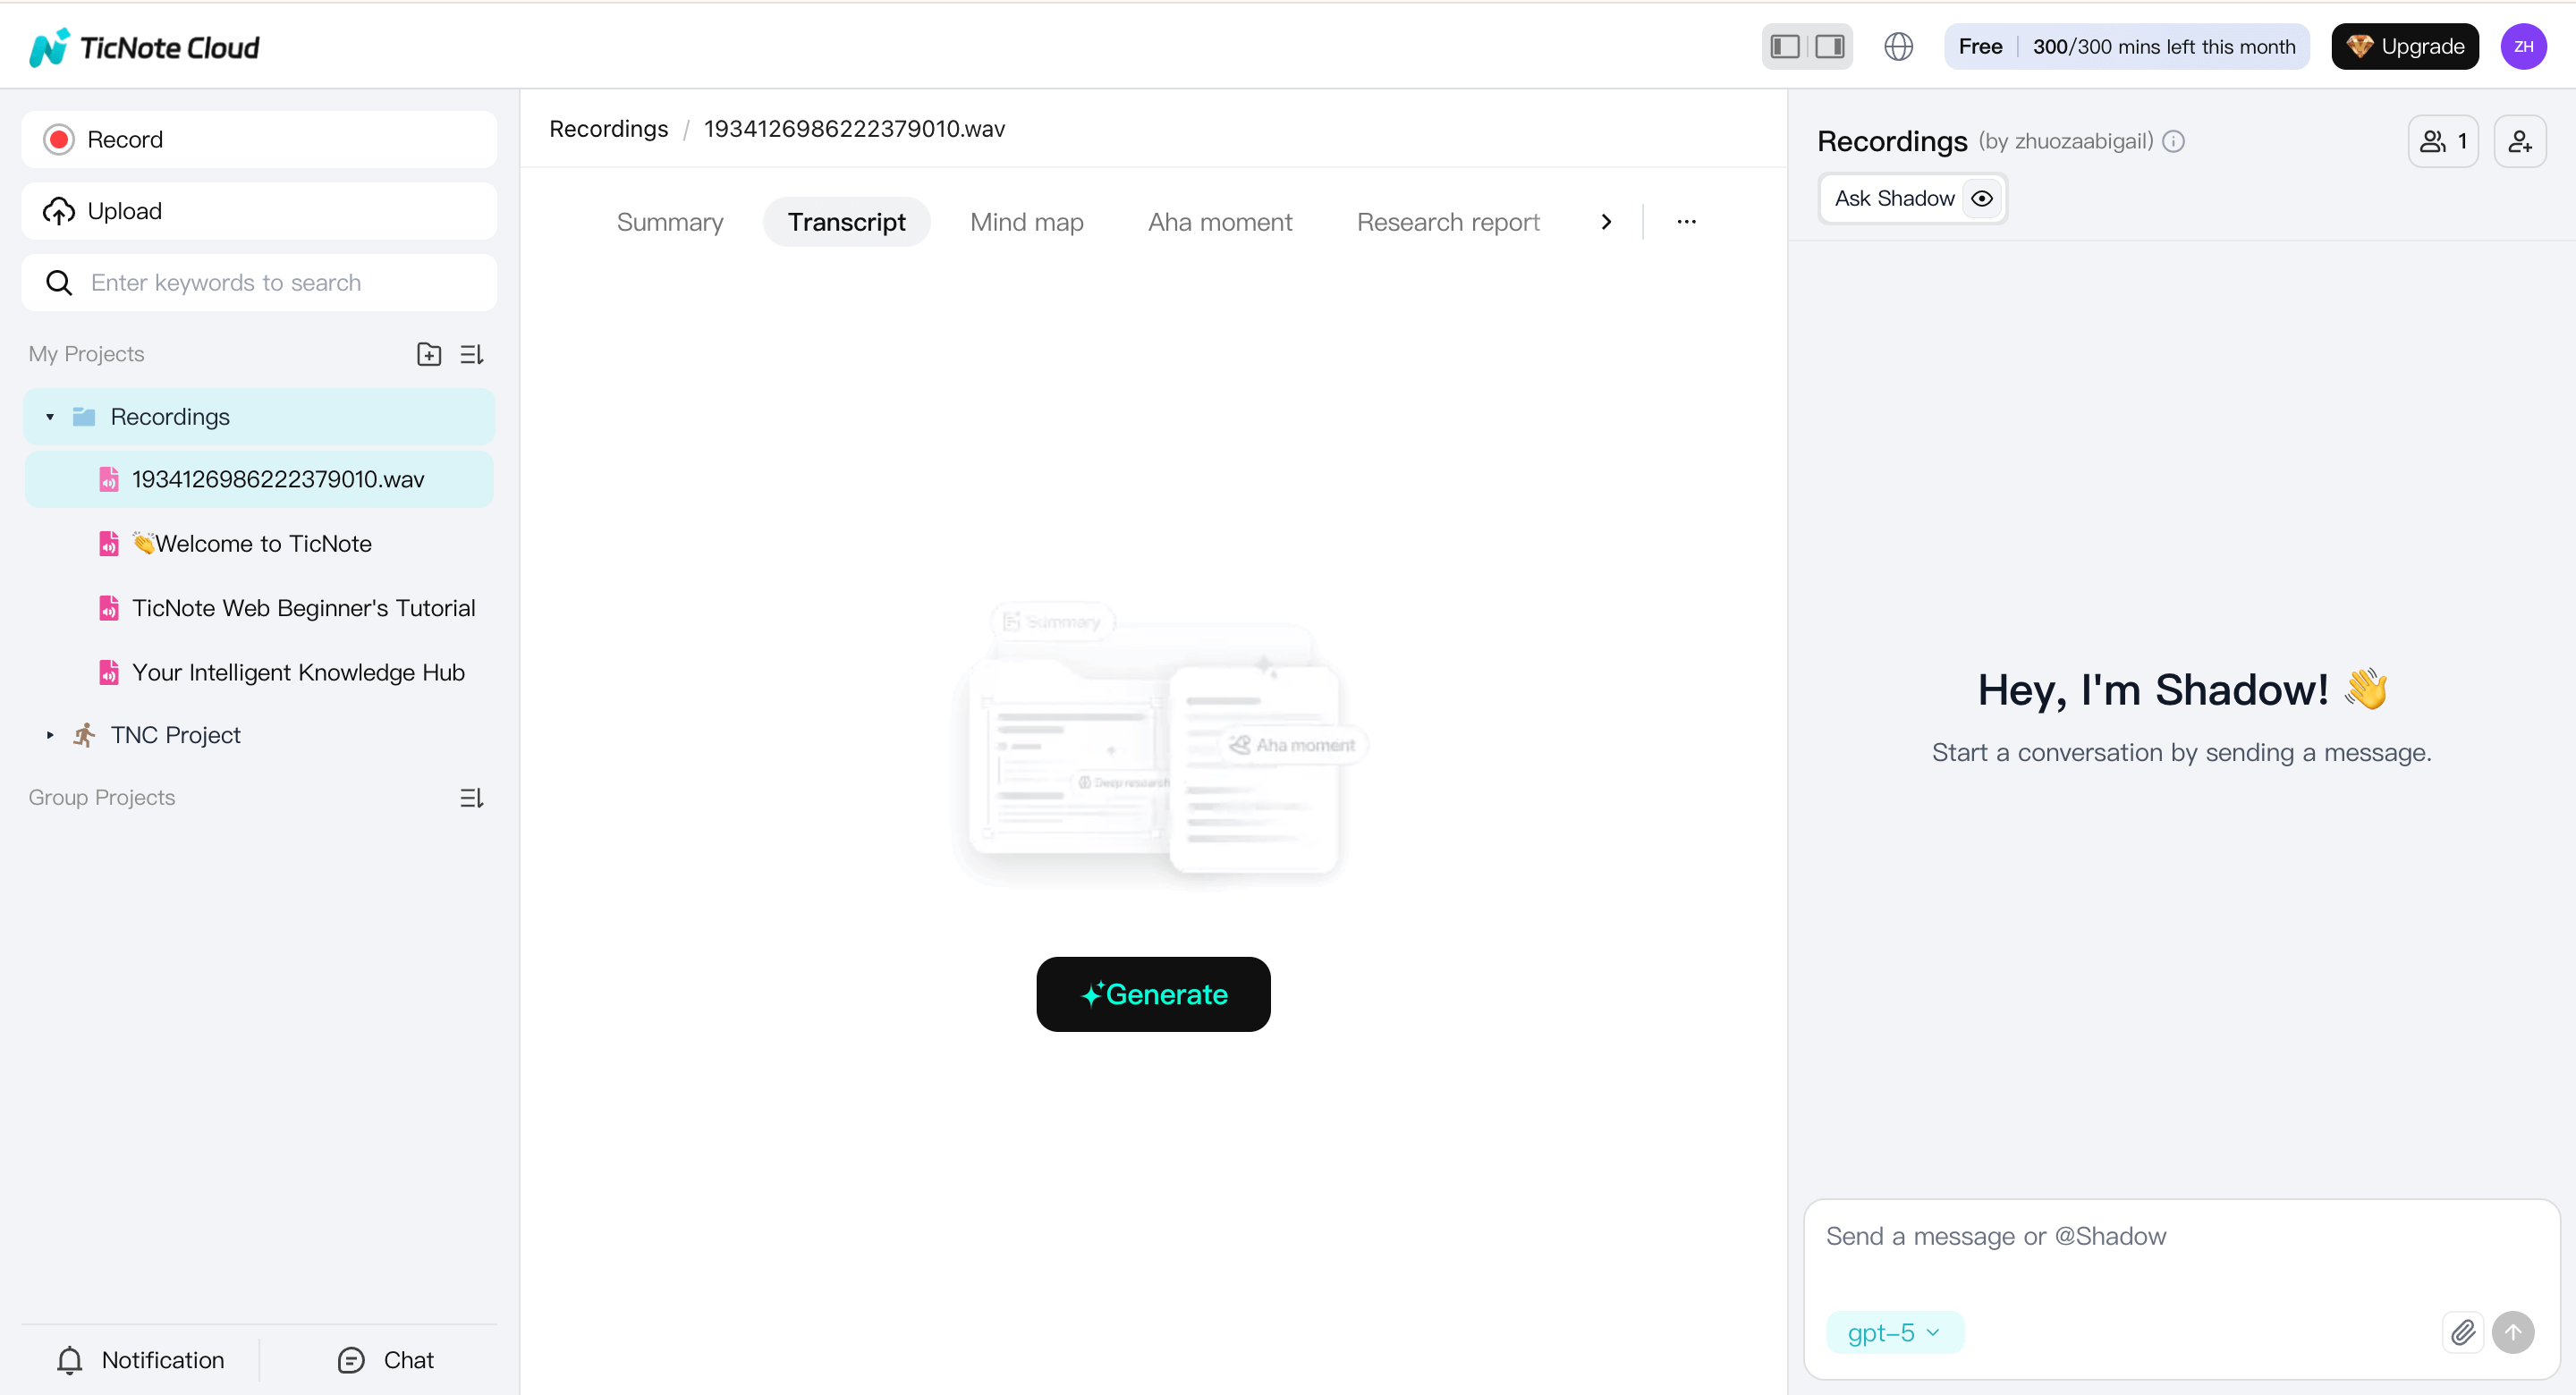
Before transcription starts, choose the spoken language and the AI model, then confirm.
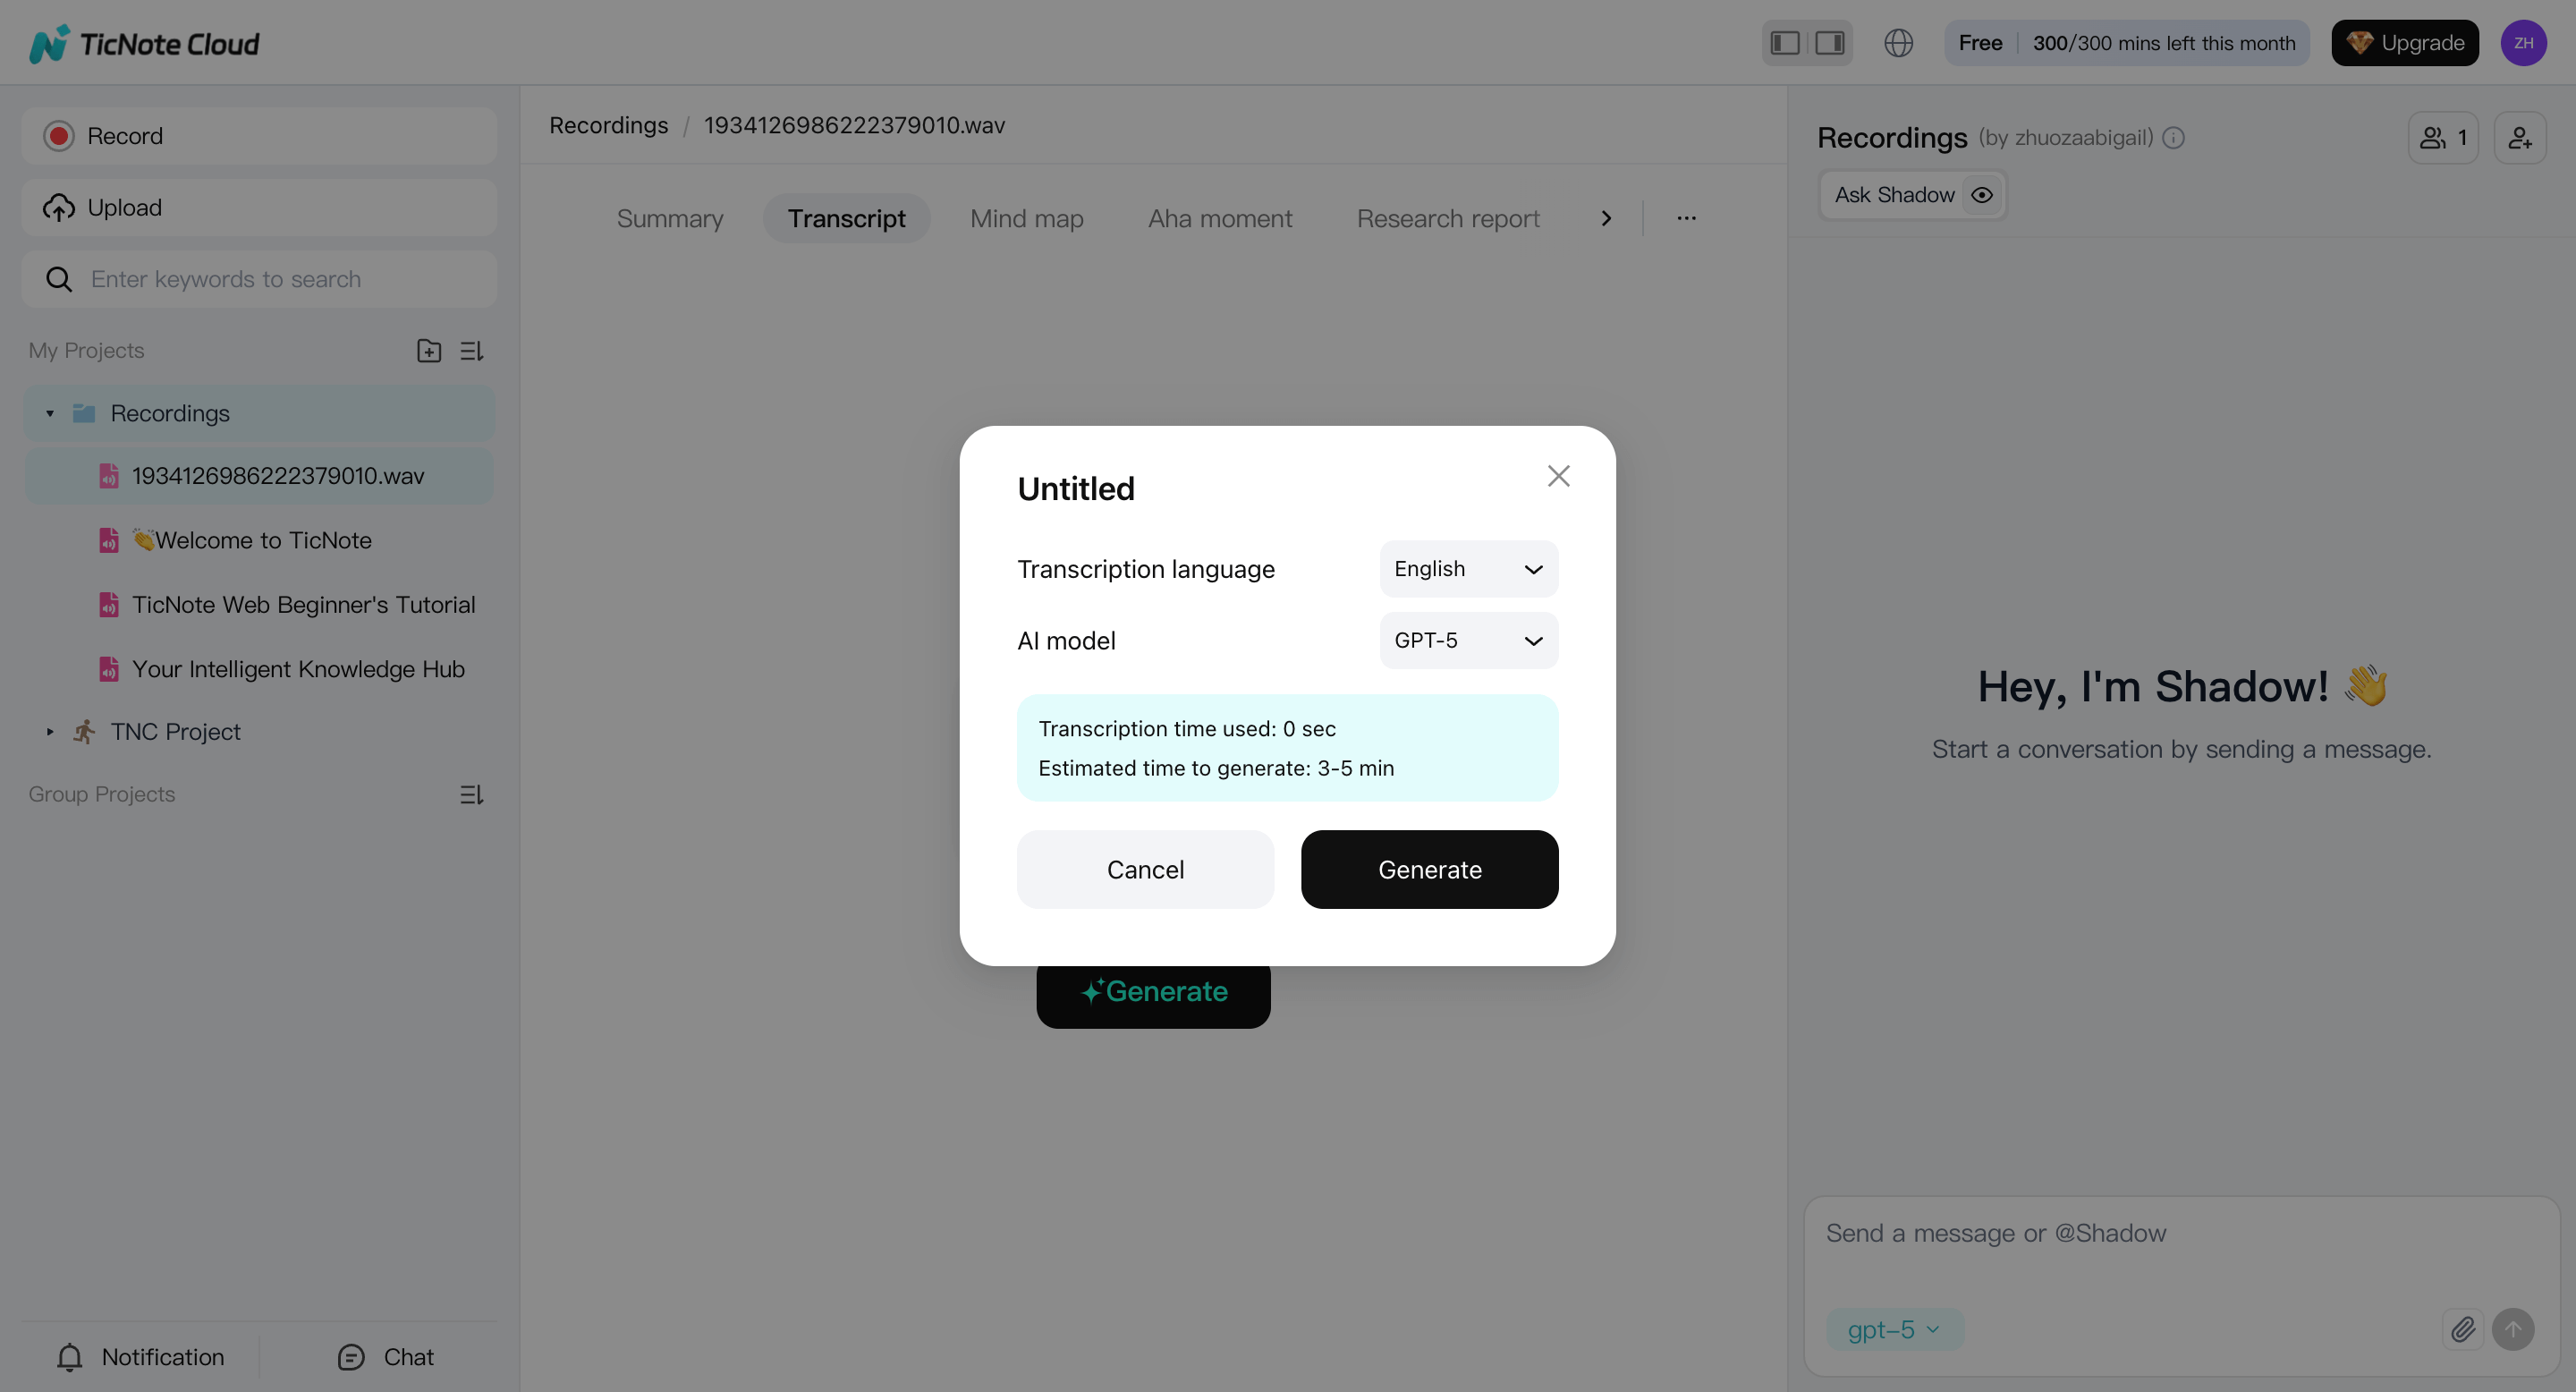
If the Reel switches languages, pick the primary one first. You can handle mixed sections during review.
Step 4: Review the draft and fix high-error spots (Web + Shadow AI)
Once the transcript is ready, do a fast review in the web editor and focus on the parts that usually break:
- Proper names (brands, creators, places)
- Slang, abbreviations, fast speech
- On-screen text that changes meaning
On the web, use Shadow AI to rewrite or clean up phrasing and produce a clearer reading version. Manual word-by-word editing isn't available on web, so Shadow AI handles most cleanup at this stage.
Step 5: Edit for "social-ready" clarity (App, optional)
If you want full control over formatting, open the same file in the TicNote App.
In the app, you can:
- Manually edit text line by line
- Add punctuation and short paragraphs for phone screens
- Normalize numbers and product names
- Add speaker labels if more than one person talks
- Trim or cut sections of the video if the Reel repeats itself
This step is especially useful for Reels with fast pacing, jokes, or repeated hooks.
Step 6: Create two outputs: transcript and caption text
For most Reels, you'll want both versions:
- Clean transcript: readable text for reuse, SEO writing, notes, or records
- Caption text: shorter lines optimized for mobile reading
Example (same audio, two outputs):
Raw AI draft:
"ok so today im gonna show you the three mistakes people make with reels first they post without a hook second they talk too fast third they never add captions"
Clean transcript (social-ready):
"Today I'm sharing three common Reel mistakes.
First, posting without a hook.
Second, talking too fast.
Third, skipping captions."
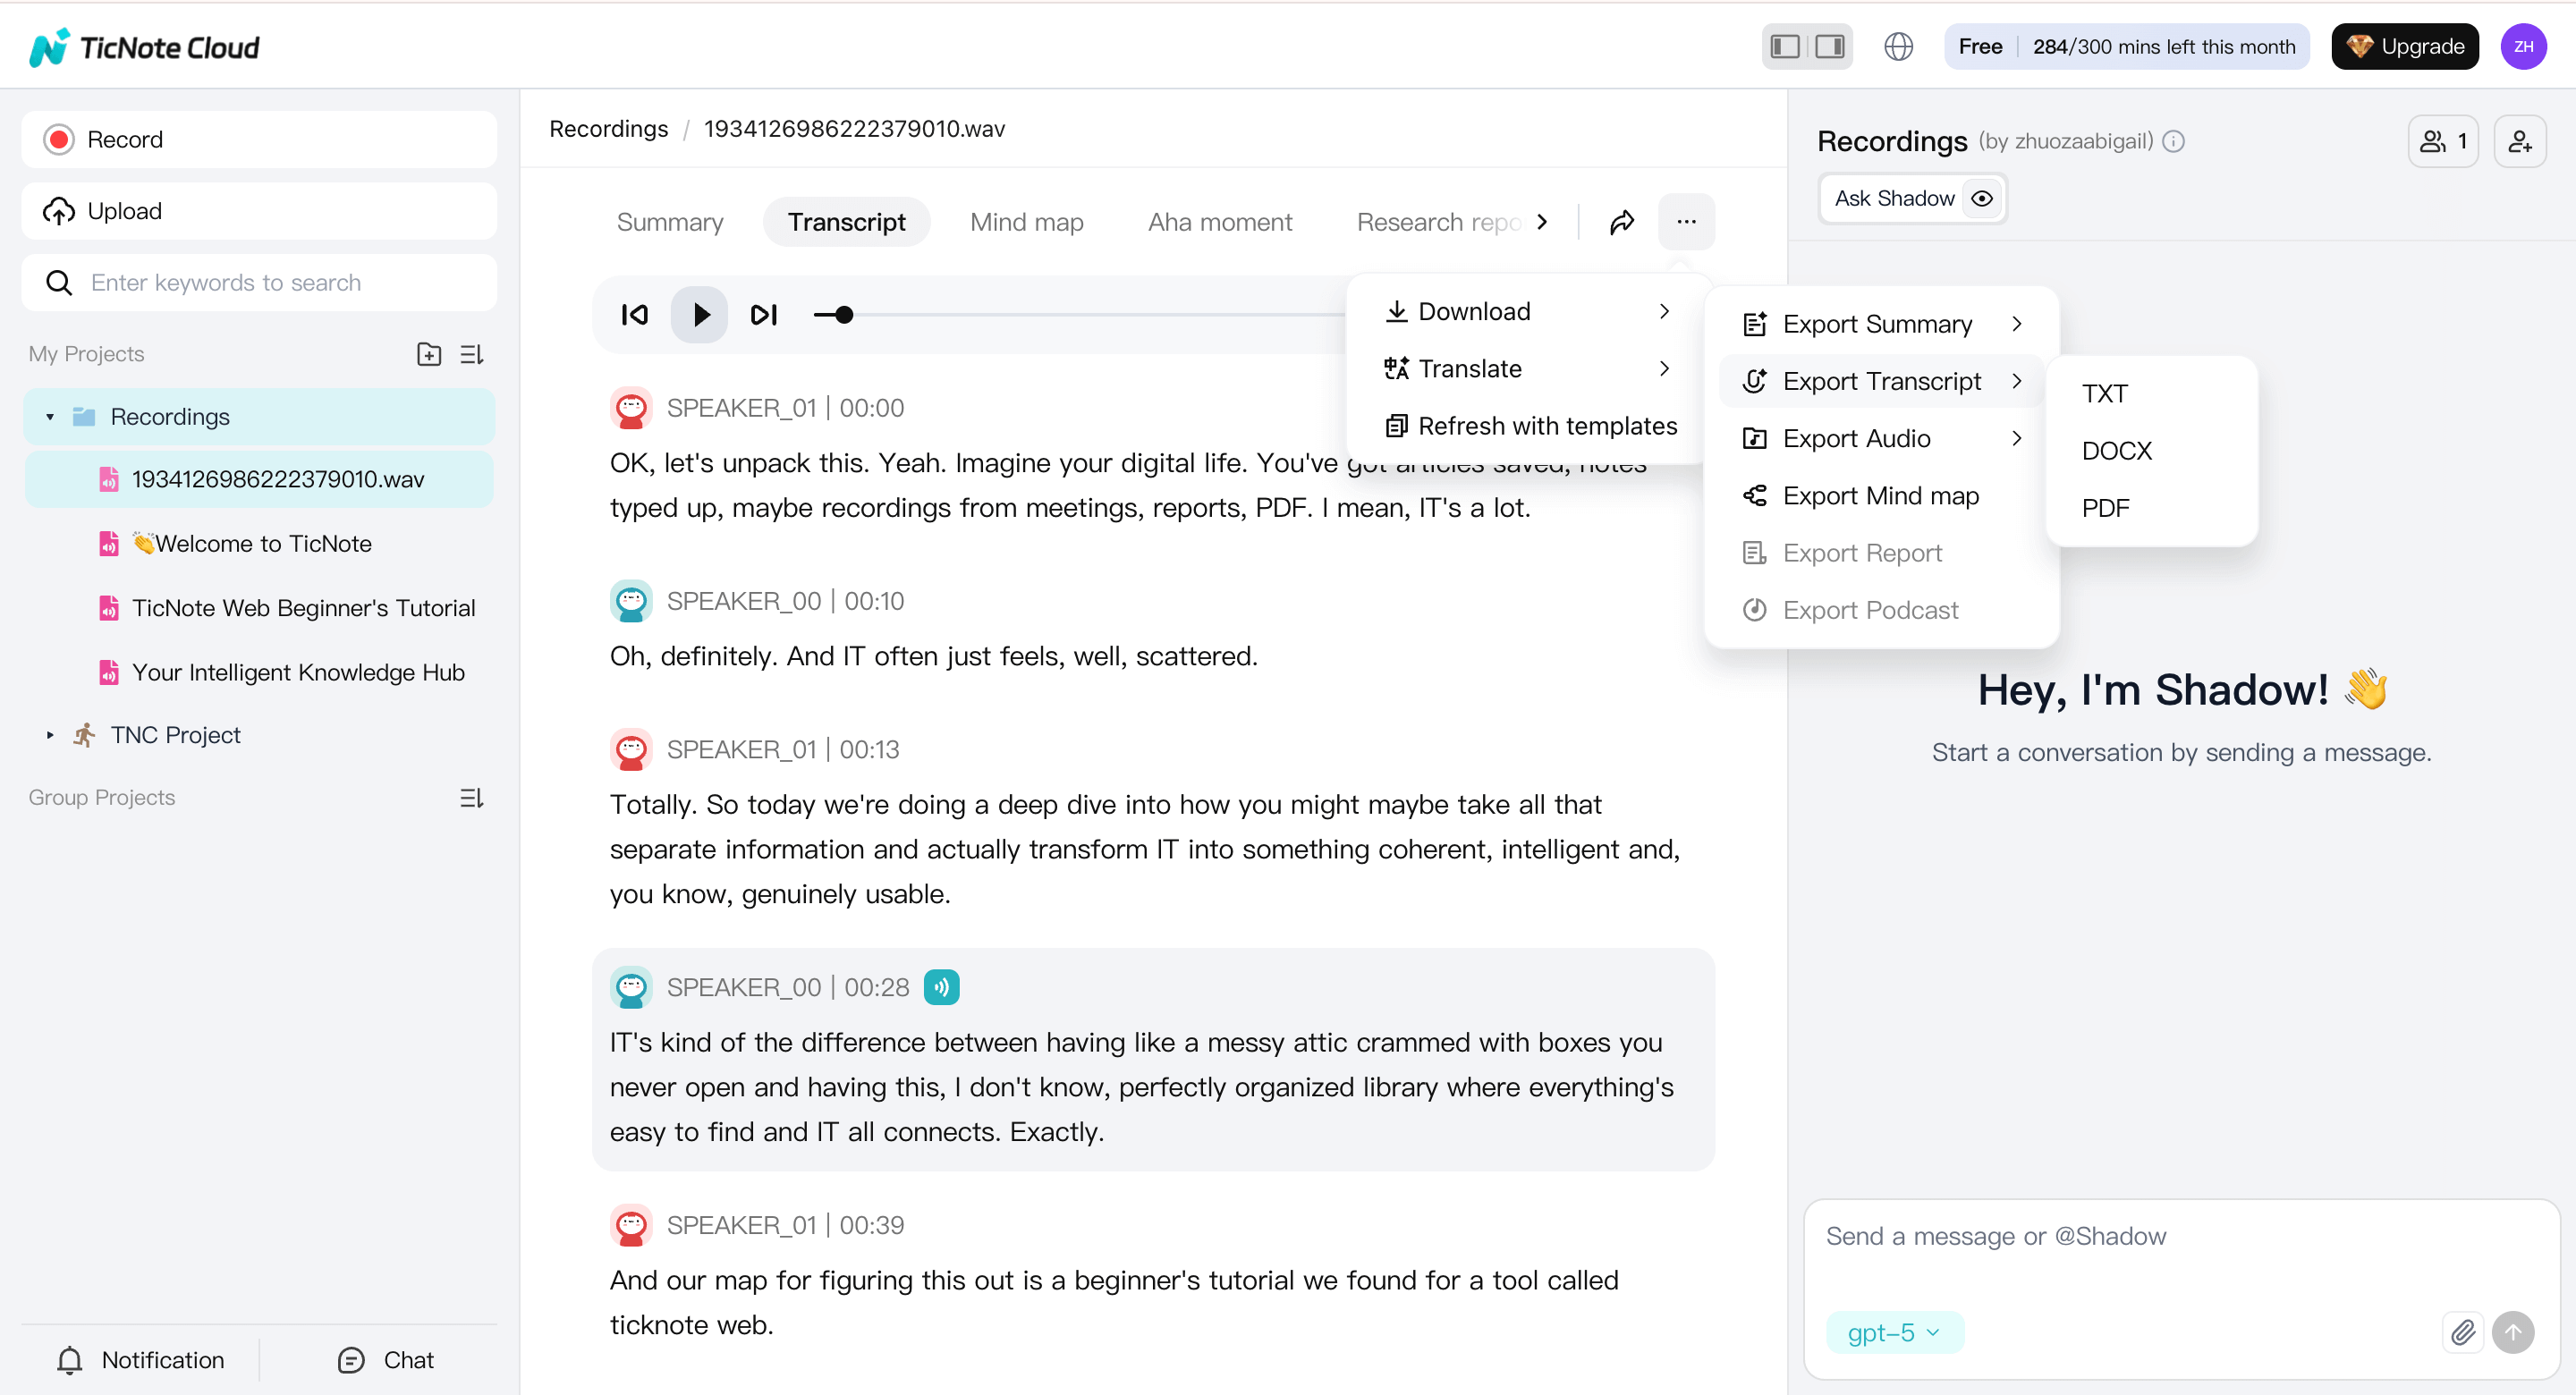
Step 7: Export and save it so it stays searchable
Export based on how you'll use the content:
- TXT for simple storage and quick sharing
- Markdown for content workflows and notes
- DOCX or PDF for reviews, approvals, or client files
Keep the transcript, cleaned version, and caption draft in the same project. Later, you can search across Reels, reuse hooks, and ask Shadow questions across multiple clips without digging through old files.
Quick checklist: What improves transcript accuracy?
- Good audio: Less background music, less noise, clearer voice
- Correct language selection: Set the spoken language before transcribing
- Glossary terms: Keep a short list of brand names and product terms to fix
Try TicNote Cloud for free, then create a project and upload one Reel to transcribe.
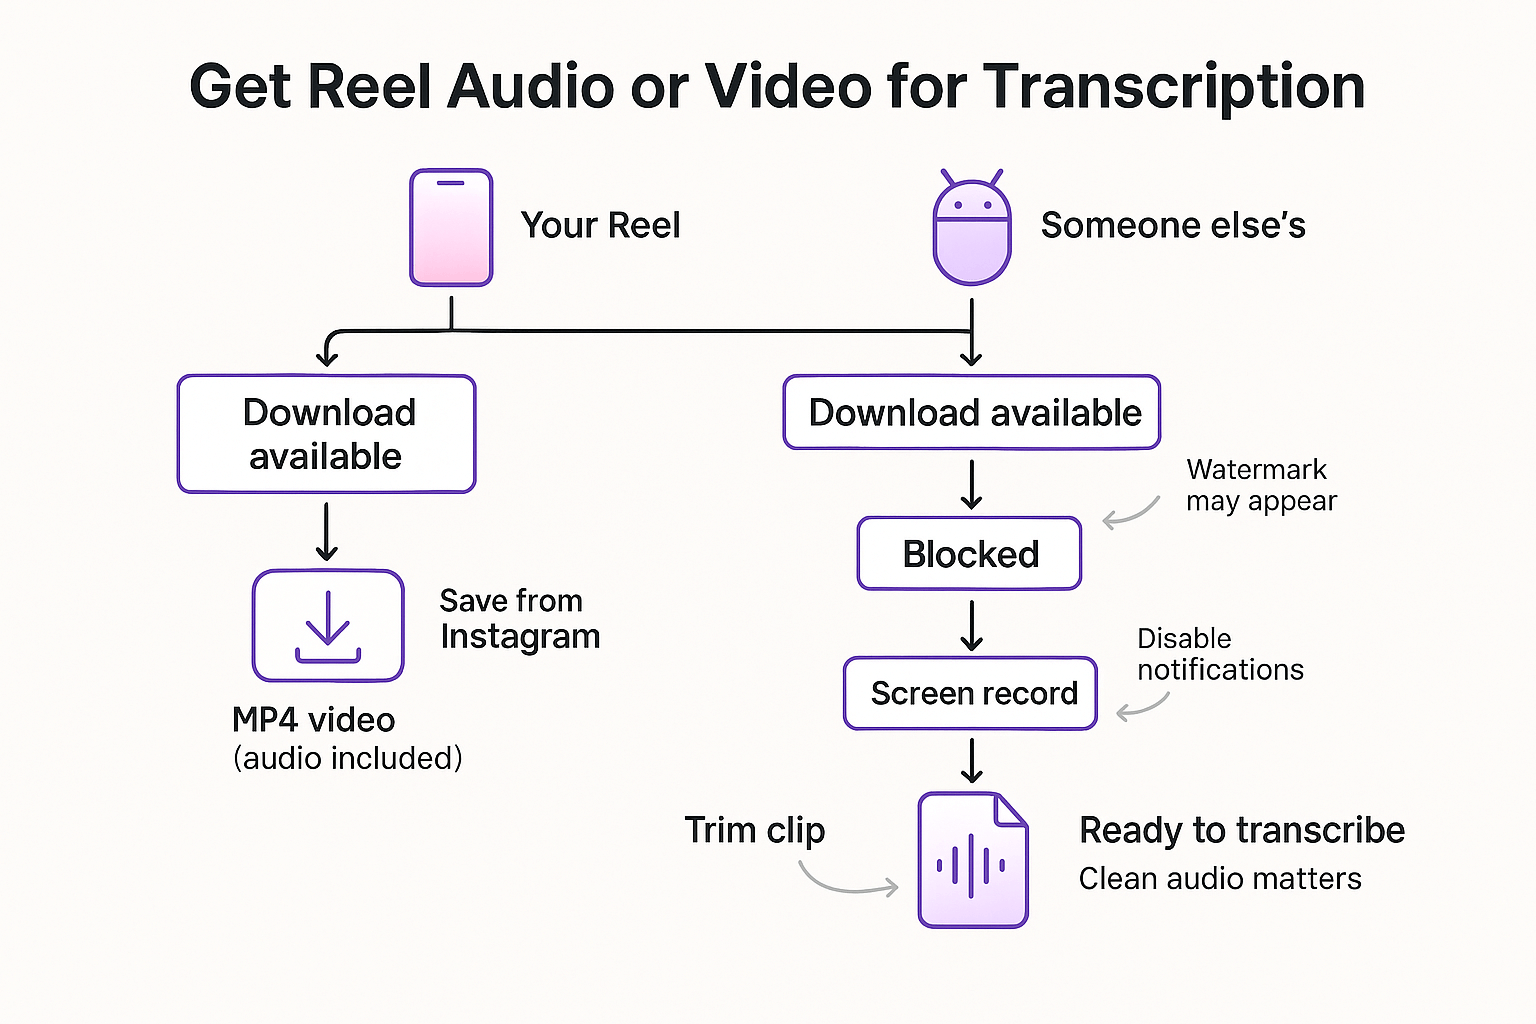
How do you get the audio or video from an Instagram Reel on iPhone, Android, and desktop?
To transcribe a Reel, you first need a usable media file. The fastest path is always: get the original video from Instagram, and only screen record if you have to. If your goal is to learn how to transcribe Instagram reels audio to text, clean audio matters more than perfect video.
Quick decision tree: pick your path
- Is it your Reel?
- Yes: try Instagram's save or download options first.
- No: check if sharing or downloading is allowed, or ask the owner.
- Is the download or share available?
- Yes: save the video file, audio is included.
- No: use screen recording (where permitted), or request the original.
If it's your Reel: download from Instagram first
For your own Reel, the best option is to save it directly from Instagram. You'll usually get an MP4 video that includes the audio.
One catch: Instagram may add a watermark when you export or share a Reel. Watermarks are mostly a reuse problem, not a transcription problem. They can also make the video look less "clean" if you plan to republish elsewhere.
iPhone: save, then screen record if needed
Option 1: Save from Instagram (best quality and simplest)
- Open Instagram and go to your Reel.
- Tap the three dots (More options).
- Tap Save or Save to camera roll (wording can vary).
- Confirm it appears in Photos.
Option 2: Screen record (fallback when download is blocked)
- Add Screen Recording to Control Center: Settings → Control Center → add Screen Recording.
- Open the Reel and pause it at the start.
- Swipe down to open Control Center.
- Tap Screen Recording, then wait for the countdown.
- Play the Reel in full.
- Stop recording, then open the video in Photos.
- Tap Edit and trim the start and end so it's only the Reel.
Tip: For transcription, avoid fast scrolling and keep the phone still. The audio track is what you're really capturing.
Android: save, then use the screen recorder in Quick Settings
Option 1: Save from Instagram (when available)
- Open the Reel.
- Tap the three dots.
- Tap Save or Download (if shown).
- Check your Gallery or Files app.
Option 2: Screen record (common fallback)
- Swipe down twice to open Quick Settings.
- Tap Screen recorder.
- Turn on device audio (and mic only if you need it).
- Start recording, play the Reel, then stop.
- Trim the clip in your Gallery editor.
Quick win: turn on Do Not Disturb before you record. Notifications can cover the screen and add alert sounds.
Desktop: expect limits, then choose a practical workaround
On desktop, there's often no obvious download button for Reels. When you can't download, your best options are:
- Record the audio on your computer (only where allowed), then transcribe that file.
- Use phone screen recording instead; it's usually faster and cleaner.
- Ask the creator for the original file; this gives the best audio quality.
If you already have a clean phone recording, you can treat it like any other audio source. The same editing approach used for transcribing voice memos on iPhone or Android works well here, too.
Audio-quality checklist before you transcribe
- Lower background music in the Reel, if you control the mix.
- Avoid Bluetooth headphones or mics; they can add delay or artifacts.
- Get closer to the speaker, or increase volume carefully.
- Re-record in a quieter place if the audio is messy.
Try TicNote Cloud for Free to turn your Reel recording into clean, searchable text.
Transcript vs captions: what should you create for Reels (or both)?
When you learn how to transcribe Instagram Reels, you'll usually end up with two useful outputs: a transcript and captions. They sound similar, but they solve different jobs.
A transcript is the full text record of what's said. It's best for repurposing, SEO drafts, internal notes, training materials, and business or legal documentation. It can include speaker labels, longer sentences, and context that would never fit on screen.
Captions are timed text that appears on the Reel. They're built for mobile viewing, often on mute. Good captions are short, easy to read, and synced to the audio for accessibility.
Choose a transcript, captions, or both
Choose a transcript if you need:
- A searchable record you can quote or archive
- Clean text for a blog, email, or lesson plan
- Speaker names, paragraphs, and full context
Choose captions if you need:
- On-screen text that's readable in 1 to 2 lines
- Accurate timing (SRT/VTT) that matches speech
- Better watch time when people scroll with sound off
Choose both if you want captions now and reuse later.
Verbatim vs clean-read: what works best on social
Verbatim transcripts keep every word, including false starts and filler like "um" and "you know." Use verbatim when accuracy matters most, like evidence, compliance, or exact quotes.
Clean-read removes filler, repeats, and small grammar slips. Use it for publishing, summaries, and captions. Keep a little filler if it's part of the creator's voice, but cut it when it hurts clarity.
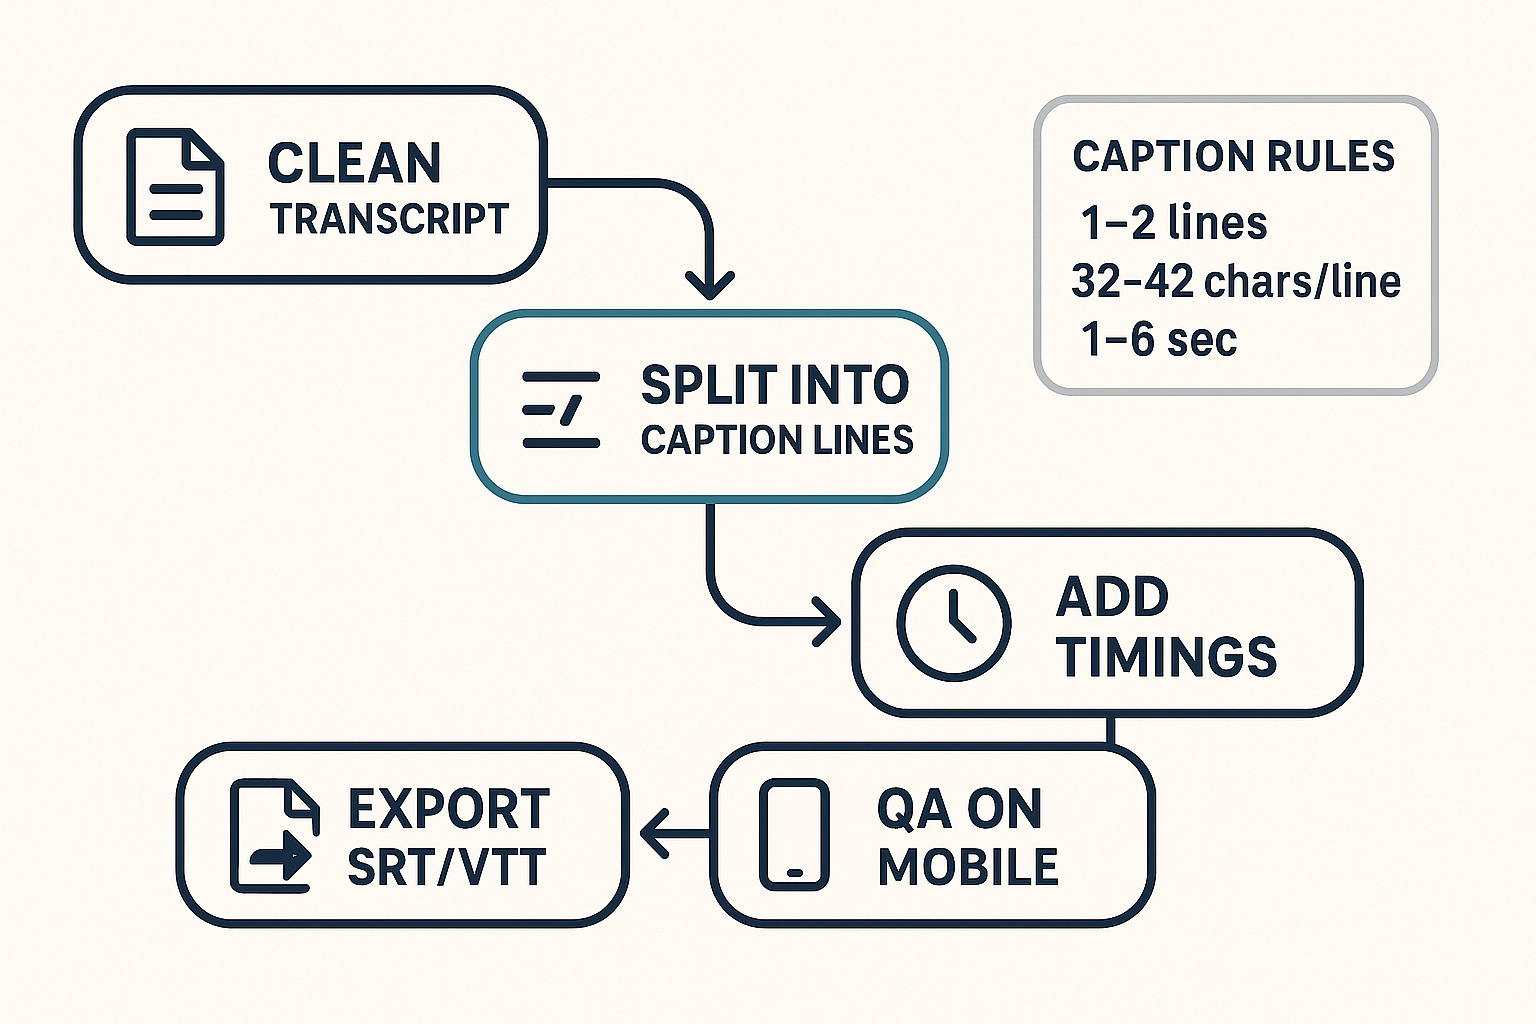
How do you turn a transcript into SRT/VTT captions that read well on mobile?
To turn a transcript into captions, you convert plain text into timed text (words that appear at set times). That means two jobs: make the text easy to read on a phone, then add timestamps. Once you do that, you can export an SRT or VTT file and upload it where you need it.
Pick the right caption format: SRT vs VTT
SRT and VTT are both caption file types.
- SRT (.srt): Simple, widely supported, common in video editors.
- VTT (.vtt): Used a lot on the web and in players. A WebVTT: The Web Video Text Tracks Format (W3C Recommendation, 2023) file must be encoded as UTF-8, which helps avoid weird character bugs.
If a platform accepts both, start with SRT for broad compatibility. Use VTT when a web player or tool asks for it.
Make captions readable on a phone (before you time them)
Small screens punish long lines. Use these rules so your captions don't feel like a wall of text:
- Keep 1 to 2 lines per caption.
- Aim for about 32 to 42 characters per line.
- Break on natural phrases, not in the middle of an idea.
- Don't split names, numbers, or units across lines.
- Bad: "We made 1,200 sales"
- Better: "We made 1,200 sales"
- Clean filler that hurts scan speed. Keep meaning, not every "um".
Rule of thumb: if you can't read it in one quick glance, shorten it.
Add timing that feels smooth (not jumpy)
Timing is what makes captions watchable.
- Split captions when there's a pause, a new sentence, or a new idea.
- Keep most captions on screen about 1 to 6 seconds.
- Avoid flash captions (single words for 0.2 seconds) unless you want a punchy style.
- If speech is fast, shorten the text and keep the key point.
A simple reading-speed check: if you have to rush to finish a caption, it's too long. Trim it or split it.
Mini example: raw transcript to social-ready to SRT
Here's how one Reel snippet becomes captions.
Raw AI transcript (messy): "I'm gonna show you how to do the three-step client follow-up, um, in Instagram reels, so first you download it, then you transcribe, and then you export captions, and if you can't download, you screen record."
Cleaned, social-ready transcript (same meaning): "I'll show you a 3-step Reel workflow: get the video, transcribe it, then export captions. If download is blocked, screen record instead."
SRT-style snippet (timed captions): 1 00:00:00,000 --> 00:00:02,200 I'll show you a 3-step Reel workflow:
2 00:00:02,200 --> 00:00:04,900 Get the video, transcribe it, then export captions.
3 00:00:04,900 --> 00:00:06,800 If download is blocked, screen record instead.
In practice, you convert a transcript to SRT by pasting the cleaned text into a caption editor, then letting it auto-split and auto-time. After that, you tweak line breaks and timing by hand. Some transcription tools can also generate timed captions directly, and then you export SRT or VTT.
QA Instagram auto-captions: fix the common mistakes
Instagram's auto-captions are a good start, but you still need a check.
Common errors to watch:
- Names and brands: wrong spelling, wrong casing.
- Homophones: "their" vs "there", "two" vs "too".
- Numbers: "15" becomes "50", or digits become words.
- Music and noise: missing words when audio dips under music.
Quick fix flow:
- Rewatch once with sound off. Fix anything you can't understand.
- Search for names, product terms, and numbers. Correct them first.
- Check line breaks on your phone screen, not on desktop.
Copyable caption quality checklist
- 1 to 2 lines per caption
- 32 to 42 characters per line (rough target)
- Break on phrases, keep names and numbers intact
- Most captions stay up 1 to 6 seconds
- No rapid flashing unless it's a style choice
- Spellcheck brands, names, and key terms
- Test on mobile with sound off
Try TicNote Cloud for Free to clean transcripts fast and reuse them across projects.
Which transcription approach should you choose (Instagram auto-captions vs AI tools vs human)?
Pick based on risk, not features. If it's casual content, Instagram auto-captions may be enough. If you need a clean deliverable, search-ready text, or exports like SRT, use a dedicated AI transcription tool. If the transcript is for legal, medical, or high-stakes client records, hire a human (or at least do a strict review pass).
Use this quick decision guide
- Just need captions fast for your own Reel: Use Instagram auto-captions, then fix names, numbers, and brand terms.
- Need a clean transcript plus captions files: Use an AI tool, then edit for clarity and timing.
- Multiple speakers, heavy jargon, or poor audio: Use AI tool + manual edit, or go human if accuracy matters.
- Need translations and consistent formatting: Use an AI tool with multi-language support and exports.
- Need a defensible record (compliance, disputes, audits): Go human transcription or human-reviewed, and store source files.
Compare your options (what matters for Reels)
| Approach | Accuracy drivers | Editing experience | Export options | Language support | Data and security questions |
| Instagram auto-captions | Works best with clear speech, low noise, one speaker | Quick in-app fixes, limited control | On-screen captions, not always true transcript files | Varies by region and language | Who can see drafts, how long data is kept |
| AI transcription tools | Audio quality, accents, jargon, speaker overlap, mic distance | Stronger editor, search, highlights, speaker labels | Copy text, TXT, and often SRT/VTT | Often broad, plus translation options | Is it private by default, retention controls, used for training |
| Human transcription | Best for hard audio, jargon, and high-stakes needs | You'll still review, but fewer errors | Clean transcript, can request SRT/VTT | Depends on vendor | NDA options, storage policy, access controls |
Pricing reality check (what changes when you pay)
Most tools look similar on free plans. The limits show up fast once you transcribe more than a few Reels. Paid tiers usually unlock higher minute caps, longer file uploads, faster processing, better exports (especially SRT/VTT), team sharing, and stronger workspace organization.
Final checklist for a repeatable workflow
Before you commit, make sure your pick can do these basics:
- Handle your real audio, including noise and fast speech
- Let you edit text easily (find and replace, speaker names, timestamps)
- Export what you need: plain transcript and timed captions (SRT/VTT)
- Support your languages now and later, including translation
- Answer data questions clearly: retention, access, and training use
- Keep work organized with projects, templates, and reliable exports
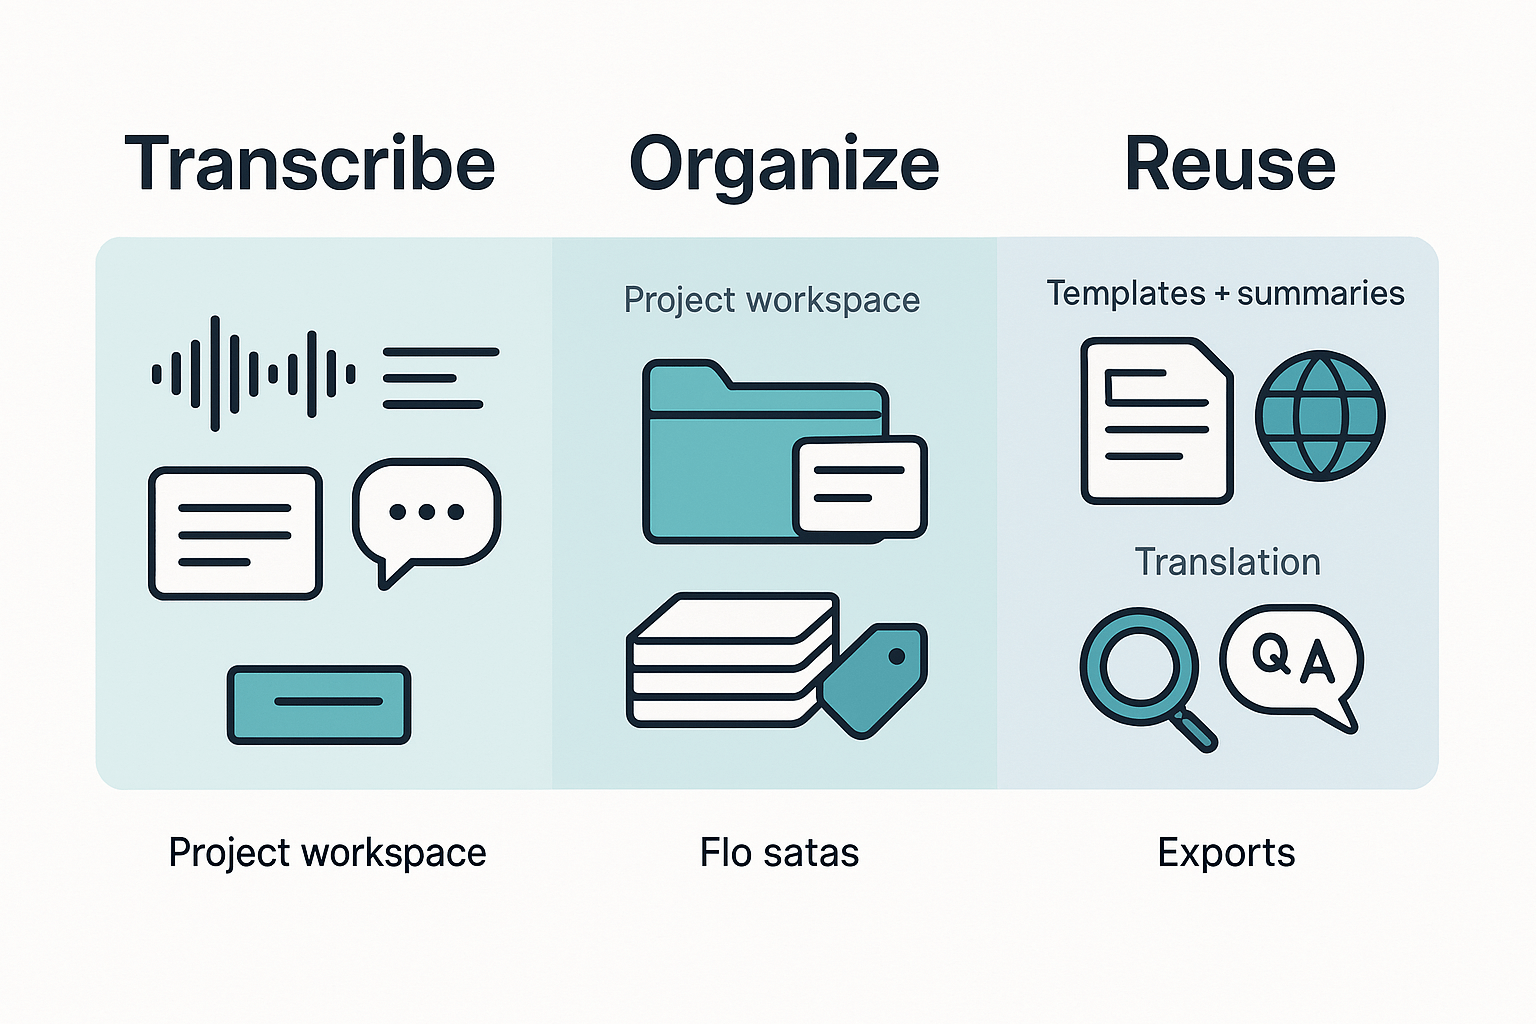
What makes TicNote Cloud different for transcribing and reusing Reels? (exclusive workflow)
Most tools help you transcribe a Reel, then you're stuck with a text file. The real work starts after that: cleaning the wording, pulling quotable lines, getting approvals, and turning the same Reel into more content. TicNote Cloud is built for that "after the transcript" phase, so the text stays useful.
Keep every Reel and its spin-offs in one place
Instead of scattered files, you can create a project library for Reels and keep everything together: the upload, the transcript, your edited version, and the assets you make from it.
Try this simple setup:
- Create a "Reels Transcriptions" project
- Add one file per Reel (name it by date and topic)
- Save key outputs beside it (hook options, caption draft, client notes)
That way, you don't have to rewatch a Reel just to find one line.
Turn messy text into ready-to-use notes with templates
A raw transcript is rarely "social-ready." With templates and AI summaries, you can turn long speech into structured notes fast.
Example template fields you can generate and edit:
- Hook ideas (1 to 3 options)
- Key points (bullets that match the Reel's order)
- CTA text (what viewers should do next)
- Claims to verify (anything you must fact-check)
If you want a broader workflow, use this audio transcription workflow guide to standardize your process across content types.
Search across many Reels with Shadow cross-file Q&A
When you have dozens of Reels, "search" isn't enough. Shadow cross-file Q&A lets you ask for what you need across your project or workspace, using your own saved files as the source.
Useful questions include:
- "Which Reels mention our product name?"
- "Pull every quote about pricing or results."
- "List action items we promised in Q4 videos."
This is where teams save time, because no one has to scrub timelines again.
Translate for multilingual captions and post text
If your audience is global, you'll often need captions in more than one language. TicNote Cloud can translate into 120+ languages, so you can create localized caption text and post copy from the same approved transcript.
Export formats that work for real teams
Creators and teams usually need more than a copy-paste window. TicNote Cloud exports:
- TXT for clean transcript handoff
- Markdown, DOCX, or PDF for summaries and client deliverables
- PNG or Xmind for mind maps when you need a quick overview
What changes after you switch to a "reuse" workflow?
Before: You rewatch Reels to find a line, redo summaries, and lose older drafts.
After: You can find quotes in seconds, route one approved transcript into many assets, and keep a tidy library for audits, clients, or future posts.
Try TicNote Cloud for free and start a "Reels Transcriptions" project today.
How can you repurpose a Reel transcript into SEO and content assets?
If you want to learn how to transcribe Instagram reels for reuse, the real win is what you do next. One clean transcript can power a week of content, plus SEO assets, without rewatching the Reel five times. Here's a simple way to turn one Reel into many outputs fast.
Use this repurpose matrix: one transcript, six assets
| Output | What you create from the transcript | Fast edit checklist (mobile and SEO friendly) |
| IG caption | A short caption that matches the Reel's hook and key points | Keep the first 1 to 2 lines as the hook, cut filler words, add 1 keyword naturally, end with one clear question or CTA, and keep claims tied to the speaker |
| Carousel outline | 6 to 10 slide bullets, each slide = one idea | Keep the hook as slide 1, turn each point into a short slide title, use bullets, not paragraphs, add one proof line per slide, and label any opinions as opinions |
| Blog outline | H2 and H3 headings pulled from the Reel's sections | Keep the hook in the intro, group ideas into 3 to 5 headings, add bullets and examples, include 1 to 2 keywords in headings or body, keep "who said what" clear |
| Email or newsletter | A quick intro, 3 takeaways, and a link | Keep the hook in the subject and first line, cut repeats, format as short bullets, add one keyword once, attribute quotes and results to the source |
| Meeting-style notes | Decisions, steps, and action items (great for teams) | Keep only what changes behavior, convert advice into steps, add owners or "you" actions, use headings like "Key points" and "Next steps", and write down exact speaker claims |
| Quote bank | 10 to 30 clean quotes for posts, threads, and graphics | Keep original wording, trim only filler, store 1 quote per line, tag by topic, note the speaker and context, avoid changing meaning |
Want a parallel workflow for long videos too? Use the same approach to transcribe a YouTube video for clean reuse and build longer SEO posts from one recording.
Build a repeatable "Transcribe" content library in a project workspace
Don't treat transcripts like one-off files. Treat them like a library you can search later.
Store these items together in one project:
- Original Reel file (or your screen recording)
- Cleaned transcript (speaker labels, punctuation, cut filler)
- Caption file (SRT or VTT) and the final on-screen caption copy
- A short summary (3 to 7 bullets) plus your repurpose outputs
Then add tags you'll actually use later, such as: topic, product, campaign, audience, and platform. Once you do that, cross-file search and Q&A become your idea engine. With ticnote cloud transcription, scattered Reels turn into searchable notes, so you can pull quote banks, outline new posts, or answer "what did we say about X?" without replaying clips.
Is it legal (and ethical) to transcribe someone else's Instagram Reel?
It depends on whose Reel it is and how you'll use the text. It's usually safest to transcribe your own Reel, content you've licensed, or content where you have clear permission. If you plan to publish the transcript, use it in ads, or post it as a blog, ask first.
Copyright is the big reason. A transcript is still a copy of someone's words, so reuse can raise issues. As the U.S. Copyright Office — Copyright in General (Circular 1) explains, "Copyright protects original works of authorship as soon as an author fixes the work in a tangible form of expression." When in doubt, keep quotes short, add commentary, and credit the creator.
Ask for consent when people could be harmed
Get consent before you transcribe when any of these apply:
- The Reel is from a private account or a paid community
- It includes minors
- It covers health, legal trouble, finances, or other sensitive topics
- You're collecting content for HR, legal, or compliance files
If you're a team, aim for written permission for commercial reuse. A quick DM is fine, but save a screenshot.
Handle transcripts like sensitive records (for business and legal teams)
Even if it's public, don't treat it as "free data." Store files securely and limit access. Keep audit-friendly notes so you can explain what you captured and why:
- Link to the Reel and capture date
- Timestamps for key quotes
- Speaker labels (if more than one person)
- Your purpose (accessibility, research, records)
Quick do and don't list
Do:
- Transcribe for accessibility, notes, and internal research
- Credit sources when you quote
- Get permission before you republish
Don't:
- Repost full transcripts as your own
- Share personal details from sensitive Reels
- Transcribe private content without consent
