

TL;DR: The fastest way to turn an episode into a clean, publishable transcript
Try TicNote Cloud for Free to go from audio to a clean transcript fast: prep your file, run transcription, edit for clarity, format for reading, then publish on your episode page.
Workflow: 1) Prep: export the best audio, note speaker names, reduce noise, 2) Transcribe: use AI for speed, 3) Edit: fix names, key terms, and unclear spots, 4) Format: add speaker labels, short paragraphs, optional timestamps, 5) Publish: post the readable transcript, plus captions if there's video.
AI is "good enough" when audio is clean, topic risk is low, and you need it today. Get human review for legal or medical topics, high brand risk, heavy accents, or lots of overlap.
Publish outputs: TXT (or cleaned web text) for the transcript, SRT or VTT for time-coded captions. Before you start: confirm consent, pick verbatim vs clean read, gather spellings and links, and choose your export format.
Messy transcripts make people bounce, and editing can eat your whole afternoon. The fastest fix is a workflow that keeps audio, transcript, summary, and reusable notes together. With TicNote Cloud, you can try it free and turn one episode into searchable content you can reuse.
How to transcribe a podcast end-to-end (prep → transcribe → edit → format → publish)
This workflow shows how to transcribe a podcast using TicNote Cloud as the example tool. But the same steps work in any transcription app. The goal is simple: clean audio in, readable text out, then publish-ready notes.
1) Prep your audio so the transcript starts clean
Better audio gives you fewer edits later. Before you upload, export a "clean mix" that's easy to understand.
Here's a quick prep checklist:
- Pick the right format: Use WAV if you can, it keeps detail. Use MP3 if you need smaller files.
- Normalize levels: Make voices a steady loudness. This helps the model catch words.
- Reduce noise: Light noise reduction is fine. Don't overdo it, or the voices sound robotic.
- Decide single vs multi-track: If you have separate tracks per speaker, keep them for editing. For transcription, a clean single mix is often enough.
- Export a final file: Trim long silence, then export one file per episode.
If you want more detail, this guide on how to transcribe audio step by step breaks down inputs and settings.
2) Upload the episode in TicNote Cloud Web and start a project
Open the TicNote Cloud Web Studio and create a project for your podcast (for example, "Show Name → Season 3"). Keeping every episode in one project makes searching, tagging, and reuse much easier later.
Upload the audio file into that project.

3) Run transcription with the right settings
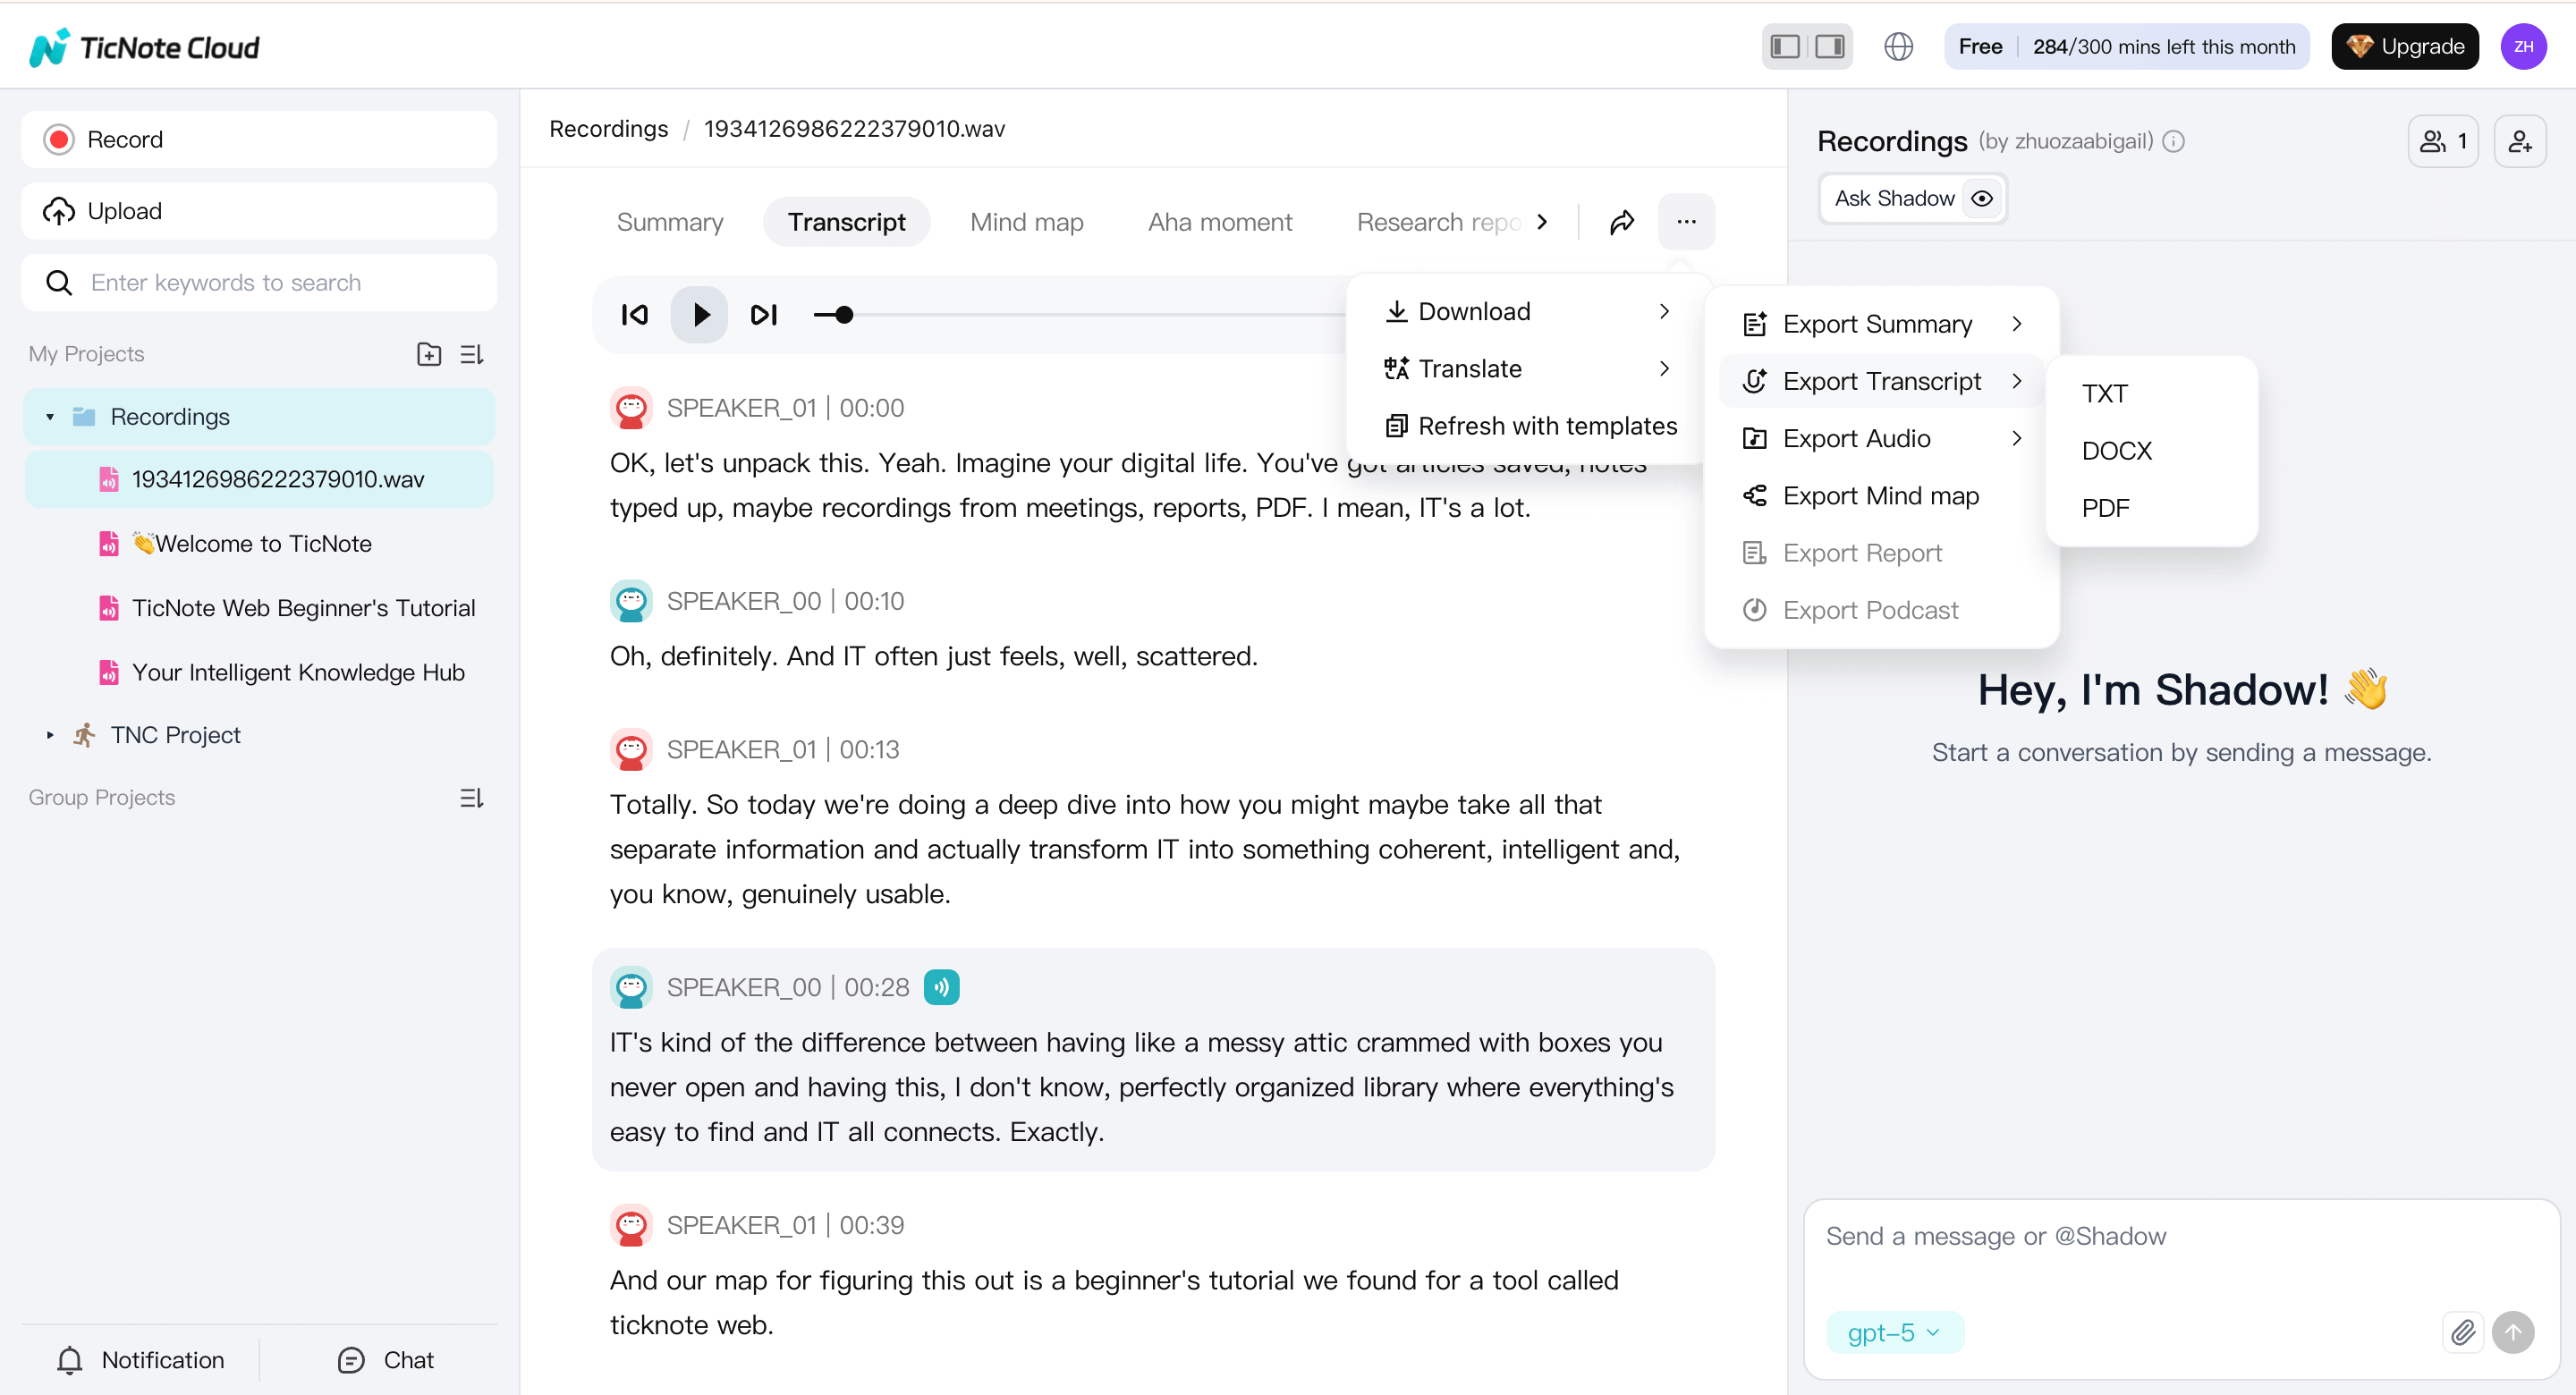
Select the uploaded episode and open the Transcript tab. Then, click the Generate button.

Before you generate the transcript, confirm:
- Language: choose the primary spoken language.
- Speaker separation: enable it if you have hosts and guests.
- Detail level: higher detail helps with long-form discussions.
Then start transcription and let it finish.

Speaker labeling is usually good enough for podcasts, especially if hosts introduce themselves clearly at the start. Crosstalk and very similar voices may still need cleanup.
4) Do a fast edit pass (Shadow AI on web, manual edits in app)
Once the draft transcript is ready, focus on fixing what listeners and readers notice most.
On the web, use Shadow AI to:
- Rewrite messy paragraphs into cleaner language
- Tighten sponsor reads
- Turn long answers into readable sections
Focus your review on:
- Guest names, brands, and tools
- Recurring show terms and segment names
- Numbers, URLs, and sponsor copy
- Obvious speaker swaps or missing breaks
If you need manual line-by-line edits or want to trim a section of the audio/video and update the transcript, open the same file in the TicNote App. The app lets you directly edit text and cut unused parts of the recording—useful when only part of an episode will be published or quoted.

5) Turn the transcript into reusable podcast notes
A transcript is raw material. Notes are what you publish and reuse.
From the transcript, generate structured outputs such as:
- Episode summary: 5–10 lines for show notes
- Key moments: timestamps with what happens
- Pull quotes: short lines for promotion
- Action items: links to add, follow-ups, edits
- Topic tags: themes to track across episodes
You can generate summaries with templates, then refine them with Shadow AI. For international audiences, translate the transcript or summary after key terms and names are fixed. Some teams also create a mind map to scan long episodes quickly.
6) Export and organize for publishing and team handoff
When everything is ready, export in formats that match your publishing flow:
- TXT: raw transcript archive
- Markdown: fast publishing to blogs or docs
- DOCX or PDF: reviews, approvals, and sharing
Save all exports back into the same project (show → season → episode). From there, you can share summaries to Notion or Slack, keep transcripts searchable, and run cross-episode Q&A later to spot recurring themes.
This web-first workflow—upload → transcribe → AI-assisted edit → format → export—keeps podcast transcription consistent and scalable, while the app fills the gap when you need precise manual edits or audio trimming.
Which transcription method should you choose (AI, human, or manual typing)?
Pick your method based on risk, not habit. To transcribe a podcast fast, most teams start with AI, then add human help only when accuracy really matters. Use this quick decision tree to choose with confidence.
Use this quick decision tree
- How accurate does it need to be?
- High stakes (legal, medical, PR, paid sponsor copy): Human transcription or AI plus human review.
- Normal episodes: AI transcription, then light editing.
- What's your deadline?
- Same day: AI.
- 24 to 72 hours: Human is possible.
- What's your budget?
- Low budget: AI.
- Higher budget: Human, or AI plus human review.
- Any privacy or sensitivity limits?
- Can't upload audio off device: Manual typing, or an on policy workflow.
- Do you need timestamps and speaker labels?
- If yes, AI with diarization (speaker ID) is usually fastest. Humans can do it too, but it costs more.
Score each option with this reusable rubric (1 to 5)
Use the same scorecard every time:
- Accuracy
- Speed
- Effort (editing time)
- Privacy/control
- Outputs (TXT, SRT, VTT)
- Integrations (Notion, Slack)
- Languages/translation
- Turnaround (minutes vs days)
Tip: If "Accuracy" and "Turnaround" both need a 5, choose AI plus human review.
Comparison table: AI vs human vs manual typing
| Method | Best for | Typical pitfalls | What "human review" means |
| AI podcast transcription | Weekly episodes, quick drafts, repurposing | Missed names, crosstalk, accents, bad mic audio | A human edits an AI draft for errors and style |
| Human transcription | High stakes, messy audio, strict style rules | Slower, costs more, still needs your terminology list | Full human typing from audio, then proofing |
| Manual typing | Tiny clips, no upload allowed, tight control | Very slow, easy to miss speakers and time codes | You do everything, including formatting |
A practical default that works for most shows
Use AI for about 80% of episodes. Then add human review for high stakes moments, like sponsor reads, quotes, or compliance topics. Save manual typing for short clips, or when you truly can't upload files.
Try TicNote Cloud for Free to turn recordings into clean transcripts plus summaries you can reuse.
What affects podcast transcript accuracy the most?
Most transcript errors come from three places: messy audio, multiple speakers talking over each other, and missing context like names. Fix those first, and you often get a big accuracy jump without paying for a more expensive service to transcribe a podcast.
Record clean audio (this matters more than the tool)
A great model can't "invent" words it can't hear. The biggest wins come from:
- Mic choice: use a dynamic mic for noisy rooms, a condenser for treated rooms
- Distance: keep mouths 4 to 8 inches from the mic, and don't drift
- Room echo: soft surfaces help, hard walls hurt
- Levels: aim for steady volume, avoid clipping (distortion)
Quick test: record 10 seconds of room tone (silence). If you hear a hiss or echo, fix the space before you record.
Manage multi-speaker problems (overlap and diarization)
Crosstalk (people speaking at once) is the fastest way to break accuracy. Even with diarization (speaker labeling), tools can swap speakers when voices sound similar or overlap.
Two fixes:
- During recording, use clear turn-taking when possible.
- During editing, relabel speaker tags when they're wrong, then keep those labels consistent (Host, Guest, Producer).
If you do interviews often, follow a repeatable interview transcription workflow so speaker IDs stay clean from episode to episode.
Prep "context" so names and terms don't get mangled
Create a short glossary before you upload:
- Host and guest names, plus pronunciations if needed
- Company, product, and brand terms
- Acronyms and industry jargon
- Guest bio links or a one-line description
Even 15 terms can prevent dozens of tiny errors.
Beginner accuracy improvement checklist
- Record separate tracks when you can
- Avoid overlap, pause before jumping in
- Do a 10-second room tone test
- Keep a shared, evolving list of recurring terms
Fast post-processing that boosts quality
Before you upload, do a quick clean: remove long silences, apply mild noise reduction, and export one continuous file so there are no missing intros or outros.

How should you format a podcast transcript so people will read it?
A readable transcript feels like a blog post, not a courtroom record. Your goal is simple: help people scan, find the moment they want, and quote it with confidence. That means you need one house style and you use it every episode.
Choose verbatim or cleaned up, then stick to it
Verbatim means you keep almost everything, including false starts, filler words, and rough grammar. Use it when wording matters, like legal, medical, research, or sensitive claims.
Cleaned up means you keep the meaning, but remove noise. Use it for most shows, especially if you want SEO and real readers.
Mini rules for cleaned up:
- Remove repeated filler words (um, like) unless they change tone.
- Fix obvious grammar, but don't rewrite ideas.
- Keep key phrases guests use, since people quote those.
Make it easy to scan on a phone
Use clear speaker labels and short blocks. A good default is 1 to 3 sentences per paragraph. If a speaker talks for a while, break it up every 2 to 4 lines.
Style rules you can reuse:
- Speaker labels: bold name + colon, like Host:
- First time a guest appears, add a short role tag in parentheses.
- Use normal punctuation, keep sentences short.
- Add simple segment headers when the topic changes.
Use timestamps only where they help
Timestamps are great for navigation and citations. They also help when you need to verify a quote fast. Add them:
- At major topic changes
- Around key moments you want people to share
- On a steady cadence, about every 3 to 5 minutes
Keep them subtle so they don't distract. Put them at the start of a paragraph, like [12:34].
Handle crosstalk, filler, and [inaudible] without noise
Don't let edge cases ruin readability:
- Crosstalk: mark it once, then move on, like [crosstalk]
- Overlaps: keep the clearer line, summarize the other in brackets if needed
- Unclear audio: use [inaudible 18:22] or [unclear], never guess
Export map: match the file to the job
| Format | Best for | Include this metadata at the top |
| TXT | Simple website publish, quick sharing | Episode title, date, guests, speaker key, source link |
| Markdown, DOCX, PDF | Blog workflows, editing, approvals | Same metadata, plus headings and links |
| SRT, VTT | Captions for video and accessibility | Speaker IDs if supported, accurate timestamps |
Want a faster "cleaned up" workflow with reusable exports? Try TicNote Cloud for transcript cleanup, summaries, and editable outputs.
Transcript vs captions: what do you need for accessibility and compliance?
A transcript is readable text of what was said. Captions are the same words, but timecoded and synced to the audio or video. If you want to transcribe a podcast for an episode page, a clean transcript usually covers most needs.
Use this rule of thumb
If it's audio-first (podcast player on a web page): publish a transcript on the page. It helps accessibility, search, and skimming.
If it's video (YouTube, courses, social clips): you also need captions in SRT or VTT format. Many users watch with sound off. Accessibility standards also call this out. Web Content Accessibility Guidelines (WCAG) 2.2 (2023) says "Captions are provided for all prerecorded audio content in synchronized media, except when the media is a media alternative for text and is clearly labeled as such."
Quick accessibility checklist for transcripts
- Put the transcript near the player, with a clear "Transcript" label.
- Use speaker names, and keep turns short (no big walls of text).
- Add paragraphs every 1 to 3 sentences, especially on mobile.
- Mark unclear audio simply, like "[inaudible]" or "[crosstalk]".
- Keep it searchable, selectable, and easy to copy.
Privacy and consent note (don't skip this)
Tell guests you record and transcribe before you hit record. Be extra careful with health, legal, or HR topics. Store transcripts with limited access, and don't share raw files in public links.

How do you publish podcast transcripts for SEO (without hurting UX)?
Publish your transcript so Google can crawl it, but humans can scan it. The simplest setup is one episode page that includes the player, a summary, and the transcript in clean HTML. That way, you get SEO value without turning the page into a wall of text.
Place the transcript where it's helpful, not noisy
Use one of these proven layouts:
- Below the player with jump links: Put a short "In this episode" list first. Then add topic jump links that scroll to transcript sections.
- Collapsible transcript (still indexable): Use a native
<details>accordion for users, but keep the full transcript in the HTML on the page. Avoid loading it only after a click with JavaScript, since it may not be crawled the way you expect.
Either way, keep the transcript on the same URL as the episode. Don't split it into a separate "/transcript" page unless you have a strong reason.
Structure the transcript so it's skimmable
Readers don't "read" transcripts, they hunt. Make that easy:
- Break the episode into H3 topic segments (not time blocks), like "Pricing mistakes" or "How to pick a mic."
- Start each segment with a bold key moment (one sentence).
- Use short paragraphs, and remove repeated filler words when you're not doing verbatim.
- Keep speaker labels consistent: "Host:" and "Guest:" are enough.
Add timestamp anchors for internal linking
Create anchors that match key moments and use them in:
- A mini table of contents near the top
- Your show notes ("Jump to the pricing example")
- Internal links from other posts ("See the exact clip where they explain it")
Example anchor format: #t-12-34 or #segment-pricing.
Keep indexing clean: one episode, one primary URL
Avoid thin duplicates. If you publish the same show notes on multiple platforms, keep one canonical episode page on your site. If you syndicate elsewhere, point those versions back to your main URL with a canonical tag.
Add PodcastEpisode structured data (and where the transcript fits)
Use PodcastEpisode (usually nested under a PodcastSeries). Focus on fields that match what's on the page:
name,description,datePublishedepisodeNumber(if you have it)url(your primary episode URL)associatedMediaoraudiopointing to the audio filetranscript: include plain text or a link to the transcript on the page, depending on your setup
Publish checklist (fast, repeatable)
- Title tag: episode topic plus guest or outcome
- Meta description: 1 promise plus 1 proof point
- Player near the top
- 3 to 6 bullet "In this episode" points
- Transcript block with H3 segments and speaker labels
- 2 to 4 pull quotes (bold) for skimmers
- Short FAQ snippet (2 to 4 Qs) pulled from listener questions
- Repurposing note: link to the summary, key takeaways, or related posts
How much does it cost (and how long does it take) to transcribe a podcast?
To transcribe a podcast, you're trading money for time, then spending time on cleanup. A simple way to estimate it is: out-of-pocket cost + editing time + turnaround time. Use the calculator below, then adjust for your audio quality.
A reusable cost and time calculator
- Pick a method: AI, human, or hybrid (AI plus human review).
- Set your "edit multiplier" (how long editing takes vs audio length).
- Add hidden tasks: names, speakers, timestamps, and caption files.
AI vs human vs hybrid: 30-minute and 60-minute scenarios
| Method | Turnaround time | Out-of-pocket cost | Editing time (rule of thumb) |
| AI transcription | Minutes to 1 hour | Subscription minutes or low per-minute fee | 0.25x to 0.75x audio length |
| Human transcription | 1 to 3 days | Highest, often per minute | 0.1x to 0.3x audio length |
| Hybrid (AI + human review) | Same day to 24 hours | Mid, pay for review time | 0.2x to 0.5x audio length |
Now plug in two common episode lengths:
- 30-minute episode:
- AI: minutes to 1 hour, low cost, 8 to 23 minutes editing.
- Human: 1 to 3 days, higher cost, 3 to 9 minutes editing.
- Hybrid: same day, mid cost, 6 to 15 minutes editing.
- 60-minute episode:
- AI: minutes to 1 hour, low cost, 15 to 45 minutes editing.
- Human: 1 to 3 days, higher cost, 6 to 18 minutes editing.
- Hybrid: same day, mid cost, 12 to 30 minutes editing.
The hidden costs most people forget
Budget extra time for:
- Names and terms: guest names, brands, and niche words.
- Speaker turns (diarization): fixing who said what.
- Formatting: headings, paragraphs, and removing filler words.
- Timestamps: adding them every 30 to 60 seconds, or per topic.
- Captions: exporting and correcting SRT/VTT (caption file formats).
If you start from an M4A file, follow a clean import path that supports exports like captions, see this guide on transcribing M4A audio into clean text and captions.
How pricing models change your monthly spend
- Per minute: easiest to estimate, minutes per episode × episodes per month.
- Per word: can surprise you on fast talkers.
- Subscription minutes: best if you publish often.
Quick estimate: (episode length in minutes × episodes per month) + 20% buffer for retakes. Then decide if you need human review for only "high-stakes" episodes (legal, sponsors, sensitive topics).
Practical plan: use AI for speed, schedule one consistent edit pass, and buy human review only when errors are costly.
Try TicNote Cloud for Free to turn episodes into transcripts, summaries, and reusable notes.
What makes TicNote Cloud different for podcast transcription (beyond text)?
Most tools help you transcribe a podcast into text. TicNote Cloud goes further: it helps you turn each episode into reusable content your team can search, reuse, and build on. You don't just get a transcript, you get a workflow that moves from raw audio to summaries, themes, and a living knowledge base.
Turn episodes into a searchable knowledge base
Instead of storing transcripts as loose files, TicNote Cloud organizes them in project spaces. That means each episode can live with its summary, key moments, and related links. Later, you can search and ask questions across the whole project, not just one transcript.
This matters when you want to plan content. With cross-file Q&A (asking questions across many episodes), you can pull recurring themes, guest quotes, or common objections. It's also handy when you're repurposing, like turning five episodes into one guide. If you also publish video, this pairs well with a clean video transcription workflow.
Review faster with summaries, translation, and mind maps
Reading a full transcript is slow. TicNote Cloud can create short summaries that help you review an episode in minutes. Need to share with a global team? Translation helps you reuse the same episode in other languages.
Mind maps add a visual layer. They're useful for topic clustering (grouping related ideas) and planning follow-up episodes. You can spot what's core vs. what's a tangent at a glance.
Before/after: from raw talk to publish-ready pieces
Raw transcript excerpt:
- Host: so um, today we're gonna talk about like, onboarding. And uh, what breaks.
- Guest: Yeah, I think the biggest thing is people skip the first email. And then support gets slammed.
Cleaned section:
- Host: Today, we'll cover onboarding and what usually breaks.
- Guest: The biggest issue is skipping the first email. That's when support tickets spike.
Summary bullets:
- Onboarding failures often start with missed first-touch messaging.
- One skipped email can create an avoidable support load.
Key moments list:
- 02:10 Onboarding "break points" to watch
- 06:45 The first email that prevents support tickets
Practical outputs you can hand to your team
Here's what you can produce and share:
- Export transcript as TXT
- Export summaries as Markdown, DOCX, or PDF
- Export mind maps as PNG or Xmind
- Send outputs to Notion or Slack for review and approvals
If you want to test the workflow, start small with one episode. The free plan includes 300 transcription minutes per month, so you can see what your process looks like before you commit.

