

TL;DR: Fast ways to turn a voice memo into text
You can transcribe voice memos fast, but the best path depends on speed, accuracy, and privacy. To learn how to transcribe voice memos with less hassle, pick the option that fits your goal.
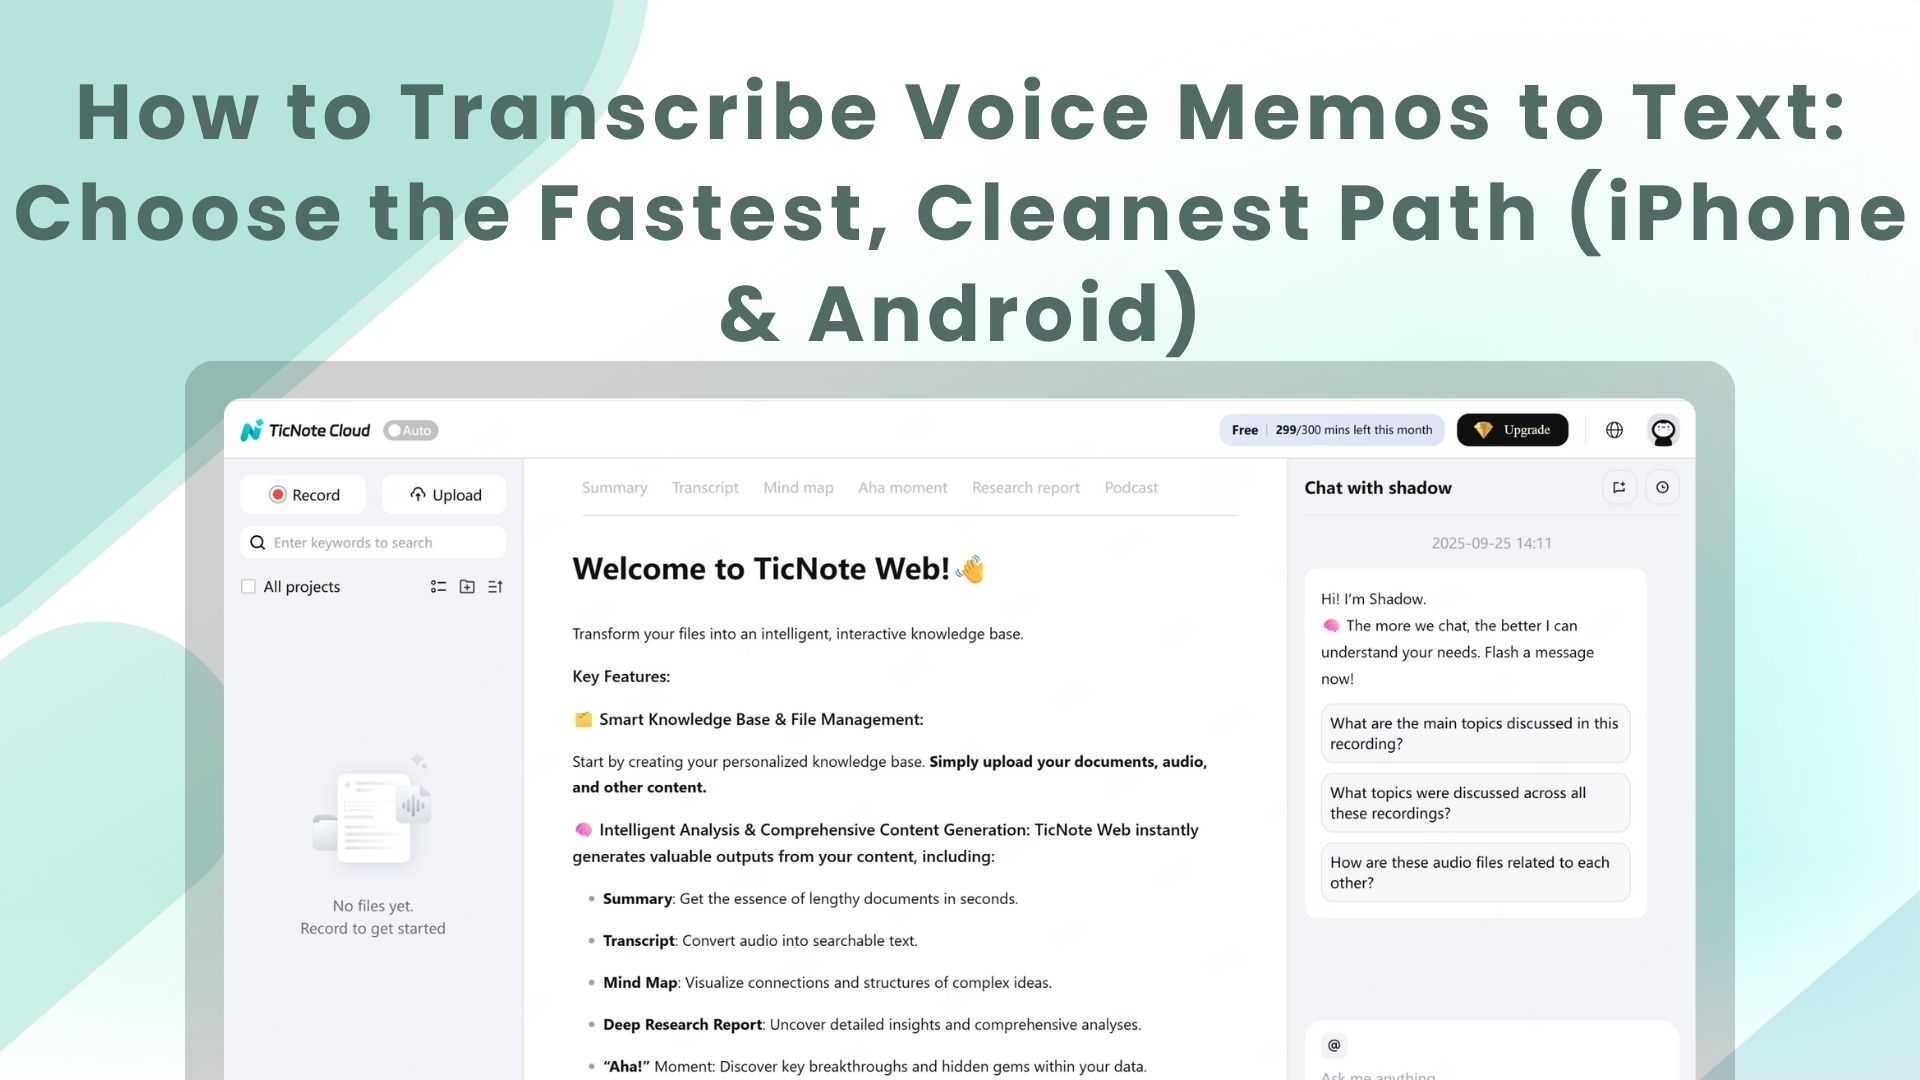
Problem: Voice notes pile up and stay “trapped” as audio. That makes follow-ups slow and easy to miss. Solution: Try TicNote Cloud for Free to go from upload to transcript to summary, then save it in a searchable project.
- Fastest: Upload the memo to an automatic transcriber, best for quick notes.
- Highest accuracy: Use a human service, or do a careful edit pass, best for quotes.
- Most private: Keep it on-device with dictation or manual typing, best for sensitive audio.
Before you start: have the audio file ready, and pick the right language.
How to transcribe voice memos on iPhone and Android (4 practical methods)
To transcribe voice memos fast, you have four simple paths. You can type it yourself, let your phone capture speech as text, upload the audio to a transcription app, or hire a human for critical accuracy. The right choice depends on the memo's length, quality, and how perfect it must be.
Method 1: Type it yourself (best for short memos)
This is the cleanest option for a 30 to 90 second note. It’s also best when names and numbers must be exact.
What you need: your memo app, headphones (optional), and 5 to 10 minutes.
- Open the recording in Voice Memos (iPhone) or your recorder app (Android).
- Set the volume to a clear level and reduce background noise.
- Use the play, pause, and type loop. Replay the last 3 to 5 seconds often.
- Add timestamps as you go, like “00:22” for key lines.
- Do a quick clean pass for spelling, names, and dates.
Tip: If the memo is long, transcribe only the “must keep” parts.
Method 2: Use built-in dictation or live captions (best for quick drafts)
This is the fastest “good enough” route. But it’s made for live speech, so it may struggle with audio playing from the same phone.
What you need: device dictation or caption setting, plus a quiet room.
- Open a notes app (Apple Notes, Google Docs, or any text field).
- Turn on Dictation (keyboard mic) or Live Captions if your phone supports it.
- Play the voice memo on another device if possible.
- Speak the audio back clearly, or let captions capture it live.
- Fix missing words, punctuation, and any wrong names.
Limits to know: accuracy depends on device model, mic, language settings, and whether audio is “leaking” from a speaker.
Method 3: Upload to a transcription app or service (best mix of speed and accuracy)
If you want fast results with editing tools, this is usually the best path. Many tools support timestamps, speaker labels, and exports.
What you need: the audio file and a transcription app or web service.
- Export the recording file (see steps below).
- Upload it to your chosen transcriber.
- Review the transcript and fix names, jargon, and formatting.
- Add speaker labels (who said what) if needed.
- Export to TXT, DOCX, or Markdown for sharing and storage.
If you’ll do this often, follow a repeatable workflow like this step-by-step guide on how to transcribe audio to save time and reduce cleanup later.
Method 4: Hire a human transcriber (best for interviews and high stakes)
Choose this when mistakes are expensive, like journalism, legal notes, or medical content. You’ll pay more and wait longer, but you get careful listening.
What you need: a clear brief, speaker names, and any spelling notes.
- Pick a service and confirm turnaround time and pricing.
- Share the audio plus context (names, topics, key terms).
- Request timestamps and speaker labels if you need them.
- Review the draft, then ask for corrections if needed.
Export and share the audio file (iPhone and Android)
- iPhone: Open Voice Memos → select the memo → tap Share → send as a file (AirDrop, Mail, Files, Drive).
- Android: Open your recorder app → find the recording → tap Share (or Export) → choose Drive, email, or your transcription app.
Try TicNote Cloud for free to upload a voice memo, get a transcript, then turn it into a clean summary you can search later for free.
Pick the right method: comparison table (cost, speed, accuracy, privacy)
If you want to know how to transcribe voice memos fast, pick your path based on how clean the audio is, how soon you need the text, and how private it must be. Use the table below to choose the simplest option that still gets you a usable transcript.
Because Multimodal Speech Recognition for Effective Communication notes, "Speech recognition accuracy significantly diminishes in environments where acoustic signals cannot be reliably captured", which is why method choice matters.
| Method | Cost | Speed | Accuracy | Privacy | Best for |
| Manual typing (or play and type) | Free | Slow, 30 to 120+ min per 30 min audio | High for short clips, but you may miss words when it’s fast | On-device, no upload | Legal notes, exact quotes, sensitive memos |
| Built-in dictation (play audio into phone mic) | Free | Fast, near real time | Medium, struggles with noise and overlap | Mostly on-device or platform processed | Quick idea dumps, short reminders |
| Free or low-cost transcription apps | Free to low monthly | Fast, minutes | Medium to high, varies by model and audio | Cloud upload in most cases | Class recaps, simple interviews, creators |
| Pro transcription service (human or hybrid) | Paid per hour | Slow, hours to days | High, best for messy audio | Human access possible | Journalism, research interviews, court-grade needs |
What accuracy depends on
Most tools live or die on these factors:
- Audio quality: clear mic beats loud volume.
- Noise: fans, traffic, cafe music.
- Accents and mixed languages.
- Speaker overlap (two people talking).
- Domain words: names, medical terms, product SKUs.
When free is enough vs when paid saves time
Free voice memo transcription is fine for clean audio and personal notes. Pay for a tool or service when you need fewer edits, clear speaker turns, or fast summaries you can reuse.
Quick scenario picks
- Class note recap: built-in dictation for speed, app for cleaner formatting.
- Content brainstorming: built-in dictation is usually enough.
- 1:1 interview: transcription app first, then upgrade if you need speaker labels.
- Noisy event: pro service, or record again closer to the mic if you can.
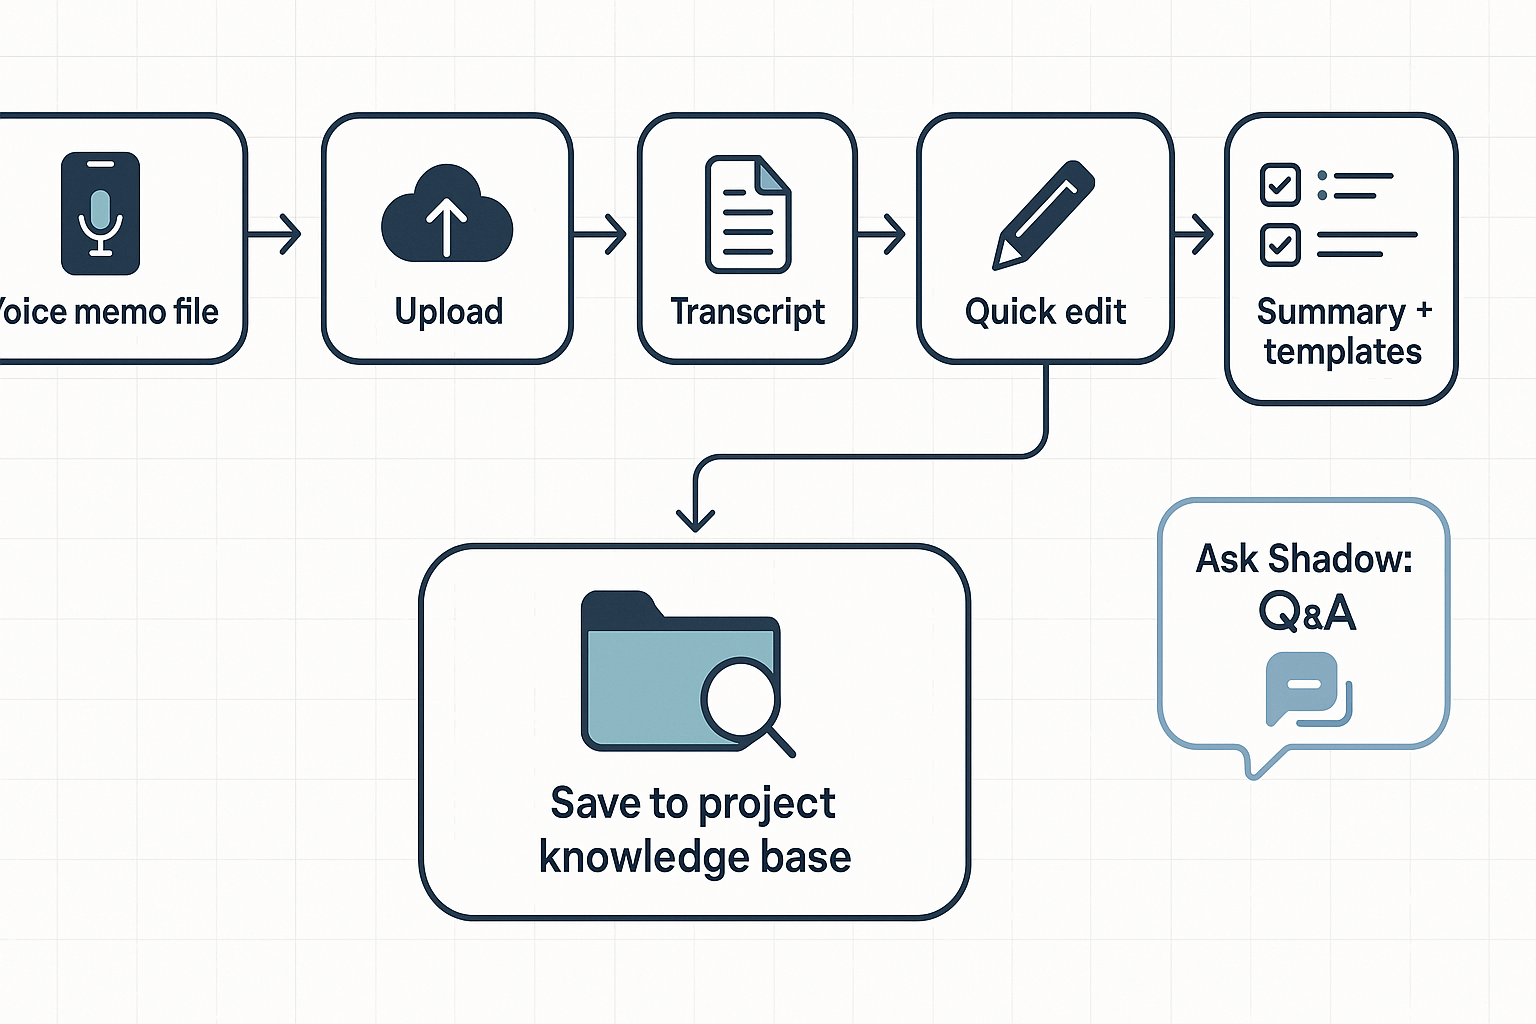
Step-by-step: Transcribe a saved voice memo with TicNote Cloud (upload → transcript → summary)
If you want the fastest, cleanest way to transcribe voice memos, use a simple loop you can repeat every time: export the audio file, upload it, generate the transcript, then create a summary you can find later. The steps below work for both iPhone and Android, even if the memo is already saved.
1) Export the voice memo file (iPhone or Android)
First, get your recording into a shareable audio file.
- iPhone (Voice Memos): Open the memo, tap Share, then choose Save to Files (or share straight to the TicNote Cloud app if you have it).
- Android recorder: Open the recording, tap Share or Export, then save it to your device (Downloads, Drive, or Files).
Tip: If you can choose a format, pick the original or a high-quality option to keep speech clear.
2) Upload to TicNote Cloud and set the right language
Open the TicNote App and tap the add (+) button at the top to upload your voice memo. You can either create a new project or add the file to an existing one so everything stays organized from the start.
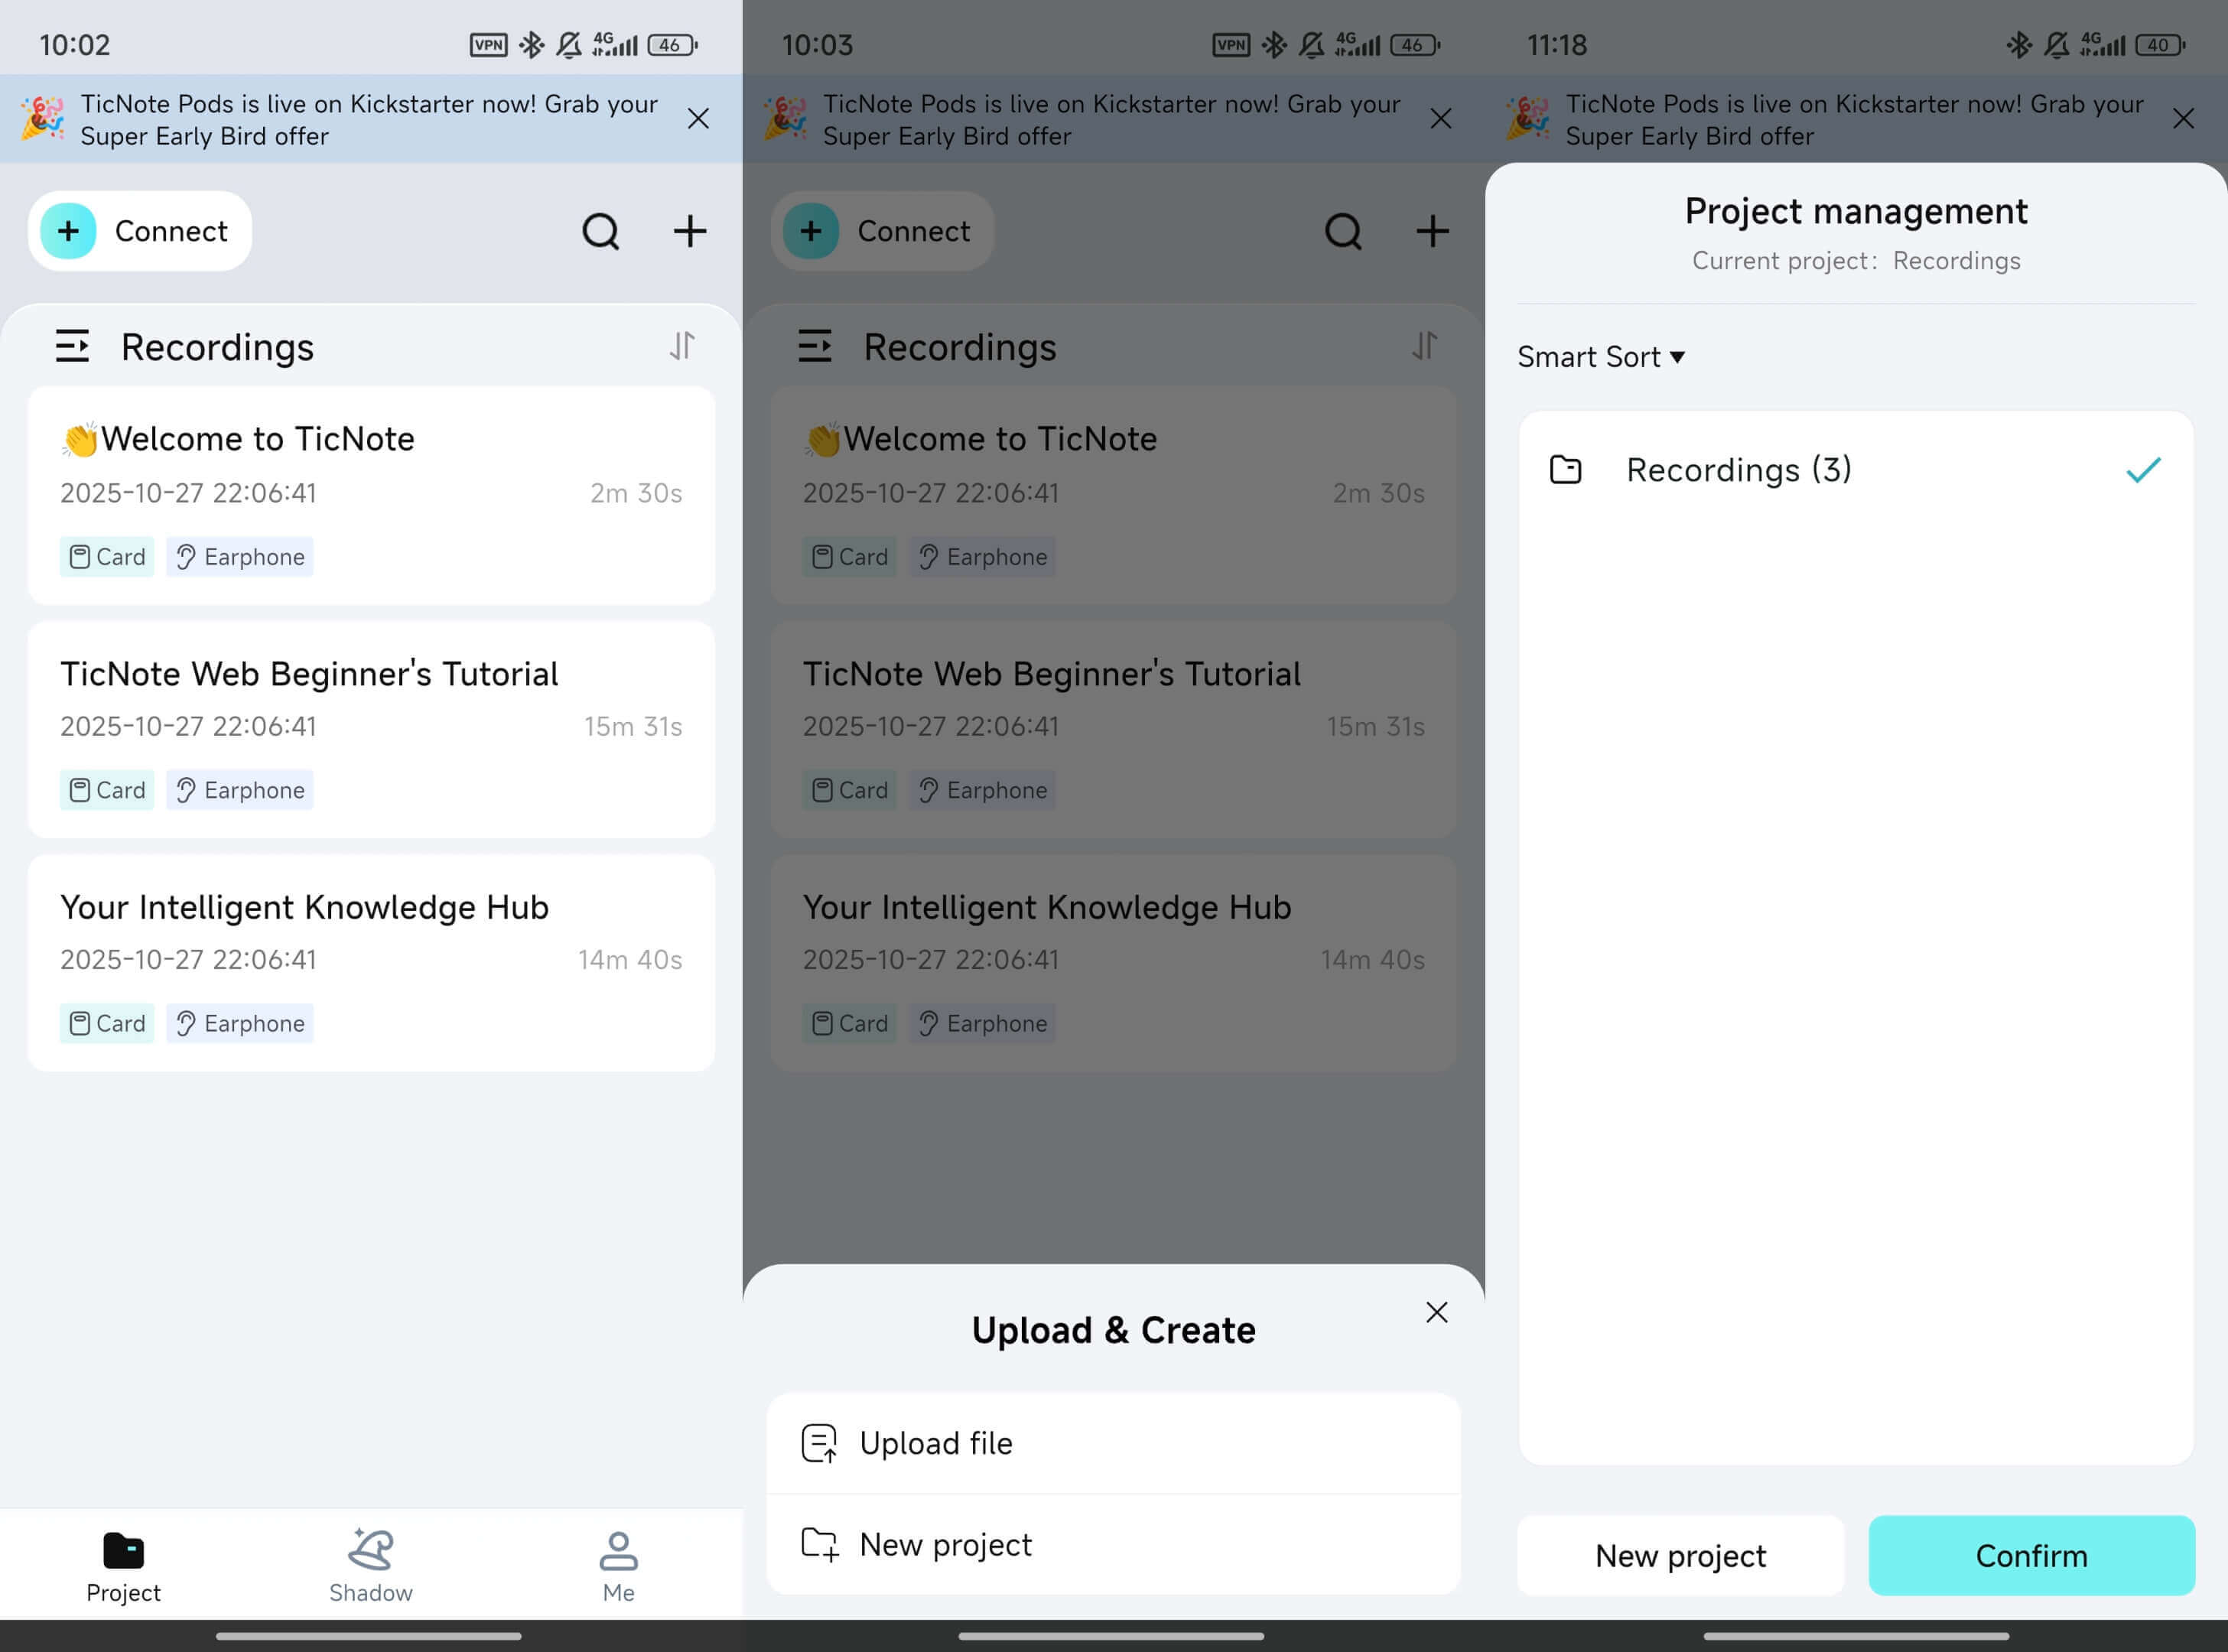
Projects make it easier to find transcripts later, especially if you record notes, meetings, or ideas often.
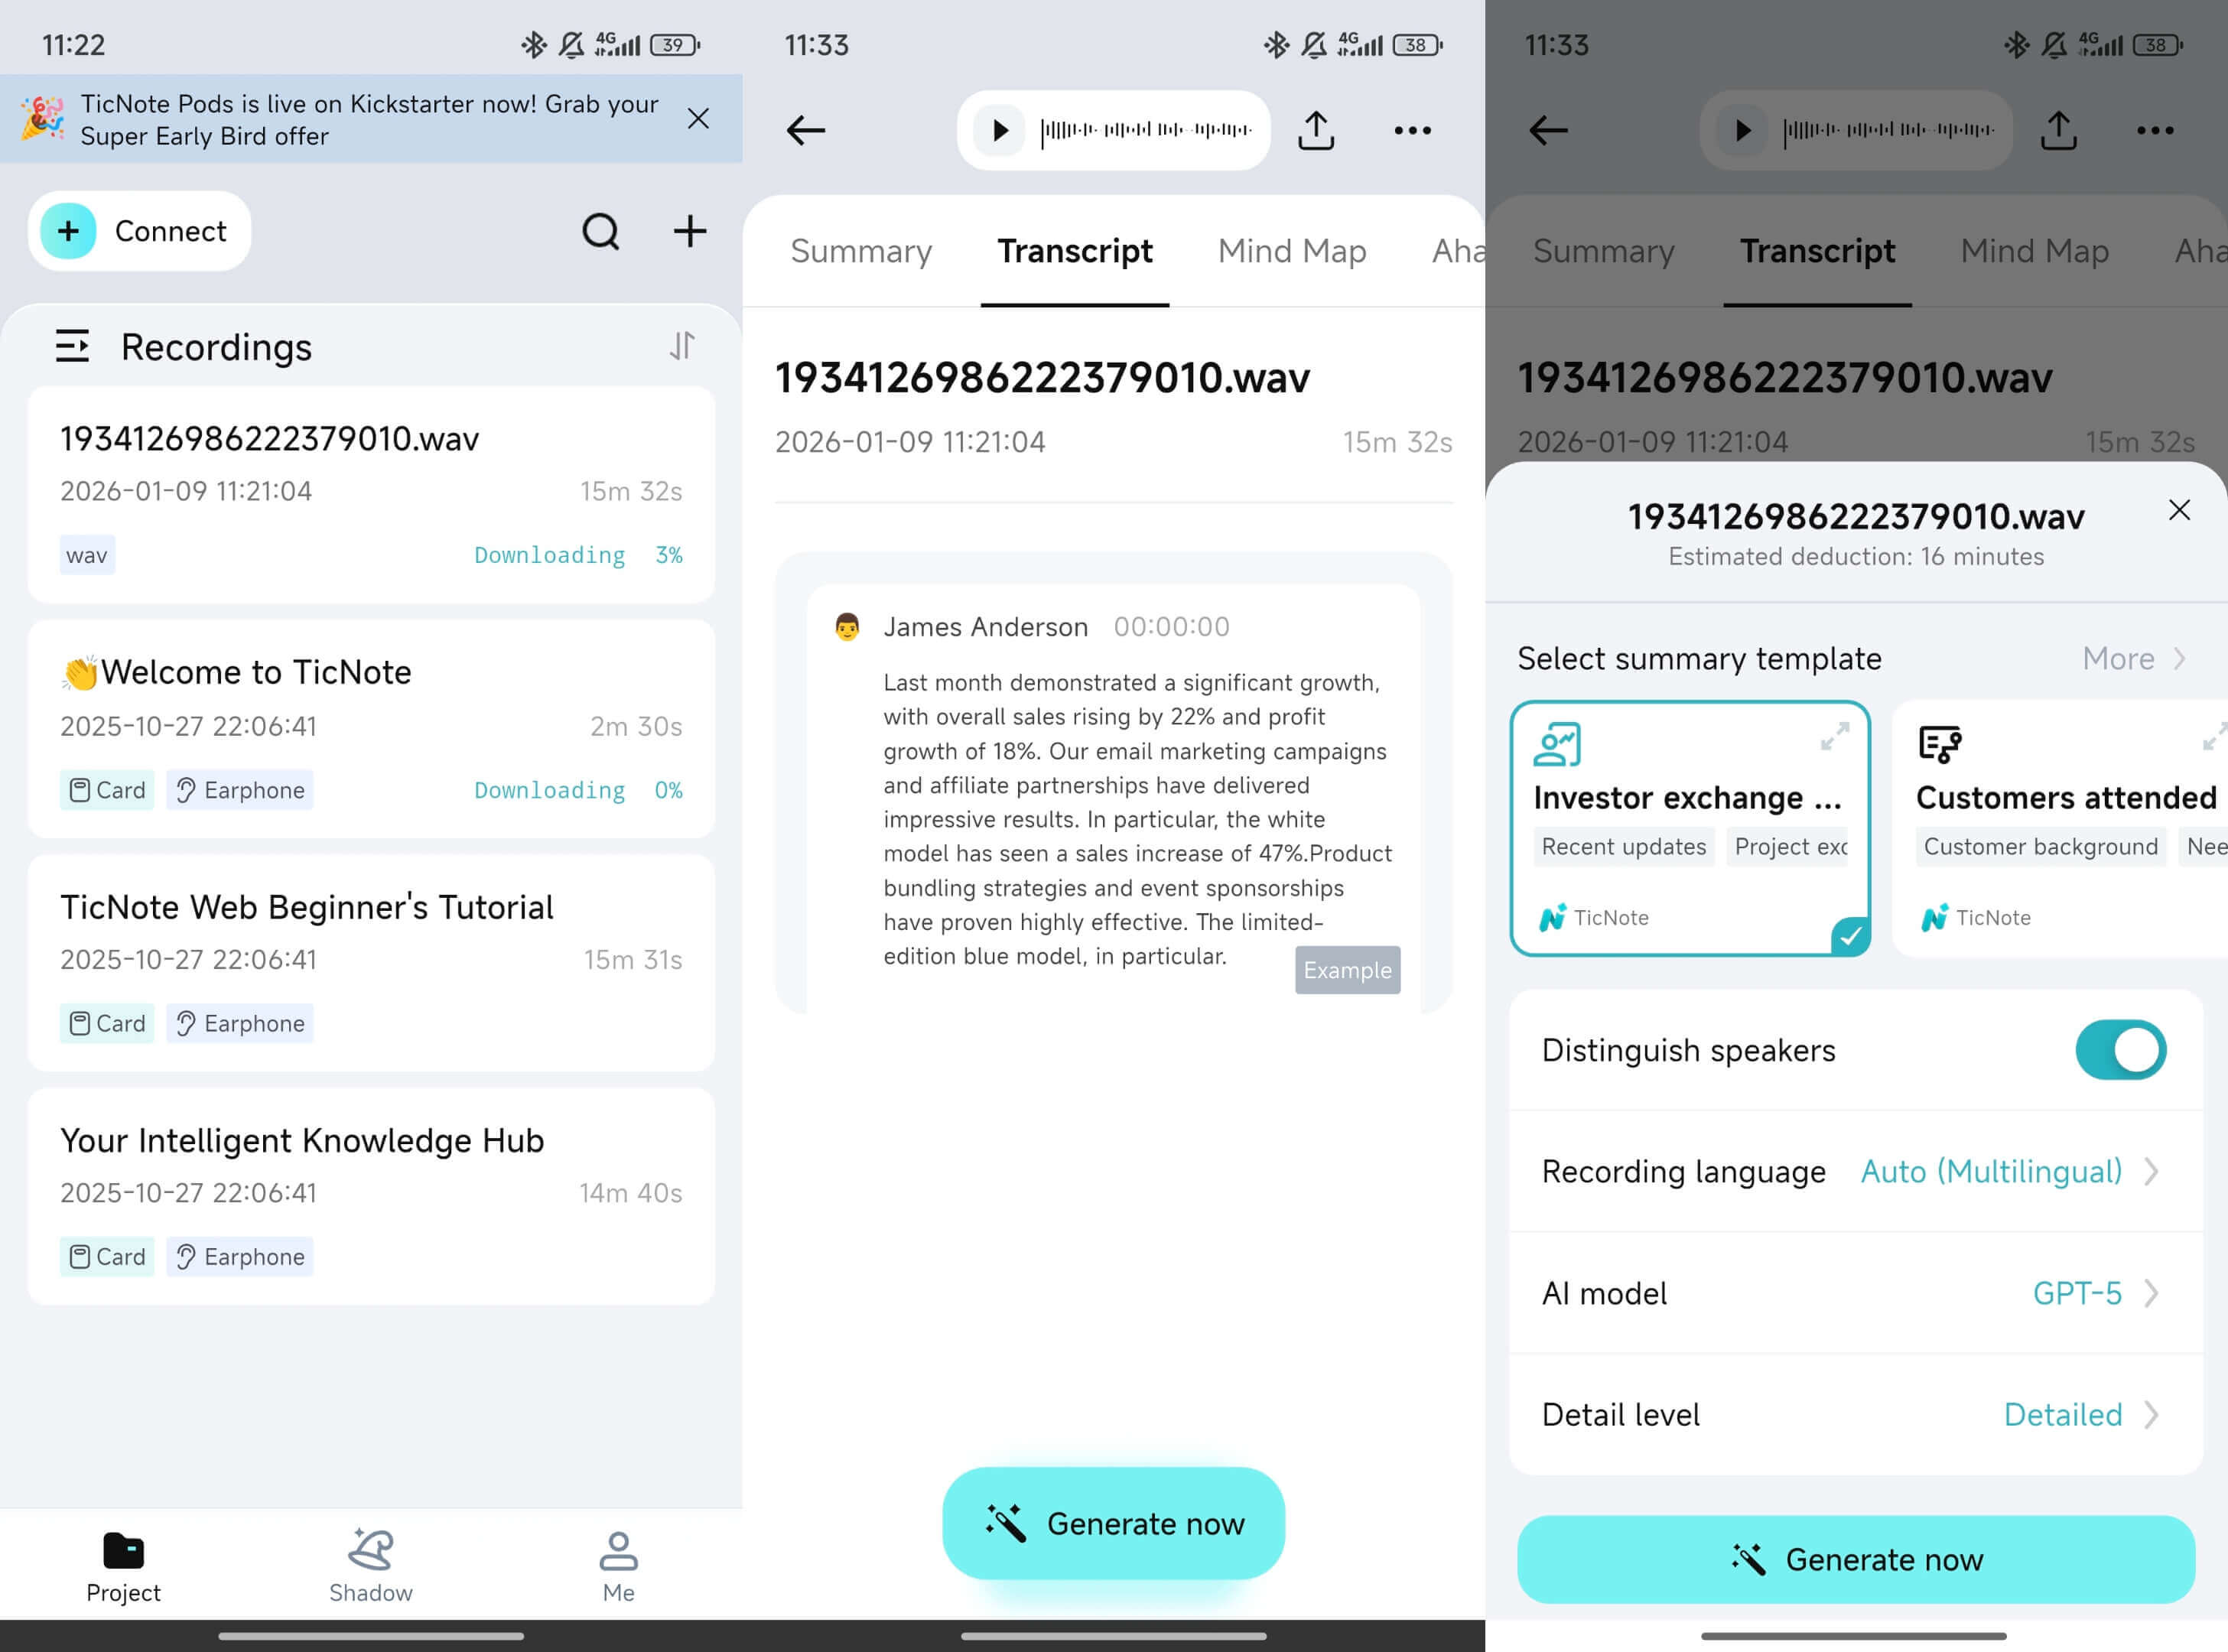
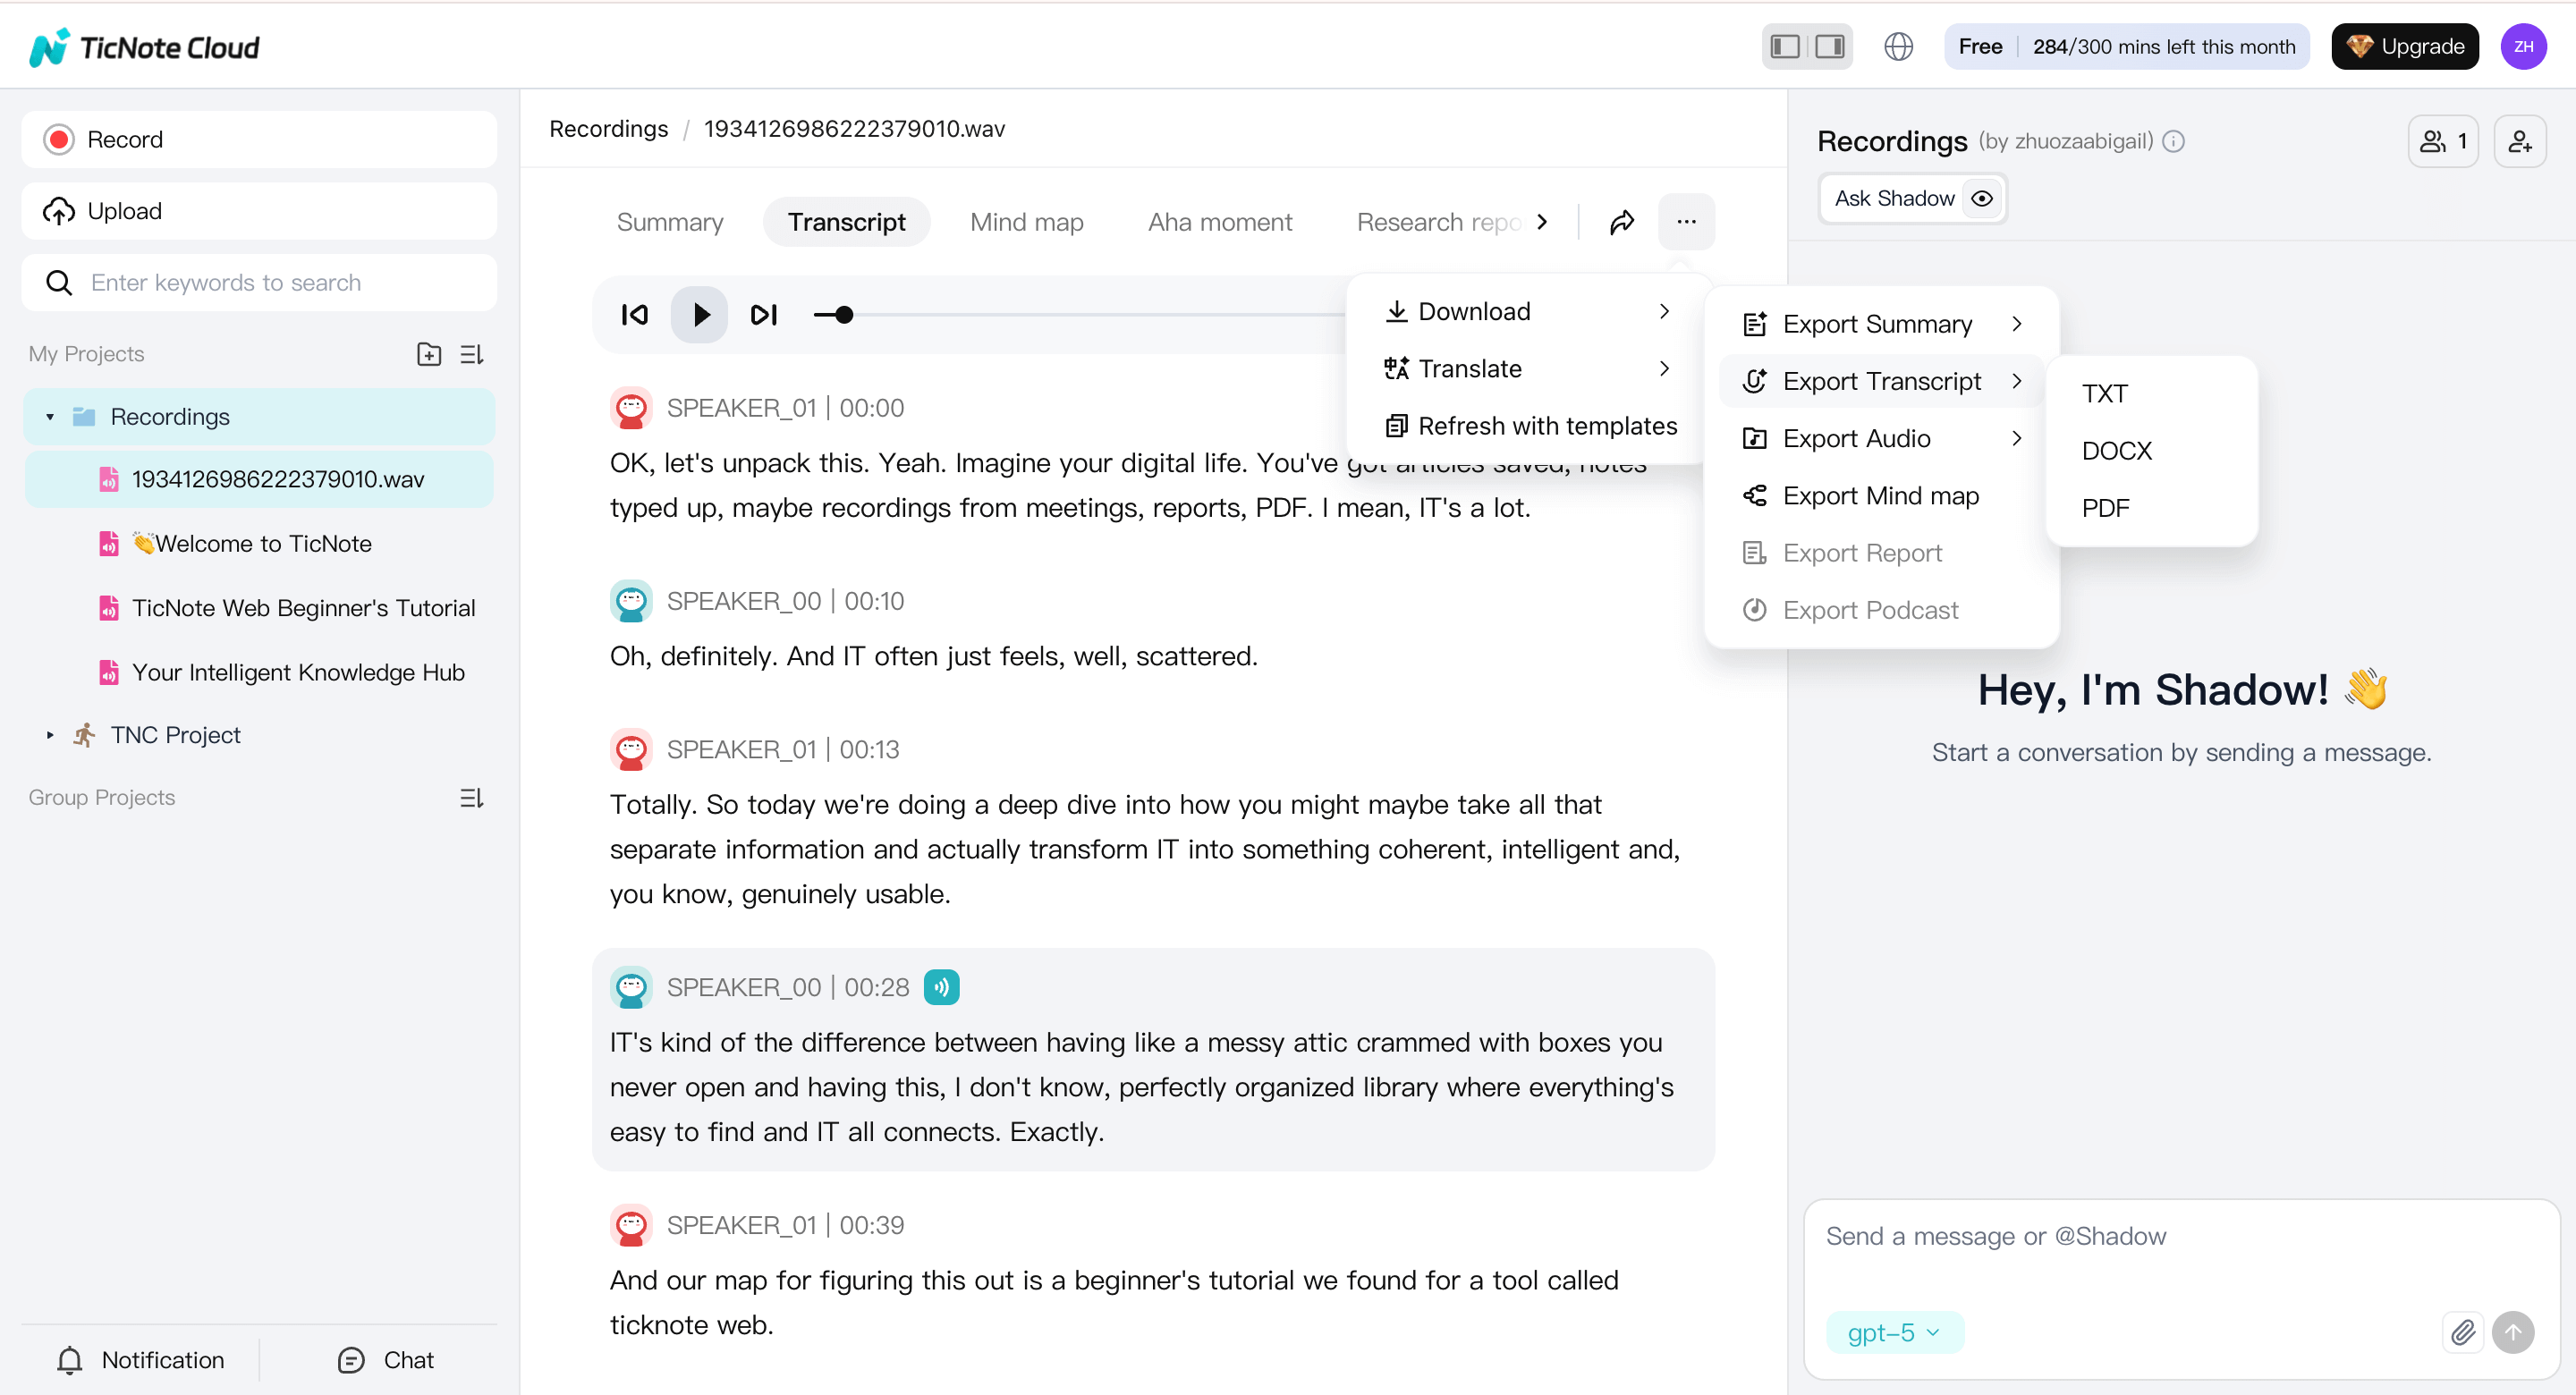
3) Generate the transcript
Select the uploaded file and tap the transcript option to start transcribing the audio or video. You can set the field and language, and choose the detailed level and whether to distinguish. Tap Generate now.
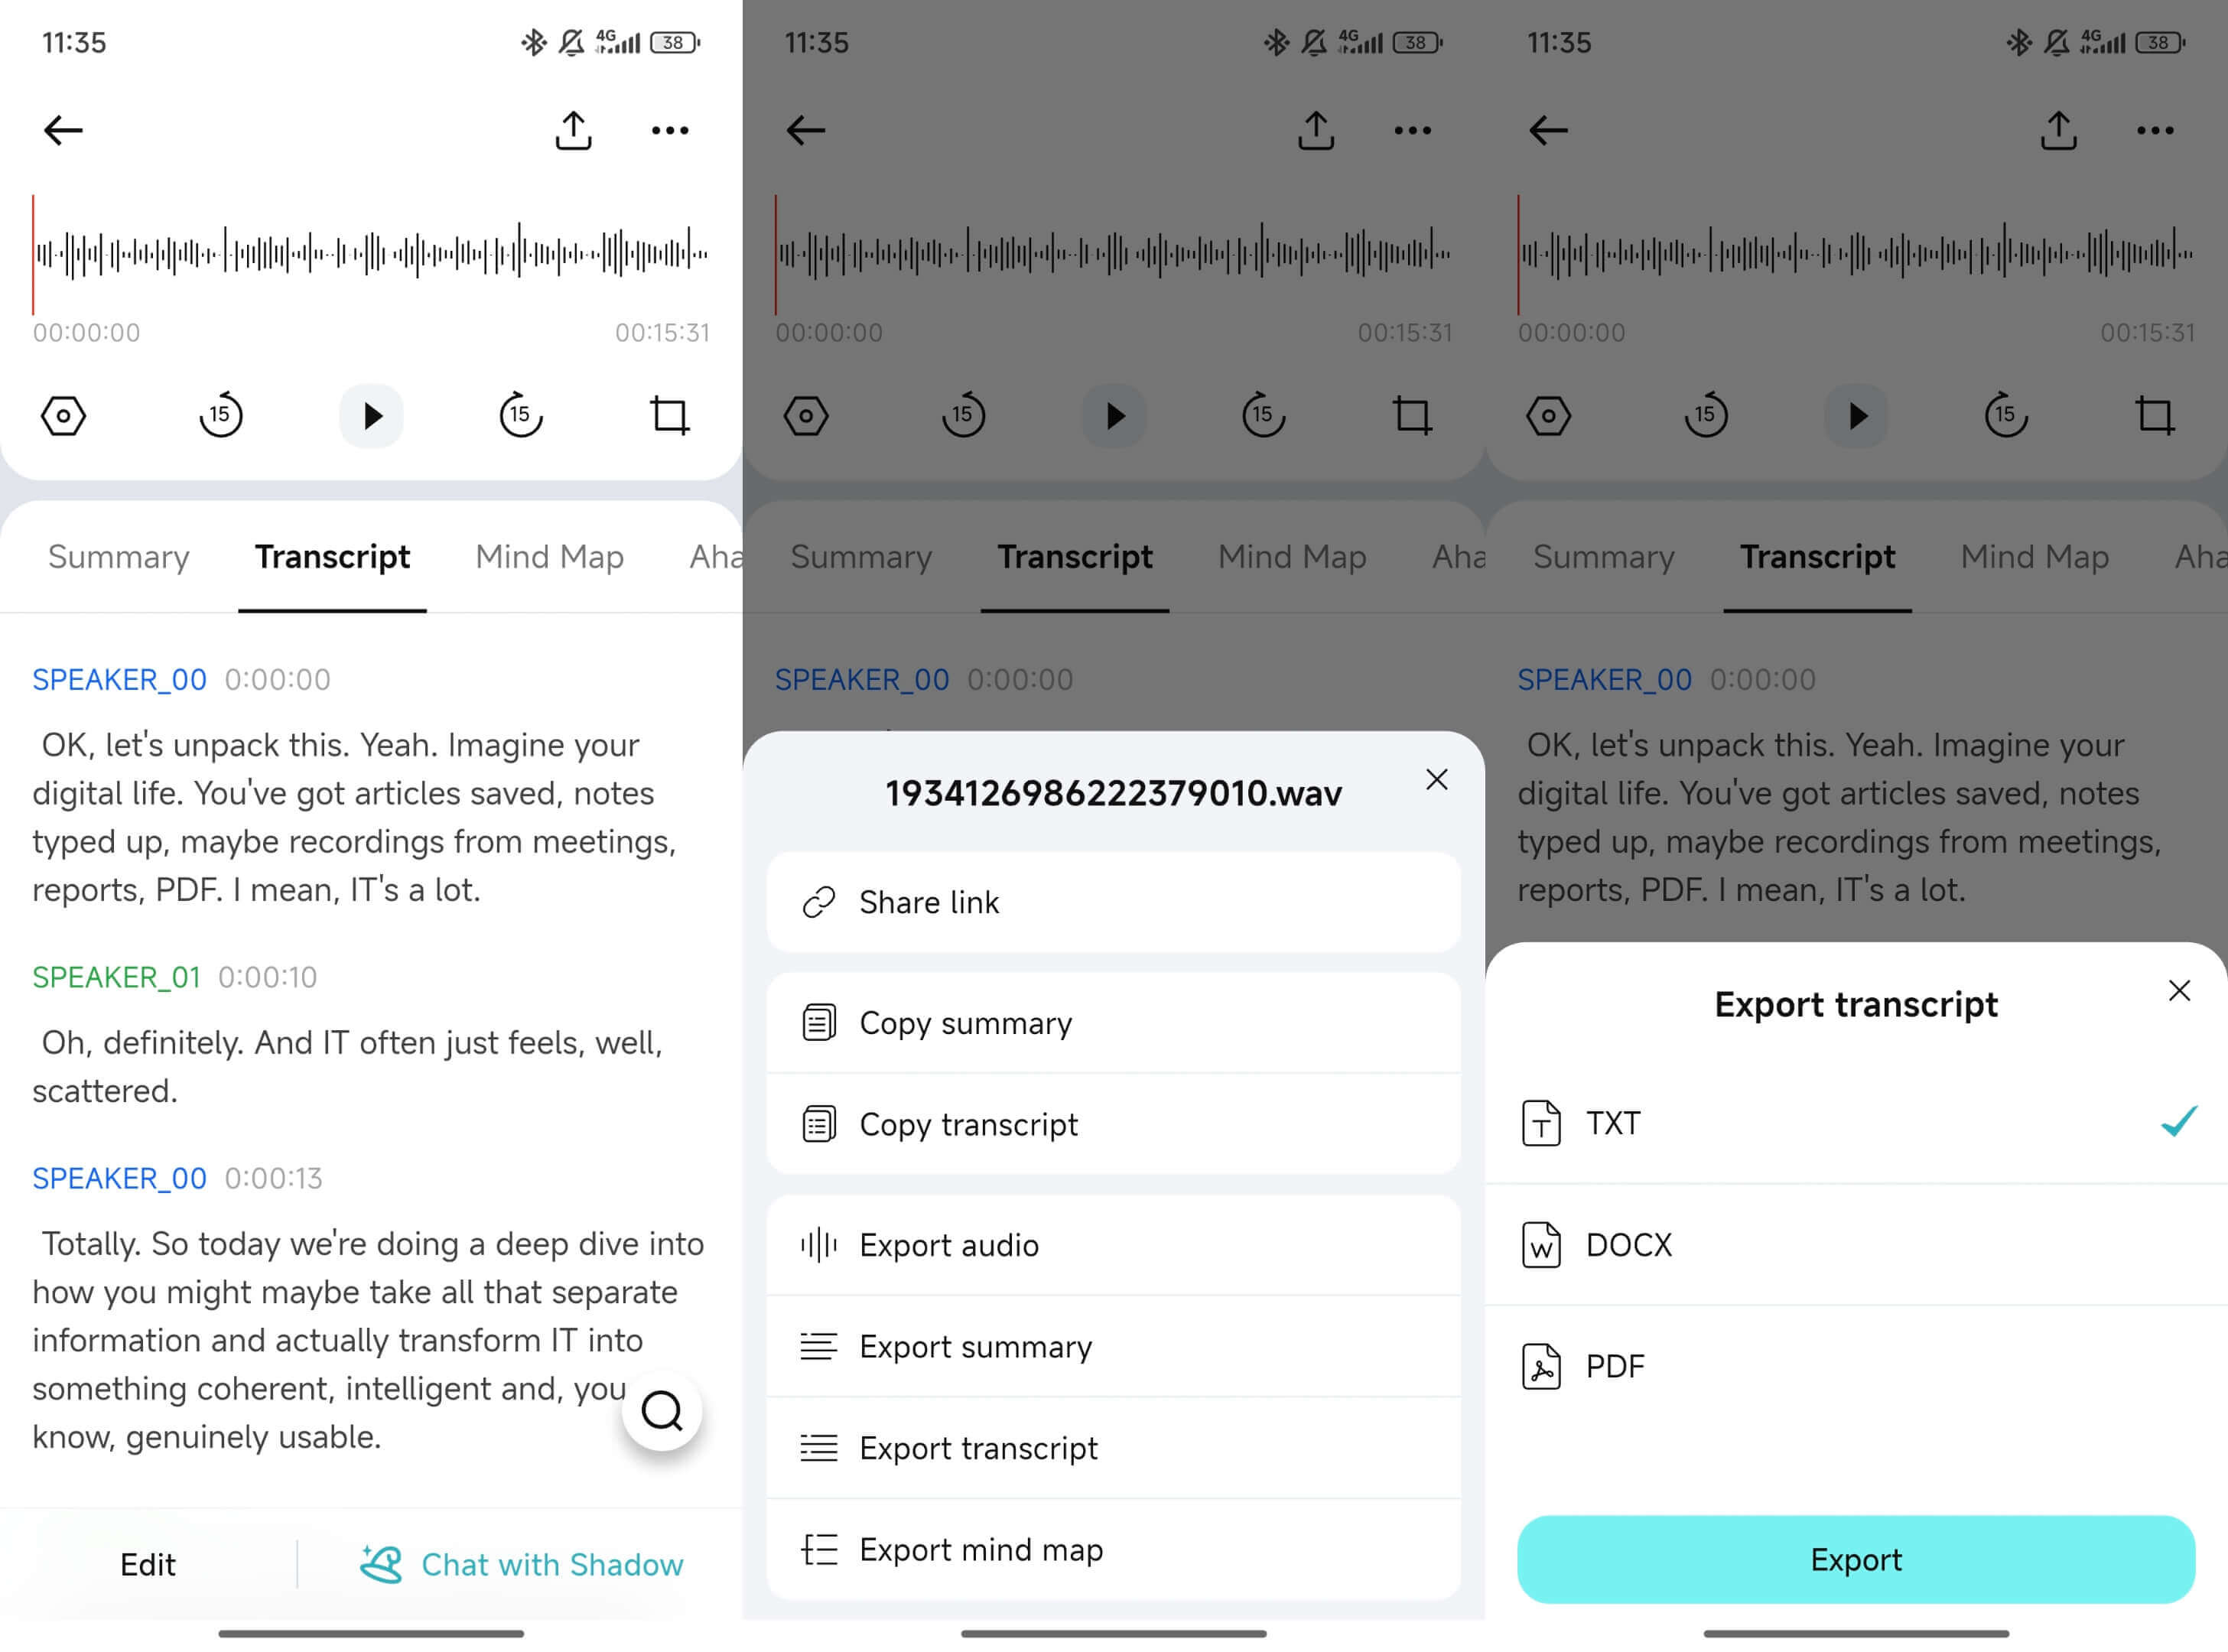
4) Download Transcript, and create a summary and action items with templates
Next, turn the transcript into something you can use. Pick a template like meeting notes or interview takeaways, then generate:
- A short summary
- Key points and quotes
- Action items and due dates
When you’re done, export what you need:
- Transcript: TXT
- Summary: Markdown, DOCX, or PDF
If you also deal with short, one-way recordings like missed calls, this workflow is very similar to how you transcribe voicemail, just with a different audio source.
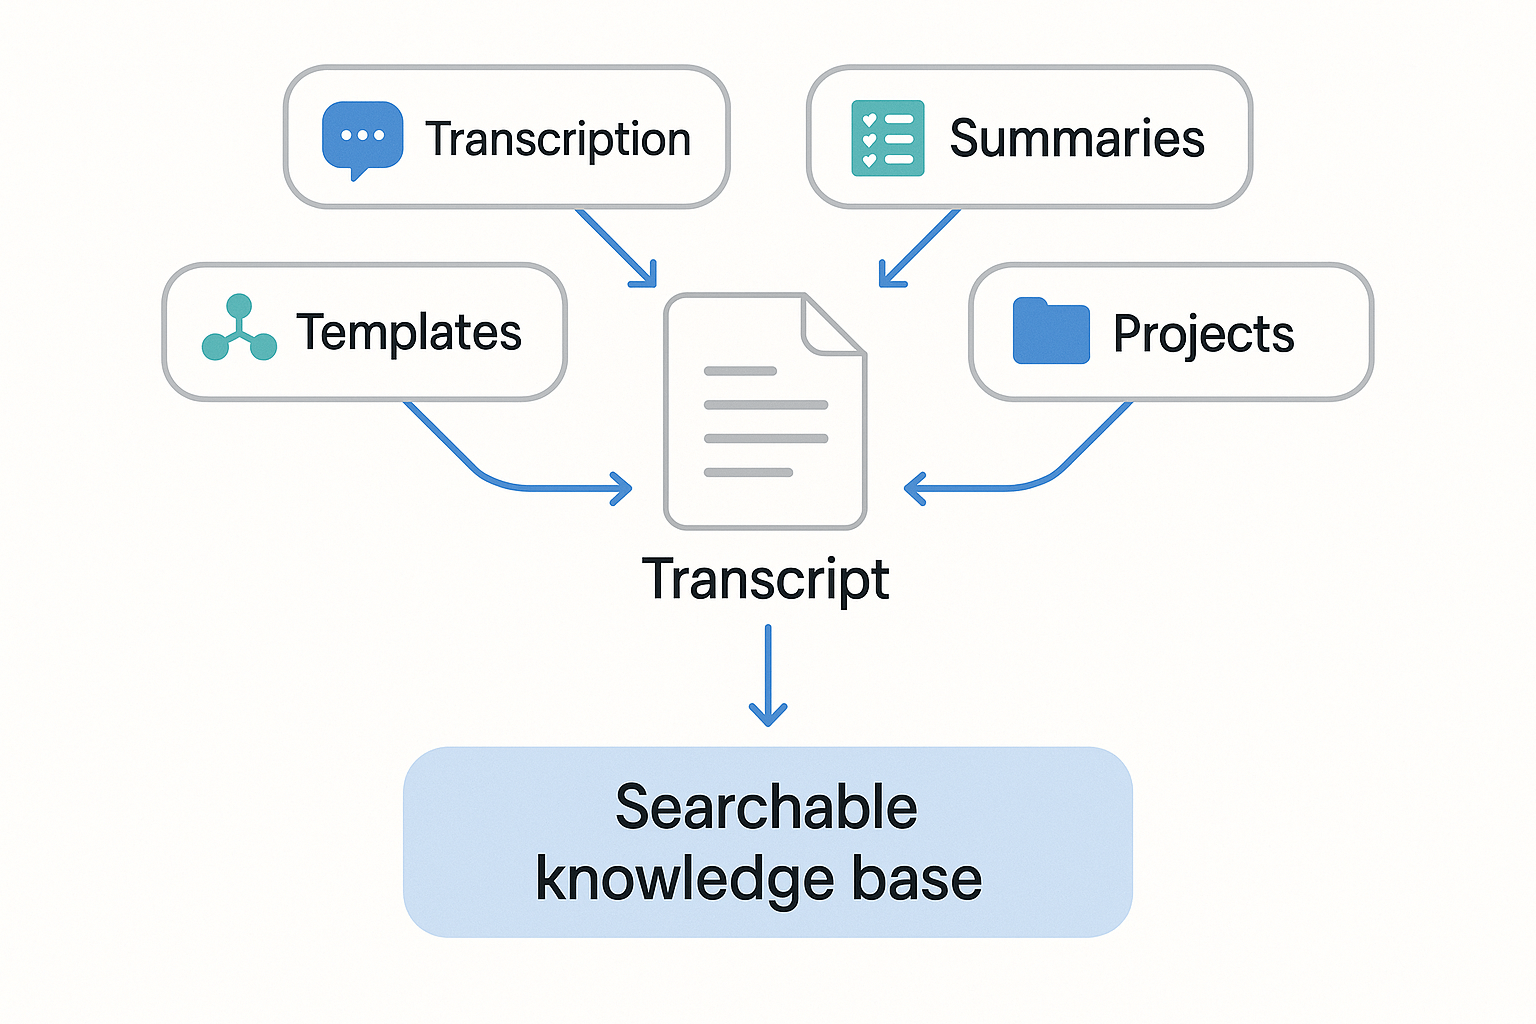
5) Save it to a project, then ask Shadow when you need details
Finally, save the transcript and summary inside a project workspace. That way, it becomes searchable later by topic, person, or keyword.
When you need something fast, use Shadow chat to ask questions like:
- “What did I decide about the deadline?”
- “List the next steps and owners.”
- “Find the exact quote about pricing.”
That’s the real win: your voice memo turns into a note you can query, reuse, and build on.
Optional: transcribe the same voice memo on the web
If you prefer working on a larger screen, you can upload the same audio file to the TicNote Cloud Web Studio.
Upload the file using the web interface, select it from the project list, open the Transcript tab, and generate the transcript. You can then review the text in the editor and export it in multiple formats.
Many users capture or upload on mobile, then switch to the web for deeper review and exporting.
TicNote Cloud features you won’t get in a basic transcriber (exclusive section)
If you only need text, any tool can help you transcribe voice memos. But most people need more than a transcript. They need clean notes, clear takeaways, and a way to find them later.
Ask your transcript questions with Shadow chat
A basic app gives you words. Shadow chat helps you use them.
- Ask: “What decisions were made?”
- Ask: “List action items with owners and due dates.”
- Ask: “Pull the key quotes for my article intro.”
Turn raw speech into real notes with Templates
Voice memos are messy. Templates turn them into a format you can reuse.
For example, drop a client memo into a “Call recap” template. You get sections like goals, pain points, next steps, and follow-ups, without rewriting everything.
Scan the big picture fast with the Mind map view
Long memos are hard to skim. A mind map groups themes and key moments.
Use it to spot topic shifts, repeat issues, and the one idea you almost missed.
Share across languages with Translation
Need to send notes to a global team? Translate the transcript or summary into another language, so everyone gets the same meaning.
Keep everything searchable with Projects
Projects keep your stuff separated and easy to find. Make one space per class, client, podcast, or research topic. Later, you can search and reuse ideas without digging through files.
Once your memos become organized knowledge, you stop losing ideas and follow-ups.
App and service recommendations (with pros/cons)
When you’re choosing an app for voice memo transcription, don’t start with brand names. Start with your need: speed, accuracy, privacy, or a clean file you can reuse. Most people want the fastest way to how to transcribe voice memos without making a mess of their notes.
For AI transcription apps: pick tools that make cleanup easy
A good transcriber isn’t just “record to text”. It helps you fix errors fast and export clean.
Look for:
- Easy import from iPhone and Android (share sheet, file upload, cloud drive)
- Editing that’s built for speech (tap to jump by timestamp)
- Speaker labels and timestamps (great for interviews and meetings)
- Exports you’ll actually use: TXT, DOCX, PDF, and SRT (subtitle file) if you need captions
Pros: fast, low cost, easy search and copy/paste. Cons: errors with noise, accents, and overlap, plus privacy varies by vendor.
For human transcription services: use them when it really matters
Human transcription is worth it when you need court-ready accuracy, heavy jargon, or bad audio. It’s also helpful when you need strict formatting.
Ask before you pay:
- Confidentiality terms (NDA options)
- Deletion policy and retention time
- Turnaround time and rush fees
- How they handle names, acronyms, and speaker IDs
Pros: best accuracy on hard audio. Cons: slower, higher cost, and you still need a place to store the result.
Red flags that waste time (and lock up your notes)
- Hidden minute limits or “fair use” caps
- No exports, or only a screenshot-style PDF
- No way to correct words and save edits
- Vague privacy policy, unclear data use, no deletion controls
If you only need a rough transcript fast, a basic tool is fine. If you want transcript plus summary plus search, use an end-to-end workspace like TicNote Cloud, and later you can even reuse the same flow to [transcribe a YouTube video for notes you can search](How to Transcribe a YouTube Video (Fast, Clean, and Easy to Reuse)).
Get cleaner transcripts: 10 audio tips that improve speech-to-text
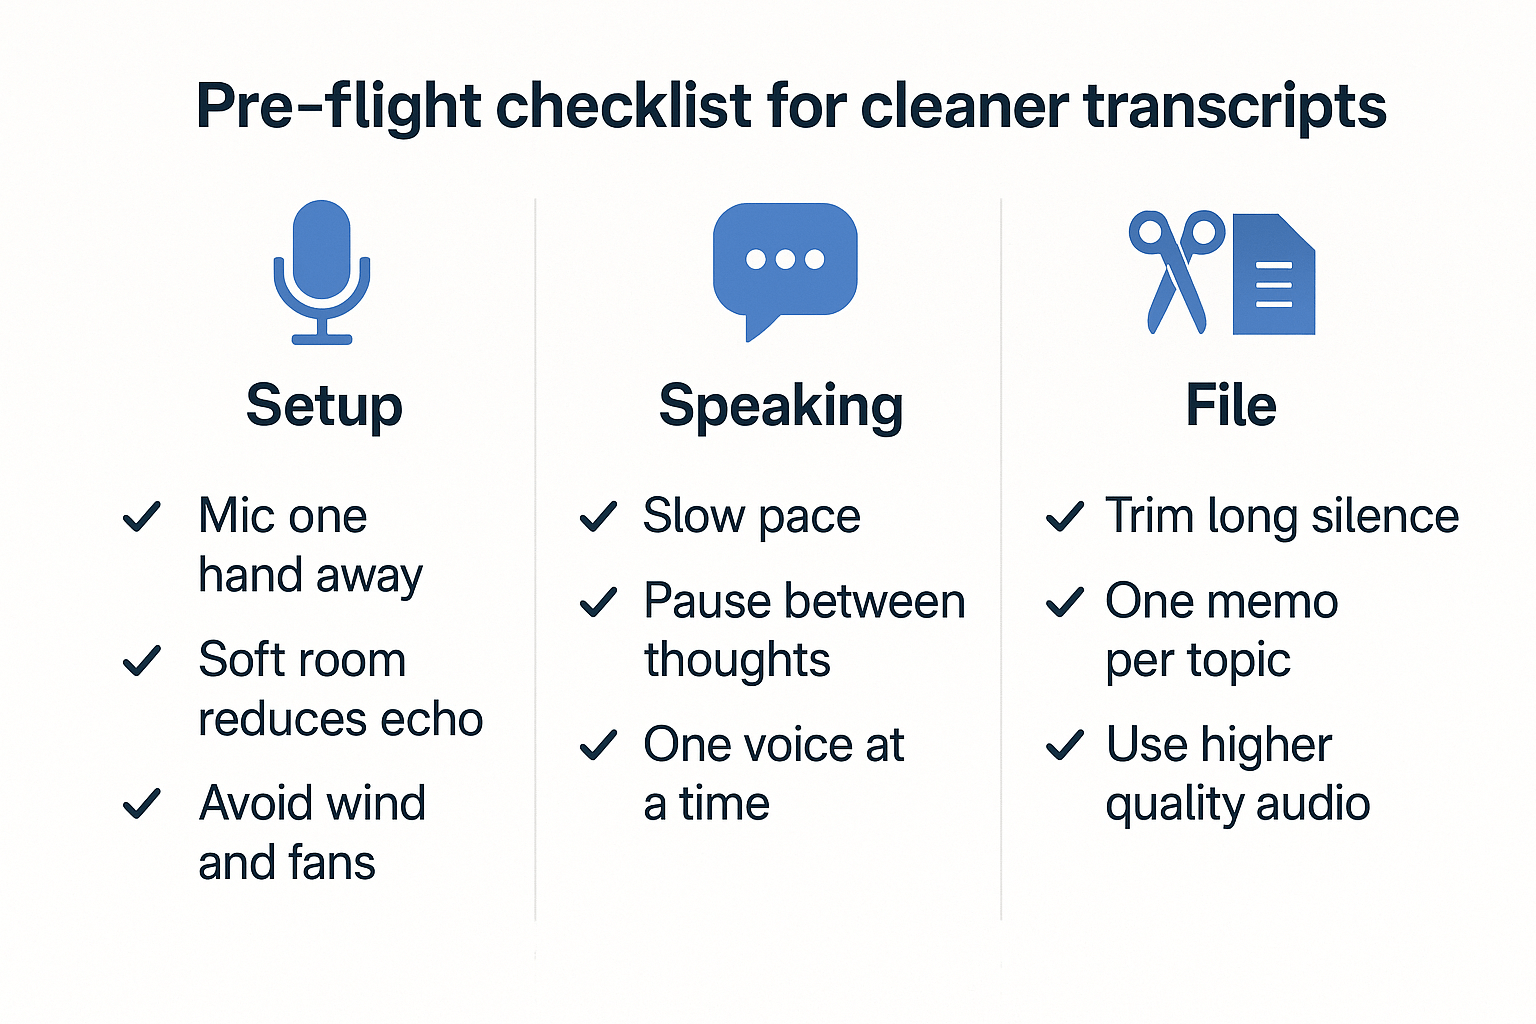
If you want to know how to transcribe voice memos with fewer errors, start with the audio. Clear sound beats a “better” app most days. Use this quick checklist before you hit record, then do a few cleanups before you upload.
Do these before you hit record: setup
- Keep the mic close: about a hand’s length from the mouth.
- Soften the room: curtains, couch, or a towel cuts echo.
- Avoid wind and noise: step away from fans, traffic, and AC.
- Keep the phone steady: set it on a table, don’t wave it.
- One mic zone: have each speaker lean in when talking.
Do these while speaking: delivery
- Slow down a bit: speed causes dropped words.
- Pause between thoughts: short gaps help punctuation.
- Spell names and emails: “Sara, S A R A.”
- Repeat numbers: say “two five” then “twenty five.”
- Don’t overlap: one voice at a time.
Mini-quote box idea: “Mic distance and background noise matter more than the transcription app. Get closer, get quieter, and your accuracy jumps.” (Audio engineer or reporter)
Do these before you upload: file hygiene
- Trim long silence at the start and end.
- Keep one memo per topic: it helps summaries stay focused.
- Pick higher quality when you can: WAV beats low-bitrate audio.
For good speech intelligibility indoors, WHO Environmental Health Criteria 12 (1980) says background noise levels should be less than 45 dB(A) Leq.
Privacy and security checklist before you upload voice memos
Before you upload a voice memo, treat it like a private document. Audio can capture names, faces (by voice), health details, home addresses, and client info by accident. If you want to learn how to transcribe voice memos safely, start by choosing what stays on your phone and what can go to the cloud.
Decide what must stay on-device
Some recordings are too sensitive to share.
- Keep on-device if it includes: medical info, legal matters, kids, passwords, financial data, or confidential work
- If you must share, cut the clip to only the needed part
- Replace names with labels in your notes, like “Client A”
Check the app’s privacy controls before you upload
Do a quick scan first.
- Permissions: allow only mic and file access you need
- Retention: can you delete audio and transcripts, and is deletion clear?
- Security: look for encryption in transit and at rest
- Model use: prefer tools that say “not used to train AI models”
For context, Data protection basics | European Data Protection Board explains that the GDPR defines personal data as any information relating to an identified or identifiable individual, including audio recordings containing sounds of individuals.
Safer sharing for teams
- Don’t post raw audio in public links
- Use project-based access, not “anyone with the link”
- Store transcripts where you can review who has access
TicNote Cloud is private by default and says your data is not used to train AI models, which is a safer baseline for many users.
Troubleshooting: Fix common voice memo transcription problems
If your transcript looks off, don’t start over blindly. Most issues come from four things: messy audio, wrong language settings, upload limits, or formatting choices. Use the fixes below to get clean text fast when you transcribe voice memos.
Problem: Wrong or missing words
- Get closer and speak across the mic, not into it.
- Cut noise, move away from fans, traffic, and clacking keyboards.
- Set the right language first, don’t leave it on auto.
- Do a quick edit pass: names, numbers, and key terms first.
- If the memo is long, split it into 5 to 15 minute parts.
Problem: Upload fails or the file won’t import
- Re-export to a supported audio format, then try again.
- Save the file to Files (iOS) or Drive (Android), then upload.
- Shorten very long recordings; some tools time out.
- Switch networks, then retry on a stable Wi-Fi connection.
- Rename the file with simple letters and numbers only.
Problem: Wrong language, accents, or niche jargon
- Pick the language manually, especially for bilingual audio.
- Add a short note with spelling for names and jargon.
- Split by topic so terms stay consistent in each chunk.
- If accuracy stays low, try a tool tuned for your domain.
Problem: Multiple speakers aren’t separated
- Turn on diarization (speaker labels) if the tool has it.
- If not, label turns itself: “Speaker 1:” “Speaker 2:”.
- Record speakers closer and avoid one person far away.
- Ask each speaker to pause before replying; it helps.
Problem: Exports look messy or formatting breaks
- Use TXT for raw text you’ll edit.
- Use Markdown, DOCX, or PDF for share-ready notes.
- Check timestamp settings before you export.
- Keep headings consistent; it improves summary structure.
When to switch methods
If you hear constant overlap, heavy wind, or loud music, switch. Re-record key parts in a quiet room, or use a human transcription service for critical legal, medical, or published work.
