TL;DR: A simple podcast launch plan (24 hours vs 30 days)
If you want to learn how to create a podcast fast, you can try TicNote Cloud for free to capture your recording, turn it into clean notes, and keep your launch tasks in one place.
You'll hit record, then lose time rewriting notes and hunting for "final" files. That slows your launch and makes you second-guess every step. A practical fix is to use TicNote Cloud to record, transcribe, and save your episode plan, outline, and assets in one project.
- Start in 24 hours (minimum viable): pick a narrow topic, record a 10 to 20 minute pilot, write a 2 to 3 sentence show description, publish on one host, then share it in one channel.
- Build a 30-day pro launch: batch 3 to 5 episodes, lock your name and cover art, publish a short trailer, and reuse one editing and publishing checklist every time.
- Prep before you hit record: a one-page listener promise, a basic outline, a quiet-room plan, a backup recorder, and a simple folder setup for audio and notes.
How to create a podcast from scratch (step-by-step)
If you want to learn how to create a podcast, start with a plan you can repeat. Your first win is not a perfect trailer. It's a topic, format, and episode template you can keep using.
Pick a topic you can sustain for 20+ episodes
Choose something you can explain over and over. A good topic feels narrow enough to focus, but wide enough for lots of angles.
Do this fast exercise:
- Set a 20-minute timer.
- Write 20 episode ideas as short titles.
- Circle the 5 you'd want to record tomorrow.
Then validate it with one quick test:
- Can you name 5 potential guests you could realistically invite?
- Or can you list 5 real questions your audience asks (emails, DMs, support tickets, comments)?
If you can't do either, the topic may be too vague.
Choose a format (solo, interview, narrative) and a cadence
Your format changes your workload more than your gear does. Pick the style that fits your time, energy, and editing comfort.
- Solo: fastest to schedule, hardest to stay "on" each week.
- Interview: easier to talk, more time on booking and prep.
- Narrative: most polished, most editing and scripting.
Next, set a cadence you can defend on your worst week:
- Weekly if you can batch record.
- Biweekly if you have a day job.
- Monthly if research is heavy.
Also pick a minimum length you can maintain. For many beginners, 12 to 25 minutes is realistic.
Define your listener promise (who it helps + outcome)
Write one sentence and don't overthink it:
"This show helps [who] achieve [result] by [method]."
Example: "This show helps new managers run better 1:1s by using simple weekly habits."
Use that promise in two places:
- Your show description
- Your episode filter (if an idea doesn't fit, it's a no)
If you want to store this promise, your audience questions, and your episode backlog in one place, build it like a simple notes system. This is the same logic used in a second-brain workflow for teams.
Outline your first 3 episodes and a simple season plan
Start with three episodes so you're not making decisions under pressure.
Use a repeatable template:
- Hook (what they'll get)
- 3 main points
- Takeaway (one sentence)
- CTA (what to do next)
Now outline:
- Episode 1: Why this show exists (your story, the promise, what to expect)
- Episode 2: Your core framework (your "how" in 3 to 5 steps)
- Episode 3: A quick win (one small result they can get today)
Finally, sketch a lightweight season map:
- Theme for the next 8 to 12 episodes
- A short guest wish list (even if you start solo)
- A backlog list (ideas you can grab when you're stuck)
Beginner checklist (5 minutes):
- Topic picked and validated
- Listener promise written
- Format chosen
- Cadence chosen
- First 3 episode outlines drafted
- Recording date on your calendar
What podcast format should you choose, and how does it change your workflow?
Your format choice decides your weekly workload. It changes your gear, your editing time, and how easy it is to reuse clips. Pick a format you can ship every week, even on busy days.
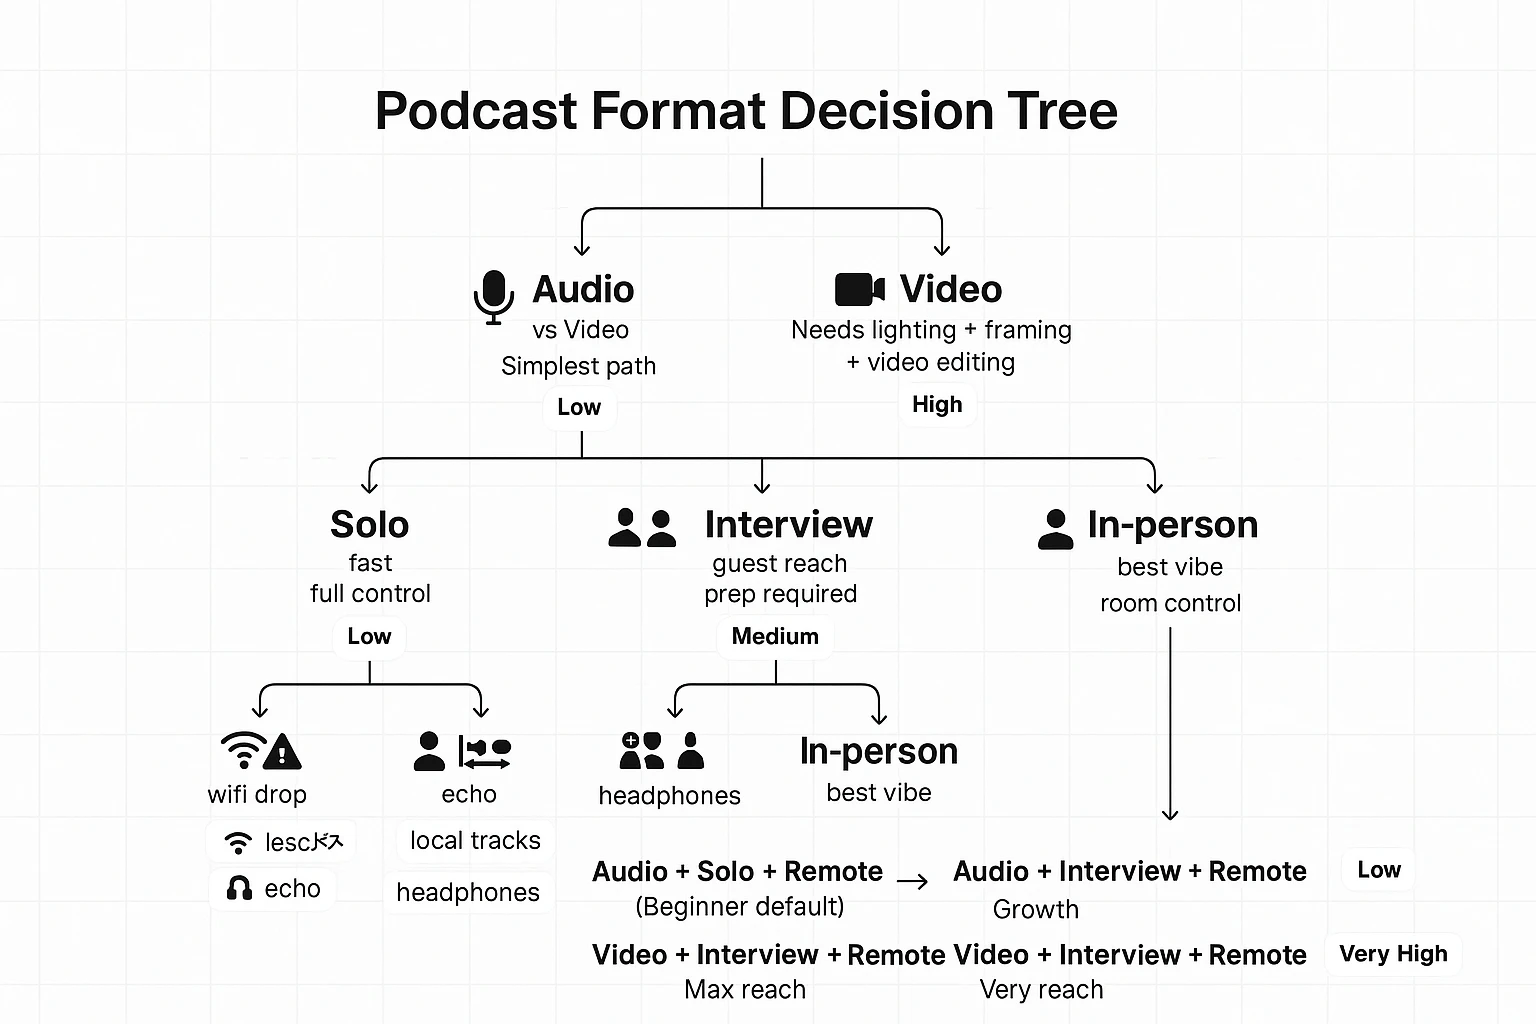
Decision tree: audio vs video
Start with where you want to be found.
- If your main channel is YouTube or social, consider video.
- If your main channel is audio apps and search, go audio-first.
Pick audio-first if you can't commit to lighting, framing, and video edits. Audio is also easier to fix when a guest's setup is bad.
Decision tree: solo vs interview vs co-host
Solo (fastest)
- Pick this if you want speed and full control.
- Best when you have clear topics and opinions.
Interview (best for growth)
- Pick this if you want guest reach and shared promotion.
- Best when you can prep questions and manage follow-ups.
Co-host (best energy, more overhead)
- Pick this if you need live banter to stay interesting.
- Best when you can schedule reliably and agree on roles.
Decision tree: remote vs in-person
Remote gets you more guests, faster. In-person often sounds and feels better.
Remote risks and fixes:
- Internet drops: record local tracks (double-ender) when possible.
- Echo: use headphones and get closer to the mic.
- Tech failure: run a backup recorder or backup app.
For more on remote workflows, use these remote meeting best practices for scheduling and run-of-show.
Time and editing effort by format (quick comparison)
| Format | Planning time | Recording complexity | Editing load | Repurposing potential |
| Audio solo | Low | Low | Low to medium | Medium |
| Audio interview (remote) | Medium | Medium | Medium | High |
| Audio co-host (remote) | Medium | Medium | Medium | High |
| Video solo | Medium | High | High | Very high |
| Video interview (remote) | High | High | Very high | Very high |
Default for beginners: audio-first, solo or interview, remote.
No matter what you choose, capture these during recording to save hours later: clean audio, clear consent to record, quick notes on key moments, and simple timestamps for edits and show notes.
What equipment do you need at different budgets (and how do you treat your room cheaply)?
Before you buy gear, lock in two things: mic placement and a quiet, non-echo room. That combo can beat a pricey mic in a bad space. Here's a simple way to think about what you need to create a podcast without overspending.
Gear tiers: under 100 to 300+
Under $100 (start today):
- Use your phone or laptop plus wired earbuds with a mic.
- Record in a closet or under a blanket "tent."
- Buy later: mic stand or boom arm, pop filter.
$100 to 300 (best value):
- A USB mic plus a simple desk stand or boom arm.
- Closed-back headphones for clean monitoring.
- Buy later: shock mount, acoustic panels.
$300+ (pro and scalable):
- An XLR mic, an audio interface, and one good XLR cable.
- Best if you'll run two mics, upgrade later, or want more control.
- Buy later: inline preamp if your mic needs more clean gain.
Mic types explained (USB vs XLR) and when each wins
USB mics win for speed. Plug in, pick the mic in your recording app, and go. It's great for solo shows, first interviews, and tight desks.
XLR mics win for flexibility. You can swap mics, add a second mic, and control gain (input level) on the interface.
Quick gain staging basics: talk at your loudest, then set gain so peaks stay safe. If your interface is noisy, turning up gain can add hiss. That's why interface quality matters.
Headphones, pop filter, and basic monitoring
Use closed-back headphones so sound doesn't leak into the mic. Add a pop filter (or foam windscreen) to tame P and B blasts.
Do this quick test each session:
- Record a 10-second sample.
- Say a few loud words.
- Listen back on headphones.
If you hear crunch, lower gain. If it's thin and roomy, get closer.
Budget room treatment (noise, echo, placement)
Pick the quietest room first. Turn off fans, AC, and buzzing lights. Soft stuff reduces echo fast: rugs, curtains, and a full closet.
Mic placement matters more than foam. Keep the mic close (about a hand span), aim it slightly off to the side, and keep your mouth level with the capsule. If your room sounds "hollow," move away from bare walls.
| Category | Must-have (don't skip) | Nice-to-have (buy later) |
| Recording | Any working mic, stable position | Backup recorder, second mic |
| Sound control | Quiet room, close mic placement | Panels, reflection filter |
| Monitoring | Closed-back headphones | Headphone amp |
| Voice clarity | Pop filter or foam | Shock mount, premium stand |
How to record and edit your first episode (remote or in-person)
If you can follow a simple checklist, you can record clean audio and ship your first episode. The goal is not perfect sound. It's a repeatable workflow you can do every week, whether you're solo, in-person, or on a remote call.
Pre-record checklist (5 minutes)
Do this before you hit record:
- Write a one-page outline: hook, 3 to 5 points, close
- Pick the quietest room, and close doors and windows
- Charge batteries, plug in laptops, and free up storage
- Turn off notifications (phone and computer)
- Record a 10-second test, then play it back in headphones
- Set a backup plan: a second recorder, or record a second track
Recording basics (solo or in-person)
Keep your mic close. Aim for about a fist's distance from your mouth. Talk slightly across the mic, not straight into it. That cuts harsh "p" and "s" sounds.
Before you start, record 10 seconds of room tone (the sound of your space). It helps later when you need to fill tiny gaps.
When you mess up, don't stop. Mark it. Clap once, or say "cut here," then redo the line. That habit makes editing much faster.
Remote interviews that don't sound like a robot call
Remote audio can be great if you control the basics:
- Ask guests to wear headphones to stop echo
- Have them close other apps and browser tabs
- Have them sit close to their mic and speak at a steady level
- Prefer local recording when possible (each person records their own audio)
- Capture consent on tape at the start (permission to record and publish)
Editing basics (keep it simple)
For your first edit, only do these three things:
- Cut long silences and tangents
- Remove obvious mistakes and repeated lines
- Reduce harsh noises (big breaths, loud clicks, bumps)
If you know how, use light EQ (tone shaping) and light compression (evens volume). Then normalize to a consistent loudness target. Spoken-word podcasts often use LUFS (a loudness unit), and standards work is based on K-weighting, which Recommendation ITU-R BS.1770-4 (10/2015): Algorithms to measure audio programme loudness and true-peak audio level describes as applied before loudness and true-peak calculation.
Music, assets, and export settings
Keep intros short (about 5 to 12 seconds). Outros can be a bit longer if you include a clear next step.
Don't use copyrighted music unless you have a license. Save the license file and note where you bought it.
Export like this:
- MP3 for publishing (smaller file)
- WAV for an archive (best quality)
- Mono for voice-only to save size; stereo if music matters
- Plan chapter markers and timestamps from your outline
"Good enough" rubric (publish when this is true)
Stop editing and publish when:
- Voices are clear in headphones and phone speakers
- Volume is steady (no sudden jumps)
- No long dead air (over 2 seconds) without a reason
- The first 60 seconds are tight and get to the point
- You fixed the top 3 mistakes listeners would notice
Podcast hosting and distribution: what to pick (with a comparison table)
Podcast hosting is where your episode audio files live. Your host also creates an RSS feed (a simple update file) that lists your show, episodes, titles, and file links. Podcast apps like Apple Podcasts and Spotify read that RSS feed and display your show in their directory.
What to look for in a host
Most beginner pain comes from picking a host that's hard to move later. Prioritize these basics:
- Ownership and portability: You can redirect your RSS feed if you switch hosts.
- Analytics quality: Clear downloads, episode trends, and listener apps.
- Private feeds: Great for paid shows, courses, or internal teams.
- Team access: Roles and permissions if more than one person publishes.
- Dynamic insertion: Swap ads or announcements without reuploading.
- Reliability: Fast download delivery and low downtime.
| Hosting feature category | What it affects | What "good" looks like for beginners |
| Portability | Switching hosts later | RSS redirect support; you keep your feed URL |
| Analytics depth | Knowing what's working | Episode-level trends; app and device insights |
| Monetization options | Ads and paid feeds | Optional, not required; can add later |
| Website/player | Sharing episodes | Clean player; simple show page |
| Limits | Growth and costs | Clear caps on storage or hours; fair overages |
Directory checklist (what you need to submit)
Before you submit, prepare: show title, short description, long description, cover art, category, language, and your RSS feed link.
Start with Apple Podcasts and Spotify. Then add YouTube Music, Amazon Music, Pocket Casts, Overcast, and Castbox if your host doesn't auto-submit.
Launch strategy: 1 episode vs a 3-episode drop
One episode is fine if you can publish weekly right away. A 3-episode drop helps new listeners sample your show fast. Either way, consistency beats a big splash.
Decision rule: If you want maximum portability, prioritize RSS control. If you want simplicity, pick an all-in-one publisher.
Podcast cover art, titles, show notes, and metadata (the technical specs that matter)
These details decide if people click, if apps index you right, and if your episode feels "real." Get them set once, then reuse templates.
Make cover art that's readable at thumbnail size
Most people will see your art at about the size of a postage stamp. Keep it simple.
- Size: 3000 x 3000 px (square)
- File: JPG or PNG, RGB color
- Design rules: high contrast, 1 focal point, 3 to 5 words max, thick fonts
Write titles that earn clicks without clickbait
A strong title = benefit + specific topic. Put the keyword early, keep it skimmable, and avoid vague hooks.
Examples:
- "Launch a podcast in a week: the minimal gear setup"
- "Remote interviews that sound clean: a simple workflow"
Use guest names only if they're known to your audience or add trust.
Use a 2 to 3 sentence description template
Show description (podcast level):
- Promise: what the show helps you do.
- Proof: your experience or format.
- Who it's for: the listener.
Episode description:
- 2 sentences: what you'll learn + why it matters.
- Bullets: 3 to 6 takeaways.
Set metadata so apps categorize you correctly
Fill out: episode title, author, show name, categories, explicit flag, and artwork. Use season and episode numbers if you publish in seasons. ID3 tags (embedded audio info) help players display the right title and art.
Add accessibility that also boosts SEO
Transcripts help listeners search, skim, and follow along. For prerecorded audio, Web Content Accessibility Guidelines (WCAG) 2.2 (2023) says an alternative for time-based media is required. Add chapters or timestamps for fast navigation, too. If you need a workflow, use this guide to transcribe podcast audio into usable text before you publish.
Metadata mini-checklist (every episode)
- Correct title format and episode number
- Explicit flag set correctly
- Categories chosen once and consistent
- Show and episode descriptions added
- Cover art meets size and file rules
- ID3 tags match what your host displays
- Transcript + chapters or timestamps included
Create transcripts, show notes, and clips faster: a repurposing workflow (with TicNote Cloud)
A fast way to create a podcast is to plan your repurposing before you hit record. One good conversation can fuel your episode, show notes, and a week of posts. The trick is using a simple pipeline you can repeat.
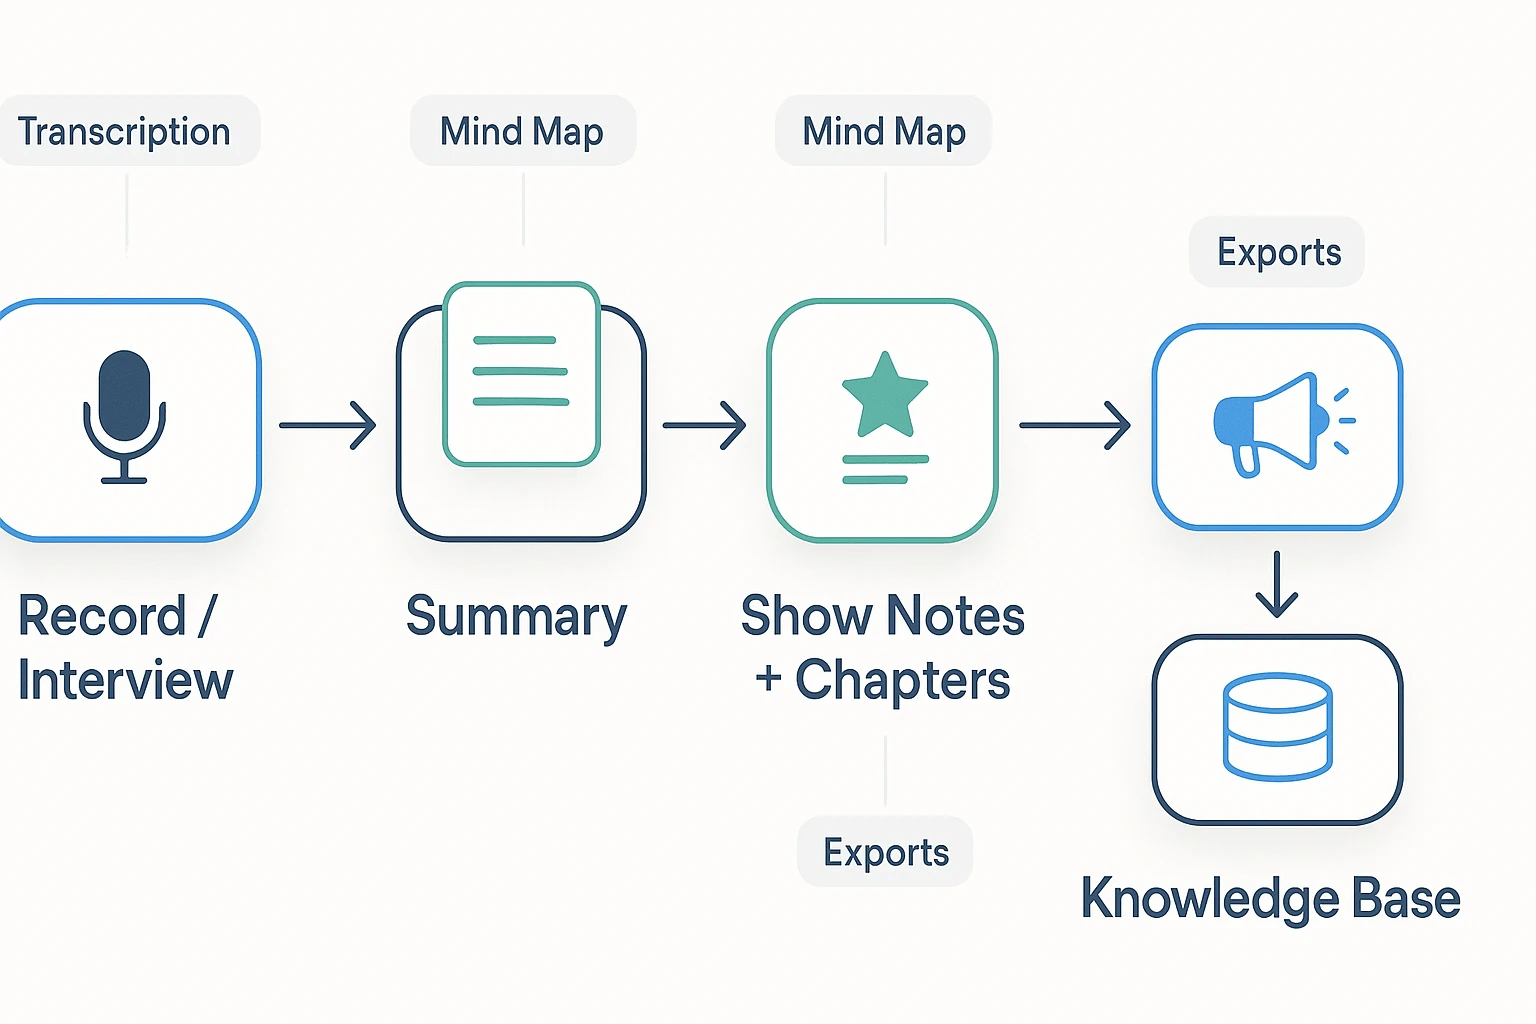
The "one recording, many assets" pipeline
Here's a clean flow that works for solo shows and interviews:
- Record or interview
- Create a transcript
- Write a short summary and outline
- Build show notes and chapters (with timestamps)
- Pull quotes and "clip moments"
- Draft social posts and newsletter blurbs
- Save the best bits into a searchable knowledge base
When you treat your episode like source material, you stop starting from scratch.
Where beginners lose hours (and how to avoid it)
Most time waste comes from re-listening. Not because you love your own audio. But because you can't find the good parts.
Common traps:
- Messy notes spread across docs, DMs, and notebook pages
- Missed timestamps (so chapters and clips take forever)
- Forgetting the best story or insight until it's too late
- Writing show notes from memory instead of the actual wording
A transcript fixes most of this. It turns audio into something you can scan, search, and reuse.
How TicNote Cloud fits into the workflow
TicNote Cloud works best when you use it as your episode "home base." Put each show or season in its own project space. Store the guest bio, research links, recording, and the outputs together.
A simple repeatable flow:
- Upload your audio or video to generate a transcript.
- Turn that transcript into a structured outline and summary using note templates.
- Use a mind map to spot themes and segment ideas fast.
- Translate key quotes for multilingual audiences.
- Export your final assets to Markdown, DOCX, or PDF for publishing.
If you want a deeper primer on summaries, this guide to how AI summarizers work and how to trust them helps you avoid vague, "fluffy" outputs.
TicNote quick wins you can use every episode
- Use templates to keep episode notes consistent: hook, segments, CTAs, links, and resources.
- Use cross-file Q&A to find recurring themes across episodes. This is perfect for season recaps, listener FAQs, and "best of" posts.
- Keep one project per show or season so you don't lose assets when your backlog grows.
Try TicNote Cloud for Free and turn one recording into transcripts, notes, and ready-to-publish assets.
How to create show notes and summaries step by step
The steps below are demonstrated using TicNote Cloud as an example workflow. The same process works in any tool: get a clean transcript, then turn it into a summary, scannable notes, and promo text.
Step 1: Upload your recording (Web)
Start with your finished episode audio, or the raw interview. In the TicNote Cloud web studio, create a new project, then click Upload to add your file (audio, video, or even docs).
Use a consistent name so you can find it later: ShowName_Ep##_Guest_Date.
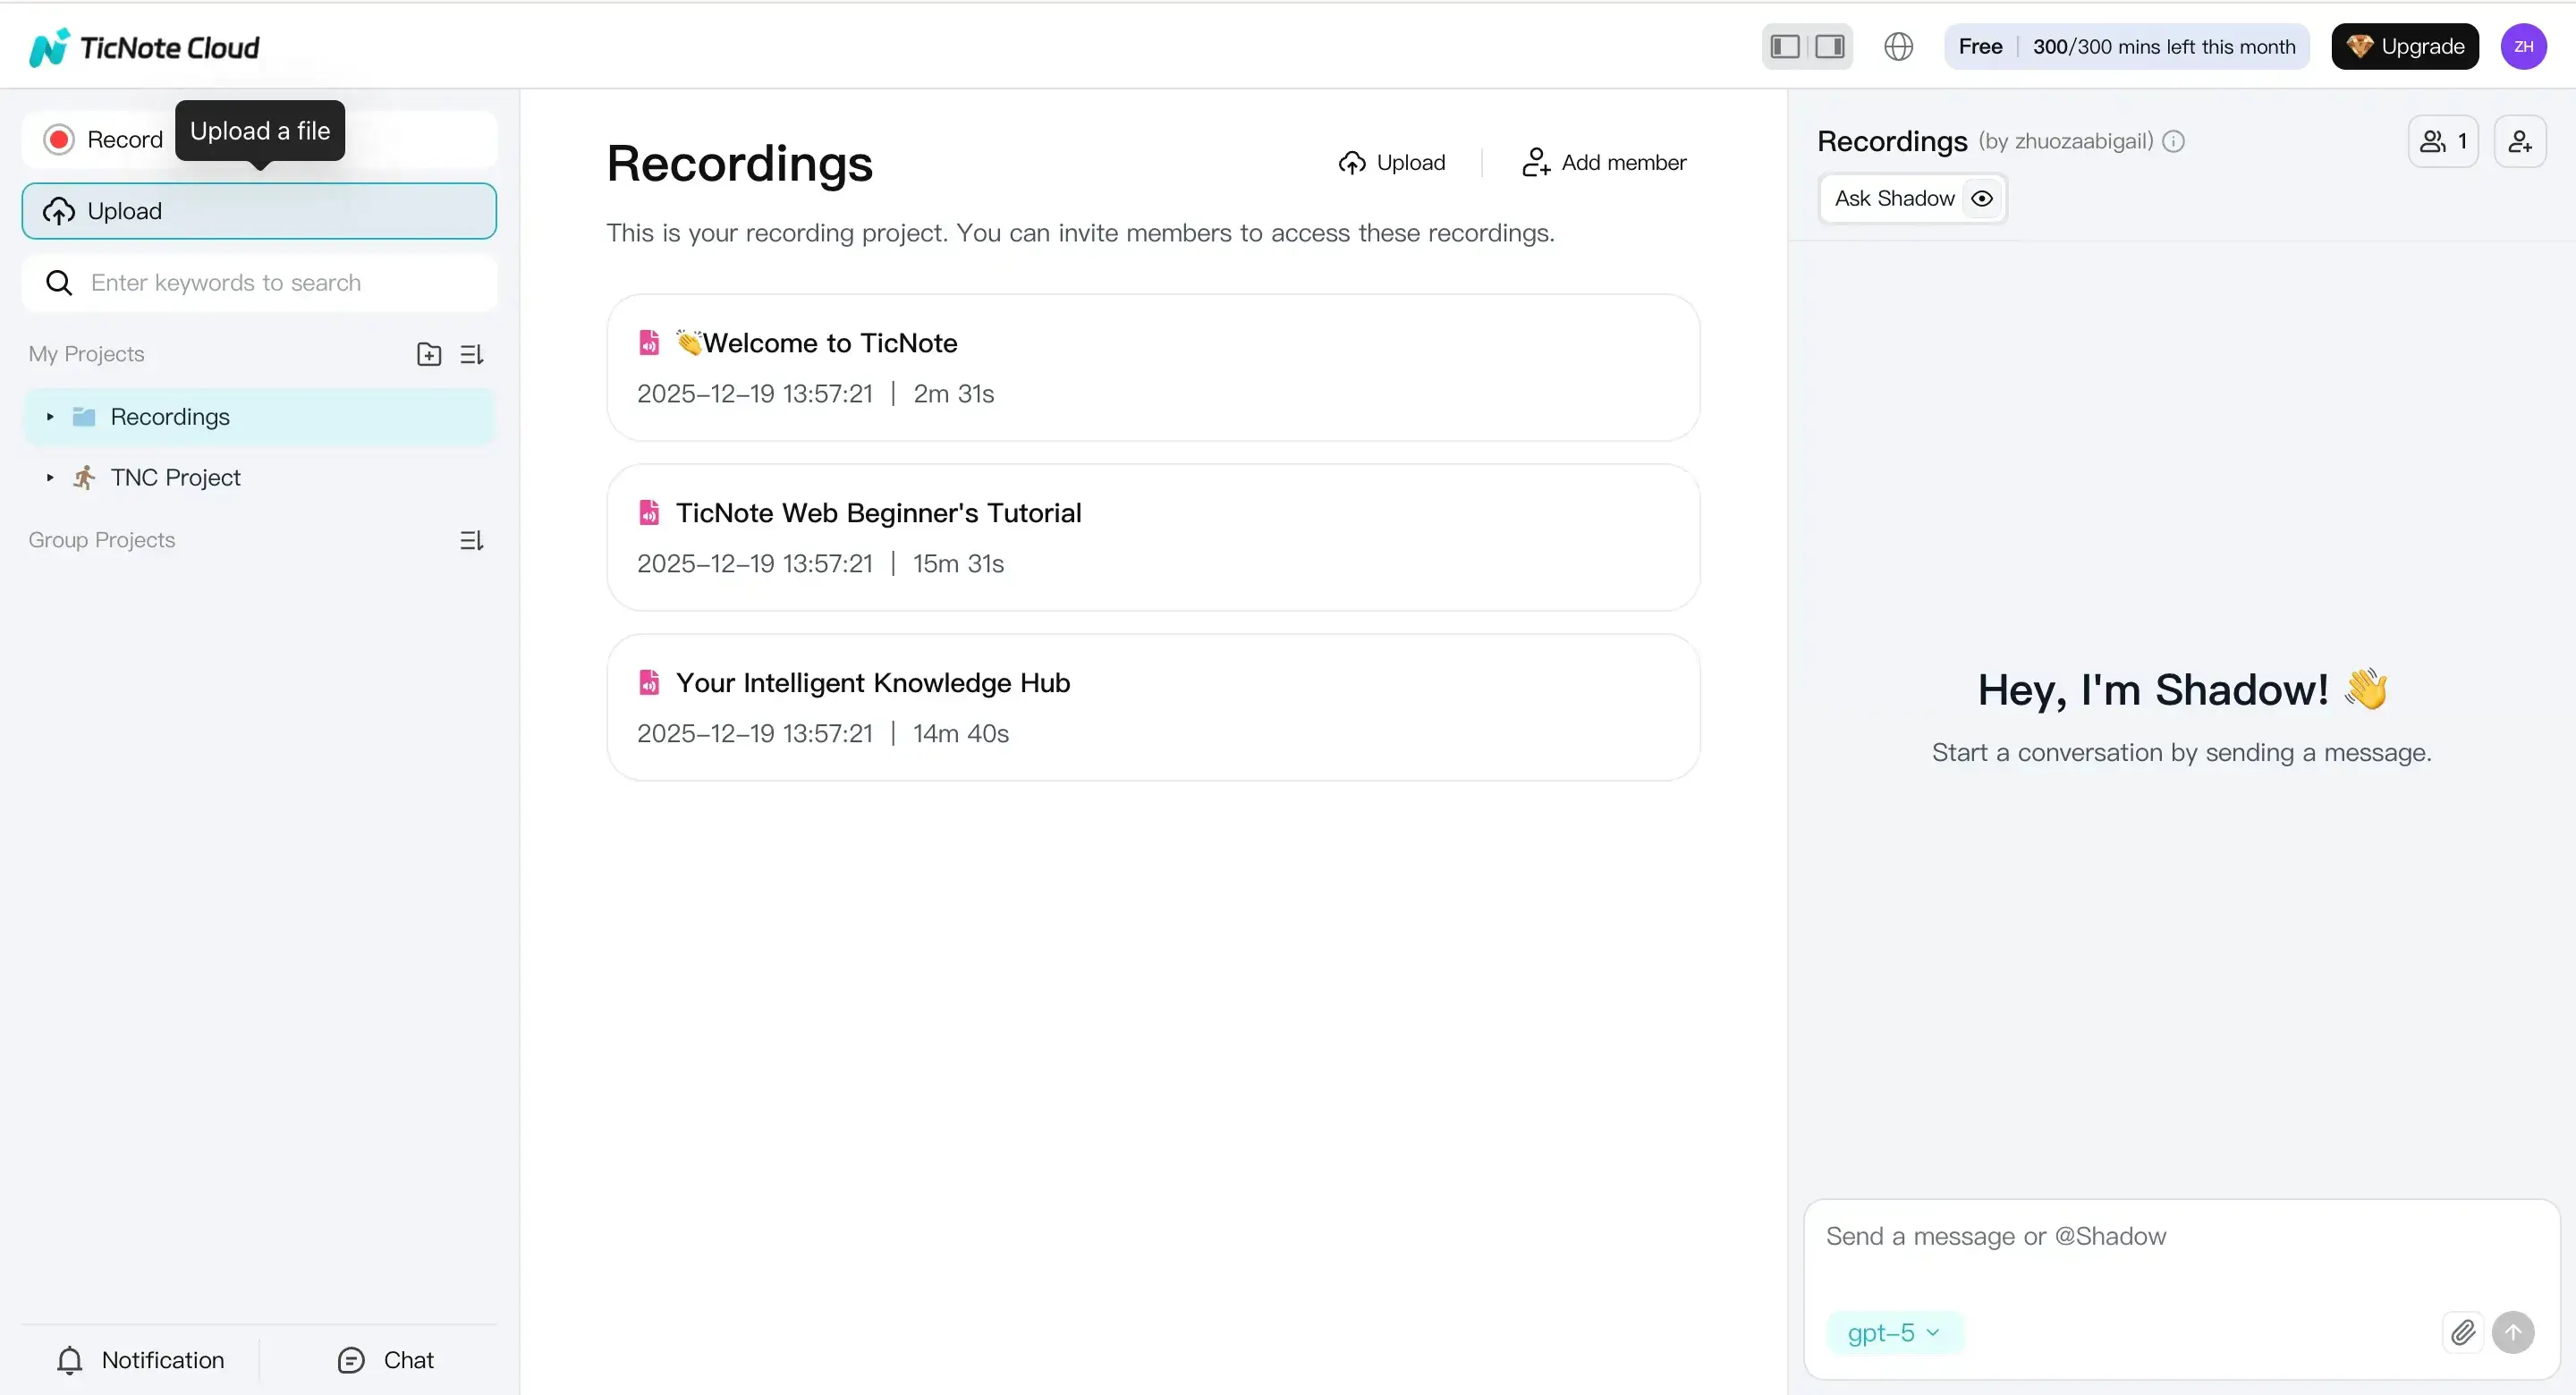
Tip: Most editors export MP3 or WAV. If your tool accepts "audio/video files," you're covered.
Step 2: Generate the podcast outputs (Web)
Once the file is in, generate the transcript first. Then create your core publishing assets:
- Episode summary (5 to 10 lines)
- Scannable show notes (bullets, links, and takeaways)
- Chapter list with timestamps
- Pull quotes (2 to 6 strong lines)
- Short promo blurb (social caption style)
In TicNote Cloud, open the Podcast tab to view the generated audio and transcript, then export from the menu.

Before you paste anything into your host, do a fast skim for names, numbers, and URLs. This is also where meeting transcription basics help you spot common errors.
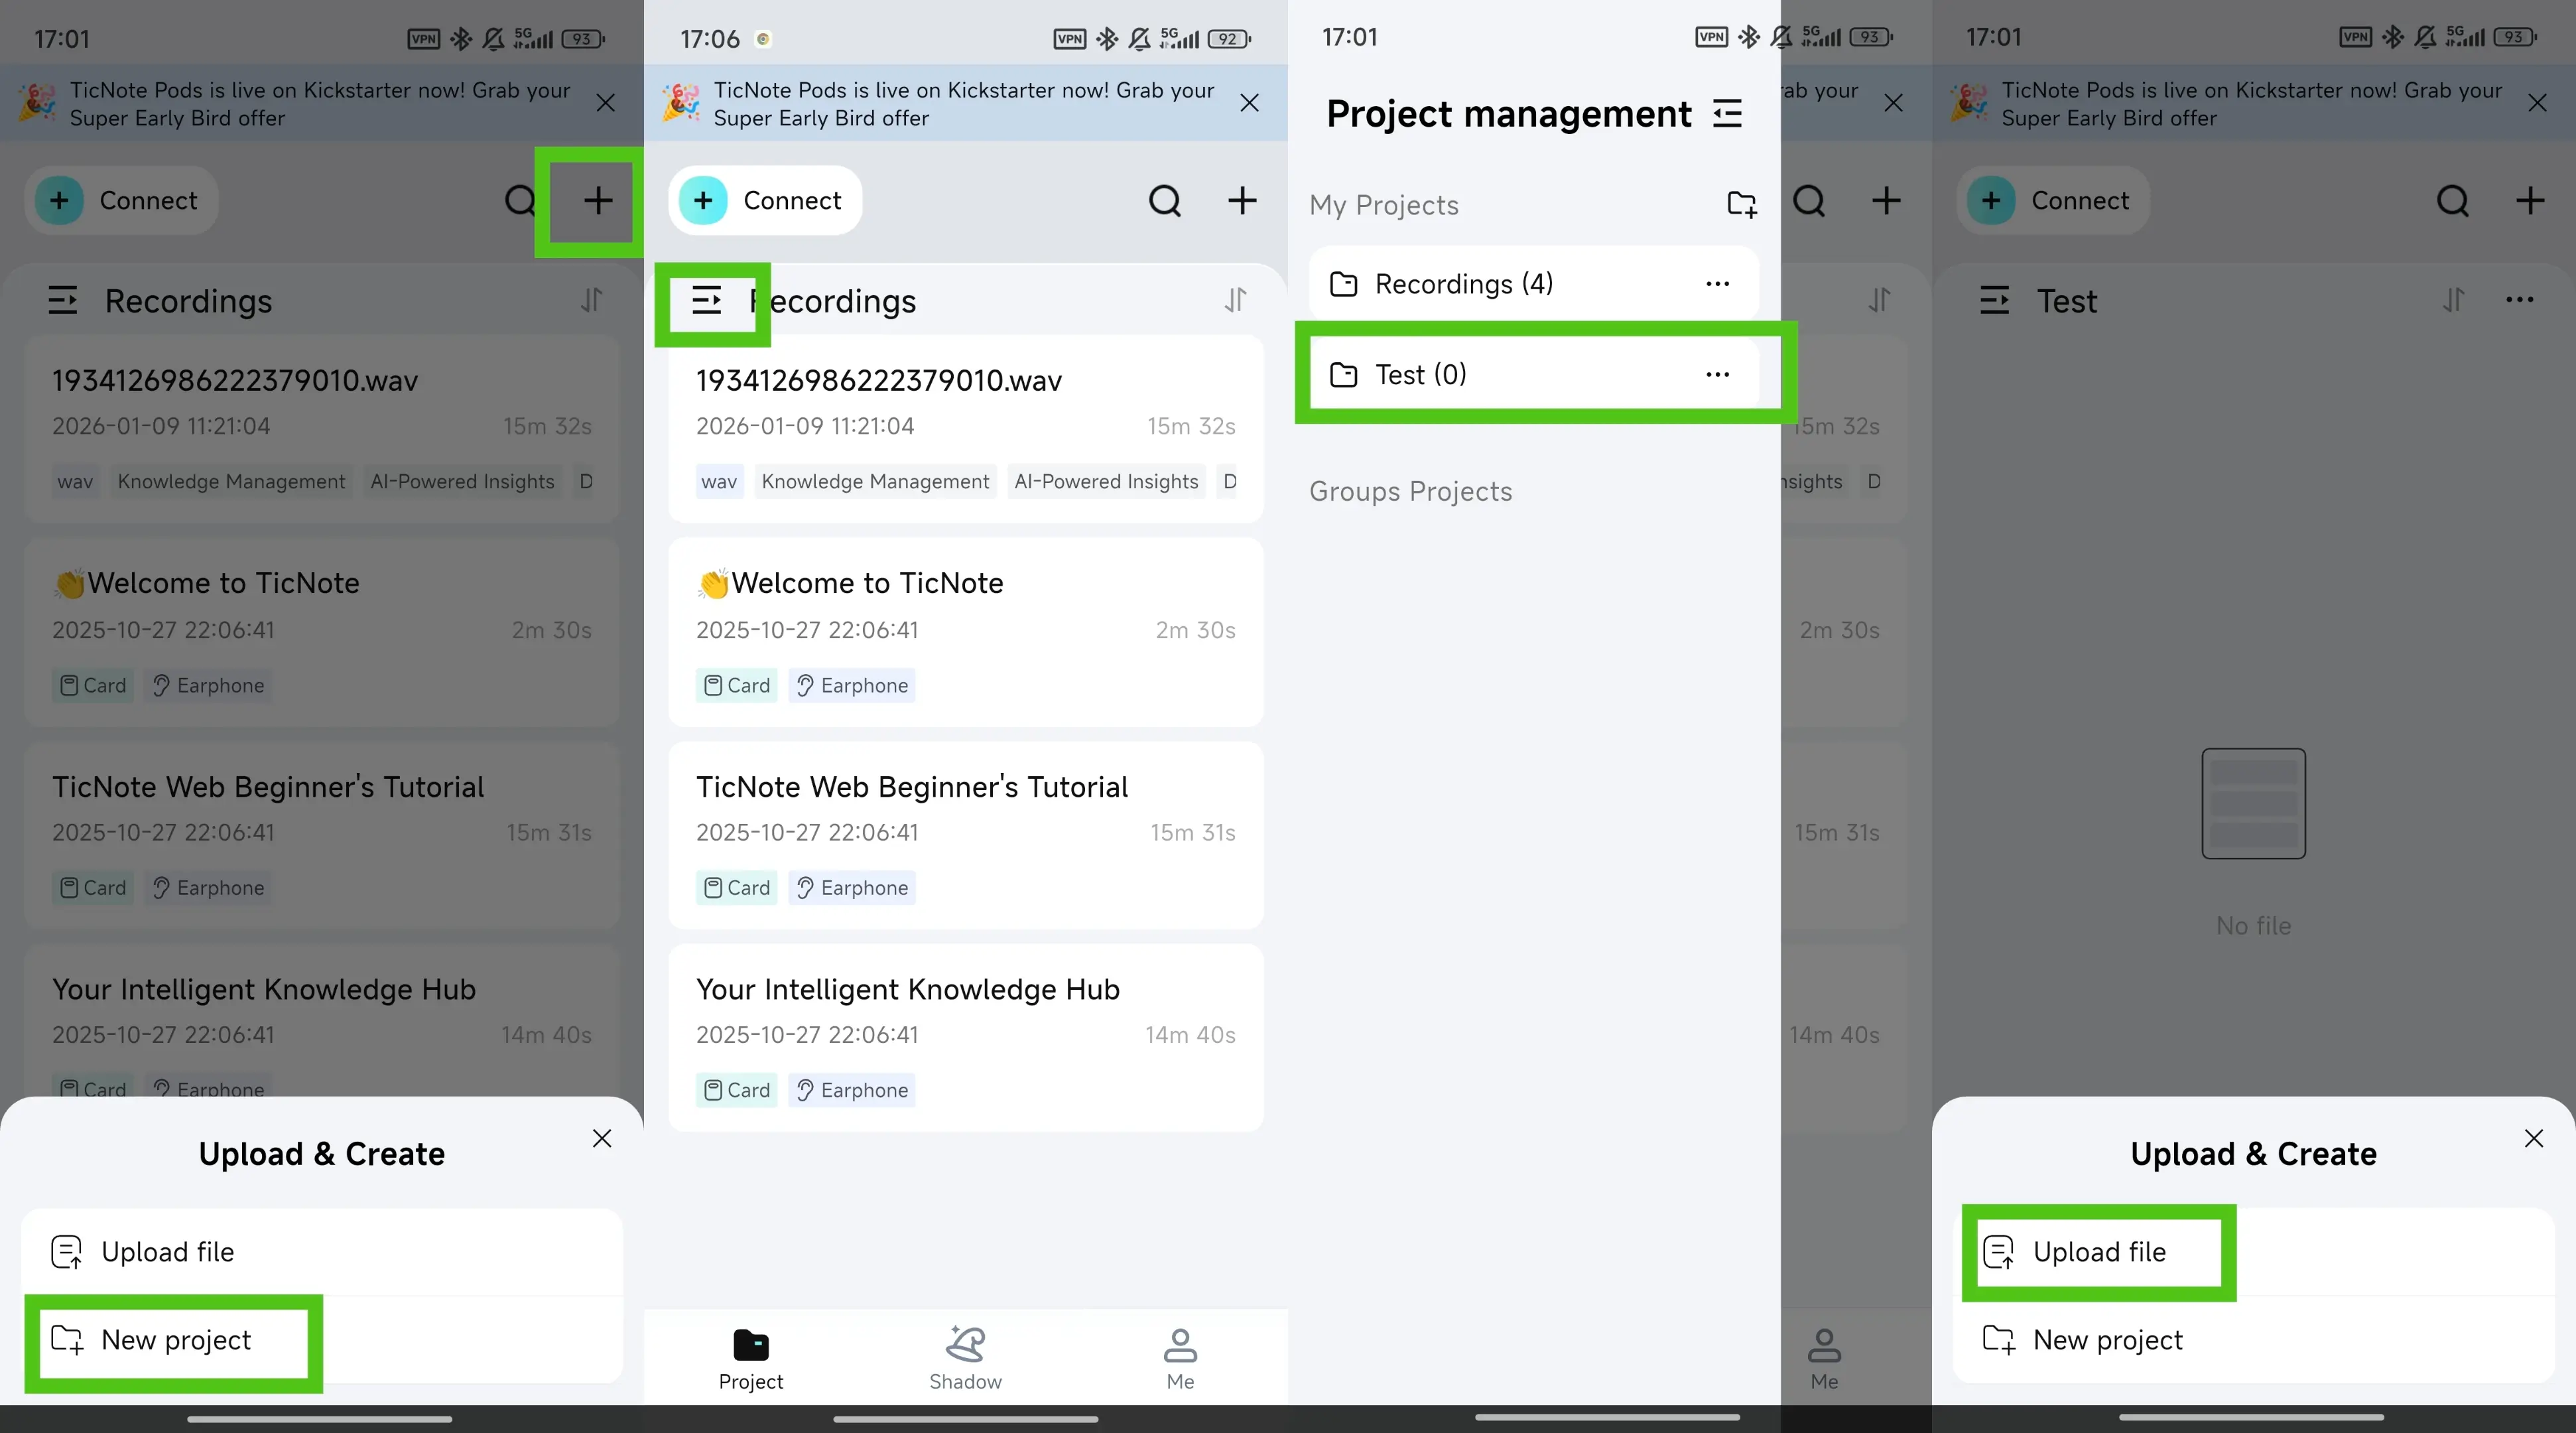
App workflow (summary)
If you're on the go, you can upload from your phone, review the transcript, make quick edits, and share exports to your publishing tool. Open the app, tap add, choose a project, and upload.
Micro-checklist (accuracy and safety)
- Guest name spelling (and company/title)
- Resources mentioned (books, tools, links)
- Sponsor reads match the approved script
- Remove sensitive info (phone, email, private client names)
Generate your first AI summary in minutes
Pre-publish QA checklist + common mistakes to avoid
The last 15 minutes before you hit Publish can save you days of fixes. Use this quick QA pass to catch broken links, missing metadata, and audio issues before they reach listeners (and podcast apps).
Last 15 minutes before publish (QA checklist)
| Area | Quick check | Pass criteria |
| Audio | Listen to first 60 seconds | No clipping, no hiss spikes, voice is clear |
| Audio | Scan the full timeline | No missing sections, no long dead air |
| Audio | Intro and outro | Correct music, calls to action, and credits |
| Metadata | Episode title | Matches what you say in the intro |
| Metadata | Episode number and season | Consistent with your naming system |
| Metadata | Explicit flag | Marked correctly for language and topics |
| Links | Guest and resources | All URLs work and point to the right pages |
| Links | Tracking or short links | Optional, but consistent across episodes |
| Cover art | Image file and crop | Looks sharp, not cut off, correct artwork |
| Notes | Show notes | Includes key points, links, and timestamps if used |
| Notes | Transcript | Present, readable, and not missing speaker names |
| Schedule | Publish date and time zone | Correct day, time, and time zone selected |
Common mistakes (and how to prevent them)
- Recording too far from the mic: get close (about a hand's width) and speak across the mic, not into it.
- Inconsistent naming and numbering: pick one format (S1E03, Ep 3, etc.) and keep it forever.
- Over-editing: don't remove every breath; aim for "easy to listen to," not "perfect."
- No clear listener promise: make the episode topic obvious in the first 20 seconds.
- Forgetting legal and consent steps: decide your consent script before you record.
- Not saving source files: keep raw audio, project files, and exports in one folder.
Risk and legal guardrails (beginner-friendly)
- Get consent to record, especially for remote interviews.
- Disclose sponsorships and paid promotions in plain language.
- Avoid copyrighted music unless you have a license.
- Treat personal data carefully (emails, addresses, health info).
- Get permission before you reuse guest clips in ads or trailers.
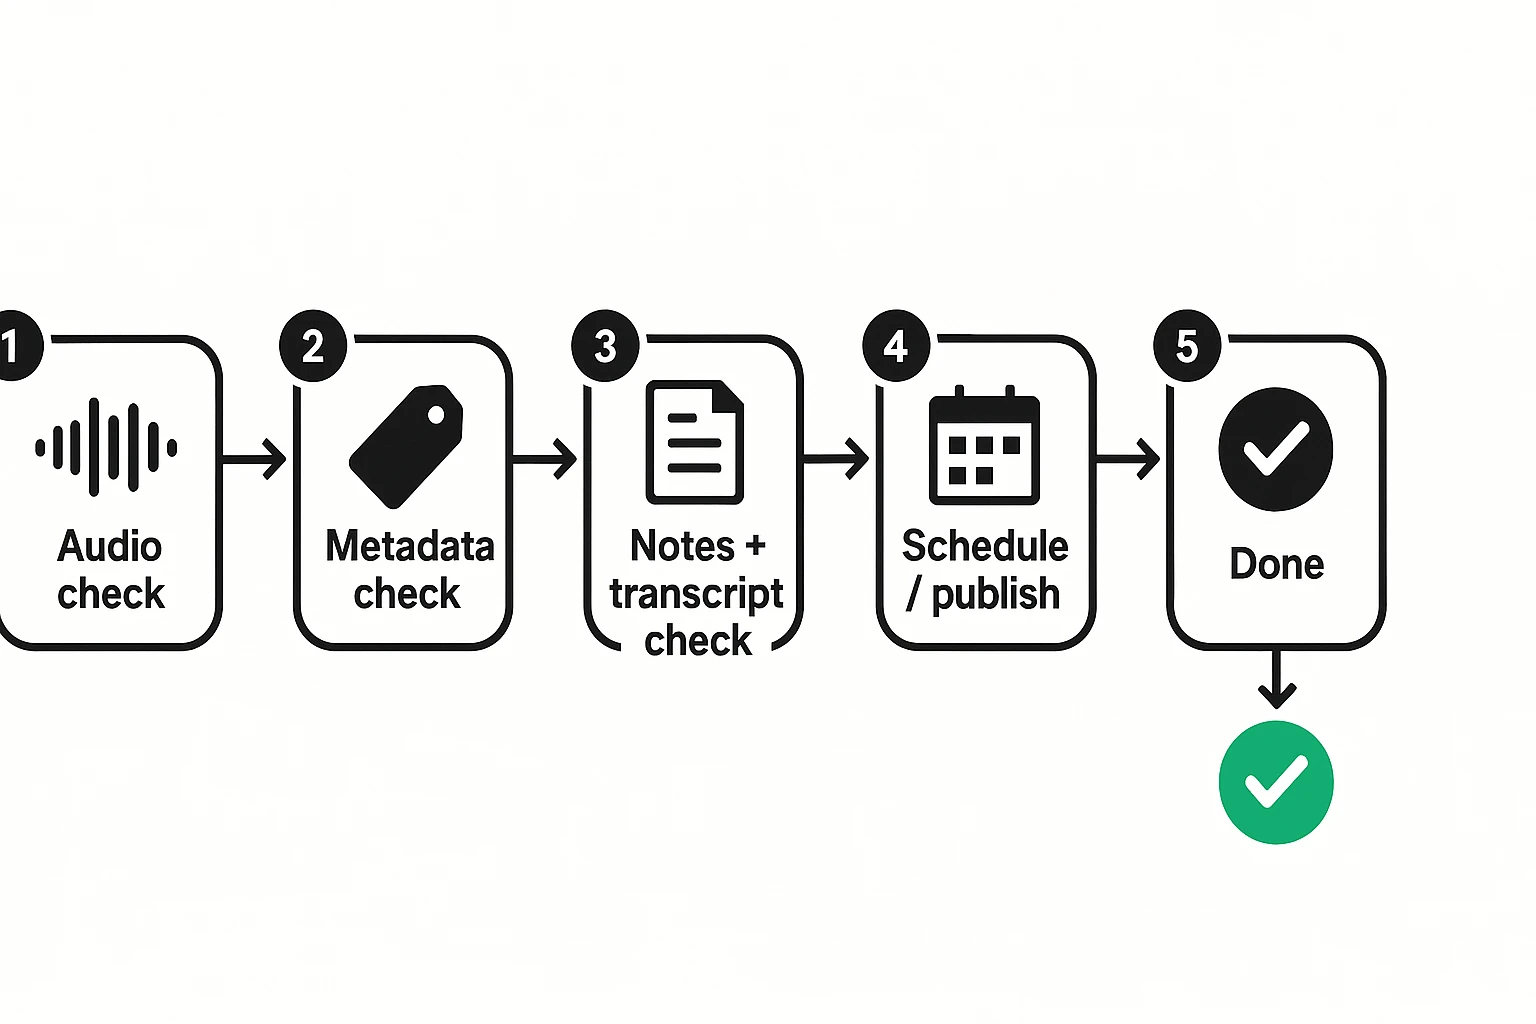
Your repeatable "definition of done"
You're done when: audio is clean, metadata is consistent, notes and transcript are included, links work, legal boxes are checked, and the schedule is correct. Ship only when all seven are true.