

![[Tested] How to Record and Transcribe on iPhone (2026 Guide)](https://cdn-digitalhuman-pb.weta365.com/voice-recorder-prd/static/backend/2026/01/23/2014541408258592770.avif)
TL;DR: The fastest ways to record and transcribe on iPhone
Try TicNote Cloud if you want your iPhone transcripts searchable by project, easy to export, and ready for summaries. Use this quick decision tree to choose the fastest way to record and transcribe on an iPhone.
- Notes (audio + live transcript): Pick this if you want the recording and text inside one note for class or interviews.
- Voice Memos (auto transcript): Pick this if you need quick capture, simple cleanup, and light editing.
- Call recording + transcript (iOS 18.1, where available): Pick this if you need a call log with text, and you have clear consent.
- Dedicated workspace after recording: Pick this if you need clean exports, summaries, translation, and cross-file Q&A.
Some features depend on iOS version, device, language, and region.
You can record something important, then lose the transcript in a sea of notes. That gets stressful when you need a quote, decision, or action item fast. A workspace like TicNote Cloud helps you store recordings by project, search them later, and reuse outputs with less manual cleanup via its web workspace.
How to record and transcribe on iPhone using built-in apps
You can record and transcribe on an iPhone with Apple's built-in Notes and Voice Memos. Before you start, check these quick prerequisites so the transcript option actually shows up.
60-second prerequisites check
- iOS version: iOS 18 for Notes and Voice Memos transcripts. iOS 18.1 for call recording and transcription, where supported.
- Device support: basic transcripts can work without Apple Intelligence. Apple Intelligence features (like stronger on-device writing tools) need newer iPhone models, but transcription can still appear on many devices that support iOS 18.
- Language and region: transcription languages and call recording features can vary by language and region. If you don't see transcript or call recording options, it's often a region or language limit.
- Permissions to verify:
- Microphone: Settings, Privacy and Security, Microphone, enable for Notes and Voice Memos.
- Speech Recognition: Settings, Privacy and Security, Speech Recognition, enable.
- iCloud sync (optional): Settings, your name, iCloud, toggle Notes and Voice Memos if you want them synced across devices.
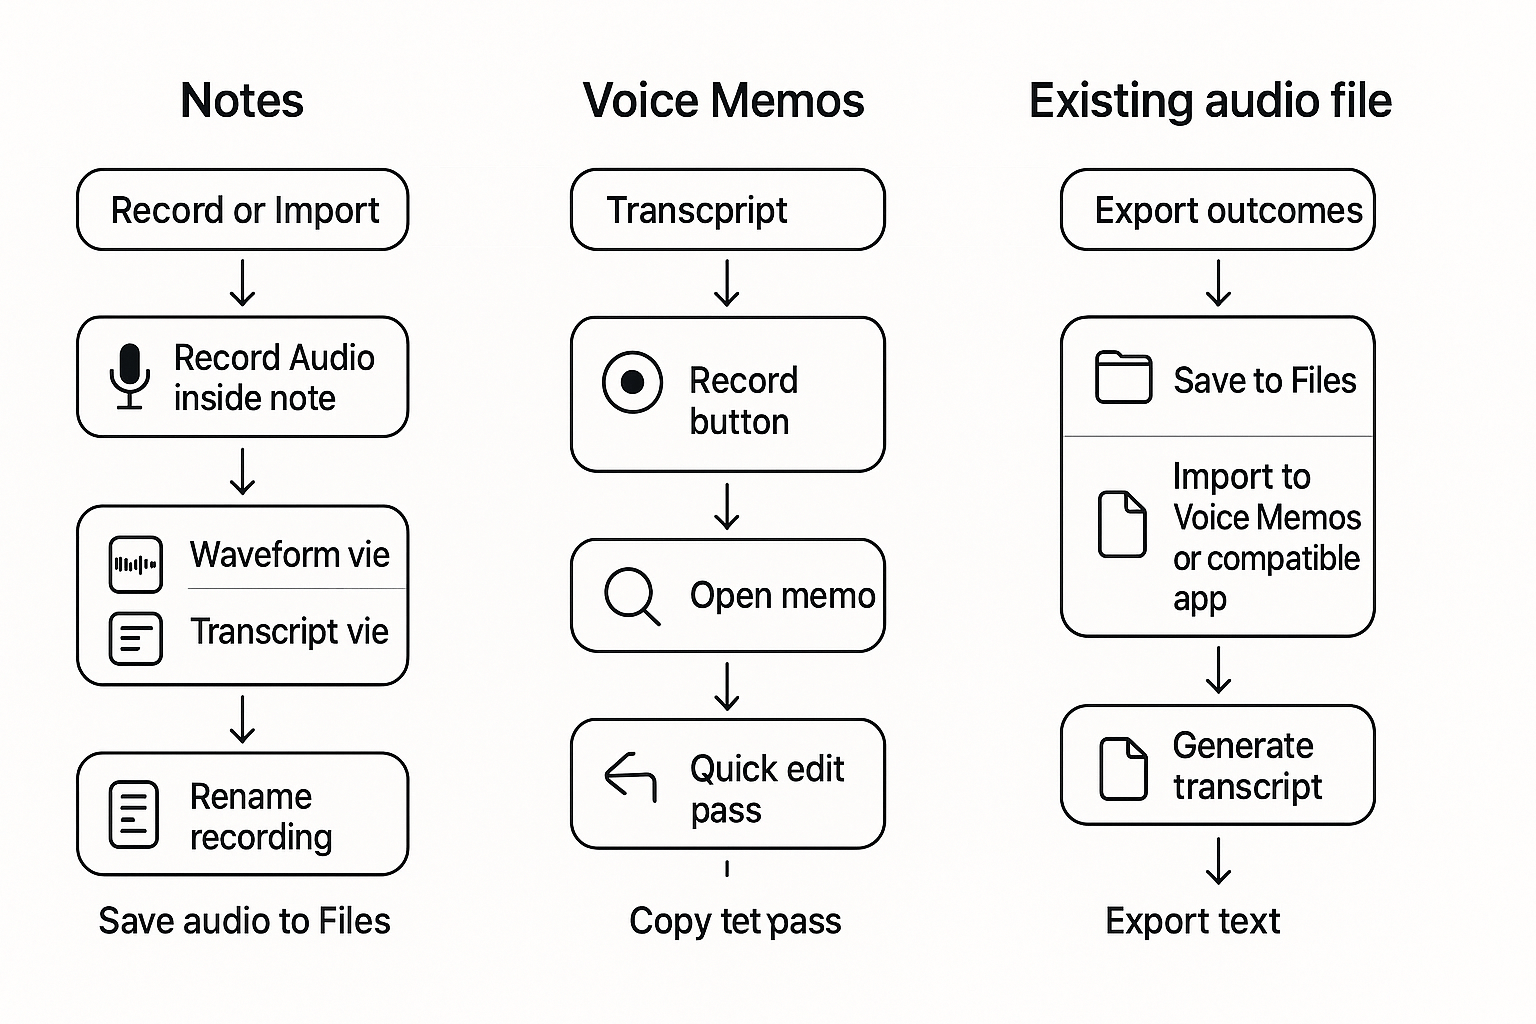
Record and transcribe inside the Notes app (audio in a note)
This is the cleanest option when you want the audio, the transcript, and your written notes in one place.
- Open Notes, then open a note or tap New Note.
- Tap the Attachment button, then choose Record Audio.
- Tap Record to start. Tap Pause to stop briefly, then tap Resume to continue.
- While it records, switch views:
- Tap the waveform view to see audio levels.
- Tap Transcript (or the transcript icon) to view text when available.
- When you're done, tap Done.
- Add the transcript to your notes:
- Open the recording inside the note.
- Tap Transcript, then select Copy Transcript or Add to Note (wording can vary by iOS build).
- Search within the transcript:
- Tap inside the transcript view, then use Find in Page (or the search field) to locate keywords.
- Tip: for global search, use Notes search at the top. Unique names help.
- Save the audio to Files:
- Open the recording, tap Share, then choose Save to Files.
- Rename recordings so they're findable later:
- In the note, press and hold the recording name, then tap Rename.
- Use a simple pattern like "Client interview, Jan 22" or "Lecture 3, supply and demand".
Record and transcribe in Voice Memos (fastest for pure audio)
Voice Memos is quickest when you just need a recording and a transcript, without note formatting.
- Open Voice Memos, tap the Record button.
- Tap the Stop button when finished.
- Tap the memo to open it.
- Tap the Transcript icon (or View Transcript) to see the text.
- Do a quick edit pass:
- Fix names, acronyms, and key numbers.
- If you can't directly edit the transcript, copy it into Notes to clean it up.
- If you record interviews, this guide on turning voice memos into clean text can help you pick the fastest path.
- Share or save what you need:
- For audio: tap Share, then AirDrop, Mail, Messages, or Save to Files.
- For text: copy the transcript, then paste into Notes, Mail, or a document.
What about existing audio files, and what "real-time" means
If you already have audio, you can often import it into Voice Memos (or save it to Files, then open it in an app that supports transcription). Notes is best when the audio is recorded inside the note.
"Real-time" usually means you see text appear while you record. "After processing" means the transcript shows up a few seconds or minutes later, once iPhone finishes analyzing the audio.
How do Notes, Voice Memos, and call recording transcription compare?
If you want to know how to record and transcribe on iPhone, the best method depends on one thing: where you need the text to end up. Notes is best when you want the transcript tied to a specific note. Voice Memos is best for fast capture and a simple audio library. Call recording is best when the details live inside a phone call.
Here's the quick side-by-side.
| What you care about | Notes (audio in a note) | Voice Memos | Call recording + transcript (iOS 18.1, where available) |
| Speed to start | Fast if you're already in the note | Fastest, one tap | Slower, only during a call and not everywhere |
| Where the transcript lives | Inside the note with your other text | In the memo's transcript view | In Notes (a new note is created for the call) |
| Editing the transcript | Easy for small fixes, in the same place you write | Basic edits, better for quick cleanup | Limited, often better to copy out and clean elsewhere |
| Search | Search in Notes, good for context | Search by memo name, transcript helps when available | Search in Notes once it's saved there |
| Export and share | Copy text, share the note, save to Files | Share audio, save to Files, copy transcript when shown | Share the note, copy text, save audio when available |
Quick decision guide
Use Notes if you want the transcript next to the agenda, tasks, or class notes. It's the simplest "audio plus context" setup.
Use Voice Memos if you just need a quick recording now. It's great for lectures, ideas, and hallway interviews.
Use call recording if you need a clean record of agreements, numbers, names, or next steps said on a call. But check local rules first, and ask for consent.
iPhone call recording transcription on iOS 18.1: what to expect
When you start call recording (in supported regions), iPhone plays an announcement so everyone knows it's being recorded. After the call, iOS saves the recording into the Notes app as a new note, along with the transcript when available.
One common limit: transcripts and summaries may depend on Apple Intelligence, and that can require supported hardware and language settings. So two people on the same iOS version may see different results.
What works without Apple Intelligence vs what gets better with it
Without Apple Intelligence, you can still:
- Record in Notes or Voice Memos and share audio
- Copy text when a transcript is available
- Search by note title, memo name, and your own typed notes
With Apple Intelligence, you usually get:
- Better summaries that pull out key points
- Better speaker handling (like clearer separation)
- Stronger search over longer transcripts
What's the cleanest way to export, share, and reuse iPhone transcripts?
To export transcript from iPhone cleanly, save the text for speed, and keep the audio when you may need proof, quotes, or re-transcribe later. In practice: copy the transcript into where you work, and file the audio in a folder you can find again.
Decide fast: text only vs text plus audio
Copying text is enough when you just need notes, a quick recap, or study points. Save the audio too when any of these are true:
- You might need exact wording later (interviews, legal, HR).
- You want a source of truth for disputes or grading.
- You plan to run it through another tool for better formatting.
- You're sharing with someone who missed the meeting.
Use the most reliable sharing paths
Start with the option that matches your goal:
- Paste the transcript into Notes, Mail, Pages, Google Docs, or Notion.
- Save audio to Files: Share from Voice Memos to Files, then pick a stable folder.
- Send via Share Sheet to Slack, Teams, Drive, Dropbox, or AirDrop for quick handoff.
Name it in 10 seconds so search works later
Use this simple pattern: YYYY-MM-DD Topic People.
Examples:
- 2026-01-22 Chem lecture Prof Lee
- 2026-01-22 Client kickoff Acme Sam
- 2026-01-22 Interview PM role Jordan
Folder plan (keep it light): Classes, Clients, Interviews. Inside each, add one level if needed (like Class name or Client name). If you use Notes, mirror the same folders so you do not hunt in two places.
Once you have the audio and text exported, you can upload them into a workspace to generate summaries, action items, and quick answers across files. For more ways to reuse recordings, see this guide on transcribing audio for meetings and research.
How can you improve transcription accuracy on iPhone?
Better audio is the fastest way to get a cleaner transcript. Before you record, set up your space and your phone so the mic can hear voices clearly. That is what matters most when you want to learn how to record and transcribe on iPhone without fixing lots of errors later.
Before you hit Record: make the mic's job easy
- Keep the phone 6 to 12 inches from the speaker
- Speak toward the bottom mic, do not point it away
- Don't cover the bottom edge with your hand or a thick case
- Move away from wind, fans, and traffic noise
- Pick a small, quiet room to cut echo (soft stuff helps)
During the recording: make speech easy to separate
If more than one person is talking, simple habits help a lot:
- One person talks at a time
- Say names before questions: "Alex, quick question…"
- Repeat key numbers, dates, and decisions once
- Do a 10-second recap at the end: "Decision is X, next step is Y"
Want a repeatable approach for interviews, too? Use this interview transcription workflow to keep questions, names, and quotes clean.
After you transcribe: a quick cleanup checklist
Scan the transcript for:
- Names (people, companies, places)
- Acronyms (spell once, then use the short form)
- Numbers (amounts, phone numbers, metrics)
- Dates and times (confirm format and time zone)
Tip: add a "Key terms:" line at the top of your note before recording. List names, acronyms, and project words. It speeds up later edits and makes search more reliable.
Try TicNote Cloud for Free to turn recordings into clean summaries and searchable notes.

What if your iPhone won't transcribe (or the transcript is missing)?
If transcription won't show up, fix it in this order. Most issues come from iOS limits, language settings, or missing permissions. Use this quick tree to get a transcript, then decide if you should export and transcribe elsewhere.
Troubleshooting tree: start here
- Check basics first
- Update iOS, then restart your iPhone.
- Confirm transcription is supported for your device, region, and language.
- Check permissions
- Settings → Privacy & Security → Microphone: allow Notes or Voice Memos.
- Settings → Privacy & Security → Speech Recognition: allow it for the app.
- If you use Siri dictation features, confirm you did not disable speech features.
- Force the transcript to process
- Open the recording again and switch to the transcript view (if available).
- Play to the end once, some files finish processing after full playback.
- Leave the app open on Wi Fi and power for a few minutes.
Match the symptom to the fix
- No transcript option at all: iOS version, language, or region is not supported. Try changing the iPhone language, then re open the app.
- Transcript stops halfway: wait on Wi Fi, then close and re open the recording. If it still stalls, export the audio and re transcribe.
- Wrong language: change the transcription language (if shown) or set the iPhone language to match the audio, then retry.
- Very low volume: re record closer to the mic, remove a case, and avoid speakerphone.
- Heavy background noise: move to a quieter room, keep one speaker at a time, and pause between topics.
- Offline: some transcription features need network access. Try again online.
Safe resets that won't lose your audio
- Duplicate the note (Notes) before retrying.
- Save the audio to Files, then reattach it to a note or re import. If you need a clean fallback, follow this guide to transcribe an M4A file to text so you can keep working even when Apple's transcript fails.
If Apple's transcript won't generate or it's too rough, export the audio (M4A) and transcribe it in a dedicated tool that can reprocess, clean up, and format the output.

Is iPhone recording and transcription private (and what should you change for sensitive audio)?
iPhone recordings and transcripts can be private, but it depends on where you save them. Some data stays on your phone. Other data can sync to iCloud and appear on your iPad or Mac.
Know what stays on-device vs what may sync
If you record in Notes (audio in a note) or Voice Memos, your content is stored on the device. But if iCloud sync is on for those apps, the recording, transcript, or both may upload to iCloud. That means the same content can show up on other signed-in Apple devices.
Privacy checklist for sensitive audio
Use this quick list before you hit record:
- Check iCloud settings for Notes and Voice Memos, turn sync off if needed.
- Prefer local-only storage for high risk work (medical, legal, HR).
- Share to one person, not a group, when possible.
- Don't send raw audio in group chats, forward chains spread fast.
- Lock your phone and use Face ID, keep your device protected.
Delete it fully (not just "gone from view")
To remove a recording or transcript:
- Delete the Voice Memo and any related note.
- Open Recently Deleted (in the app) and delete it there too.
- If you shared it, delete the sent copy in Messages or Mail.
Consent first, always
For interviews, meetings, and calls, get clear consent before recording. If iPhone call recording is available to you, the other person is notified, and laws can vary by place. Before sharing a transcript, build a redaction habit: remove names, phone numbers, addresses, and account details.
When should you use a tool to transcribe and organize iPhone recordings? (Step-by-step example)
Use a tool when your iPhone recordings turn into a pile of files. That's when searching, sharing, and follow-ups get slow. Below is a simple "record → transcribe → reuse" flow, shown using TicNote Cloud as an example, after you capture audio on iPhone.
Use a tool when any of these are true
If you only need a quick quote, iPhone tools may be enough. But a tool helps when you:
- Have many classes, client calls, or weekly meetings
- Need action items and owners, not just raw text
- Must share clean notes with a team, fast
- Work in two languages and need translation
- Want to search across multiple recordings at once
Step-by-step: iPhone recording to a searchable workspace
- Create a project (one per class, client, or topic) Create a project like "Bio 201", "Client A", or "User interviews". This keeps each transcript, summary, and file in one place.
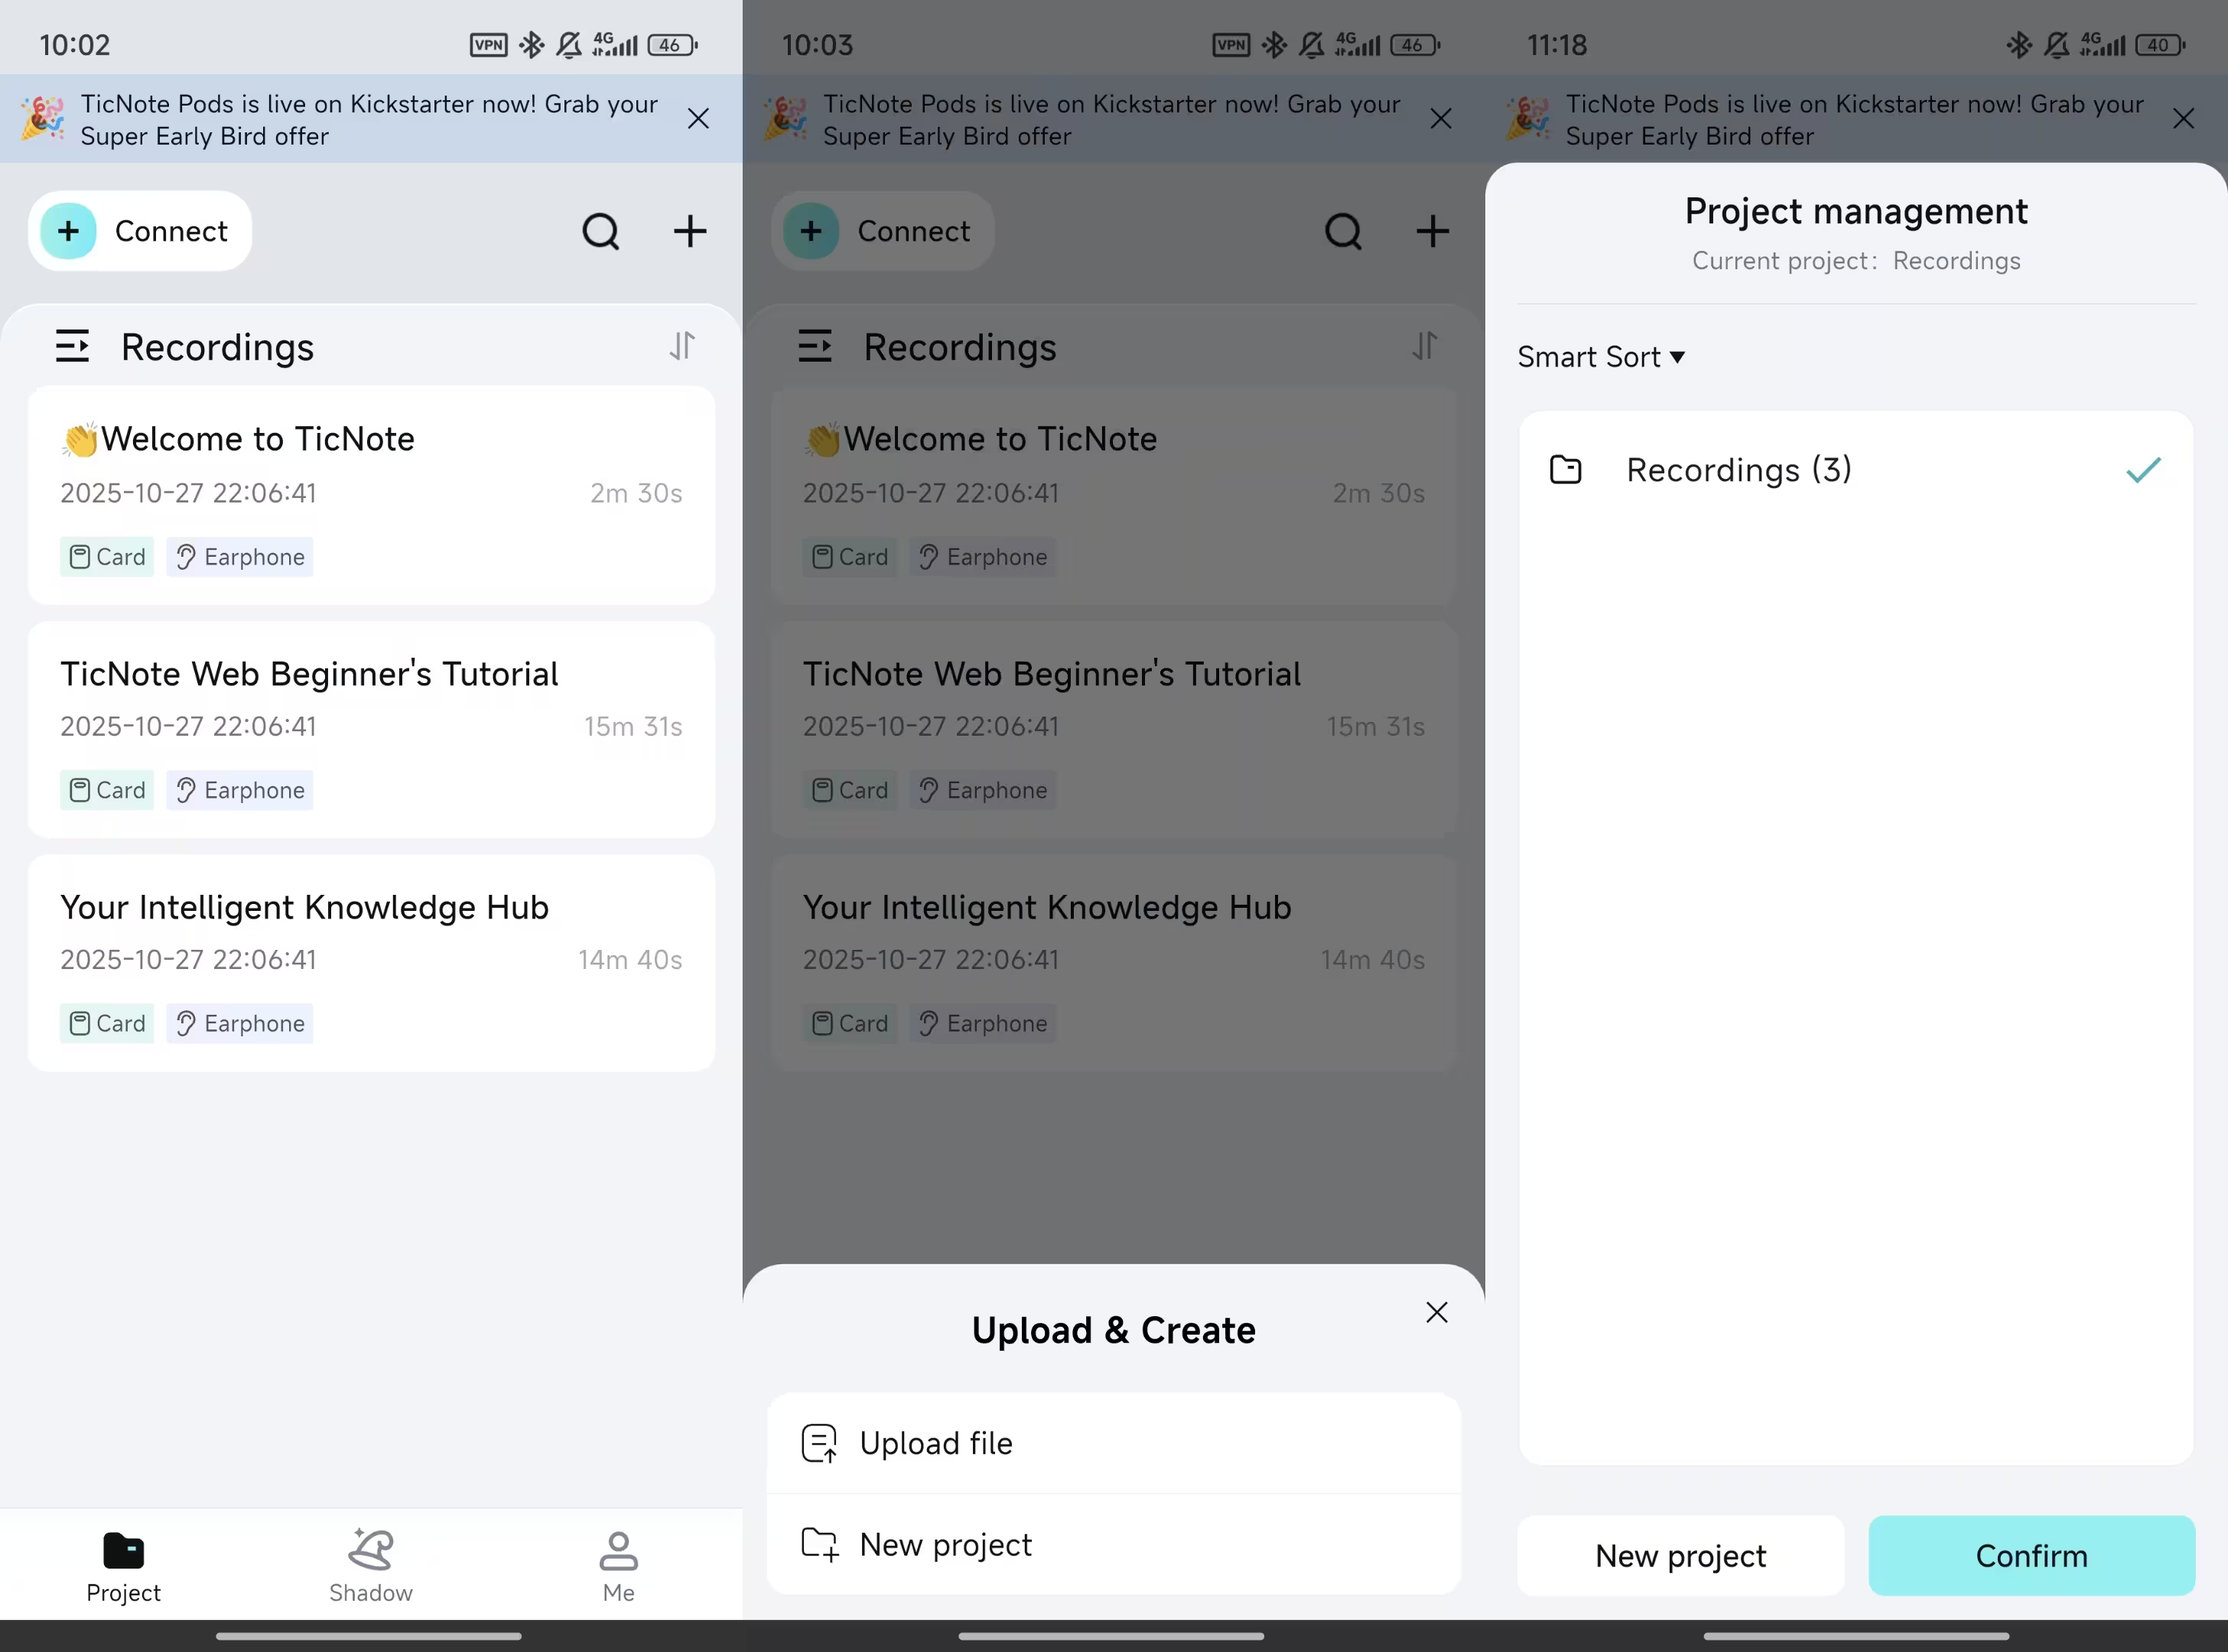
- Import an iPhone recording from Files or Share From Voice Memos or Files, tap Share and save the audio where you can access it. Then upload it to your project. (If your audio is already in Files, you can import it from there.)
- Generate the transcript Run transcription to turn the audio into text. Now you can scan, search keywords, and copy key lines without replaying audio.
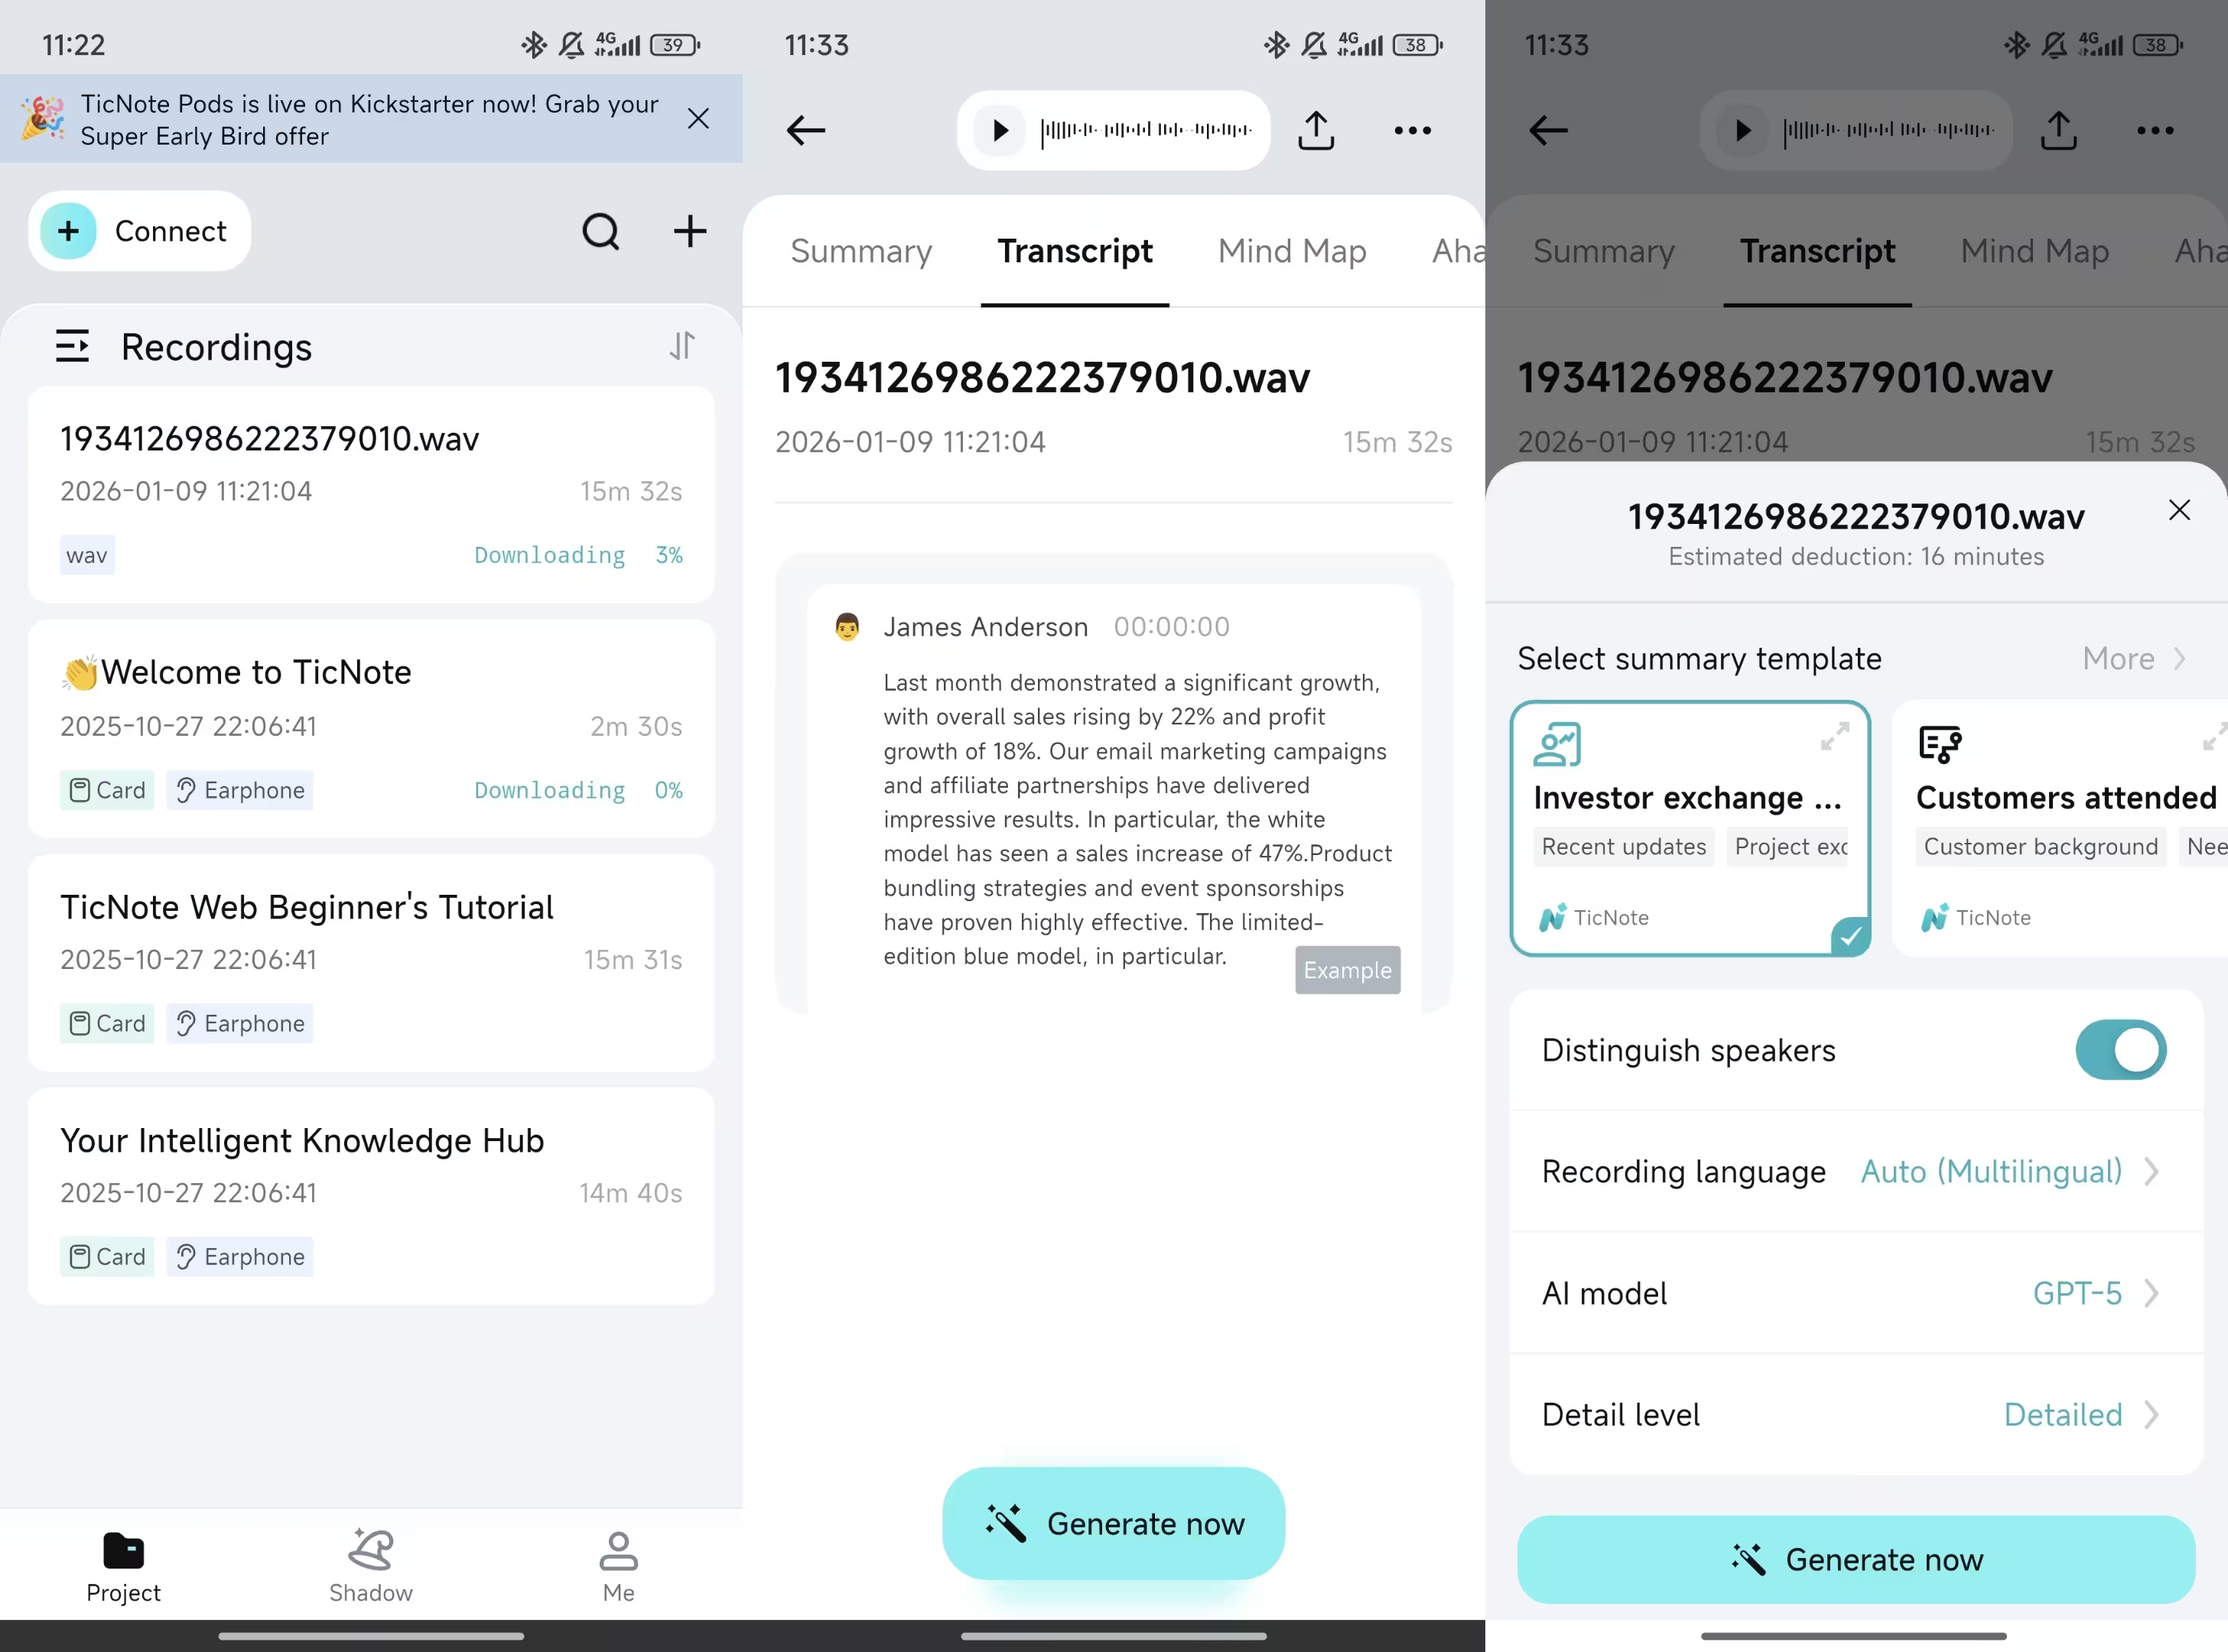
- Create a structured summary with action items (using a template) Pick a template that matches the situation, like "Meeting notes", "Interview", or "Lecture". Generate a summary that pulls out:
- Decisions
- Action items (task, owner, due date)
- Open questions
- Key quotes or timestamps (if included)
- Translate the transcript or summary for teammates If your team works across regions, translate the transcript or the summary into another language. Share the translated version so everyone reads the same source.
- Ask cross-file questions to find decisions and follow-ups Once you have several meetings in the same project, ask a single question across files. Examples:
- "What did we agree to ship by Friday?"
- "List open risks mentioned in the last three calls."
- "What follow-ups were assigned to me?"
This is the point where "how to record and transcribe on iPhone" becomes a repeatable system, not a one-off task.
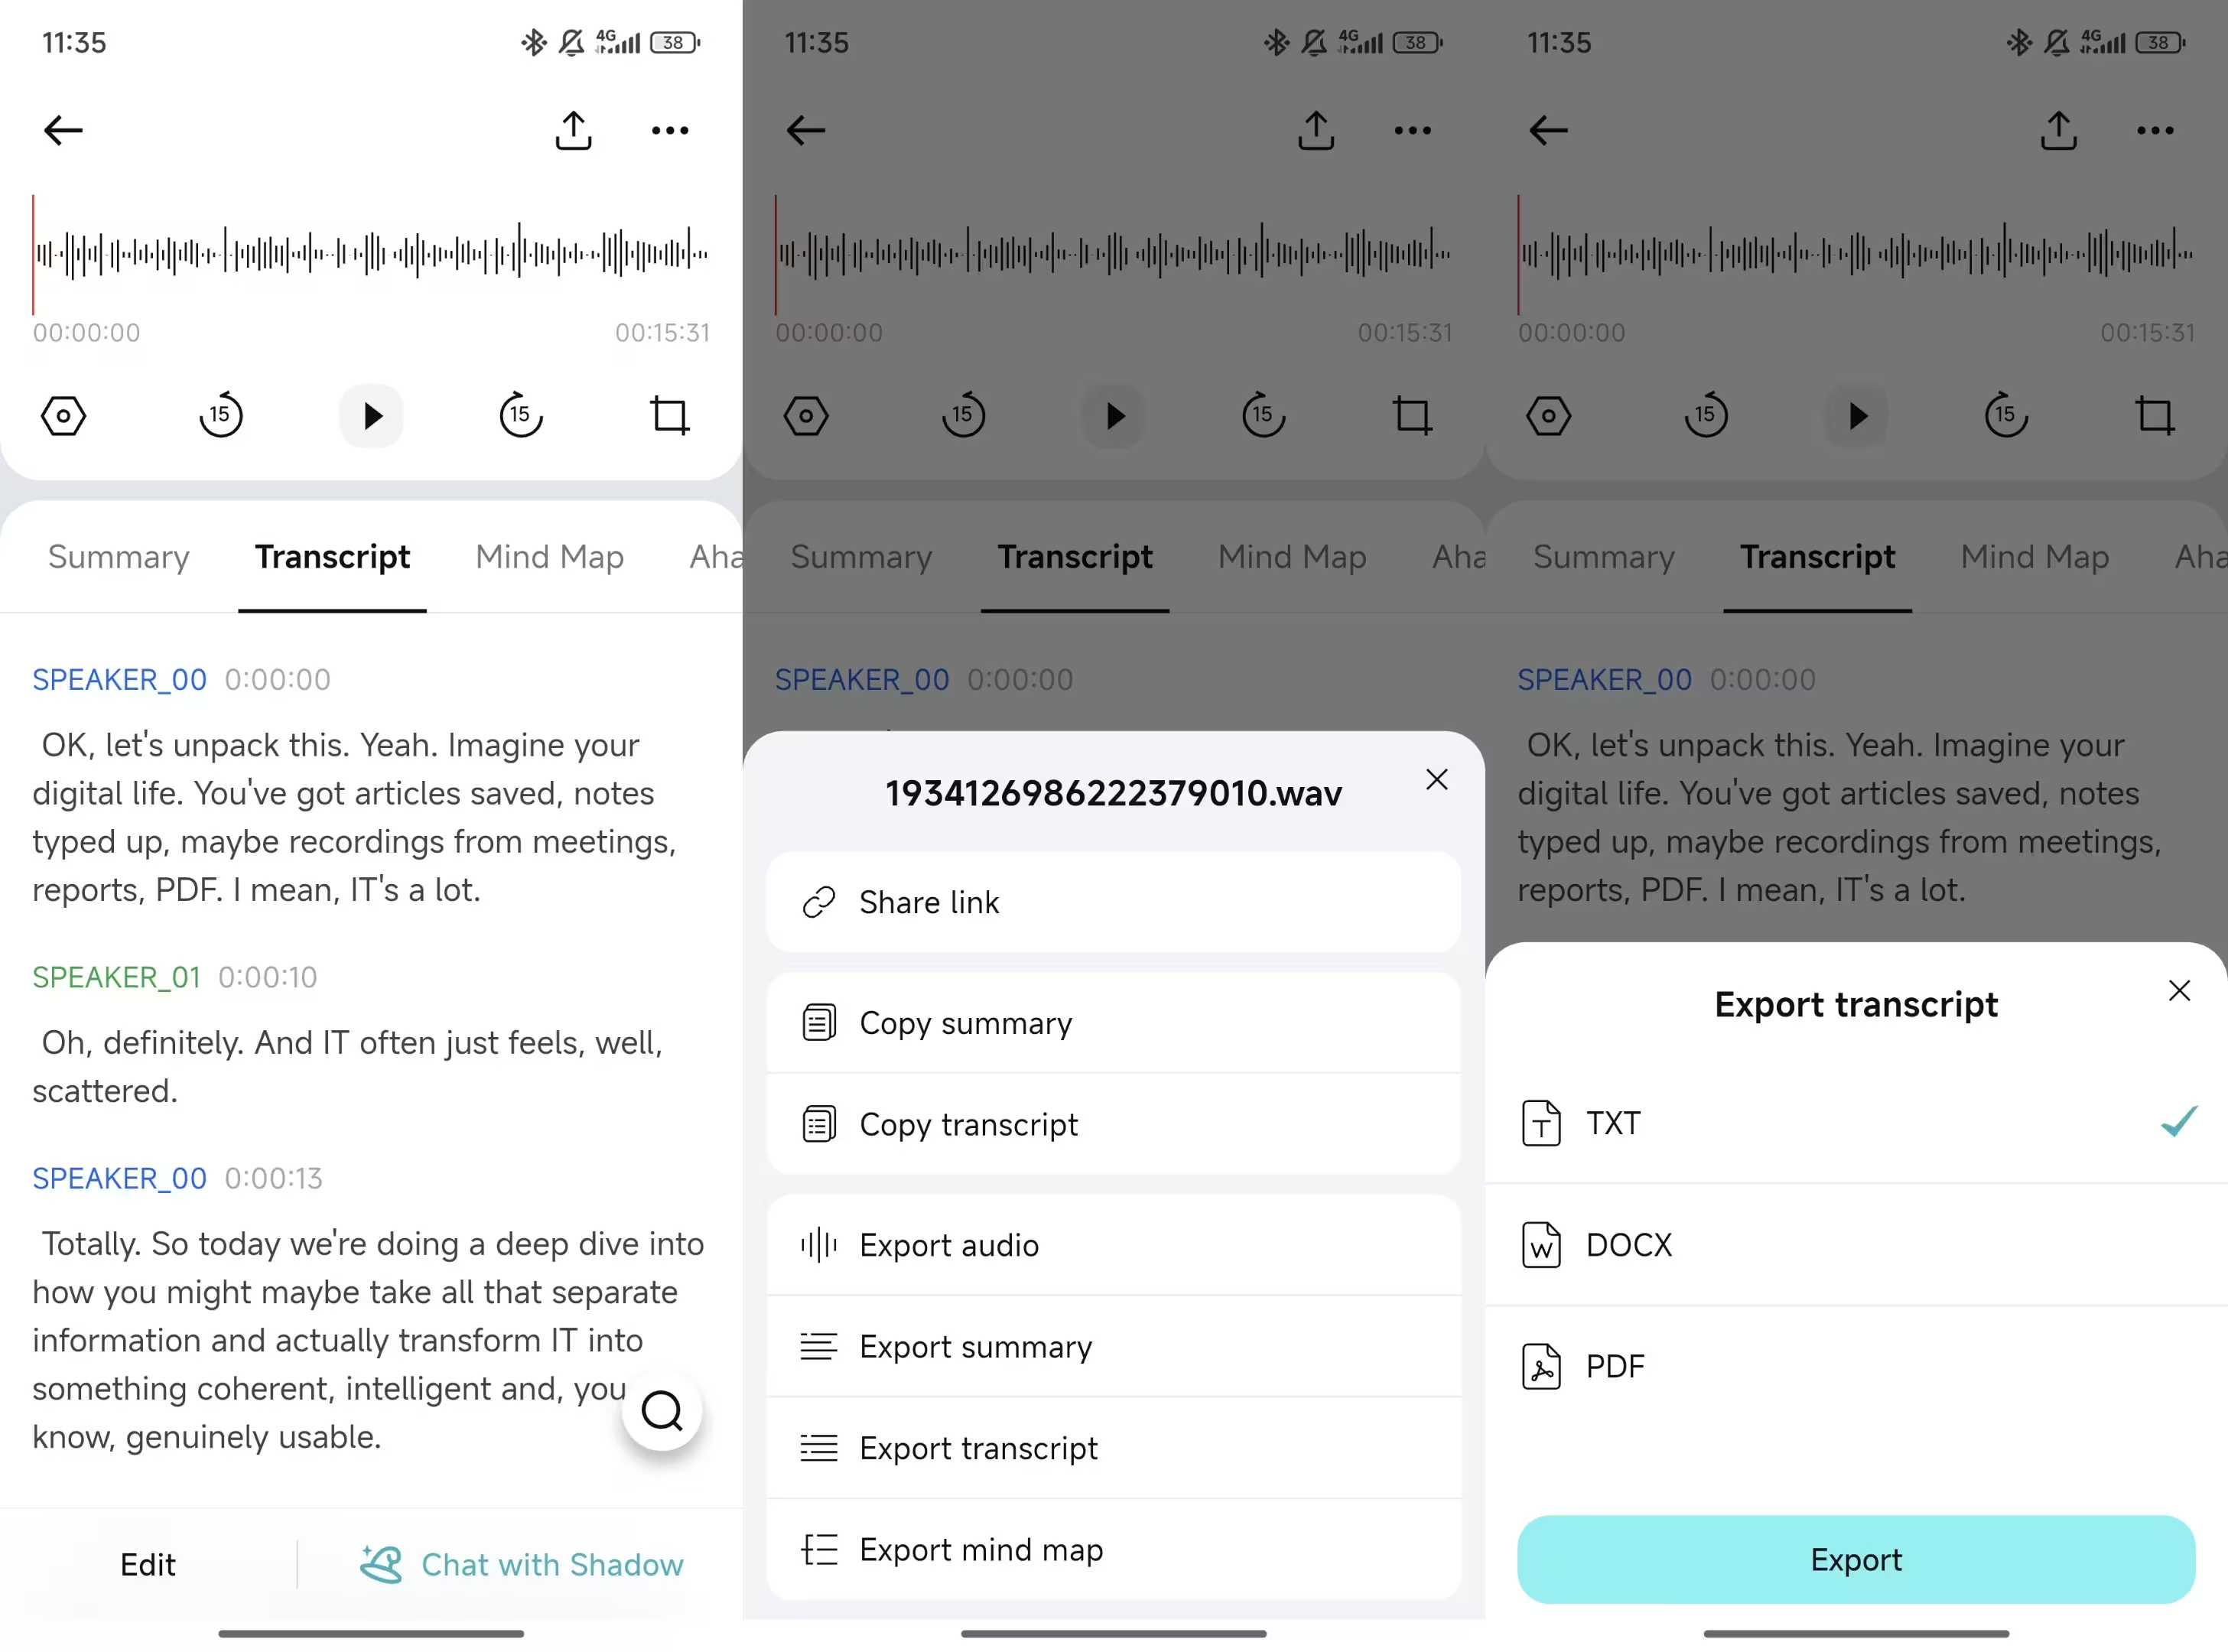
Export formats people actually need
After you clean up the output, export it for the next step in your workflow:
- WAV (audio)
- TXT (transcript)
- Markdown, DOCX, PDF (summary)
- PNG, Xmind (mind map)
If you want to test the workflow quickly, create one project and upload one iPhone recording. You should be able to see a transcript and a usable summary in minutes.
Moreover, TicNote also has a web studio. You can edit the transcription, summary, and export files in a bigger screen:
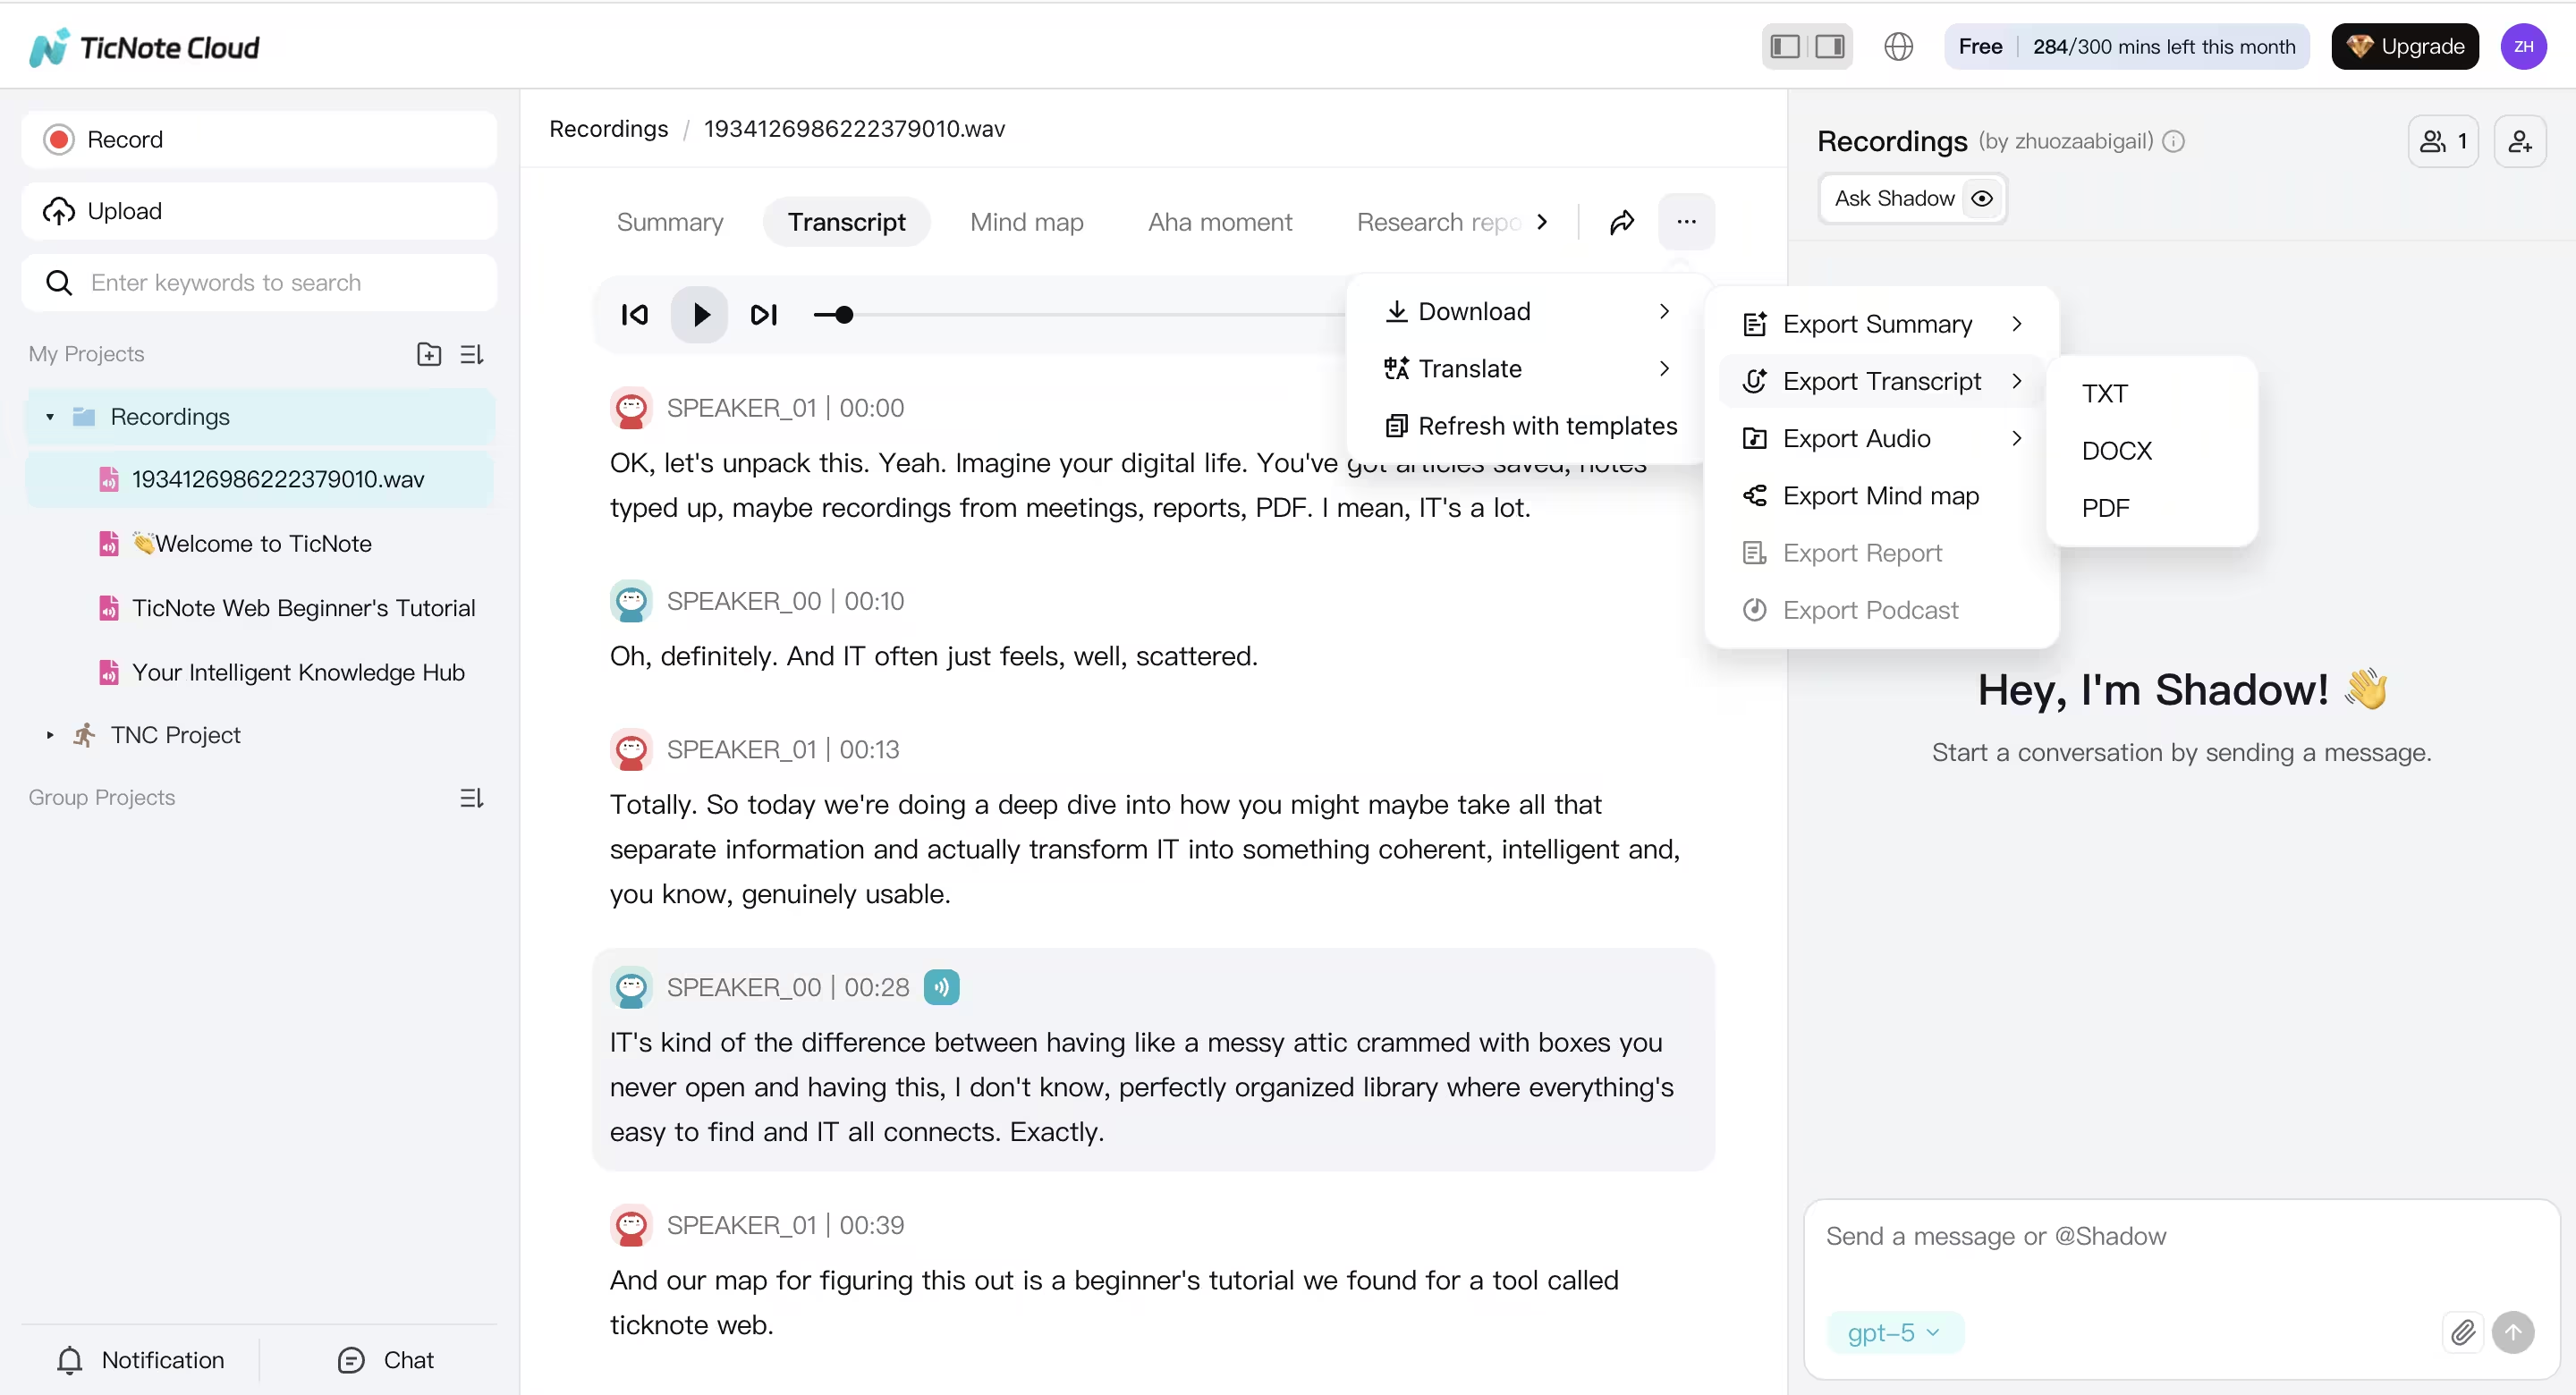
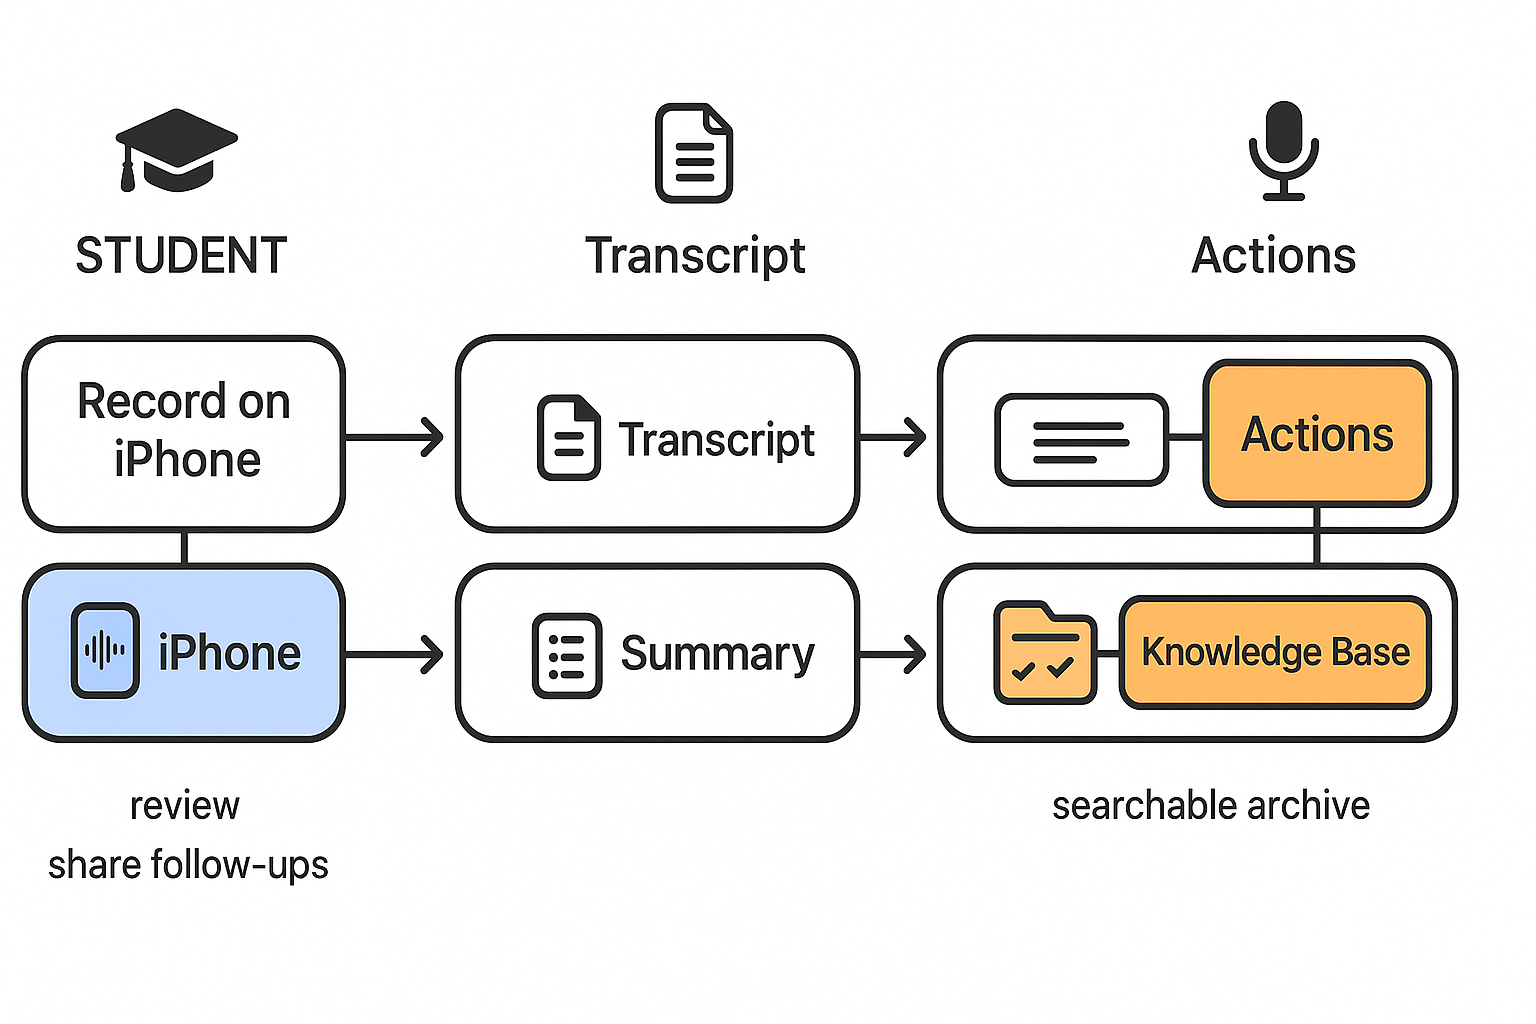
A simple "record → transcribe → summary → action items" workflow for students and professionals
If you can record on an iPhone, you can turn that audio into notes you can reuse. Below are three quick workflows you can repeat each week. Each one ends with clear outputs you can study, send, or file.
Student: lecture to clean notes you can review fast
- Record the lecture in Notes (paperclip, then Record Audio).
- Let Notes create the transcript, then fix names and key terms.
- Add headings for topics, then bold any definitions.
- Make a 5-line summary at the top of the note.
- Optional: move the transcript into TicNote Cloud to make a mind map and keep lectures in one project.
Output: cleaned transcript, short summary, quick review mind map.
Work: meeting to, decisions, and follow-ups
- Record in Voice Memos (or Notes) with the phone near the center.
- Generate the transcript, then scan for dates, owners, and numbers.
- Pull out "Decisions" and "Action items" into a short list.
- Share the follow-up as a note or email, then save the transcript.
- Optional: upload to TicNote Cloud to store meetings by project and ask questions across past meetings.
Output: decisions list, action list with owners, shareable follow-up.
Interview: audio to verified quotes and a searchable archive
- Record with the iPhone mic close to the speaker.
- Transcribe, then verify key quotes against the audio.
- Add time markers (00:12, 05:40) beside important quotes.
- Tag themes (pricing, pain points, objections) in the text.
- Optional: keep interviews in TicNote Cloud folders so you can search themes and reuse quotes later.
Output: quote-ready transcript, theme tags, searchable interview library.
If you want to keep going past iPhone, here's a simple plan snapshot for TicNote Cloud: Free includes 300 transcription mins per month and basic templates. Professional adds 1,500 mins per month and unlimited AI chat. Business is built for heavier teams with 6,000 mins per month.
Try TicNote Cloud for Free and turn transcripts into summaries and action items.
TicNote Cloud vs iPhone Built-In Apps: Which Should You Use?
| Feature | iPhone Notes / Voice Memos | TicNote Cloud |
| Real-time transcription | ✅ (Voice Memos, iOS 17+) | ✅ |
| Speaker identification | ❌ | ✅ |
| Multi-language support | Limited | ✅ 40+ languages |
| Export to Word / PDF | ❌ Manual copy | ✅ One-click export |
| Meeting platforms (Zoom/Teams) | ❌ | ✅ |
| Works offline | ✅ | Partial (PLAUD device) |
| Free to use | ✅ | ✅ Free tier |
Bottom line: Use iPhone's built-in apps for quick personal notes. Use TicNote Cloud when you need searchable, exportable, multi-speaker transcripts.