

TL;DR: The fastest safe way to get a phone call transcript
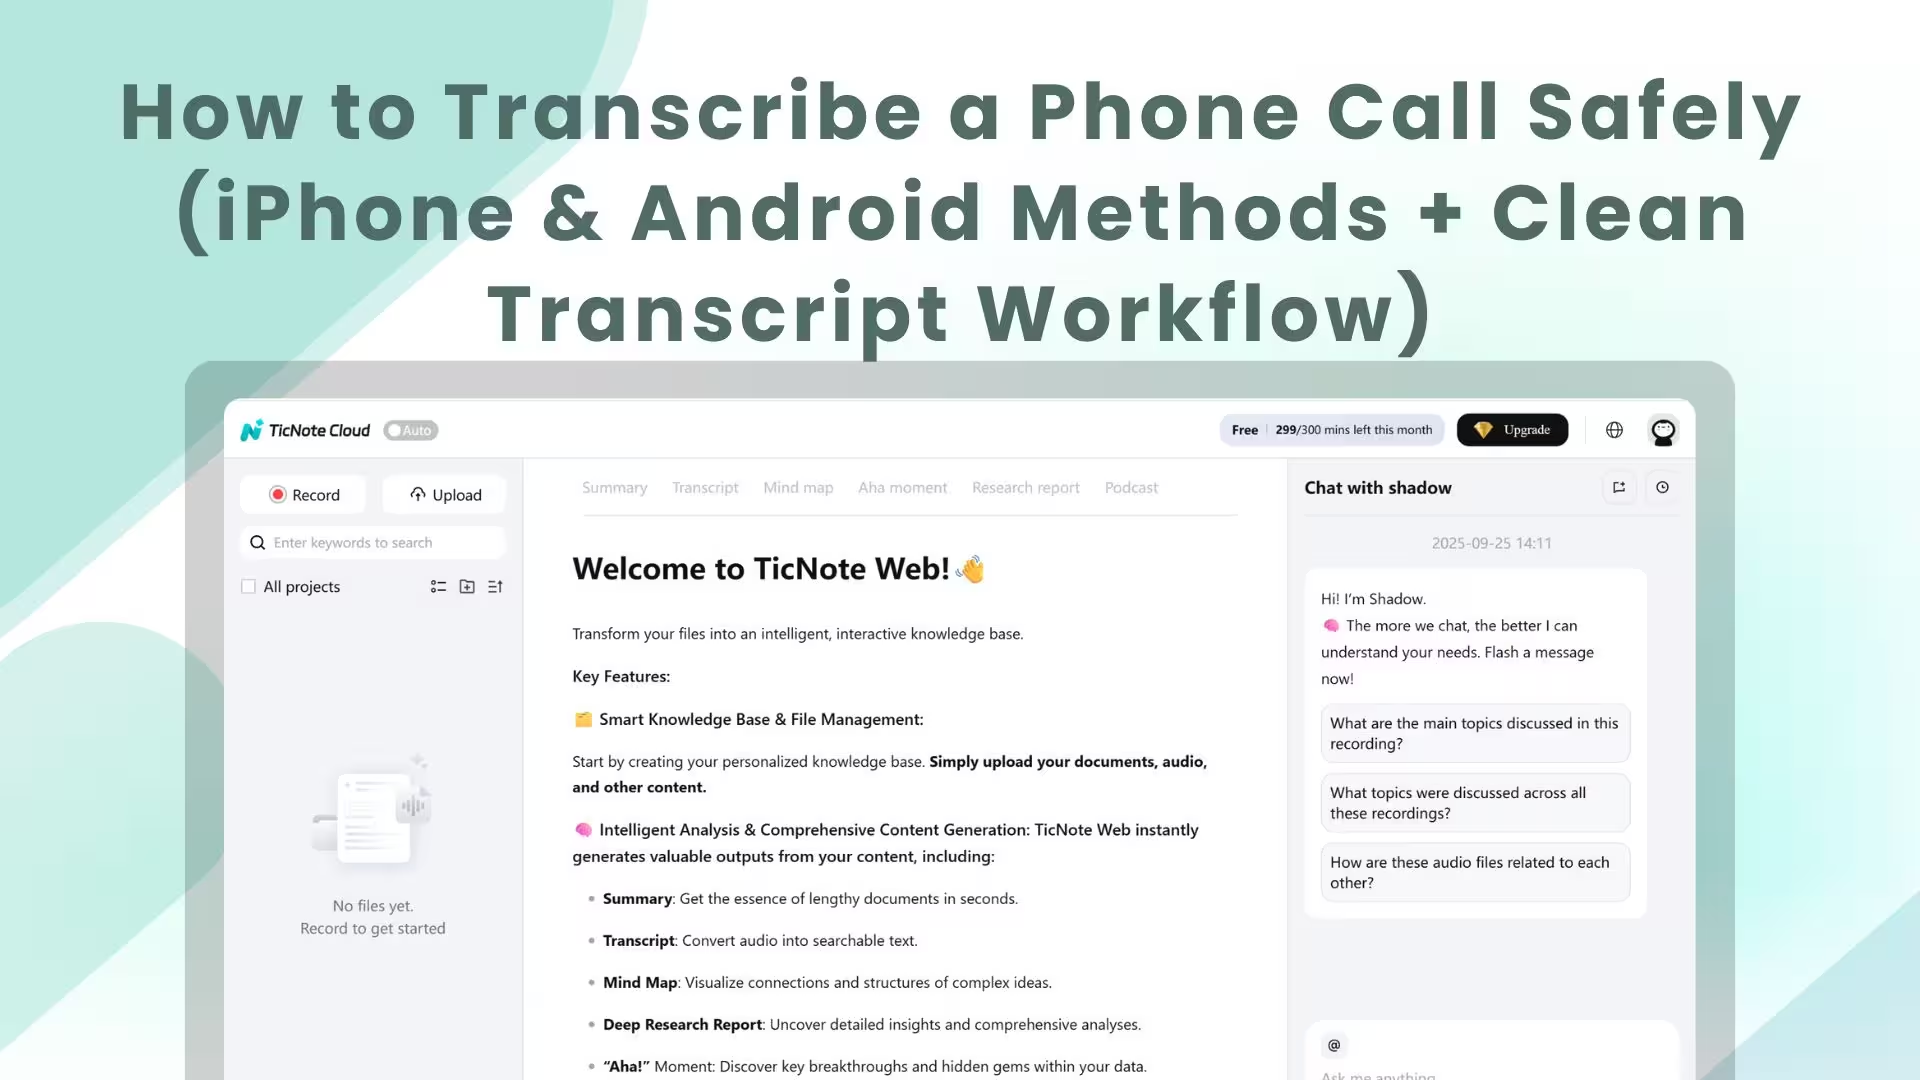
Try TicNote Cloud for free if you already have a recording and need clean notes fast. To transcribe a phone call safely, do it in two steps: capture the audio (or live captions), then convert it into text and clean it.
- iPhone with built-in call recording and transcripts (where available): record in the Phone app, then export.
- iPhone without it: use speakerphone, then record on a second device.
- Android: use built-in call recording (if allowed), or speakerphone plus Live Transcribe for on-screen captions.
- VoIP apps (WhatsApp, Zoom): use the app's recording option, or capture on speakerphone.
If the call is sensitive, involves minors, or breaks policy, don't record. When you're not sure, ask for consent. If you already have an audio file, upload it, fix key names and numbers, then export a shareable transcript and summary.
You can lose hours hunting for "what was decided" after a call, and a messy transcript makes it worse. TicNote Cloud helps you turn recordings into clean summaries you can search later, so follow-ups and handoffs don't slip. You can try TicNote Cloud for free and keep everything organized in projects.
How do you transcribe a phone call (and what do you need first)?
To transcribe a phone call safely, split the job into two: capture the audio, then convert it to text. Recording is just saving sound. Transcribing is turning that sound into words. You can do those steps in different apps, and that's often the easiest path.
Know what you're trying to produce
Most people don't need "a transcript." They need a specific output for work.
- TXT transcript: best for search, copy and paste, and quick cleanup.
- DOCX or PDF: best for sharing with teammates, clients, or case files.
- Timestamps (optional): helpful when you must quote, audit, train, or resolve a dispute.
If you pick the output first, the rest gets simpler. Some tools capture audio but export weak text. Others create good text but need you to upload audio.
Minimum inputs you need for a good result
You don't need fancy gear, but you do need three basics.
- Usable audio (or live captions): clear enough to hear both sides.
- Correct language and dialect: for example, US vs UK English. This affects names and terms.
- Enough volume for both speakers: one loud voice and one quiet voice usually means missing lines.
If one person is on Bluetooth, test first. Some setups record only one side.
Use a simple workflow: capture, then clean, then reuse
Here's the repeatable process most teams use:
- Capture: record the call in the best legal way you can.
- Transcribe: upload the file and generate text.
- Review: fix names, numbers, and key terms, then add speaker labels.
- Reuse: pull action items, write a summary, and export to the format your team needs.
If you want a deeper guide for the same flow on other audio types, use this step-by-step audio transcription workflow as a reference.
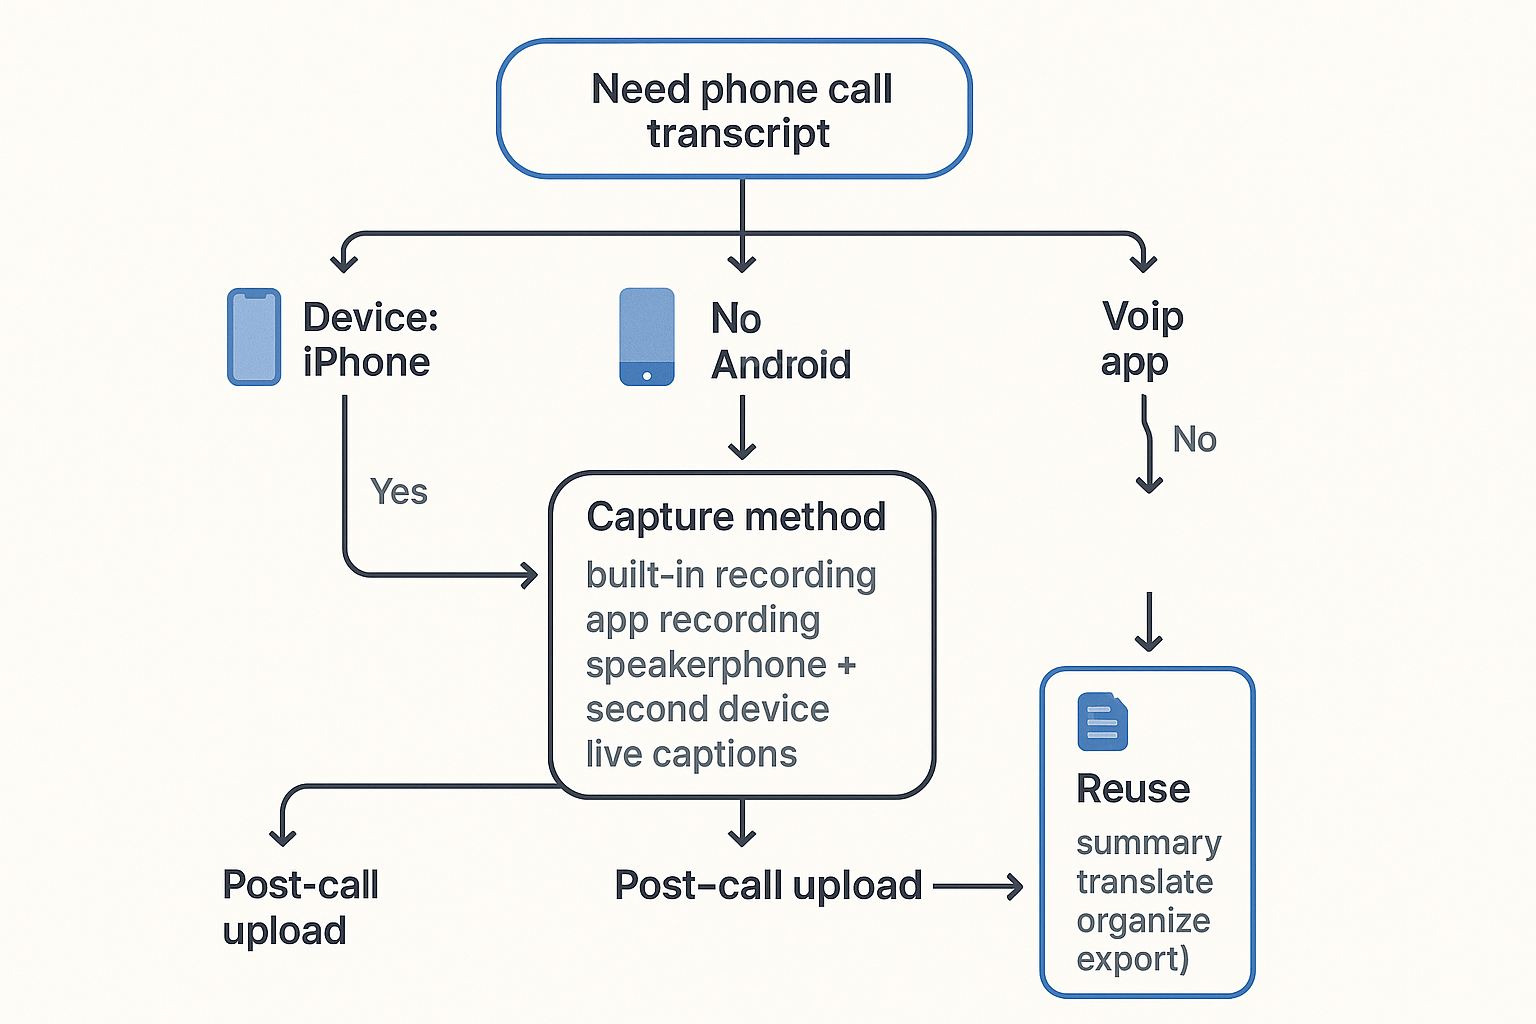
Think like a decision tree
First, choose the best capture method you can do legally (phone feature, call app, speakerphone to a second device, or live captions). Then choose a transcription tool that lets you:
- edit the text easily
- export TXT and shareable DOCX or PDF
- store files in a clean folder or project system so you can find them later
Before you record: is it legal to record and transcribe calls where you are?
Before you record anything, check the consent rule where you are. Call recording laws often fall into two buckets: one-party consent or all-party consent. If you plan to transcribe a phone call for work, a client, or research, the safest move is to get clear permission.
Know the two consent models
Most places use one of these standards:
- One-party consent: One person on the call can agree to recording, and that can be enough.
- All-party consent: Everyone on the call must agree before you record.
Even inside the same country, rules can change by state or province. They can also vary by the type of call and system used, like mobile vs landline, or company phone systems and contact centers.
Cross-border calls: use the stricter rule
Calls often cross borders. You might be in one state, your customer in another, and your coworker abroad. That can create overlap between laws.
A simple rule of thumb is: follow the stricter standard on the call. In practice, that usually means getting consent from everyone. It reduces risk and avoids awkward surprises later. This is not legal advice, so if the call is high-stakes, check your local rules or ask counsel.
Use a clear disclosure script (and keep it simple)
Don't hide the ball. Ask early, ideally right after greetings. Here's a script you can copy:
"Just a quick note, would you be okay if I record this call so I can create an accurate transcript and notes? The recording will be stored securely and only shared with [who]."
If someone says no, stop and switch to live notes. Or ask if a written summary is okay.
Privacy basics that keep you out of trouble
Consent is only part of doing this safely. Treat call audio and transcripts like sensitive work files.
- Avoid sensitive data unless it's truly needed (passwords, payment info, medical details).
- Limit access to the smallest group possible.
- Set a retention window: keep recordings only as long as you need them.
- Follow company and client policy: some workplaces ban call recording even if local law allows it.
The goal is simple: get an accurate record without creating unnecessary risk.
How can you record a call for transcription on an iPhone?
To transcribe a phone call later, you first need a clean recording. On iPhone, the best path is Apple's native call recording and transcript feature, if it's available in your region. If it's not, the most reliable fallback is speakerphone plus a second device that records audio.
Option 1: Use native iPhone call recording and transcripts (best case)
If your iPhone supports it, native recording is the simplest and safest option because it's built into Phone. Before you rely on it, check:
- Your iOS version is up to date.
- Your country or region supports call recording.
- Your language settings match what the feature supports.
When you start recording, the iPhone plays a clear notification so everyone on the call knows. That's the point; it's designed for consent. After the call, the recording and transcript are saved in a system location you can reopen later (typically tied to the call entry in the Phone app or saved as a recording you can share out).
Tip: Do a quick test call with a friend first. You'll learn where the file lands and how the transcript looks.
Option 2: Speakerphone plus a second device (works almost everywhere)
If native call recording is missing or blocked, this method is boring but dependable. Put the iPhone call on speaker, then record using:
- Another phone's voice recorder
- A laptop recorder app
- A handheld recorder
Why it works: you're not relying on carrier features, region settings, or tricky app behavior.
To keep both voices clear:
- Place the second device 6 to 12 inches from the iPhone.
- Lower iPhone volume slightly to reduce echo.
- Avoid Bluetooth earbuds; they can drop one side of audio.
- Use a quiet room and keep the phones on a soft surface.
If you already use Voice Memos for audio capture, follow a clean voice memo to text workflow to keep files organized.
Option 3: Third-party call recorder apps (verify before trusting)
Some apps can record calls, but many depend on workarounds like conference or "merge call" lines. Before you use one, confirm:
- It's legal where you are, and it gives an audible notice if needed.
- It records both sides clearly, not just your microphone.
- It works with your call type: carrier calls vs VoIP (FaceTime Audio, WhatsApp, Zoom).
- You can export the audio file (WAV or M4A is ideal).
- You can access the file later without a subscription lock-in.
If the app can't export clean audio, it's a dead end for accuracy.
Export paths you'll actually use for transcription later
Once you have the recording, get it off your phone in a format you can upload:
- Save to Files (On My iPhone) or iCloud Drive.
- AirDrop the file to a Mac for faster handling.
- Upload to a cloud drive (Google Drive, Dropbox, OneDrive) so it's easy to share and back up.
The goal is simple: a single audio file you can upload and transcribe in your tool of choice.
Try TicNote Cloud for Free to upload call audio, generate a clean transcript, and export a summary.
How can you record a call for transcription on Android?
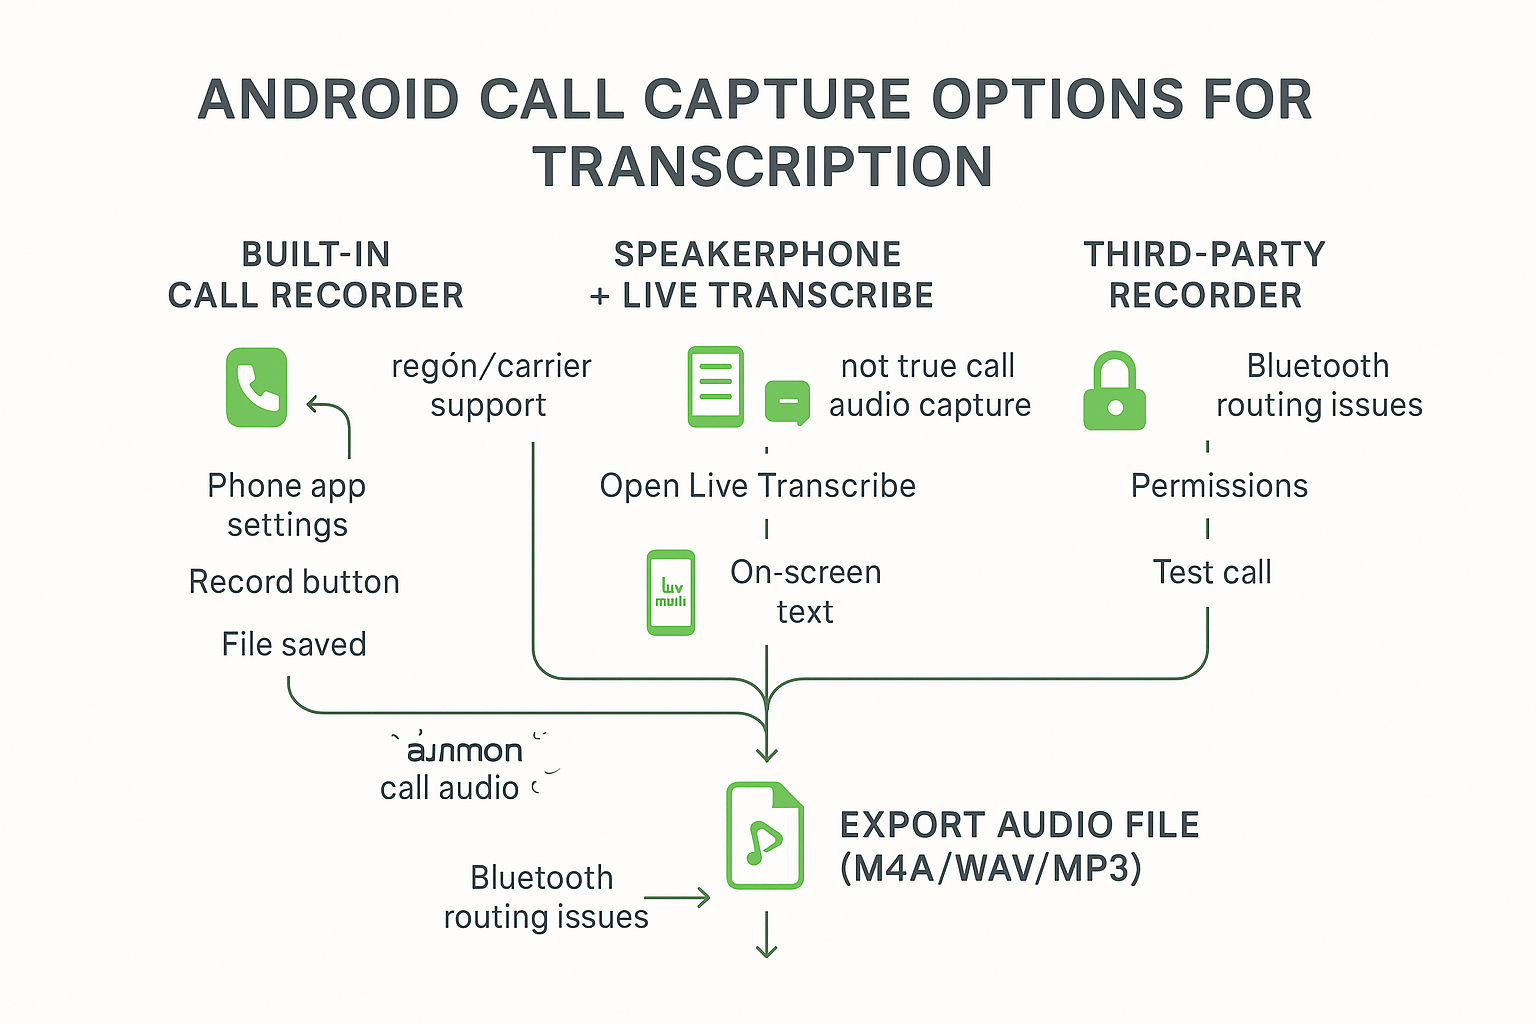
Android call recording is not one simple switch. It depends on your phone brand, Android version, carrier, and region. So the safest plan is to pick a capture method that works on your device, then save a clean audio file you can transcribe.
Option 1: Check for built-in call recording first
If your Phone app supports recording, it's usually the cleanest option.
- Open the Phone app (the dialer).
- Tap the three-dot menu, then Settings.
- Look for Call recording, Record calls, or Recording.
- If you see it, turn it on or choose manual recording.
- During a call, look for a Record button on the call screen.
Where the file goes varies by device. Common places include:
- In the call log: open the call entry, then tap the recording.
- In a Recorder app folder (sometimes called Call recordings).
- In internal storage: look in a Recordings or CallRecordings folder.
Option 2: Use speakerphone plus Live Transcribe for on-screen text
If you can't record calls on your Android, Speakerphone Plus Live Transcribe can still help you transcribe a phone call in the moment. Put the call on speaker, open Live Transcribe, and let it display what it hears.
Just note the limits: it's not a true call recording, and it may miss audio if the room is noisy. Saving and exporting the full text can also be limited, depending on your setup and settings.
Option 3: Try third-party call recorders, but expect failures
Third-party recorders can work on some devices, but Android restrictions often break them. You may get only your voice, very low volume, or no audio at all.
Typical failure points include:
- OS restrictions that block capturing the other party's audio.
- VoIP app rules (WhatsApp, Zoom, Teams) that prevent recording.
- Mic and phone permissions not granted, or blocked in the background.
- Bluetooth routing problems: the recorder may not hear the call audio.
If you go this route, test with a short call first. Then listen to the file before you rely on it.
Export best practices before transcription
Once you have audio, treat it like evidence: keep it tidy and backed up.
- Export in a common format when possible: M4A, WAV, or MP3.
- Rename files right away: YYYY-MM-DD Client Name Topic.
- Back up to Google Drive or a secure folder before uploading.
- If you need a separate workflow, you can also transcribe voicemail on an iPhone or Android using similar file steps.
How to Transcribe a Recorded Phone Call Step by Step (Upload → Transcript → Summary → Export)
Transcribing a phone call doesn’t need to feel messy or fragile. With the right workflow, you can turn a raw recording into something searchable, actionable, and easy to reuse. Below is a practical, repeatable process using the TicNote App as the primary example, with notes on how the same steps translate to the Web version.
The core idea is simple: organize first, transcribe once, then reuse the output many times.
Step 1: Create or choose a project in the TicNote app
Before uploading anything, open the TicNote app and decide where this call belongs. Projects act as containers, so future searches, summaries, and follow-ups stay connected.
Use project names that reflect how you’ll think later, such as a client, role, or case type. Inside the project, name each call clearly so it’s easy to scan weeks or months from now.
This small habit saves time when you need context across multiple calls.
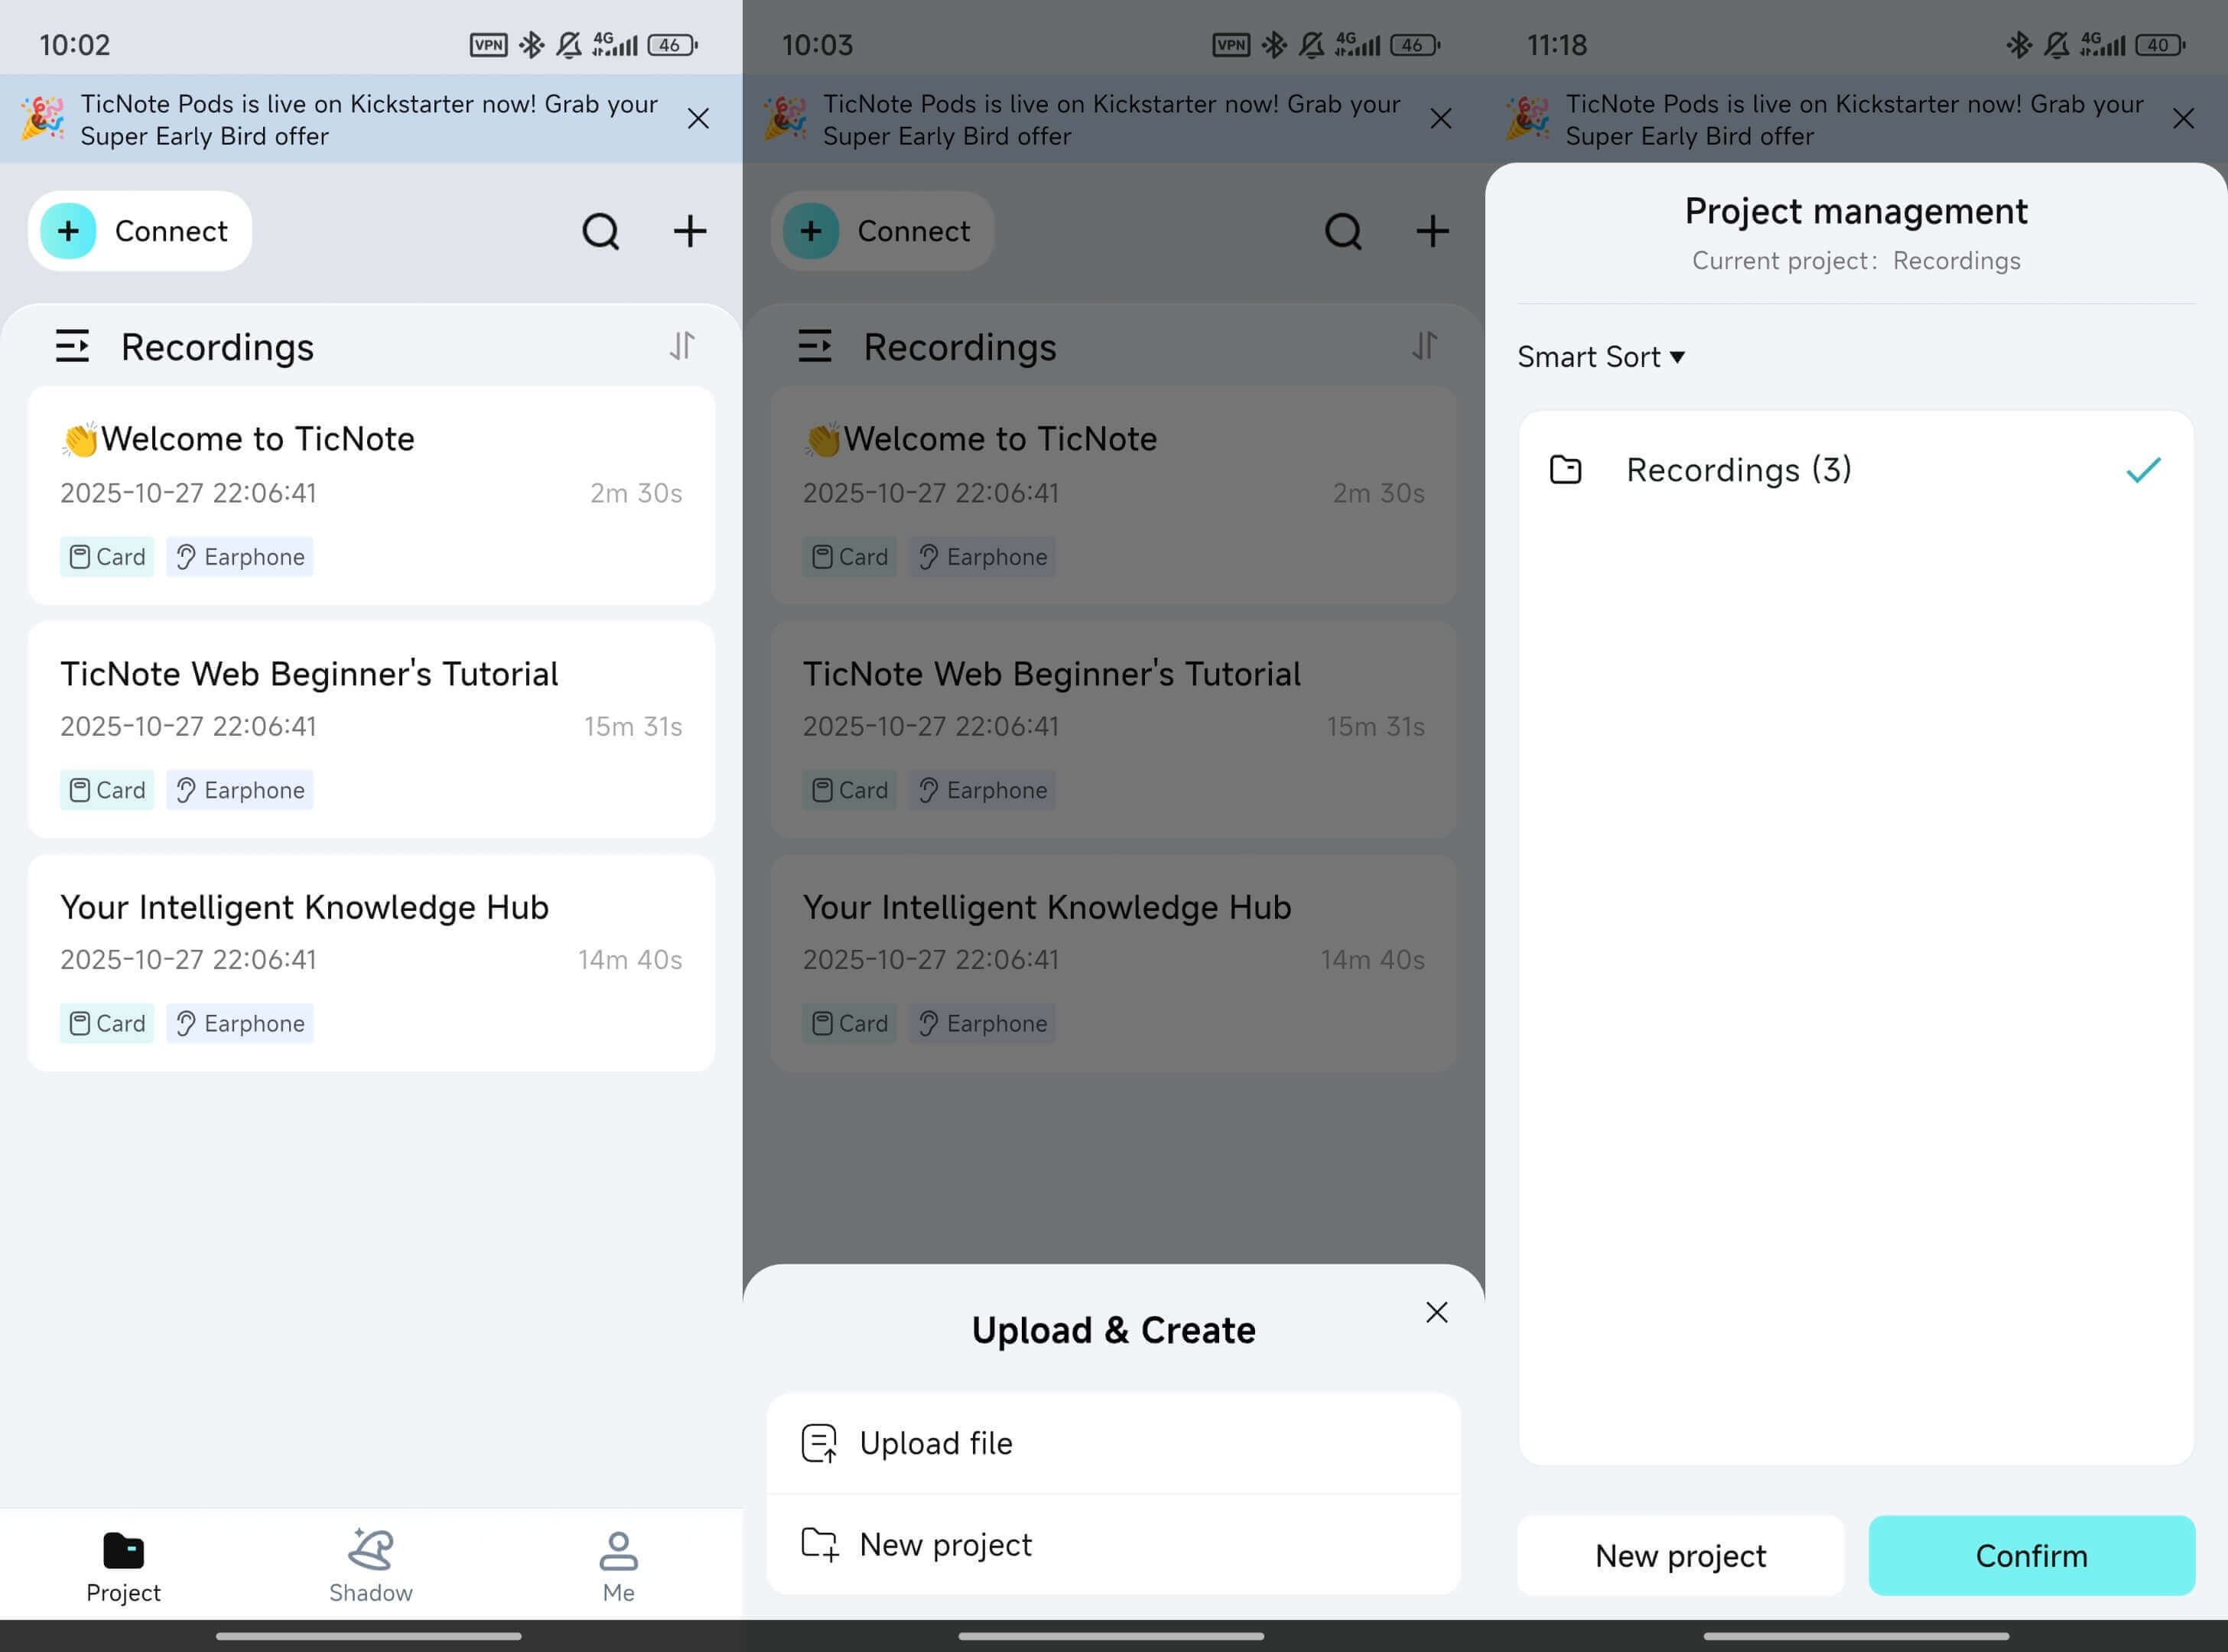
Step 2: Upload the phone call recording from your device
Once inside the project, tap the add button at the top of the app to upload your audio or video file. You can either upload directly into an existing project or create a new one during this step.
If the recording originally lives on your phone, make sure you upload the original file rather than an edited version. Keeping the raw recording intact helps if you ever need to re-check timing or wording.
After the upload finishes, the file will appear inside the project and be ready for transcription.
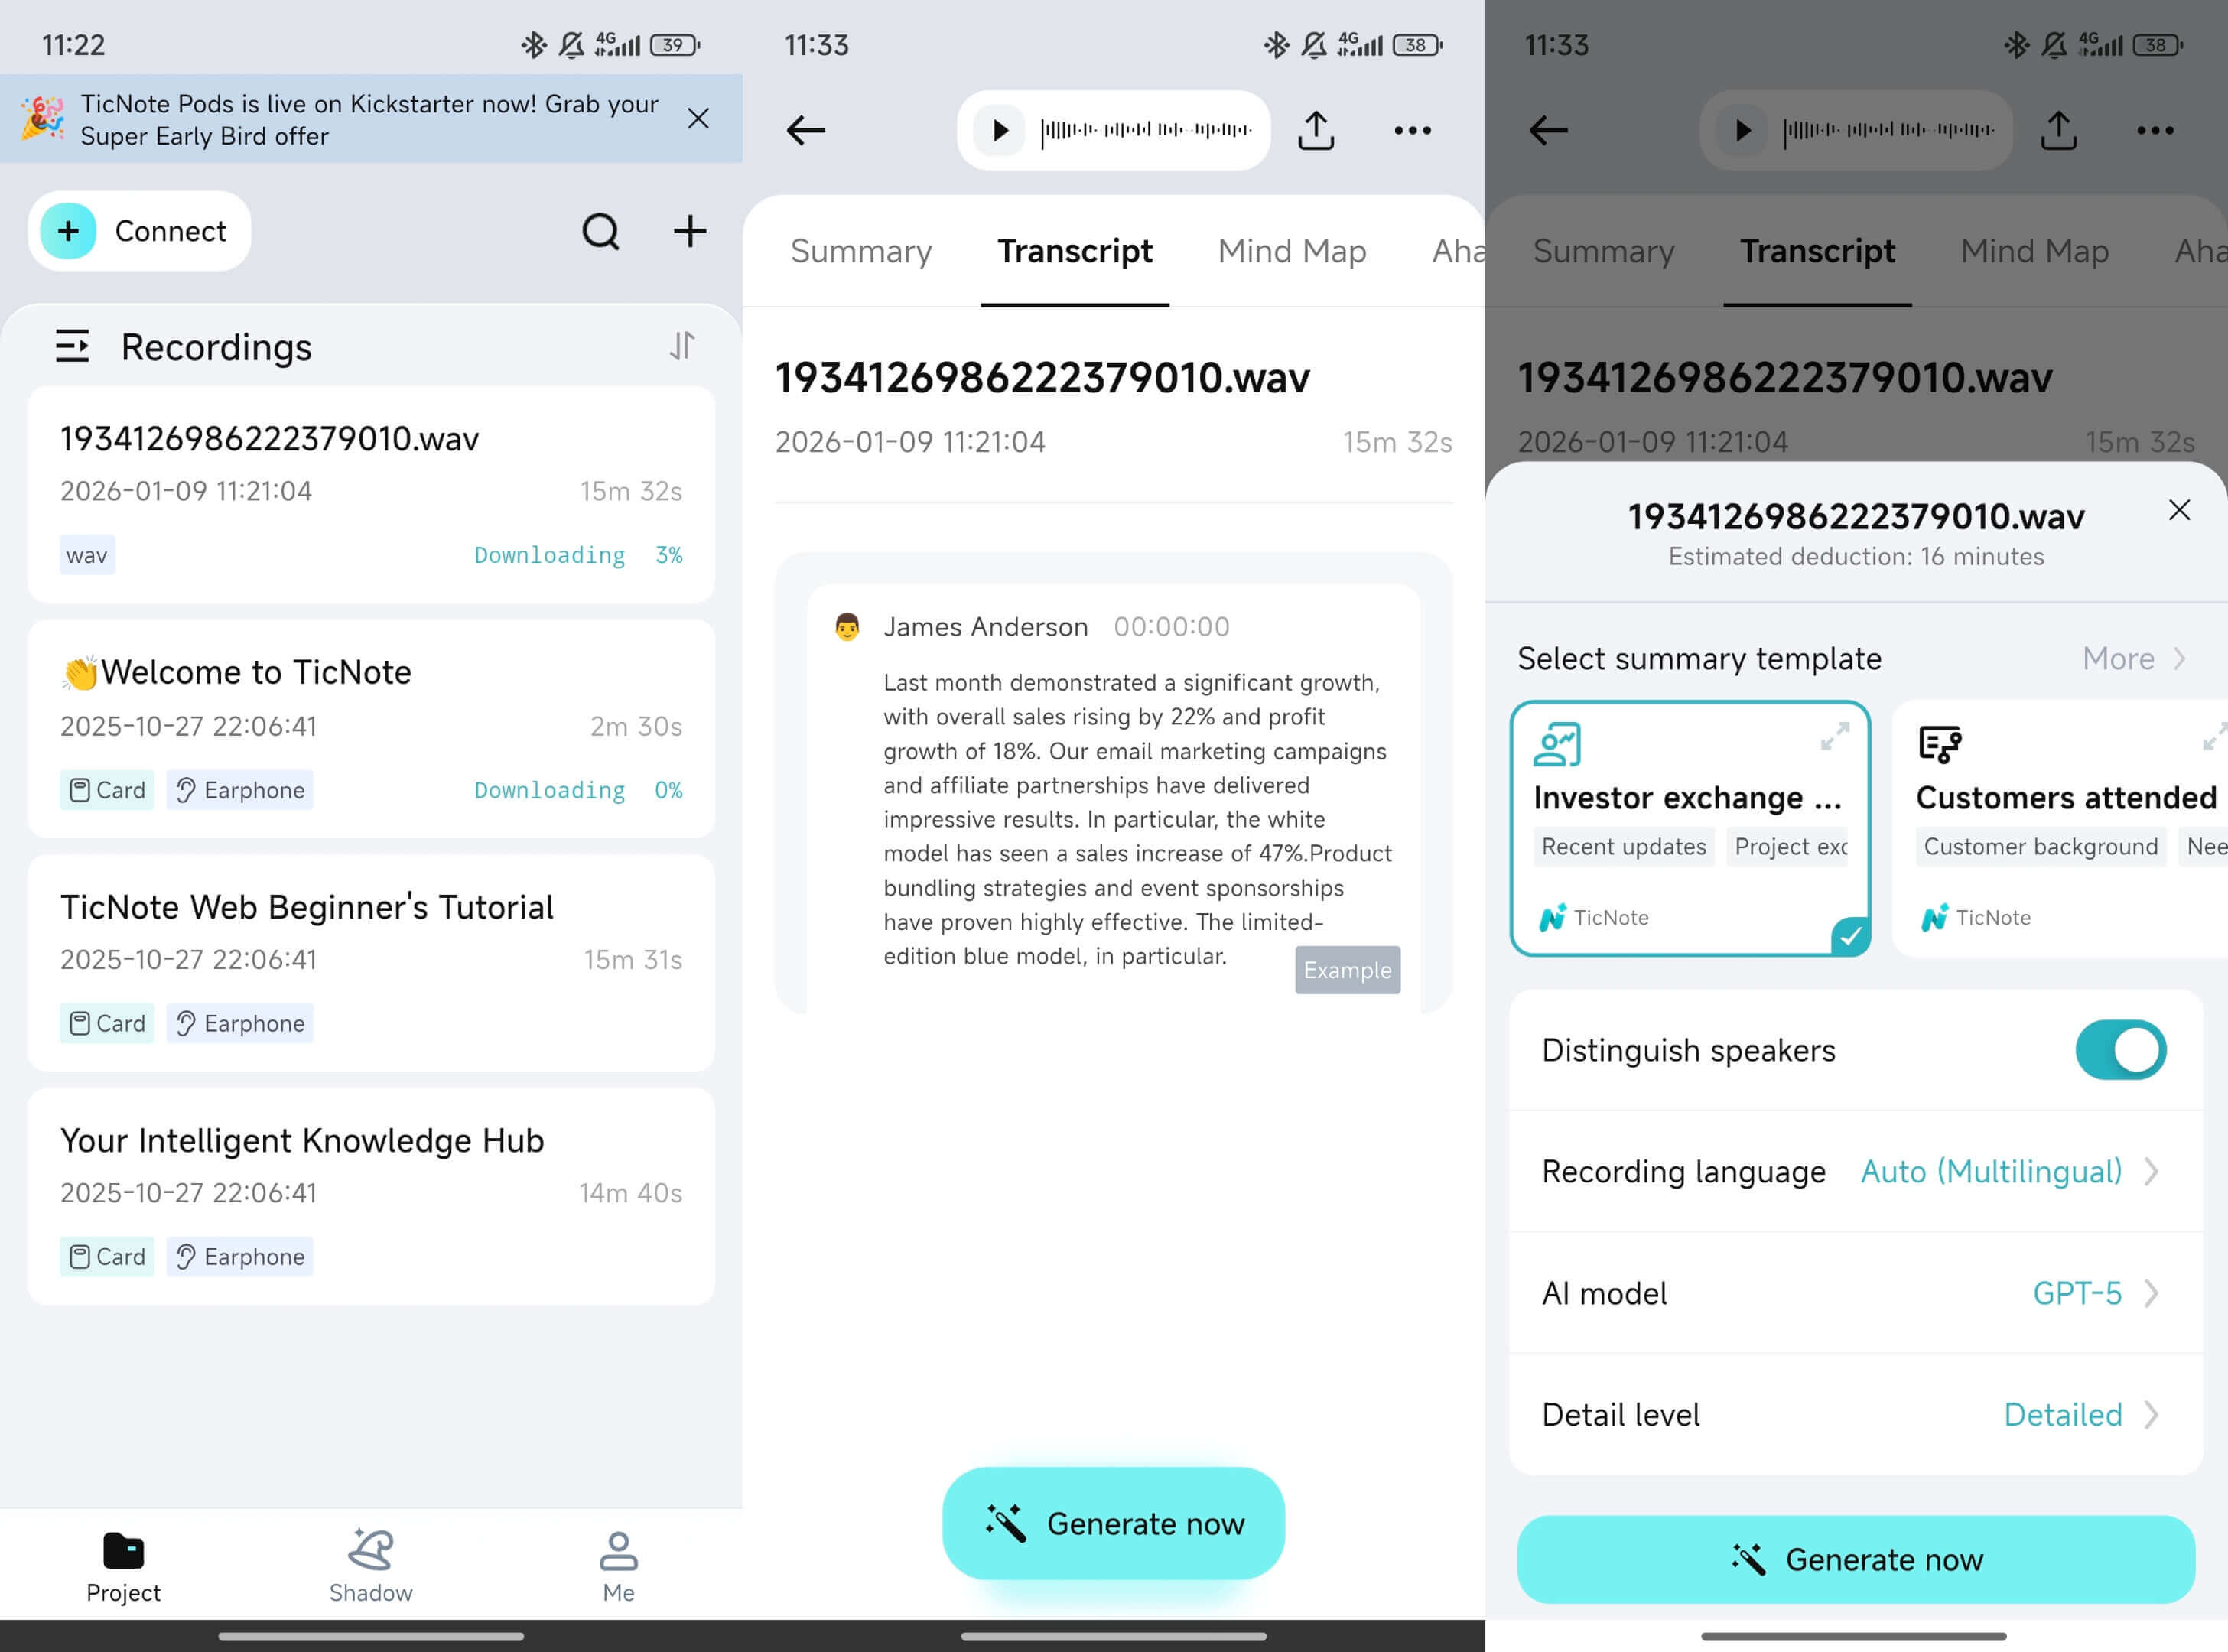
Step 3: Start transcription and set the right options
Tap the uploaded file and choose the transcript option. Before generating anything, take a moment to configure the key settings.
Here you can select the spoken language of the call, relevant fields or context, the level of detail you want in the transcript, and whether speakers should be distinguished.
When everything looks right, tap Generate now to start transcribing.
While the transcript is processing, you don’t need to stay on the screen. Once it’s done, you can open it and review it immediately.
Step 4: Review and lightly edit the transcript while it’s fresh
After generation, the transcript opens in the editor. This is the best moment to scan for high-impact issues before you rely on the text.
Focus on elements that tend to matter most later, such as names of people or companies, numbers like prices and dates, commitments and deadlines, and negations like “not” or “don’t” that can flip meaning.
You can edit both the transcript and the audio context directly in the app, making quick corrections without breaking your workflow.
Step 5: Generate a usable summary from the call
A transcript captures everything, but a summary captures what matters. From the transcribed call, create an AI summary that pulls out decisions, next steps, owners, and open questions.
For many roles—sales, recruiting, support, consulting—the summary is what actually gets reused. It’s often what ends up in a CRM, case system, or internal update.
Keeping the summary and transcript together in the same project ensures you always have both detail and clarity.
Step 6: Translate when your team or client uses another language
If your teammates or stakeholders read a different language, translate the transcript or the summary directly from the project. In many cases, translating the summary alone is enough and keeps sharing simple.
Store both language versions in the same project so searches and future questions still work in context.
Step 7: Reuse calls later with project search and cross-file questions
Once multiple calls live inside projects, you no longer need to dig through folders or filenames. You can search across calls or ask questions that span files, such as what was agreed on last month or which calls mentioned a specific issue.
This is where phone call transcripts stop being static documents and start acting like a living knowledge base.
Step 8: Export the transcript or summary in the format you need
When you’re ready to share or archive, tap the three-dots menu at the top of the app and choose Export transcript. Select the format that fits your next step, then confirm export.
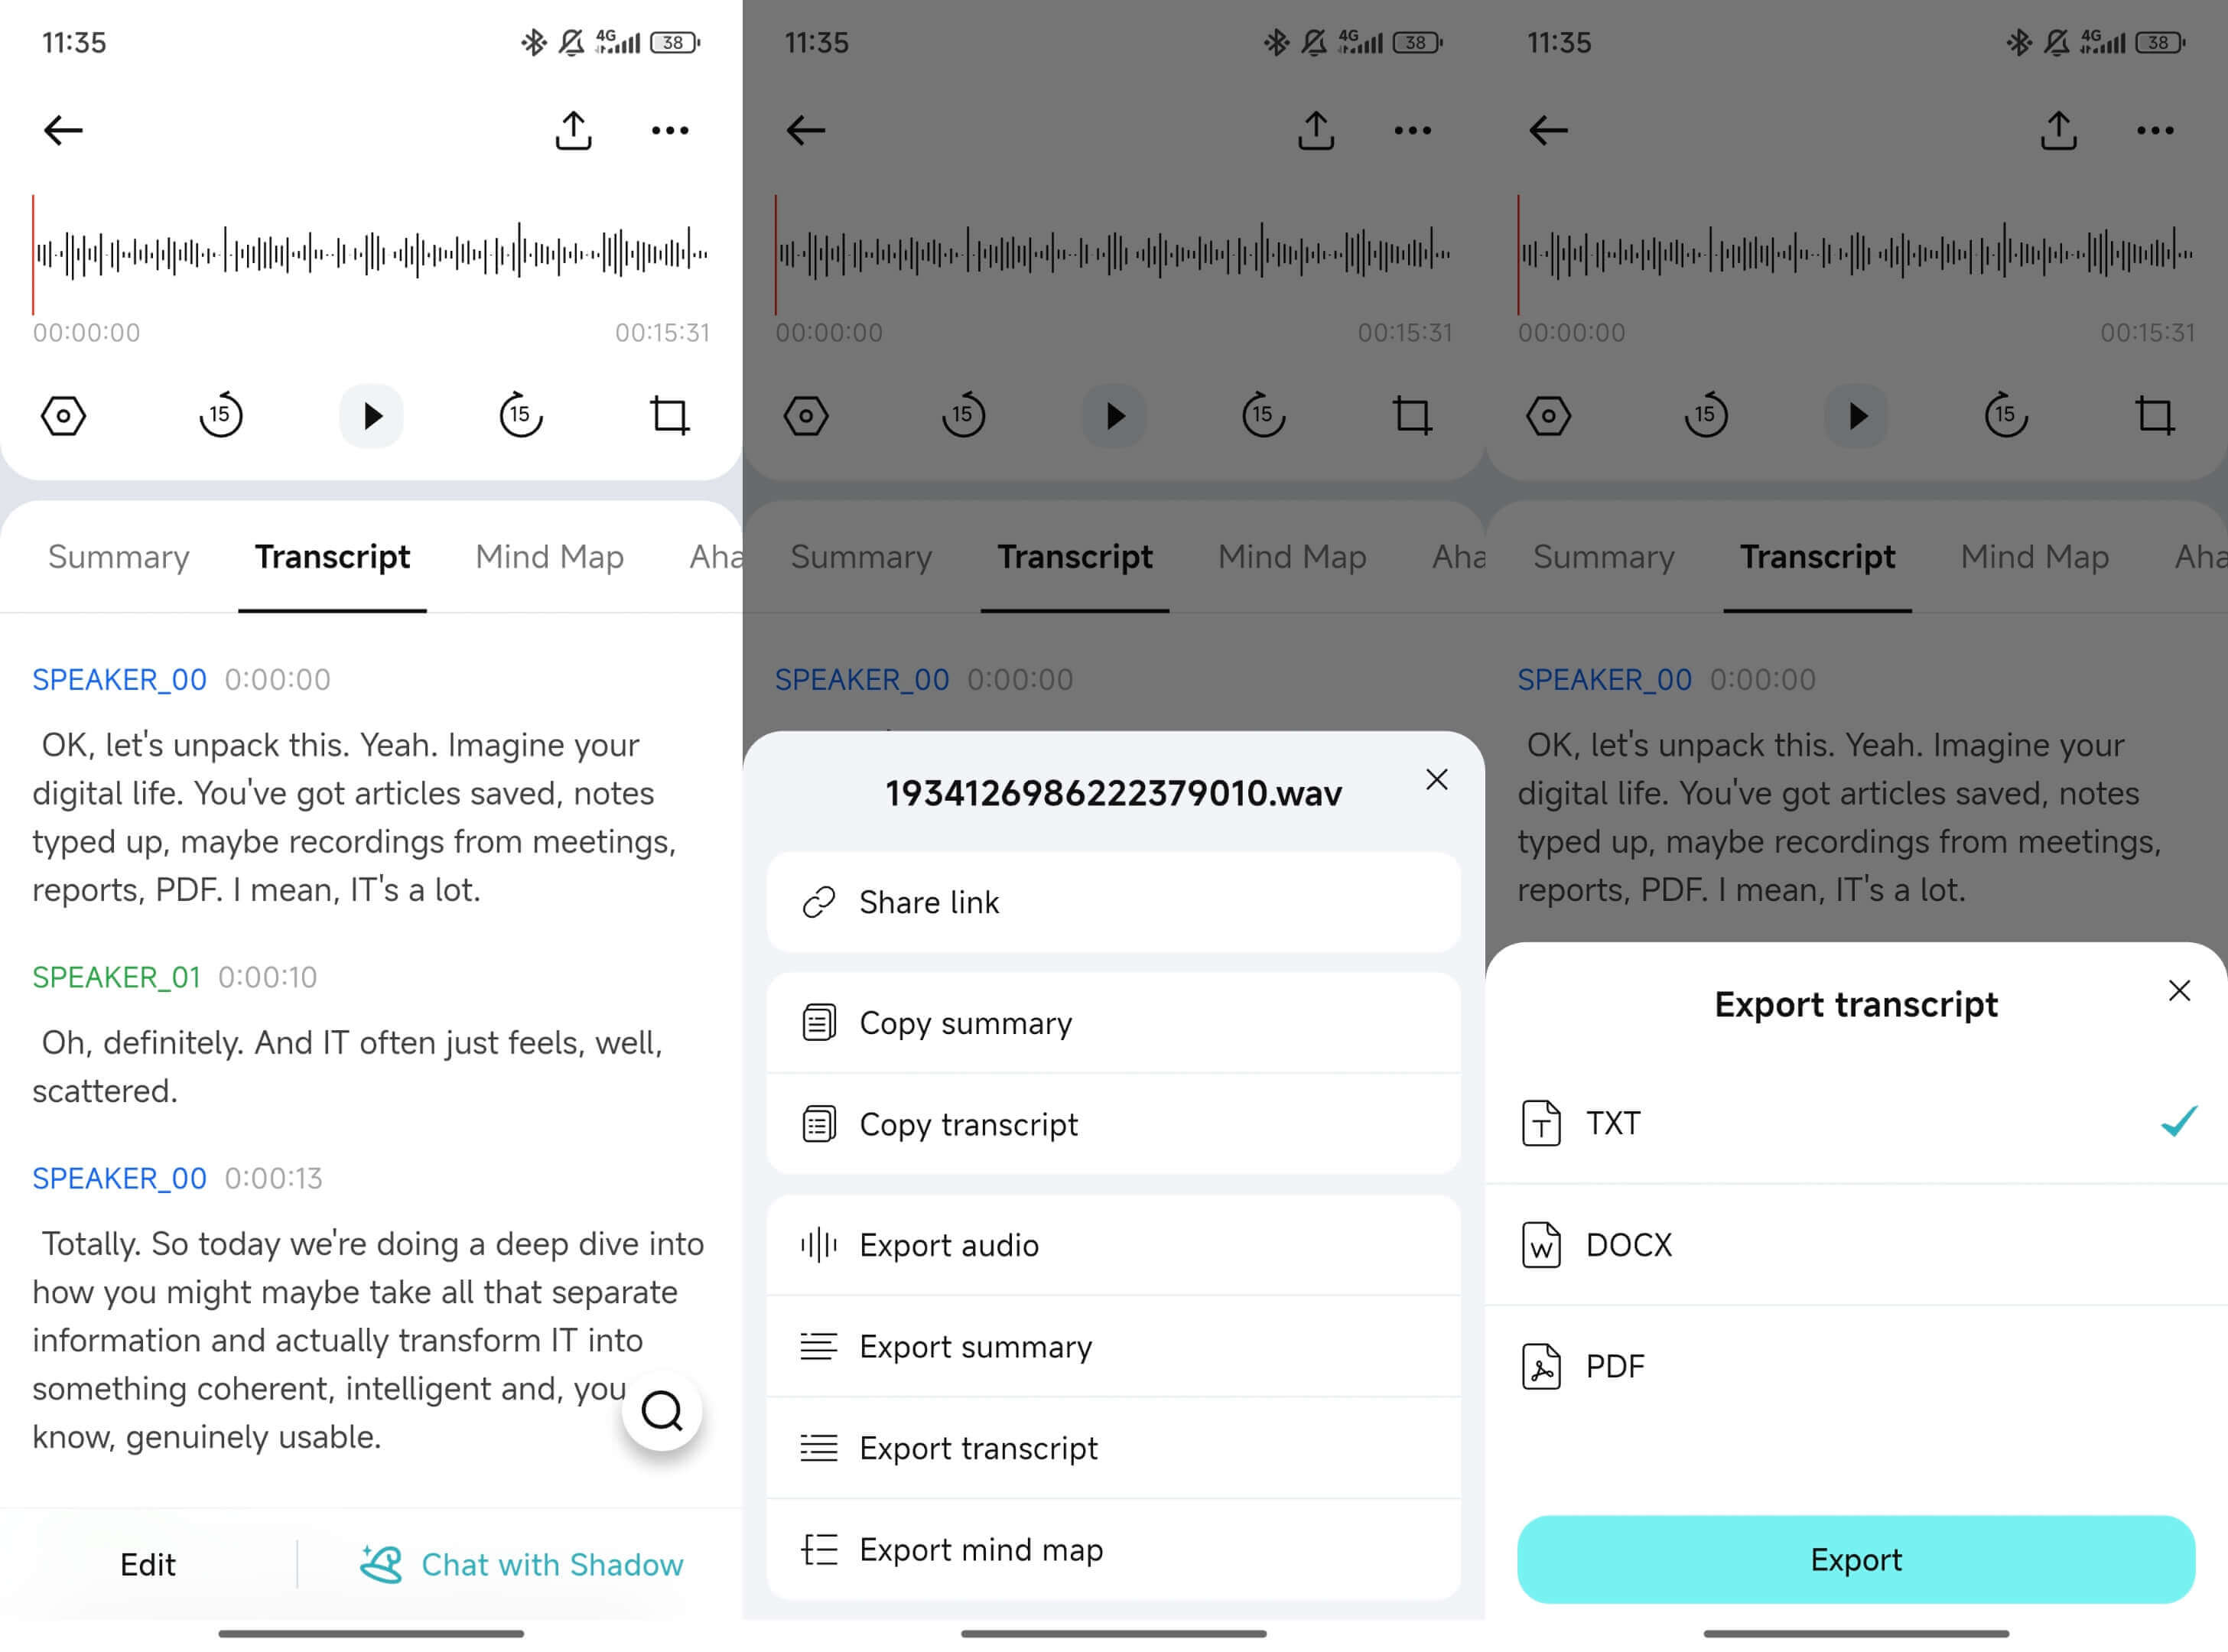
You might export transcripts for editing, importing, or record-keeping, while summaries are often exported for sharing, reporting, or formal documentation.
Before sending anything out, do a quick safety check: share only with people who need access, redact sensitive information if required, and consider sharing the summary instead of the full transcript when appropriate.
Notes for using the same workflow on Web
If you prefer working on desktop, the flow in TicNote Web Studio is nearly identical. You upload files into a project, generate the transcript from the Transcript tab, choose the language and AI model in a pop-up, then export in your preferred format.
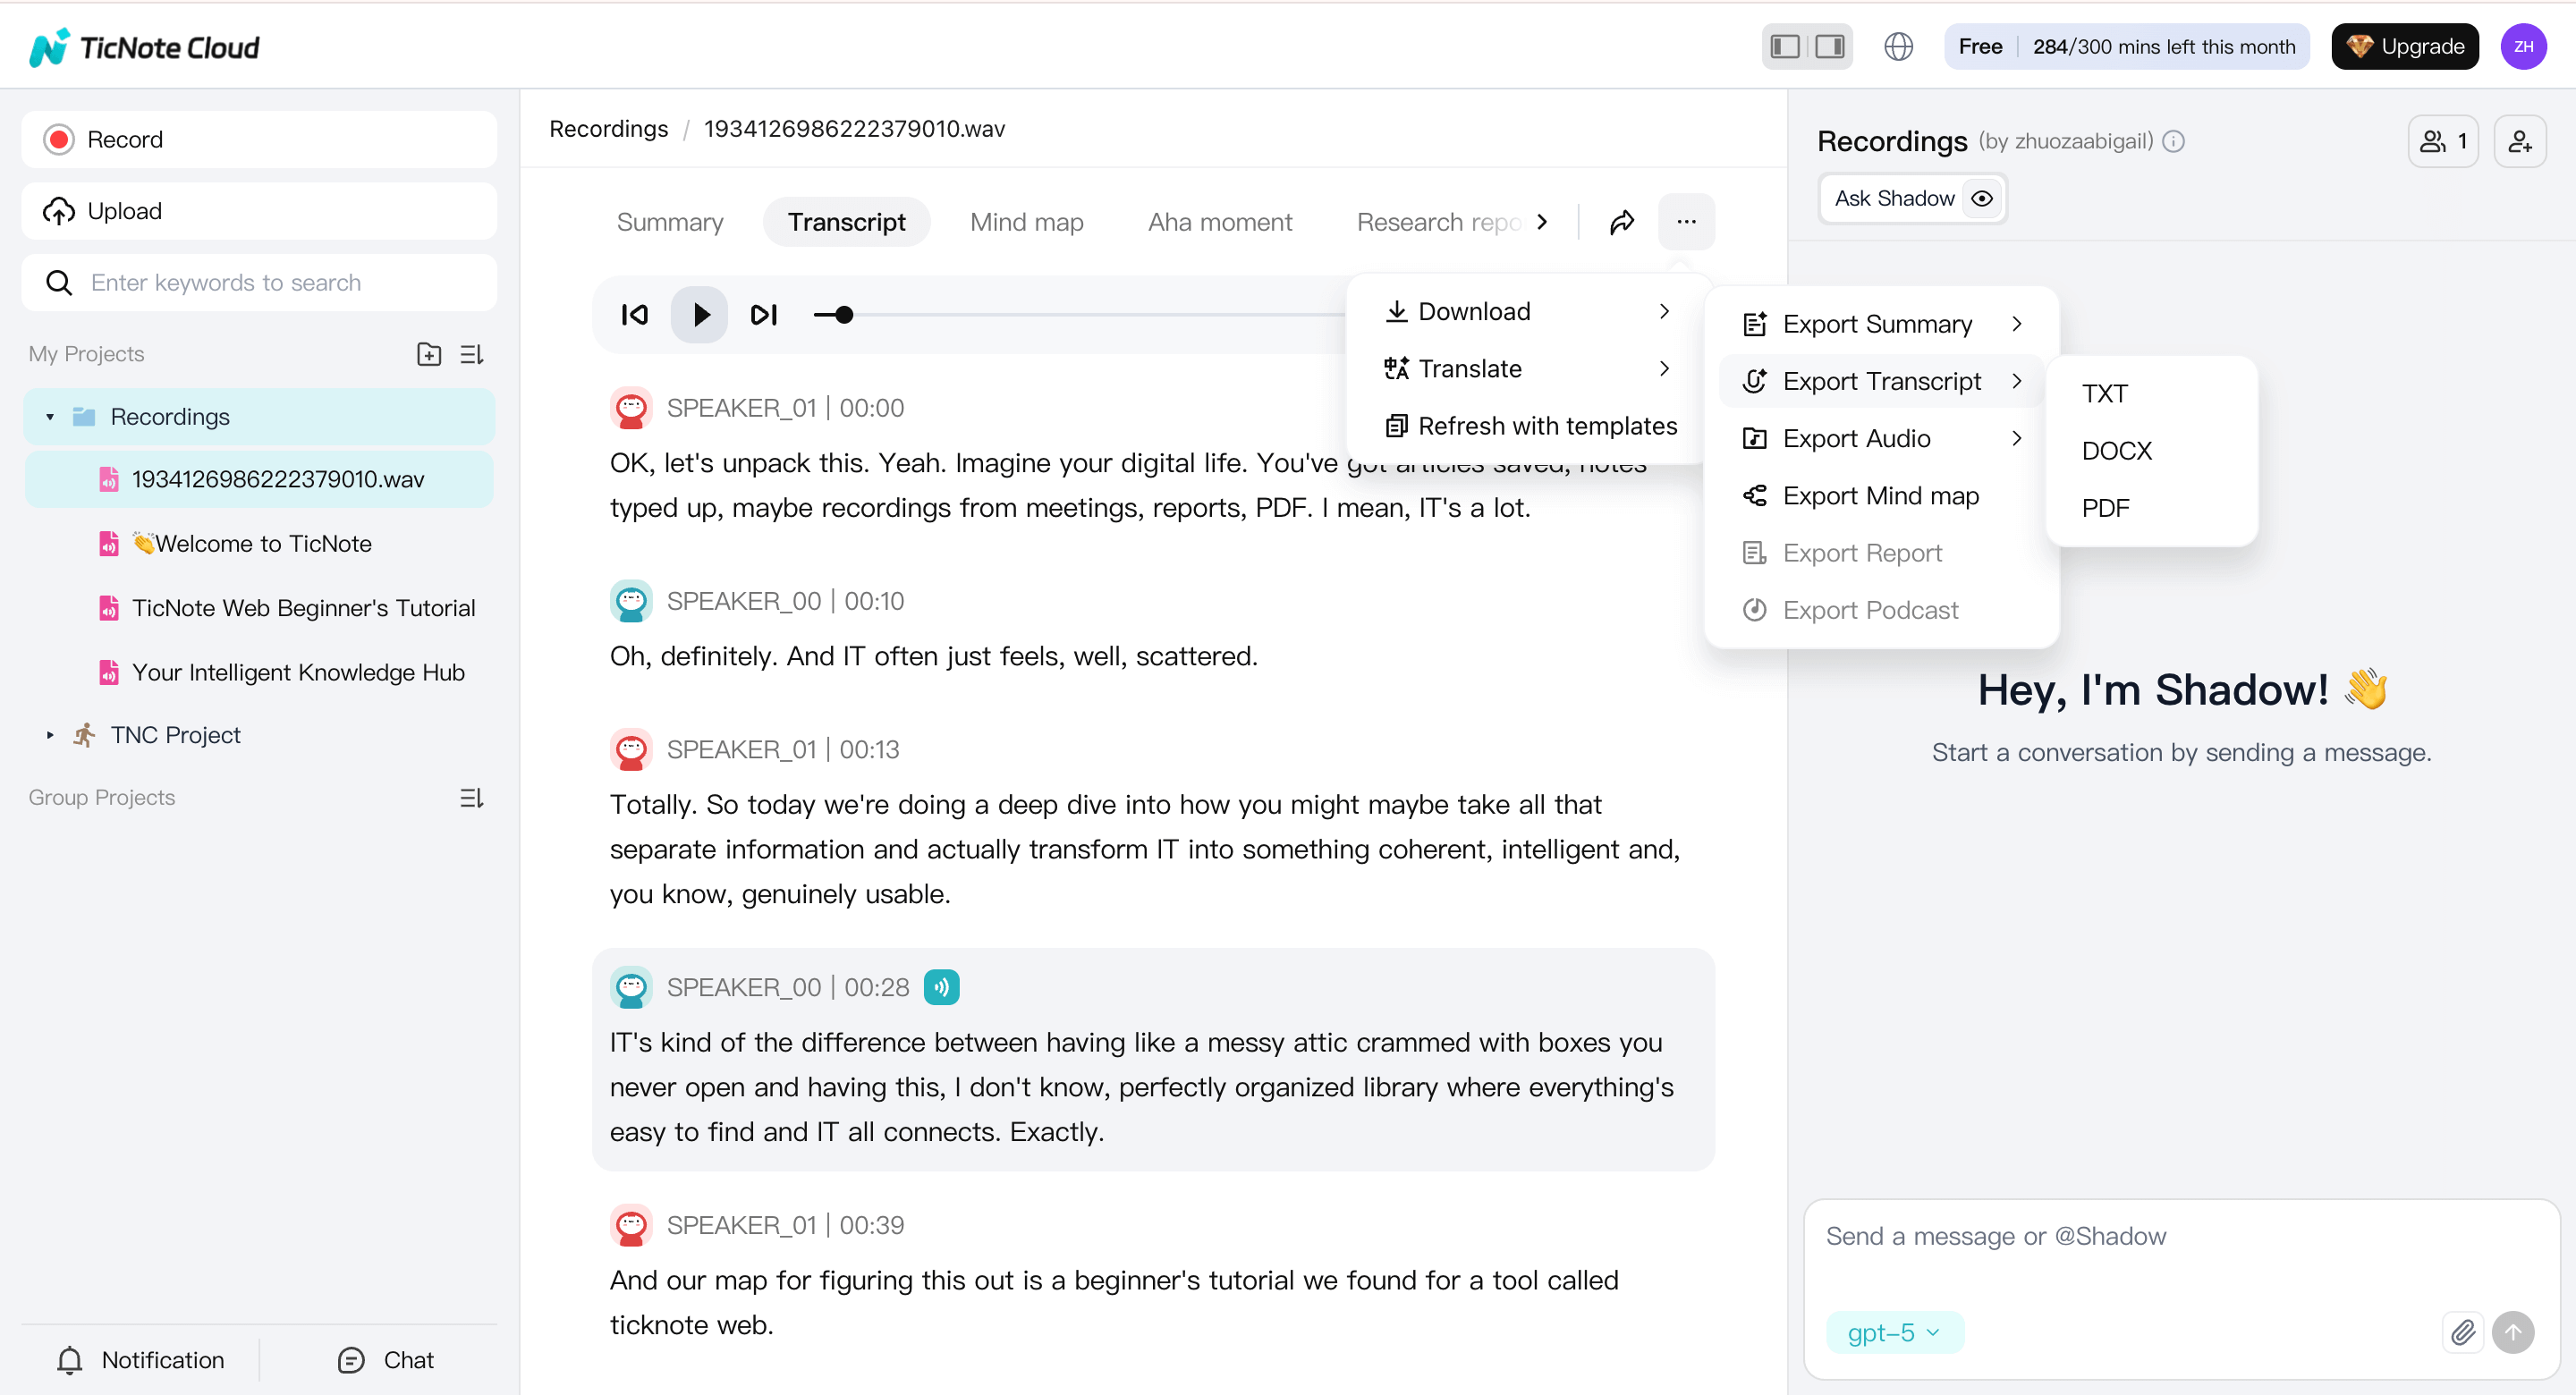
The key difference is interface, not capability. The same project-first workflow applies on both app and web.
How do you make phone call transcripts more accurate?
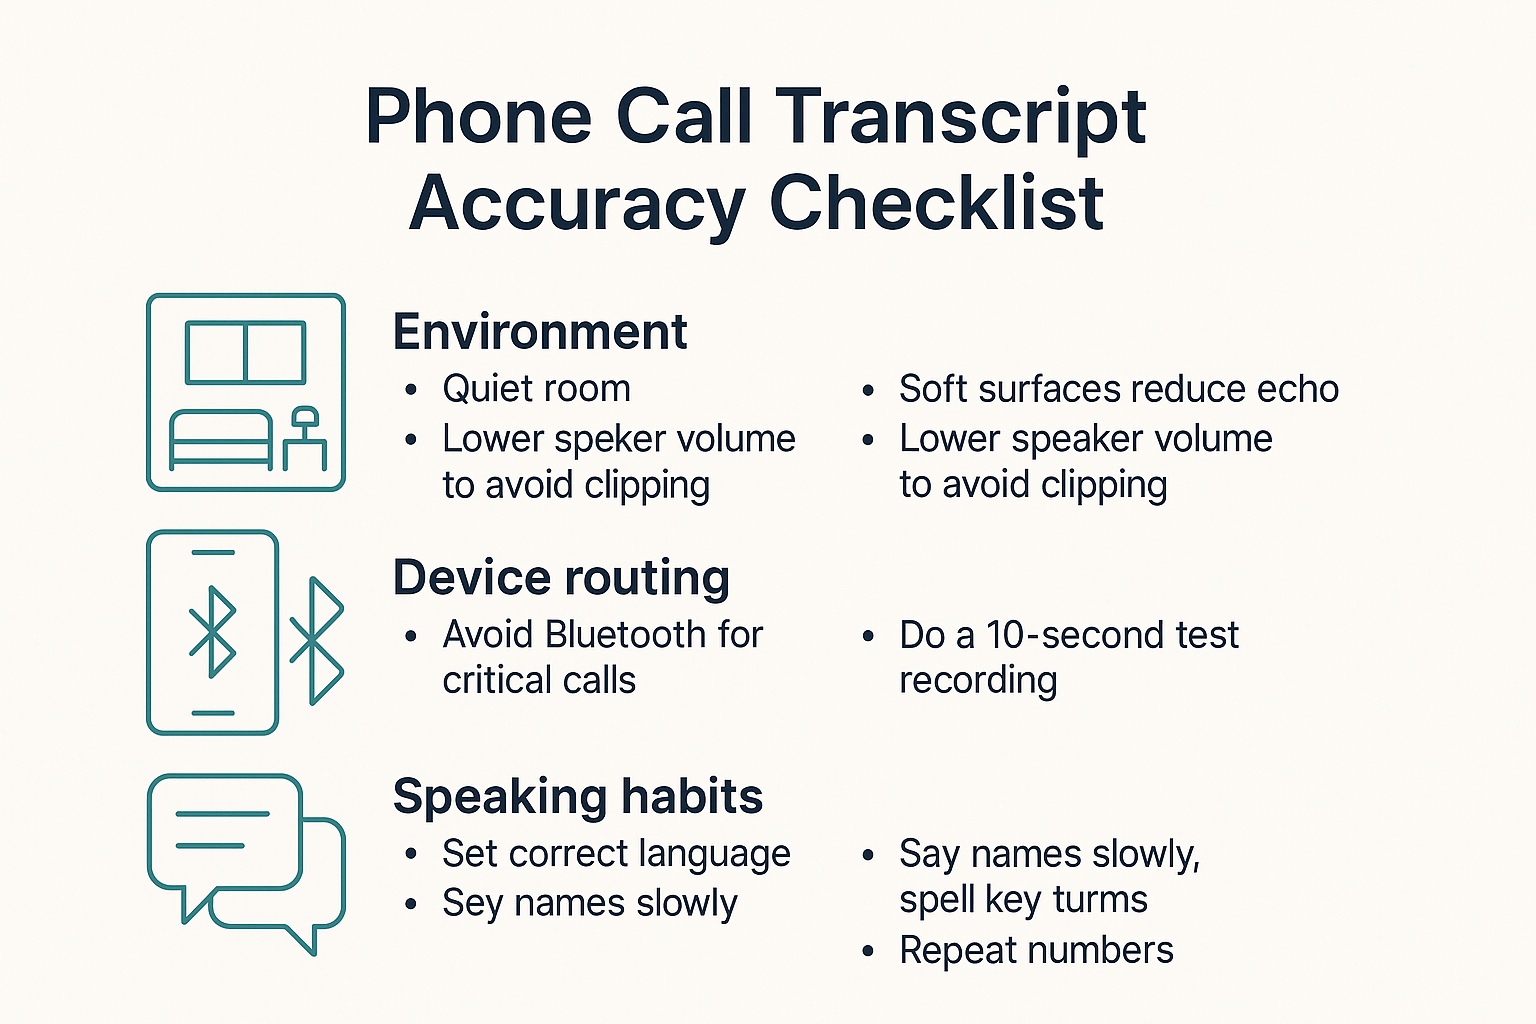
Better audio in means better text out. If you want to transcribe a phone call accurately, focus on what you can control: the room, the phone's mic path, and how people speak. Small changes can cut errors fast.
Fix the room first (it matters more than you think)
Start with a quiet space. Background noise forces the recorder to guess words.
- Pick a small, soft room: curtains, rugs, and couches reduce echo.
- Shut off steady noise: fans, AC vents, and TVs.
- If you must use speakerphone: keep the phones farther apart and lower the volume if it sounds harsh or "crackly" (that's clipping).
Control device routing so you capture both sides
Many "bad transcripts" are really routing problems. Your phone may switch microphones without warning.
- Avoid Bluetooth headsets when accuracy matters. Some models compress audio or capture your voice better than the other person.
- Be careful with car systems. Hands-free mode can add road noise and may record only one side.
- Do a 10-second test before an important call: record, play it back, and confirm you can hear both speakers clearly.
Use speaking habits that help the transcript
You can guide the transcript without sounding robotic.
- Set the right language in your transcription tool. If the language is wrong, names and terms get mangled.
- Say names slowly once, then keep going. For key terms, spell them once: "That's N A P A."
- Repeat numbers and critical details: "The order number is 4182, that's 4182."
Make diarization work (speaker labels)
Speaker separation (diarization) means the transcript labels who said what, like "Speaker 1" and "Speaker 2." It breaks down when people talk over each other or answer too fast.
Try this simple call rhythm:
- Pause for a beat after someone finishes.
- Don't interrupt, even with quick "yeah" and "right."
- If speakers blend anyway, use a tool with speaker labels and quick edits so you can fix names and turns in minutes.
What should you do when transcription goes wrong (troubleshooting)?
When a call transcript looks wrong, don't start over yet. First, figure out if the issue is capture (bad audio) or conversion (wrong settings). Most fixes take two minutes, and they can save the whole recording.
If only your voice is captured
This usually means your app recorded the phone's microphone, not the call audio. It can also happen if you used the earpiece or Bluetooth routed the other voice away.
Try this quick checklist:
- Turn off Bluetooth and disconnect earbuds.
- Put the call on speakerphone (not earpiece).
- Place a second device 6 to 12 inches from the phone speaker.
- Do a 10-second test, then play it back before the real call.
If the other person is too quiet
Low volume makes the transcript miss words, names, and numbers. Fix the sound at the source before you "fix" the text.
Do this:
- Move your recording device closer to the speaker.
- Raise call volume until it's clear, but not harsh.
- Ask them to speak toward their mic and move to a quiet room.
- If they're on speaker too, ask them to switch to a handset.
If the transcript is garbled or choppy
This is often clipping (audio too loud), heavy noise suppression, or low-quality audio from a compressed file.
Common fixes:
- Lower the speaker volume a bit if the audio sounds crackly.
- Turn off "voice isolation" or aggressive noise controls if you can.
- Record in a higher-quality format when possible.
- Avoid sending audio through chat apps that recompress files.
If it picks the wrong language or keeps missing jargon
Wrong language settings can wreck accuracy fast. Jargon can confuse even good models.
Use this clean-up pass:
- Set the right spoken language before transcription.
- Add a short glossary in your notes (names, product terms, acronyms).
- Re-check only high-risk items: names, dates, amounts, and decisions.
- If it's still messy, re-upload a cleaner audio file.
If you want a repeatable edit flow, this interview transcription workflow also works well for phone calls.
Which phone call transcription tool should you choose? (Comparison table)
Pick a tool based on your real workflow, not feature lists. First, ask: how will you capture the call (native recording, speakerphone, or VoIP)? Then decide if you need an all-in-one app that records and transcribes, or a post-call tool that turns recordings into clean notes, summaries, and exports.
Use this quick comparison (based on how you actually work)
| Option type | How you capture the call | Records the call too? | Best for | Exports | Speaker labels | Editing tools | Storage and retention | Team sharing |
| Native phone recorder (where available) | Built in call recording or system feature | Yes (device and region dependent) | Simple proof of what was said | Often limited, sometimes audio only | Usually basic or none | Basic trimming, limited text edit | Tied to device and OS settings | Limited |
| Speakerphone plus second device | Call on speaker, record with another phone or recorder | Yes (manual setup) | Most reliable "works anywhere" capture | Audio file you can upload | Depends on transcription tool | Depends on transcription tool | You control files locally | Easy to share files, not built in |
| VoIP app recording (Zoom, Teams, app calls) | Record inside the VoIP app | Yes (inside the app) | Work calls with clear audio | Varies, often more export options | Often stronger | Often stronger | Usually cloud retention settings | Often strong |
| All in one call recording transcription apps | App captures audio then runs ASR (automatic speech recognition) | Sometimes | Convenience on one device | Varies by app | Varies | Light to medium | Cloud account rules vary | Varies |
| Post call transcription workspace (upload first) | You bring your own recording | No (post call only) | Clean transcript workflow plus reuse | Strong, multi format | Often good | Strong text editing and restructure | Project based controls | Strong for sharing and reuse |
Where TicNote Cloud fits best
TicNote Cloud is strongest when you already have a legal recording and want a clean post-call workflow. Upload the audio, get a transcript, then generate a structured summary for follow-ups. You can translate into 120 plus languages, organize files into projects, then search or chat across many calls later. When you need outputs for other systems, export the transcript as TXT, and export summaries as Markdown, DOCX, or PDF.
When a human transcription service is worth it
Pay for a human when the stakes are high, like legal, medical, compliance, or a required verbatim format. It also helps when audio is messy, like overlap, heavy accents, or loud background noise. To cut costs, clean the audio first (reduce noise, trim hold music), and only request timestamps when you truly need them.
A simple decision rule
- Need the recording itself: start with your capture method and legal consent.
- Need clean notes you can reuse: choose a post-call tool with strong editing, exports, and project storage.
- Need perfect formatting: use a human, and scope it tightly.
