

TL;DR: Fast ways to turn a YouTube video into text (and when to use each)
Need to know how to transcribe a YouTube video fast? Choose from the best 3 methods: TicNote transcribing, YouTube default transcribing, and human-made transcription. Pick the option that matches your goal, then move on.
Problem: auto captions are messy and hard to reuse. It wastes time, and you still miss key points. A workflow tool fixes this by turning the transcript into clean notes, summaries, and exports.
- Read it now: Open YouTube’s Transcript panel on desktop, then search and copy.
- Get a clean, shareable transcript: Use YouTube Studio (if it’s your channel) or a transcription tool, then export to TXT or DOCX.
- Turn it into usable notes: Use a transcript plus summary, templates, and Markdown or PDF exports for study, posts, and docs.
Accuracy mostly comes down to audio: clear voice, low noise, one speaker at a time.
How to transcribe a YouTube video: the 5 best methods (ranked by effort and accuracy)
To pick the best way to transcribe a YouTube video, decide four things fast: speed, accuracy, cost, and how clean the final text must be. If you only need rough notes, auto-text is fine. If you need quotes, subtitles, or publish-ready copy, you need cleaner output and more control.
If you're also working with social platforms, this workflow is the same when you transcribe Facebook video to text, so you can reuse the same cleanup and formatting steps.
Here’s the simple rule: the cleaner you need it, the more you either edit, use better tools, or pay a human.
Choose your method (speed, accuracy, and what you get)
| Method | Effort | Accuracy | Cost | What you get | Best for |
| YouTube transcript (viewer, desktop) | Low | edium | Free | Auto captions shown as a transcript | Quick study notes, quote hunting |
| YouTube Studio captions (your channel) | Medium | Medium to high | Free | Captions file you can edit, timing included | Accessibility, subtitles, creators |
| TicNote Cloud workflow | Low to medium | High (after cleanup) | Free and paid plans | Searchable notes, summaries, templates, exports | Repurposing, research, repeatable notes |
| Live dictation (Google Docs, phone) | Medium | Low to medium | Free | Real-time text you speak or play into | Fast rough drafts, personal notes |
| Human transcription service | Low | Very high | Paid | Polished transcript, often with speakers | Legal, interviews, publish-ready copy |
If you're working with other formats too, this process fits into the broader workflow of how to transcribe a video, from setup to cleanup and export.
Method 1: YouTube transcript (fastest for viewers)
Who it’s for: students, educators, and anyone reading for key points.
What you get: a transcript view built from auto captions (automatic text YouTube creates from the audio). It may include timestamps, but it usually won’t include clean paragraphs or speaker labels.
Key limits:
- Not every video has it.
- Copying can be messy, with timestamps and line breaks.
- Names, jargon, and numbers often need fixes.
Best use cases:
- Pulling quotes.
- Making quick lecture notes.
- Scanning a long video without rewatching it.
Method 2: YouTube Studio captions (best if it’s your channel)
Who it’s for: YouTubers, editors, and teams managing accessibility.
What you get: caption tracks you can edit in YouTube Studio. This is closer to subtitles (timed text shown on the video) than a clean reading transcript.
Key limits:
- It’s mainly for your own uploads.
- It’s built for timing, not readability.
- Export options depend on the caption format you choose.
Best use cases:
- Fixing auto captions for accessibility.
- Publishing better subtitles.
- Keeping timing for translation or localization.
Method 3 (recommended for reuse): TicNote Cloud (fast to search, summarize, and export)
Who it’s for: marketers, students, podcasters, and busy pros who turn videos into assets.
What you get: a transcript plus note outputs you can actually use. That includes summaries, structured templates, translation (120+ languages), and even a mind map for review. You can also export to TXT, DOCX, PDF, or Markdown, which is great when you need content in other tools.
Key limits:
- You still need to do a quick cleanup pass for names and terms.
- Some workflows may require choosing a template that fits your goal.
Best use cases:
- Turning a 30-minute lecture into study notes and a quiz outline.
- Repurposing a webinar into a blog post, email, and social snippets.
- Building a searchable knowledge base you can ask questions later.
Mini example: A student has a 30-minute lecture. They transcribe it, then generate a topic summary, key terms list, and 10 flashcards. Later, they search one phrase to find the exact section again.
Method 4: Live dictation (good for rough text, not accuracy)
Who it’s for: anyone who needs words on the page fast.
What you get: text from speech-to-text while you talk, or while you play audio near your mic. It’s basically “best effort” typing.
Key limits:
- It picks up background noise.
- Punctuation and speaker changes are weak.
- It’s hard to keep timing or structure.
Best use cases:
- Drafting rough notes.
- Capturing ideas while you watch.
Method 5: Human transcription (best quality, highest cost)
Who it’s for: teams that need high accuracy, clean formatting, and speaker names.
What you get: a polished transcript. Many services offer speaker labels, timestamps, and formatting rules.
Key limits:
- It costs more.
- Turnaround time varies.
Best use cases:
- Interviews you’ll publish.
- Legal or compliance documentation.
- Research quotes where accuracy matters.
Quick definitions so you pick right
Auto captions vs transcript: Auto captions are machine-made captions meant to display on video. A transcript is the readable text version you copy, edit, and reuse.
YouTube subtitles vs transcript: Subtitles are timed lines that appear on screen. A transcript is for reading, searching, quoting, and repurposing.
Example before and after:
- Raw auto captions: “so today we gonna talk about growth hacks first thing you do is open the ads manager right”
- Clean transcript: “Today we’ll cover growth hacks. First, open Ads Manager.”
Method 1: Pull the transcript from YouTube on desktop (and copy it cleanly)
If you just need the text fast, YouTube’s built-in transcript is the quickest way to transcribe a YouTube video on desktop. You can grab the captions in under a minute, then paste them into Google Docs, Word, or Notion for edits and reuse.
Get the transcript from a YouTube video (desktop)
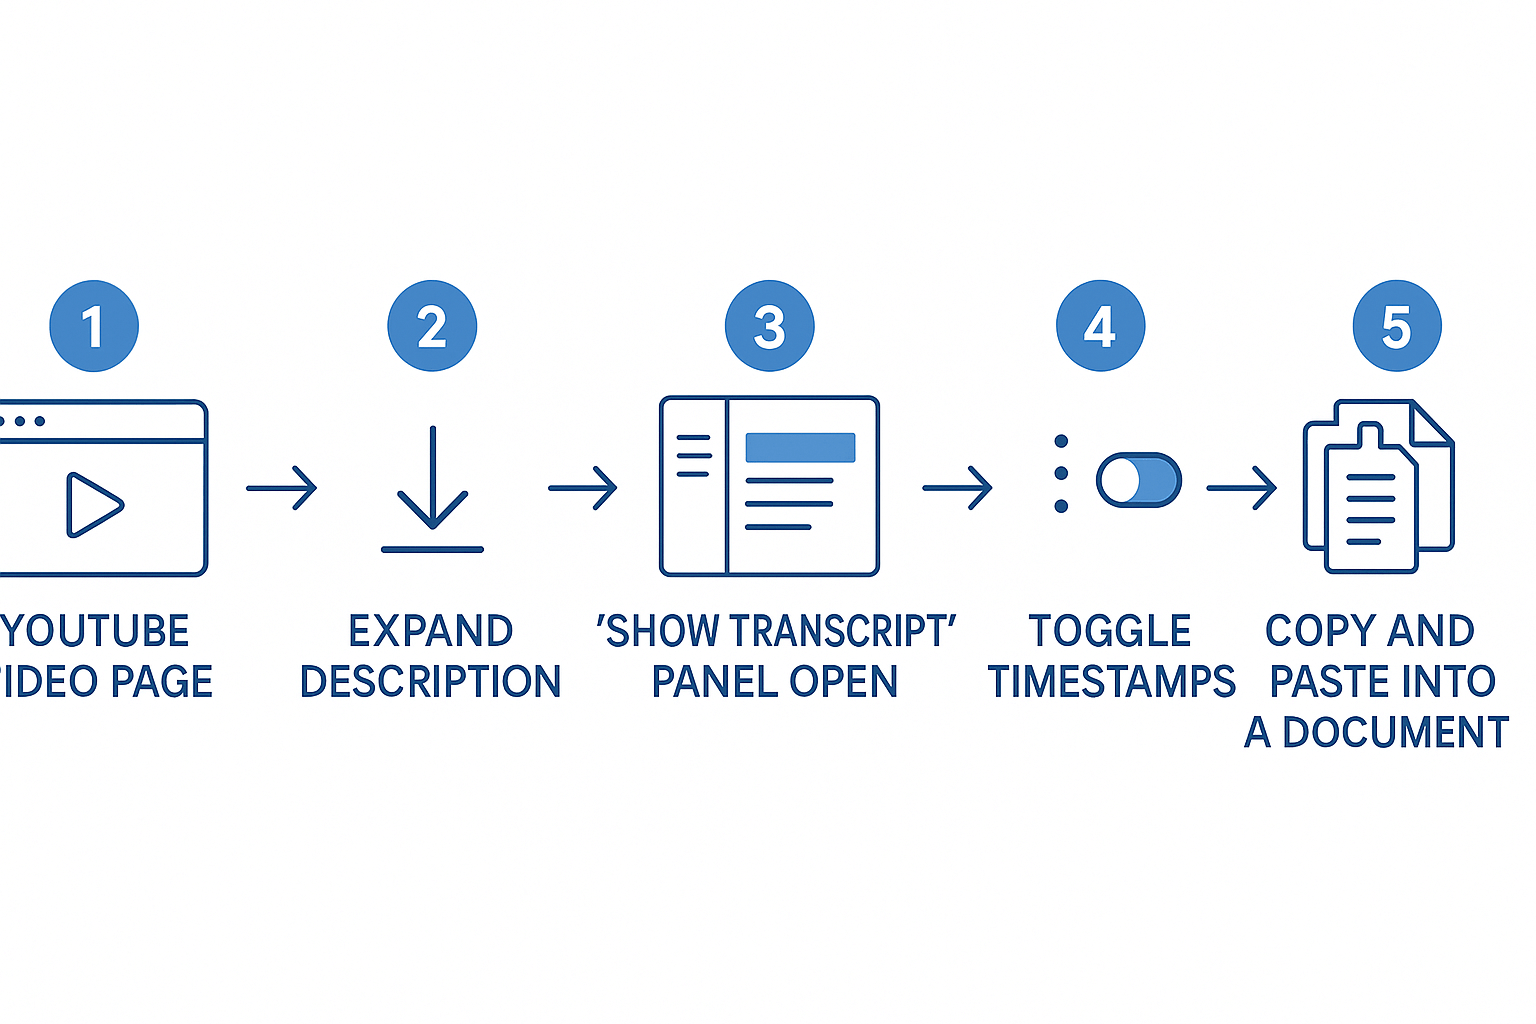
Follow these steps:
- Open the video on YouTube (desktop browser).
- Under the video, click …more to expand the description.
- Look for Show transcript and click it.
- A transcript panel opens on the right.
- In that panel, click the three-dot menu.
- Turn Toggle timestamps off (if you see it).
- Click inside the transcript, press Ctrl+A (Cmd+A on Mac), then Ctrl+C (Cmd+C).
- Paste into your document and save as a working draft.
Tip: copy YouTube transcript without timestamps
Best case: turn timestamps off before you copy. That gives you cleaner text right away.
If the toggle isn’t there, do this instead:
- Paste the transcript into a doc first.
- Use Find and replace to remove timecodes.
- Example patterns to search for:
0:00or00:00. - Replace them with nothing, then clean any extra blank lines.
If “Show transcript” is missing, check this list
YouTube won’t always show a transcript. Common reasons include:
- No captions exist for the video.
- The video is mostly music or has little speech.
- The creator disabled captions.
- The video is age-restricted or limited in your region.
- Language mismatch, captions exist but not in your language.
What to try next:
- Reload the page, and try a different browser.
- Check the video’s caption settings (if available) and switch languages.
- If there are no captions, use a transcription tool (see later methods) or ask the creator to enable captions.
Method 2: Get a YouTube transcript on mobile (what works, what doesn’t)
If you want to know how to transcribe a youtube video on your phone, start in the YouTube app. Open the video, tap the title or the “More” area, then scroll until you see Transcript. Tap it to open the scrolling text, then tap a line to jump to that moment.
Find the transcript in the YouTube app
The path changes a bit by device and app version, but this usually works:
- Open the video in the YouTube app
- Tap the title area or “More” to expand details
- Scroll down to Transcript
- Tap Transcript, then tap any timestamp to jump
What mobile does well (and where it falls short)
Mobile is great for reading and navigating by timestamp. It’s also good for study, since you can jump to the exact sentence you missed.
The catch: copying text is often limited. Some users can select a few lines, but full copy and clean paste is not reliable in the app.
Workarounds that don’t require downloads
If you need clean text you can paste into notes:
- Try the desktop site in your mobile browser: open YouTube in Safari or Chrome, request “Desktop site,” then use the transcript panel there
- If you have rights to use the audio, use a transcription tool to convert the YouTube video to text from captured audio, then export it as plain text for editing
Quick accessibility and study tips
- Increase system font size for easier reading
- Slow playback to 0.75x or 0.5x to catch key terms
- Use the transcript as a “jump list” to pause, review, and replay hard parts
Method 3 (recommended): Use TicNote Cloud to transcribe YouTube audio into notes you can search, summarize, and reuse
If you need more than raw captions, this workflow is the fastest path. TicNote Cloud helps you go from audio to clean notes, then to summaries, templates, and reuse-ready outputs. It’s built for people who want to transcribe a YouTube video and actually study, publish, or share the text later.
Start here if you want one place to store the transcript, find key moments fast, and turn it into new content. You can Try TicNote Cloud for Free inside your normal note workflow, then keep everything in one project.
Choose a safe capture path (no downloads needed)
Before you transcribe, make sure you’re allowed to use the audio.
Use one of these safe options:
- Record audio you’re allowed to use
- Your own videos
- Licensed training your team paid for
- Classroom material your instructor permits
- Upload a file you already own or can use
- An audio or video file you created
- A file you received with permission to transcribe
If you also work with podcasts, meetings, or interviews, this guide on audio transcription workflows helps you reuse the same process across formats.
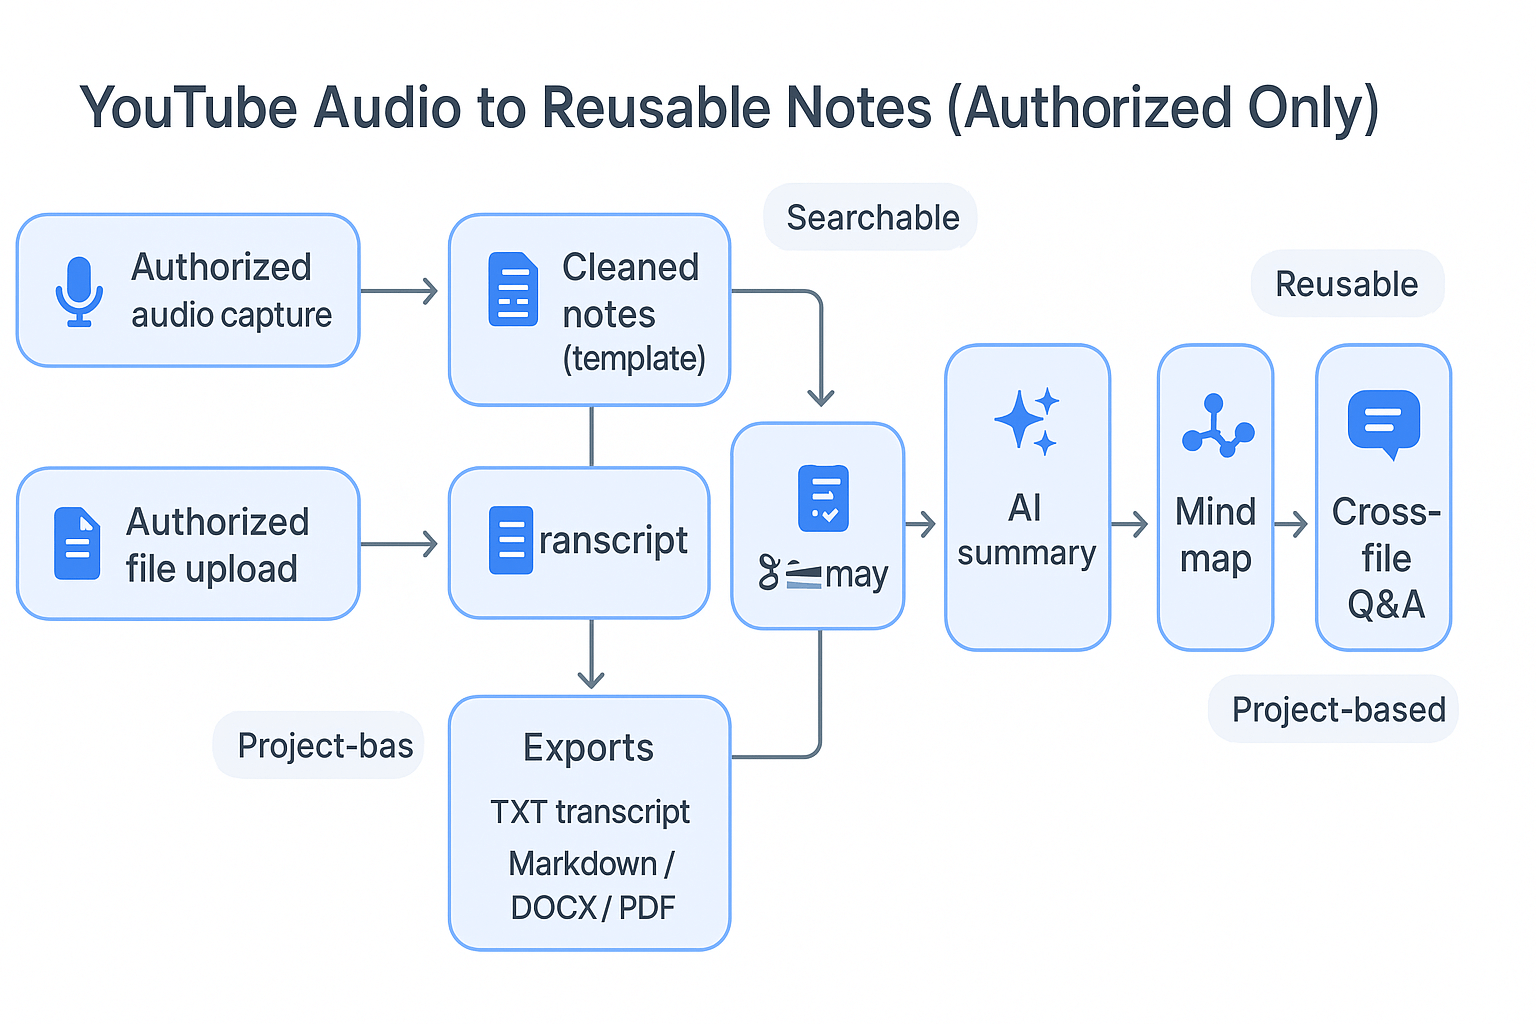
Turn audio into a “second brain” in TicNote Cloud
Here’s the repeatable workflow, end to end.
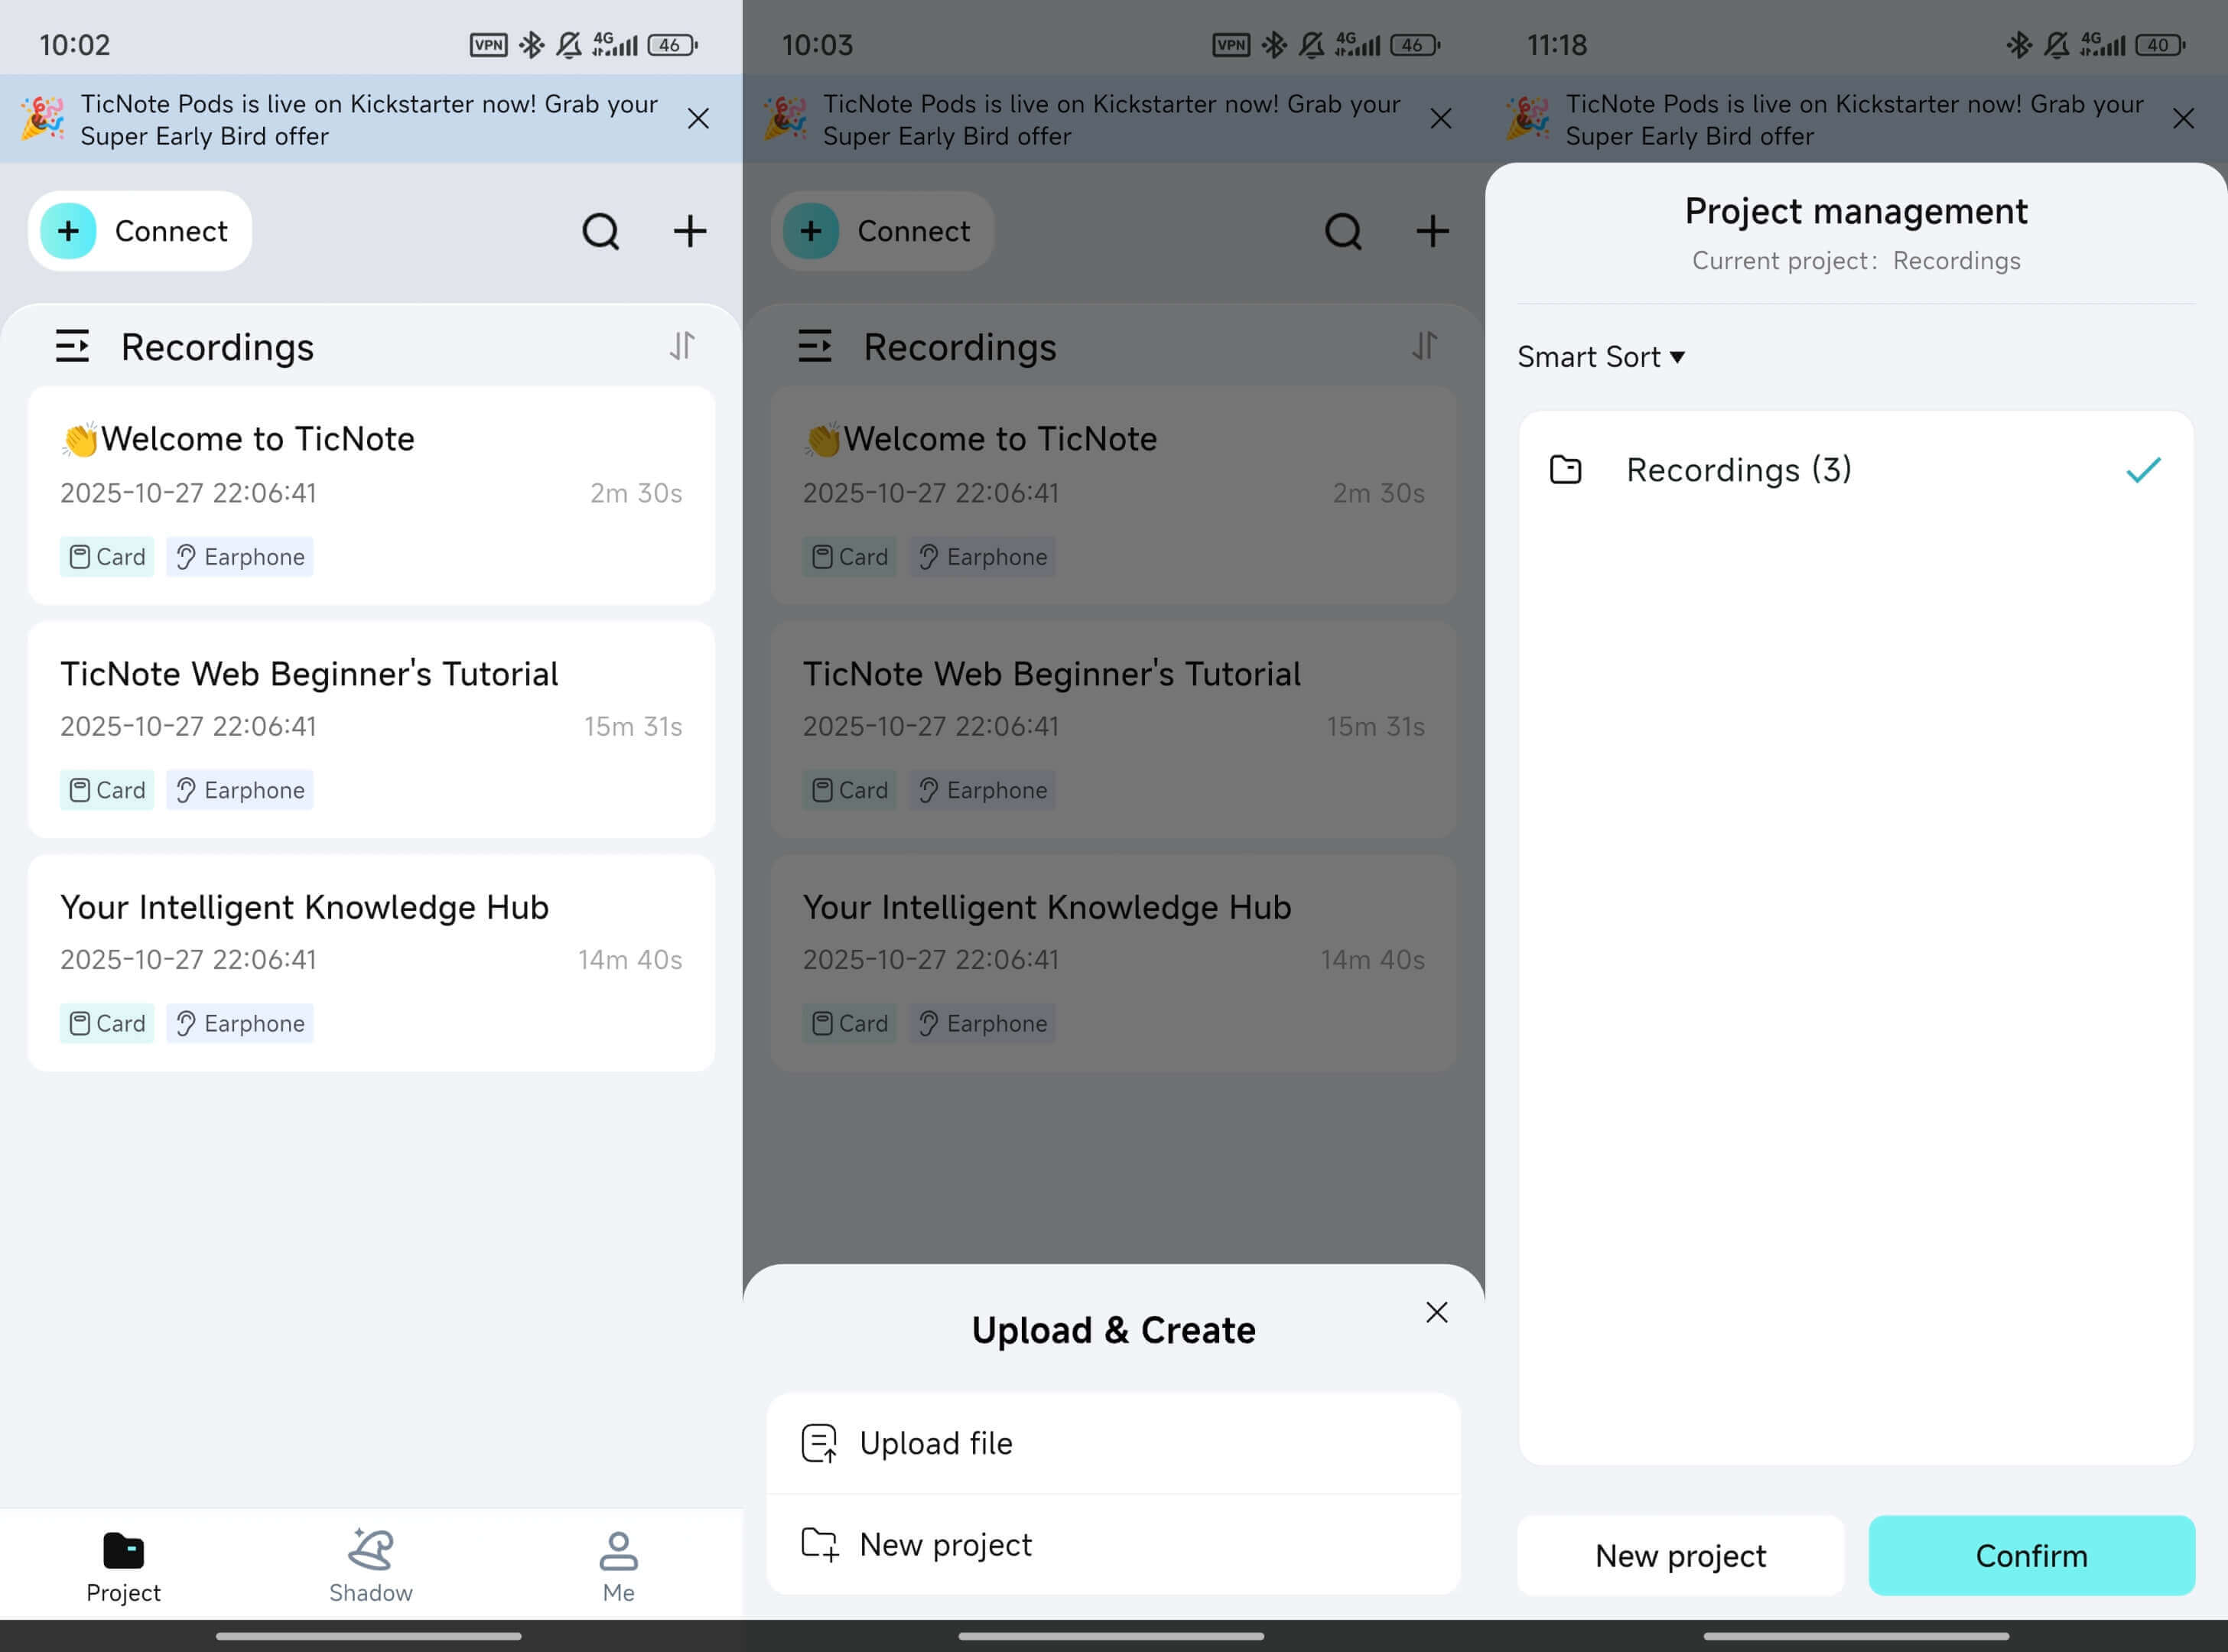
Create a project and upload your file
Start by creating a project named after the class, topic, or campaign. This keeps related transcripts, summaries, and exports together.
Upload your authorized audio or video file using the upload option at the top of the TicNote Cloud interface. The file will appear in the project list on the left.
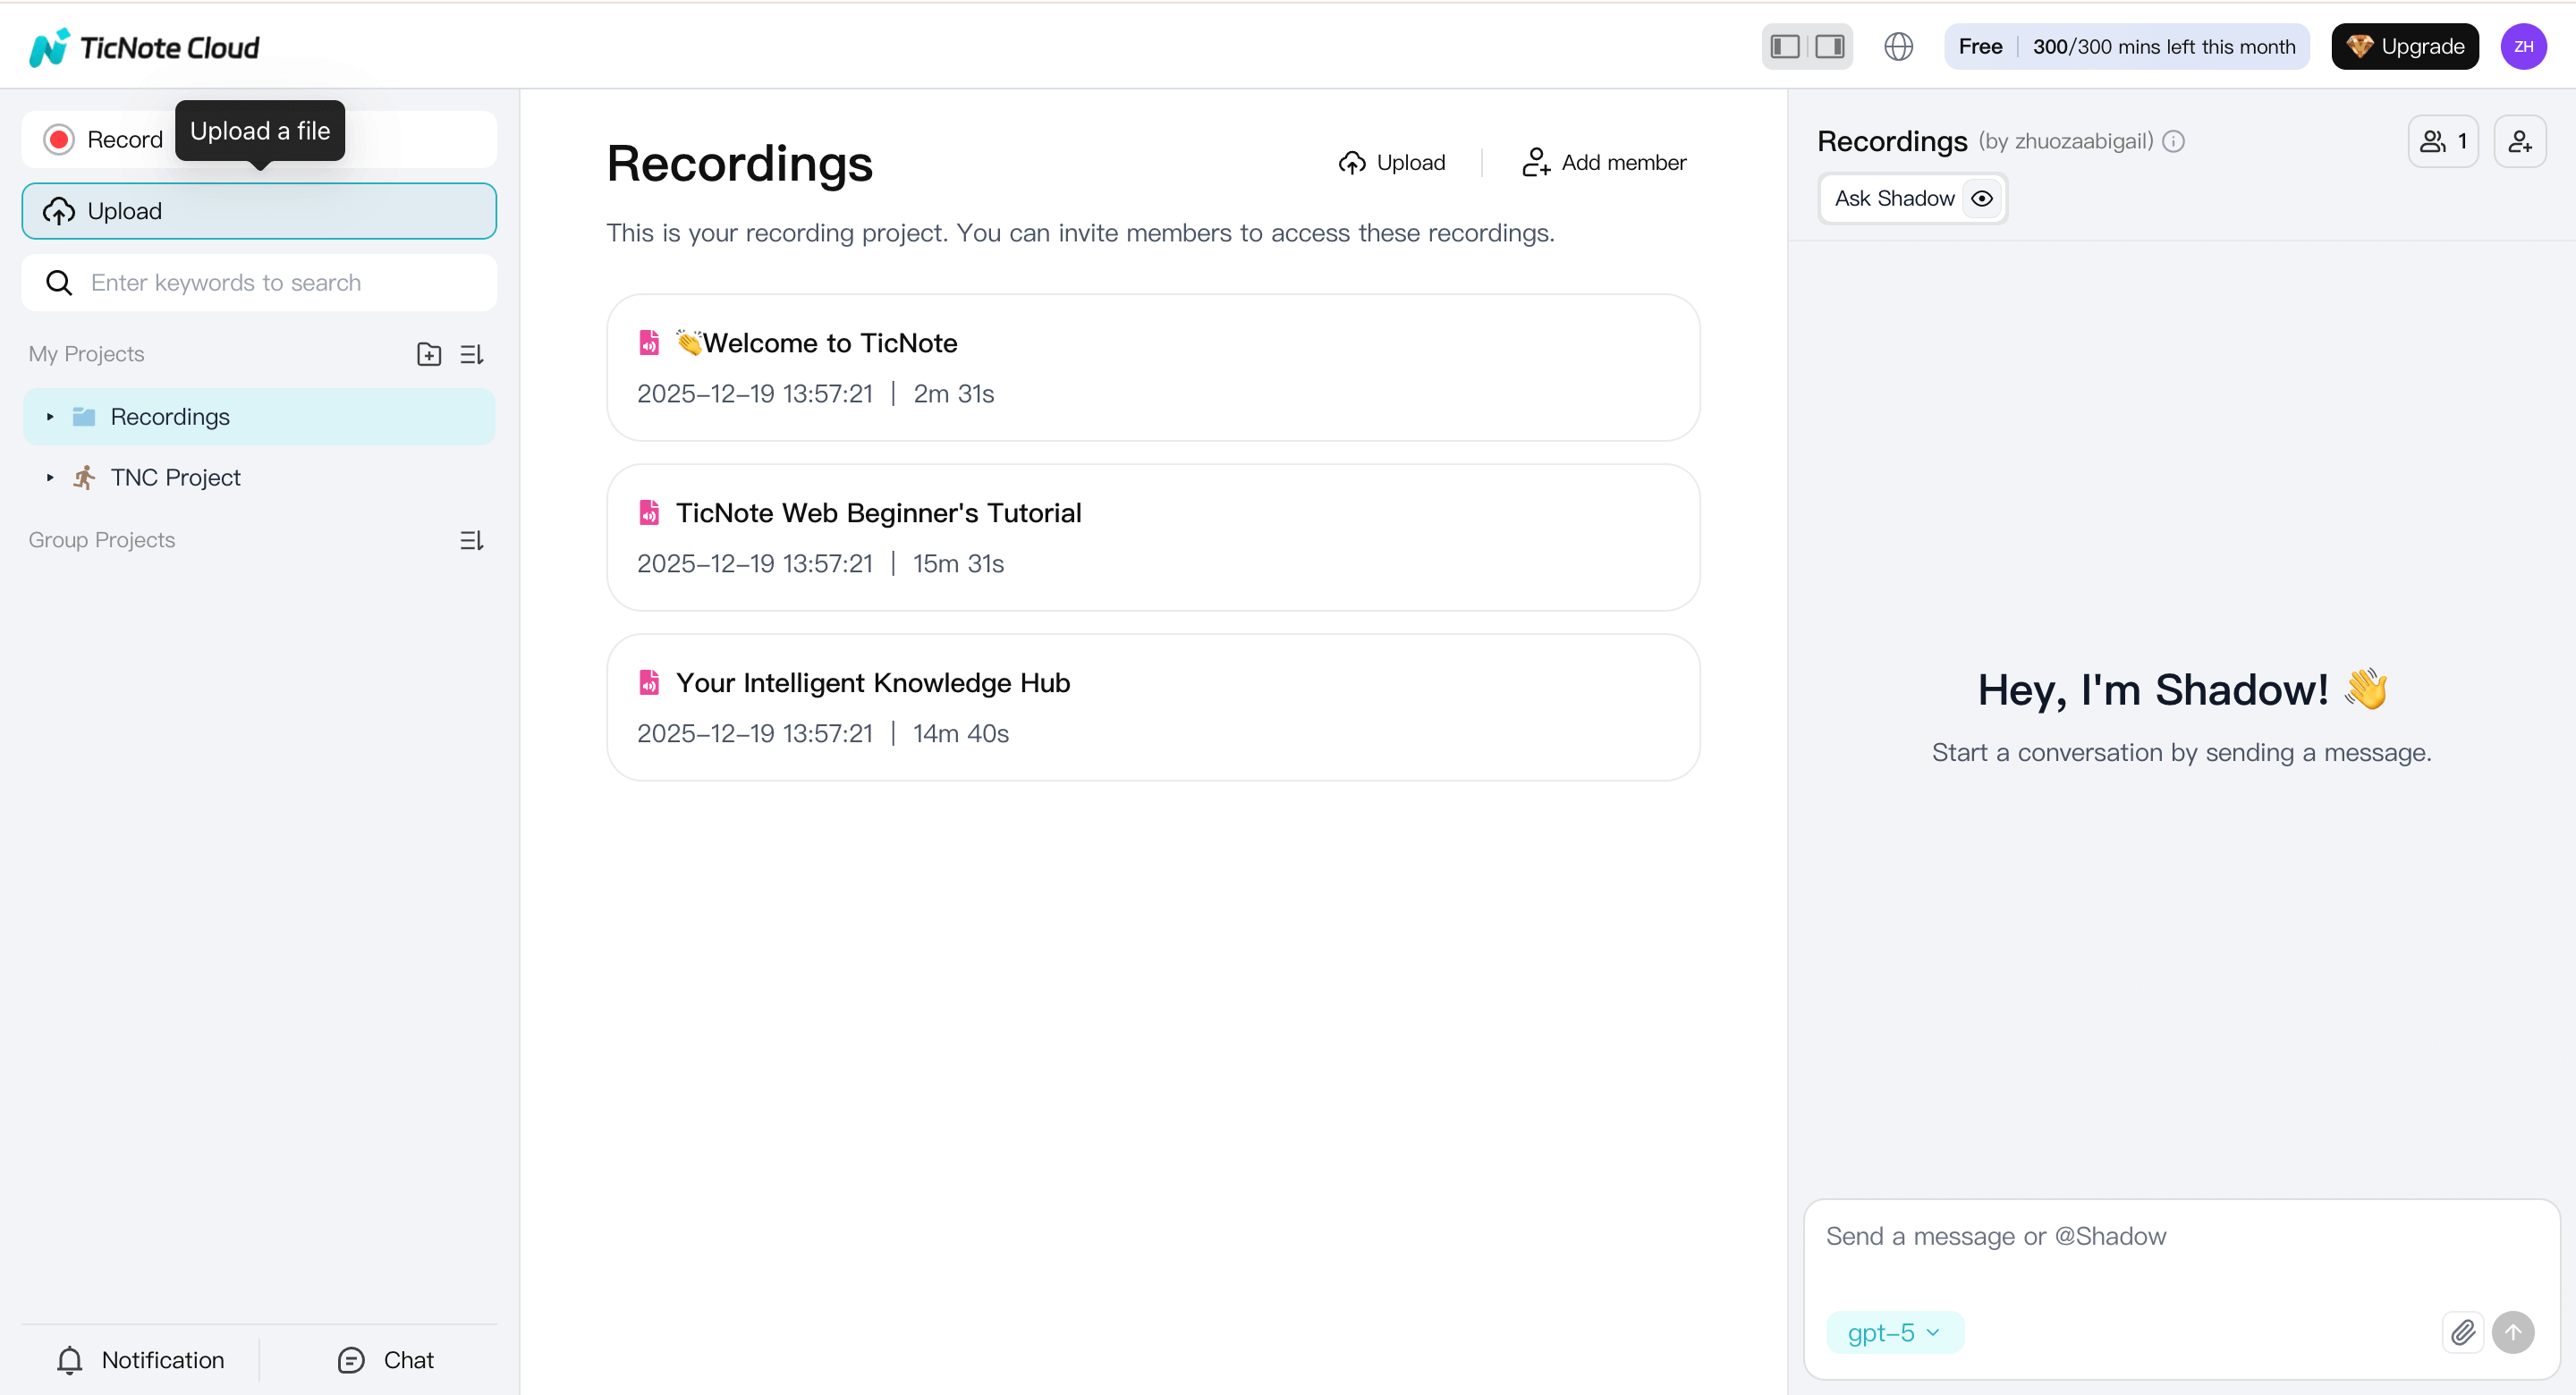
Clear file names like “History Lecture – Week 4” or “YouTube Essay Draft” make later review much easier.
Generate the transcript
Select the uploaded file from the left panel, switch to the Transcript tab, and start the transcription process.
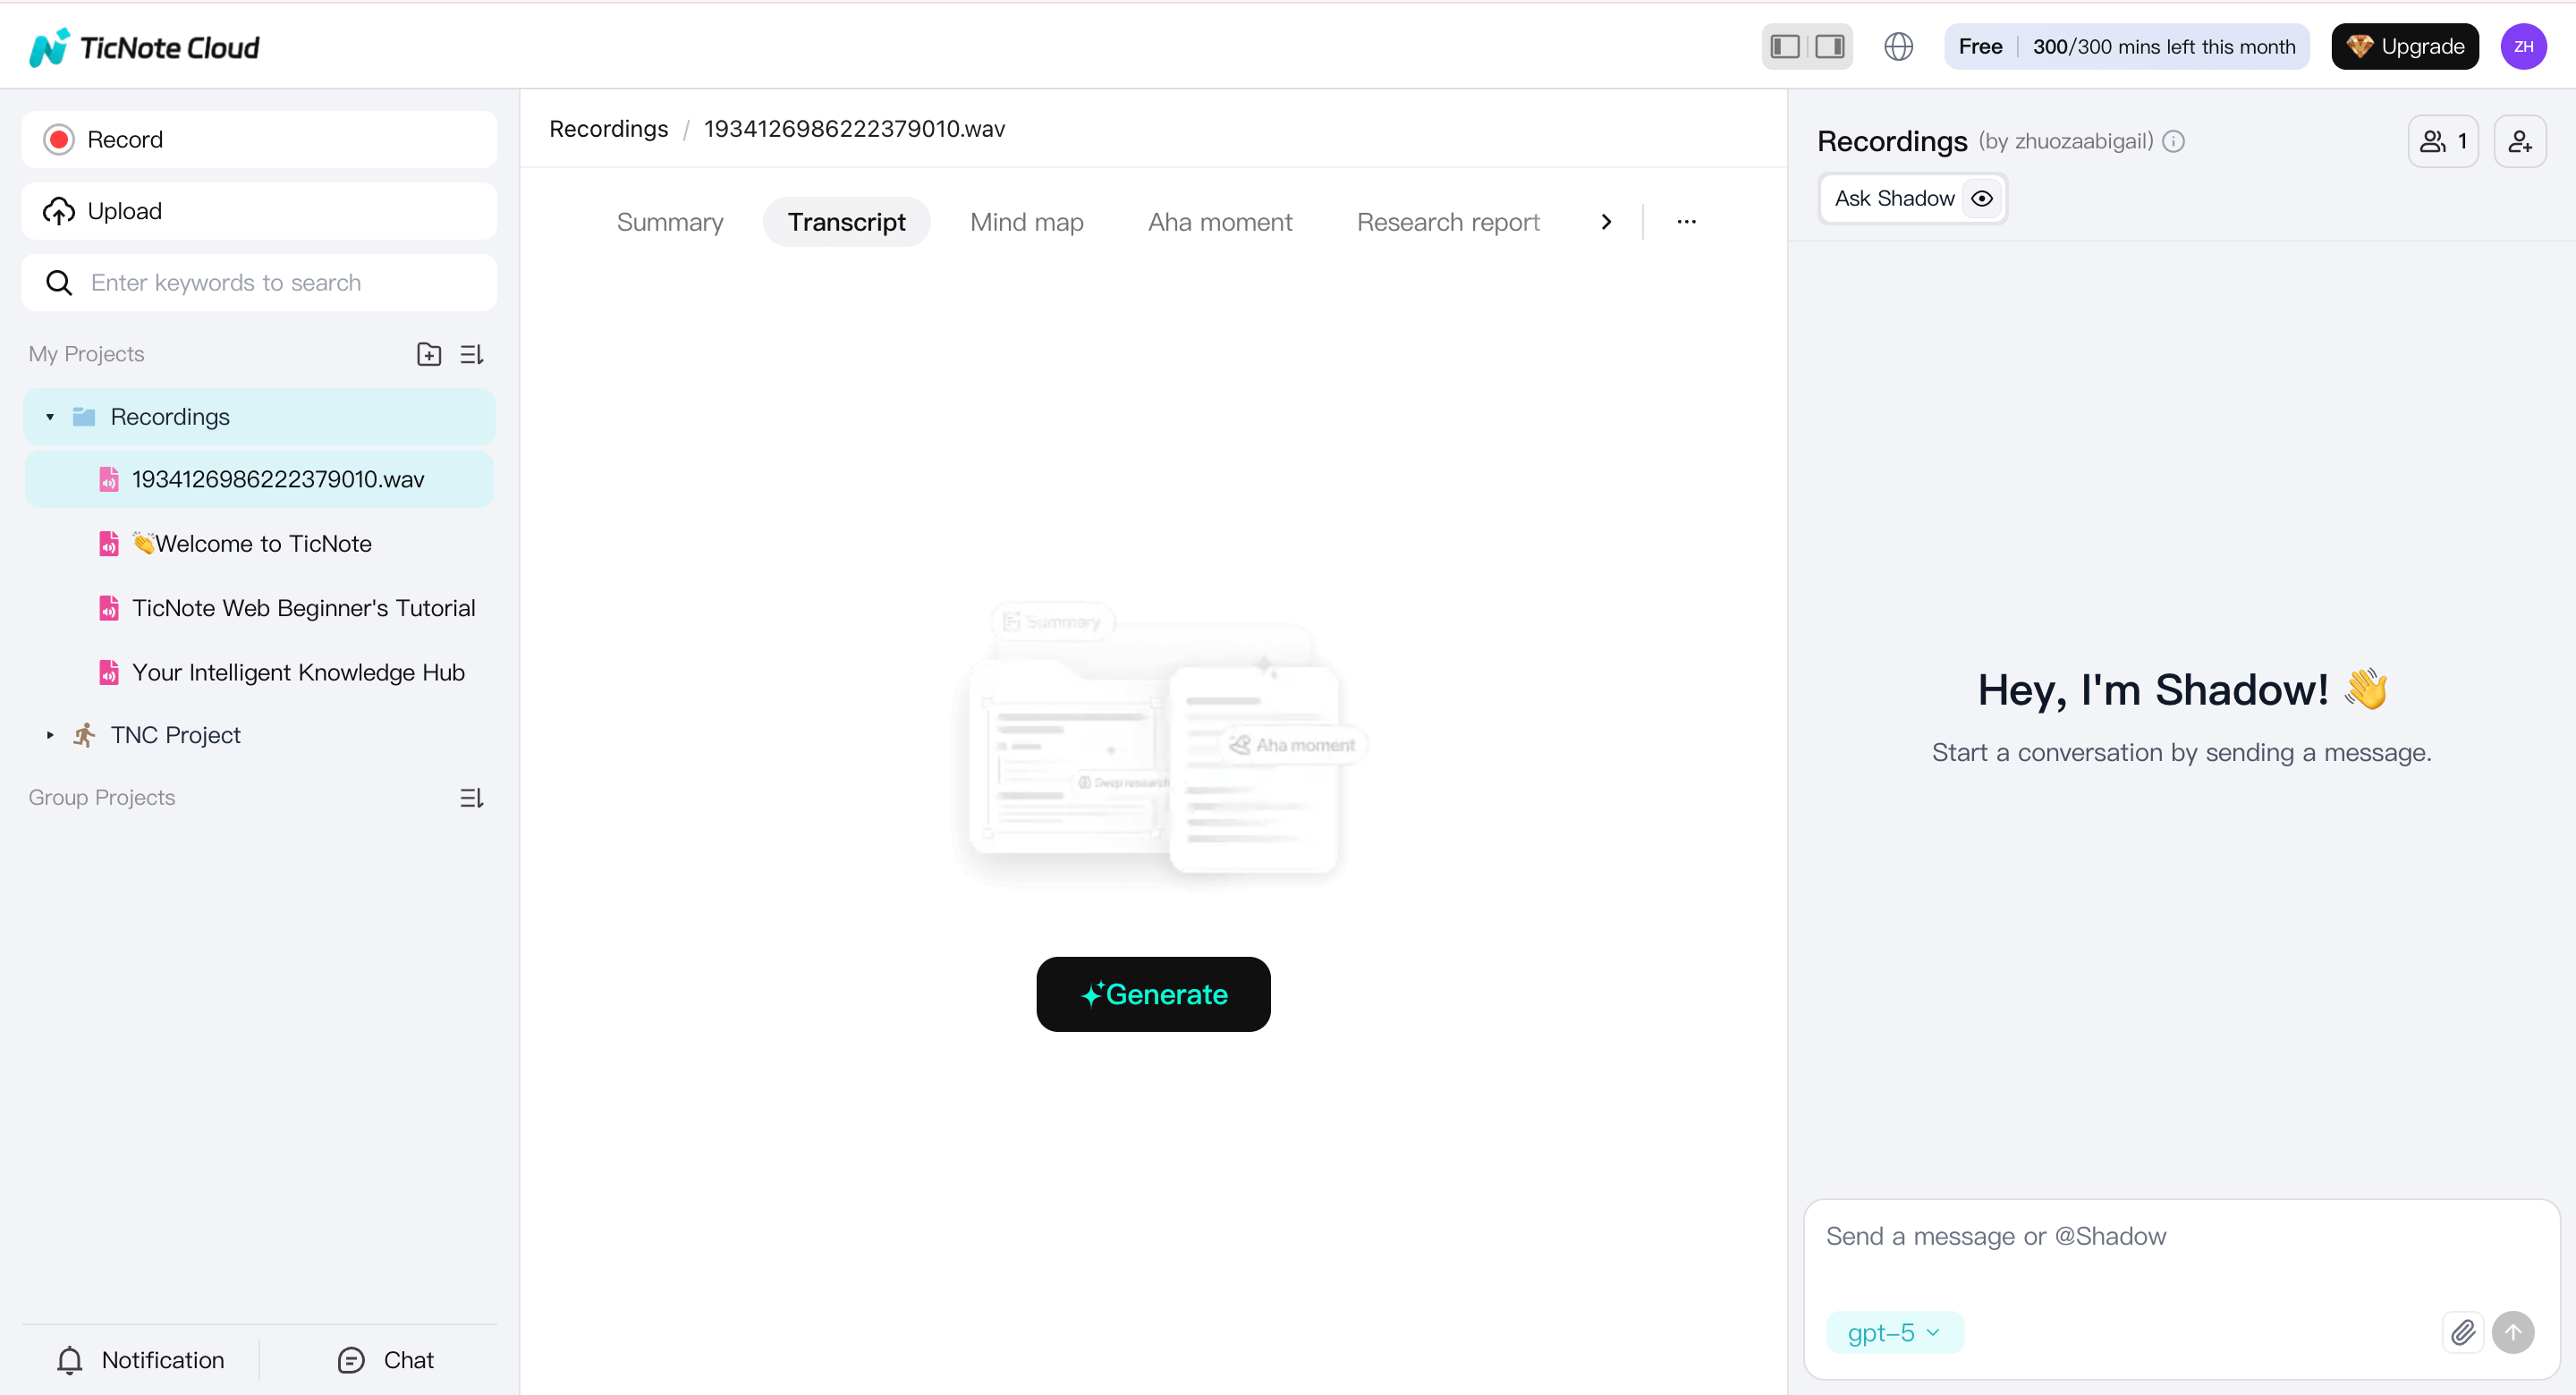
When prompted, choose the spoken language and the AI model that best matches your content, then confirm to begin.
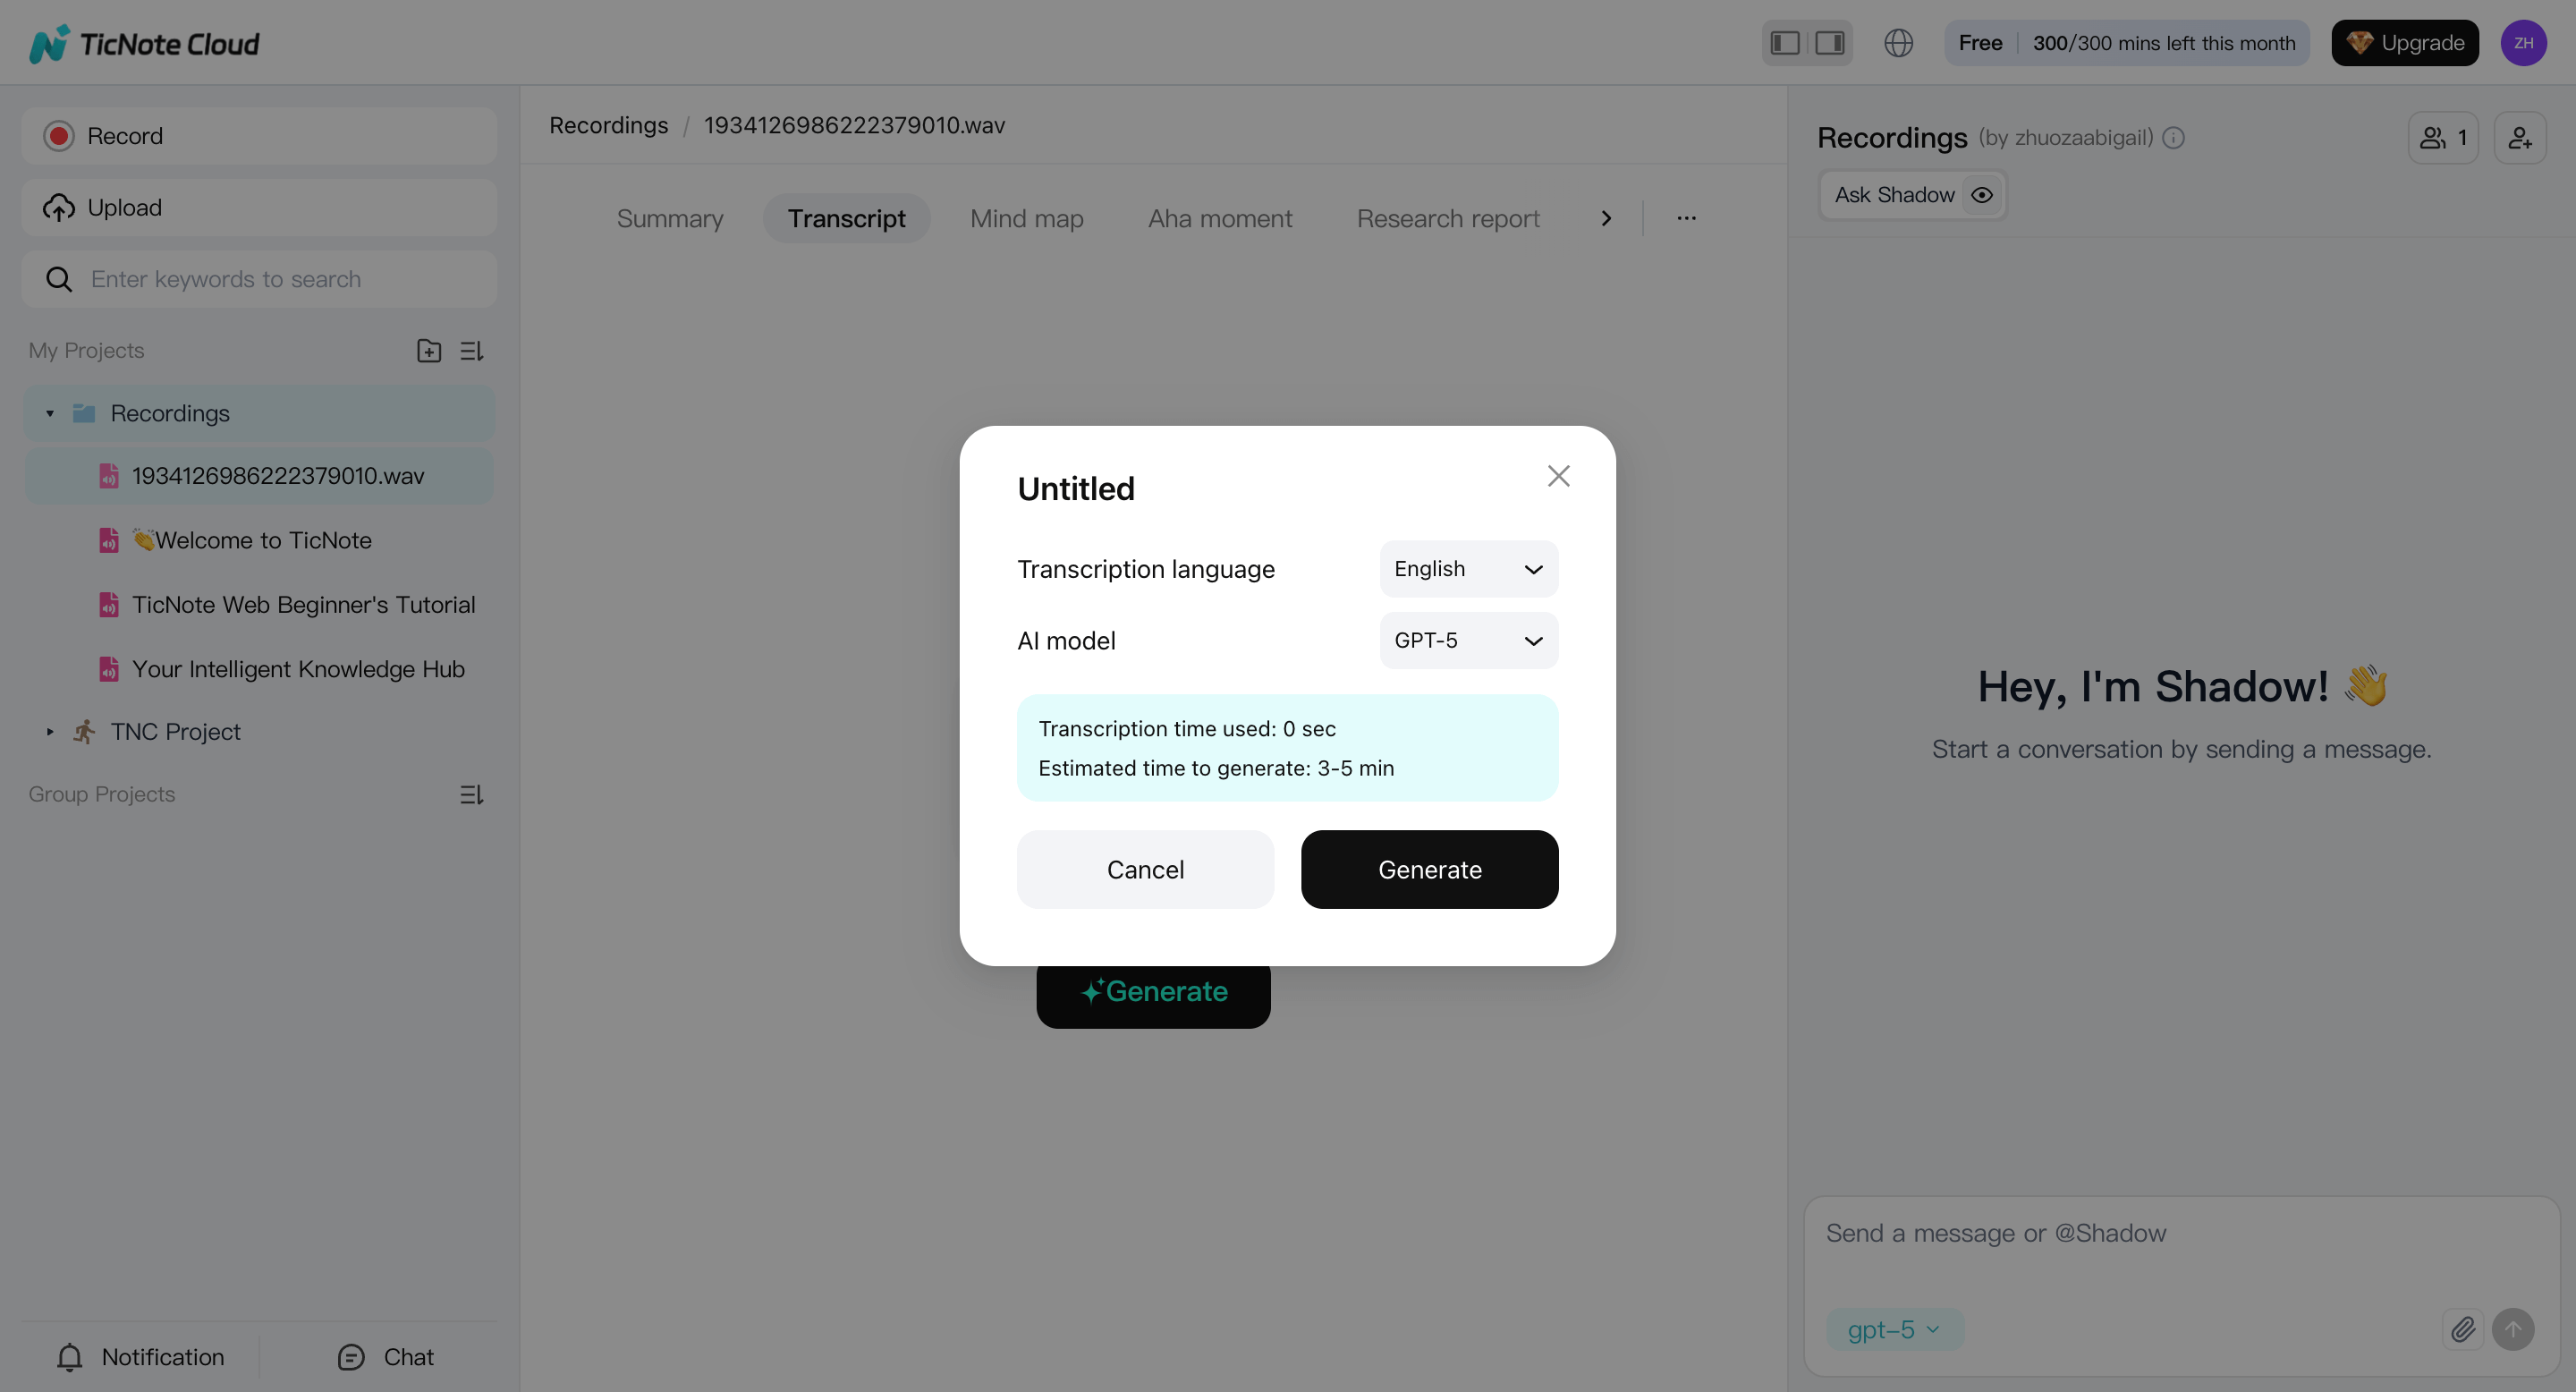
This creates a solid first draft you can work from—much faster than manual note-taking.
Clean the transcript so it’s actually usable
Once transcription finishes, review the text directly in the editor:
- Fix names, technical terms, and acronyms first
- Correct numbers and repeated errors once, then scan for them
- Add light paragraph breaks so the text is readable

This quick pass turns raw auto-captions into notes you can study, quote, or publish.
Apply structure, summaries, and reuse-ready outputs
With clean text in place, you can now make the transcript work for you instead of sitting unused.
- Apply a note template based on your goal:
- Lecture notes (key ideas, examples, definitions)
- Marketing notes (angles, claims, proof points, CTAs)
- Action items (tasks, owners, deadlines)
- Generate an AI summary:
- One-page overview for fast review
- Bullet points you can paste into docs or slides
- Go further when needed:
- Translate notes for sharing or studying
- Generate a mind map for recall
- Use cross-file Q&A to ask things like “What concepts repeat across these lectures?” or “What questions should I expect on this topic?”
This is where a transcript becomes a real “second brain.”
Export clean files (and keep everything searchable)
When you’re done, export based on how you’ll reuse the content:
- Export TXT for raw editing
- Export Markdown, DOCX, or PDF for class notes, work docs, or publishing
- Keep all exports inside the same project so they remain searchable later
Once you’ve done this once, you can generate your first AI summary in minutes and reuse the same structure for every new video.
Optional: Use the TicNote App for mobile capture and review
If you prefer working on mobile, the TicNote App follows the same logic with a streamlined interface.
Upload your audio or video to a project, start transcription, adjust language and detail settings, then generate the transcript. You can review and export results directly from the app.
Many users capture or review on mobile, then switch to the web editor for deeper cleanup and exporting.
Mini case: a student turns a 30-minute lecture into study notes
Let’s say Maya has a 30-minute biology lecture. She needs study notes fast.
Her workflow looks like this:
- Create a “BIO 201” project
- Add the authorized lecture audio
- Generate the transcript, then fix terms like “mitochondria” and “ATP”
- Apply a Lecture Notes template with sections for key ideas and examples
- Ask for spaced-repetition style prompts (short Q and A pairs)
- Export a one-page summary as PDF, plus the full transcript as TXT
Result: she gets a clean summary for review, plus Q and A cards she can practice.
Example: raw auto-captions vs cleaned transcript
Raw auto-captions (hard to reuse):
- “so today were gonna talk about cell energy and like atp is kind of the currency right and um mitochondria makes it”
Cleaned transcript (easy to study and quote):
- “Today we’re covering cell energy. ATP is the cell’s energy currency. Cells produce most ATP in the mitochondria.”
The difference is small, but it saves time later.
Generate your first AI summary in minutes with TicNote Cloud.
Method 4: Live dictation (Google Docs / phone dictation)
Live dictation is the “good enough” way to how to transcribe a youtube video when you need rough text fast. It works best for quick notes, quotes, or a first draft. Just expect cleanup, especially with names, jargon, and fast talkers.
Use Google Docs Voice Typing (desktop)
This method is simple and free. It’s also very sensitive to echo.
- Open Google Docs, start a new doc.
- Go to Tools, then Voice typing, then pick your language.
- Put the YouTube video on speakers (not headphones).
- Place your laptop mic close to the speaker, but not touching it.
- Click the mic icon, then press play on the video.
- When done, stop voice typing and save your doc.
Quick routing tips:
- Lower your speaker volume until distortion stops.
- Sit in a quiet room, close doors, silence alerts.
- If you hear “roomy” audio, move the mic closer to the speaker.
Use phone dictation (iOS or Android)
Phone dictation can be faster if you’re away from a laptop.
- Open Notes (or any text app).
- Tap the microphone key on your keyboard.
- Play the YouTube video on another device’s speakers.
- Hold your phone 6 to 12 inches from the speaker.
- Let it run, then stop dictation and review.
Avoid this setup: video playing on the same phone you’re dictating into. It often captures poorly.
Know when to skip live dictation
Don’t use dictation for:
- Legal or medical content
- Publish-ready transcripts
- Panel talks with many speakers
If you’ll reuse the text for a blog, study guide, or training doc, a dedicated transcription workflow usually saves time. You’ll spend less effort fixing the same mistakes again and again.
Method 5: Hire a human service (highest accuracy)
If you need near publish-ready text, hire a human transcriptionist. It’s the best pick for compliance-heavy work, dense terms, or lots of speakers. It’s also smart when you must get names and numbers right. If you’re wondering how to transcribe a YouTube video with the fewest errors, this is it.
Use a simple cost vs risk test
Human work costs more, so tie it to risk.
- High risk: legal, medical, HR, finance, or safety. Go human.
- Medium risk: client work, training, PR quotes. Human review helps.
- Low risk: personal study notes, rough content drafts. Auto is fine.
A helpful hybrid: run a machine transcript first, then pay a human to fix only key parts. For example, have them clean the intro, any quotes, and the final takeaways.
Give the transcriptionist the right inputs
Better inputs mean fewer edits later. Send:
- A glossary of names, brands, and jargon (plus spellings).
- The style you want: verbatim (every word) or clean read (light cleanup).
- A speaker list, and how to label speakers.
- Formatting rules: timestamps on or off, paragraphs, headings, and bullets.
- Turnaround time, and what “good enough” means for you.
When you do this, you’re buying clarity, not just text.
Make any YouTube transcript more accurate (before you edit a single word)
If you want to know how to transcribe a YouTube video with fewer mistakes, start with the audio, not the text. Better input gives better words, so you spend less time fixing lines. You also get cleaner study notes, stronger accessibility, and faster repurposing.
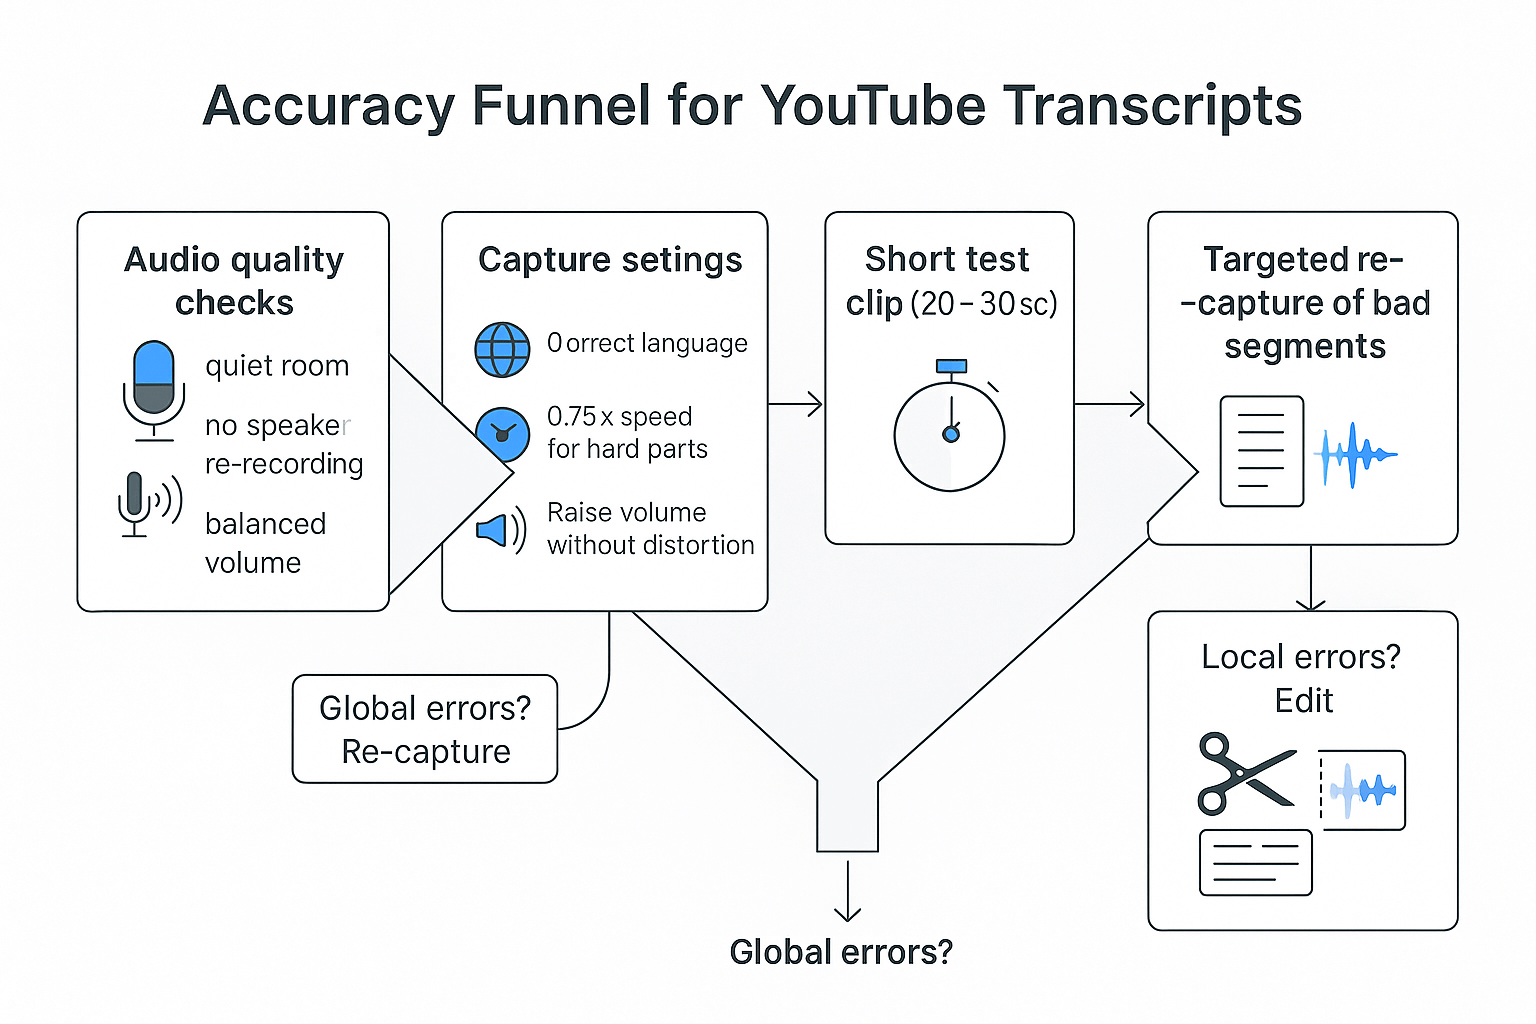
Run this accuracy checklist first
- Pick the best source audio you can get. If you can capture the video audio direct, do that.
- Don’t re-record through speakers unless you must. Speakers add echo and room noise.
- Use a quiet room. Close doors, mute fans, and avoid keyboard clicks.
- Raise volume without distortion. If it sounds “crunchy,” turn it down.
- Set the right language before you start. Wrong language settings cause wild errors.
- Slow playback for hard parts. Use 0.75x for fast talkers or strong accents.
- Do a 20 to 30 second test clip. Check names, numbers, and key terms.
One key reason: Learning Audio-Visual Dereverberation (2023) notes that reverberation not only degrades the quality of speech for human perception, but also severely impacts the accuracy of automatic speech recognition.
Know when to re-capture instead of “fixing it in edits”
Use this rule of thumb: re-capture when the error is global, not local.
Re-capture the audio if:
- Whole sentences are wrong, not just a few words
- You hear echo or “roominess” on every line
- Music or crowd noise is louder than the speaker
But if only a few spots are messy, keep the transcript and fix those sections. Re-run just the bad segment, then paste it back in. That keeps your notes clean, and it saves time.
Clean up and format the transcript so it’s actually usable
Once you know how to transcribe a youtube video, the real win is turning choppy captions into clean text you can scan. The goal is simple: fewer line breaks, clear sentences, and consistent terms. Do that, and editing time drops fast.
Run a 5-minute cleanup pass (in this order)
Work top to bottom. Don’t “perfect” anything yet.
- Merge lines into paragraphs: Remove hard line breaks. Start a new paragraph only when the topic changes.
- Fix punctuation: Add periods and commas so ideas land. Capitalize the first word of each sentence.
- Add light structure: Use speaker labels if it’s an interview, like Host: and Guest:.
- Mark non-speech audio: Add bracket cues like [music], [laughter], [applause].
Before/after: what “usable” looks like
Raw auto-captions:
Host hi everyone welcome back to the channel
today were talking about content audits
i spent 200 dollars on tools
and it saved me 3 hours a week
Cleaned transcript:
Host: Hi everyone. Welcome back to the channel.
Today, we’re talking about content audits.
I spent $200 on tools, and it saved me 3 hours a week. [laughter]
Fix the mistakes that cause most rework
- Names (people, brands, products): Pick one spelling, then use Find/Replace. Example: “Tic Note” → “TicNote Cloud.”
- Numbers (dates, prices, steps): Standardize formats. Example: “jan 5 2026” → “Jan 5, 2026.” “two hundred” → “$200.” “step four” → “Step 4.”
- Jargon: Make a mini glossary (short list of approved terms). Then apply Find/Replace across the file. If a term needs a quick meaning, add it once in parentheses.
Choose a format that matches your end use
- Study notes: Headings by topic, then bullets, then a 5-question quiz.
- Meeting-style action items: Decisions, Action items (owner + due date), Open questions.
- Blog outline: H2 topics, H3 supporting points, then “examples” bullets.
- Quote bank (marketers): One quote per line with timestamp or section label, plus the angle it supports.
Copyright, privacy, and sharing: what you can (and can’t) do with someone else’s video transcript
You can often transcribe a YouTube video for personal use, like study, notes, or accessibility. But sharing the full transcript can cross a legal line. If you want to reuse it publicly, assume you need rights or permission.
Use it for study, then share only what’s needed
For class notes, research, or internal team learning, keeping a transcript private is usually the safest path. If you publish anything, stick to short quotes with clear credit. The U.S. Copyright Office notes that Fair Use (FAQ) | U.S. Copyright Office permits using limited portions, including quotes, for purposes like commentary, criticism, news reporting, and scholarly reports.
When to ask the creator (and when not to risk it)
Ask the creator if you plan to:
- Post the full transcript on a website, blog, or community
- Turn it into a downloadable PDF, lead magnet, or template
- Translate and publish the full text (translation is a derivative work)
If you only need a few lines, quote them, add attribution, and link to the original video.
Privacy rules for client or classroom audio
If the audio includes students, clients, or employees, get consent first. Then follow privacy-by-design basics:
- Share the minimum audio or text needed
- Store transcripts in a secured workspace
- Don’t post full transcripts publicly unless you have rights
Terms and laws vary by country and platform, so check local rules for your use case.
Troubleshooting: common transcription problems and quick fixes
When you transcribe a YouTube video, most issues come from two places: the video has no captions, or the audio is hard for any tool to hear. Use the matrix below to spot the cause fast, then apply a simple fix before you start editing.
Quick troubleshooting matrix
| Problem | Likely cause | Quick fix |
| Transcript or captions are unavailable | Creator didn’t upload captions, auto-captions are off, or the video is restricted | Try a different video version (same talk on another channel). If you control the content, enable captions and wait for processing. Otherwise, use a transcription tool on the audio you can access. |
| Text is garbled or full of wrong words | Low audio quality, background noise, music, or heavy accents | Re-capture a clean segment first (1 to 3 minutes) to test. Use headphones, a quieter room, and a better source track. If it’s long, split into smaller chunks. |
| Wrong language | Auto-detect guessed wrong, or the speaker switches languages | Manually switch the transcript language if available. If not, set the language before you transcribe, then translate after. |
| Missing punctuation and run-on lines | Auto-captions often skip punctuation | Add punctuation in one pass, then break into short paragraphs. Search and replace filler words you don’t need. |
| Bad speaker separation | Overlapping voices, similar tones, or no clear pauses | Rework by sections: label speakers manually, then merge short back-and-forth lines into one block per idea. If possible, re-capture a portion with fewer overlaps. |
| No audio, echo, or lag during capture | Wrong mic input, system audio not routed, Bluetooth delay, or echo from speakers | Verify mic routing and input device. Use wired headphones to kill echo. Close extra tabs, lower playback speed, and capture in shorter segments. |
When to escalate
If the transcript must be publish-ready, legally compliant, or used for accessibility, don’t “patch it later.” Get a human review, or use a tool with strong editing and clean exports (TXT, DOCX, PDF, Markdown) so your final text is reliable.
