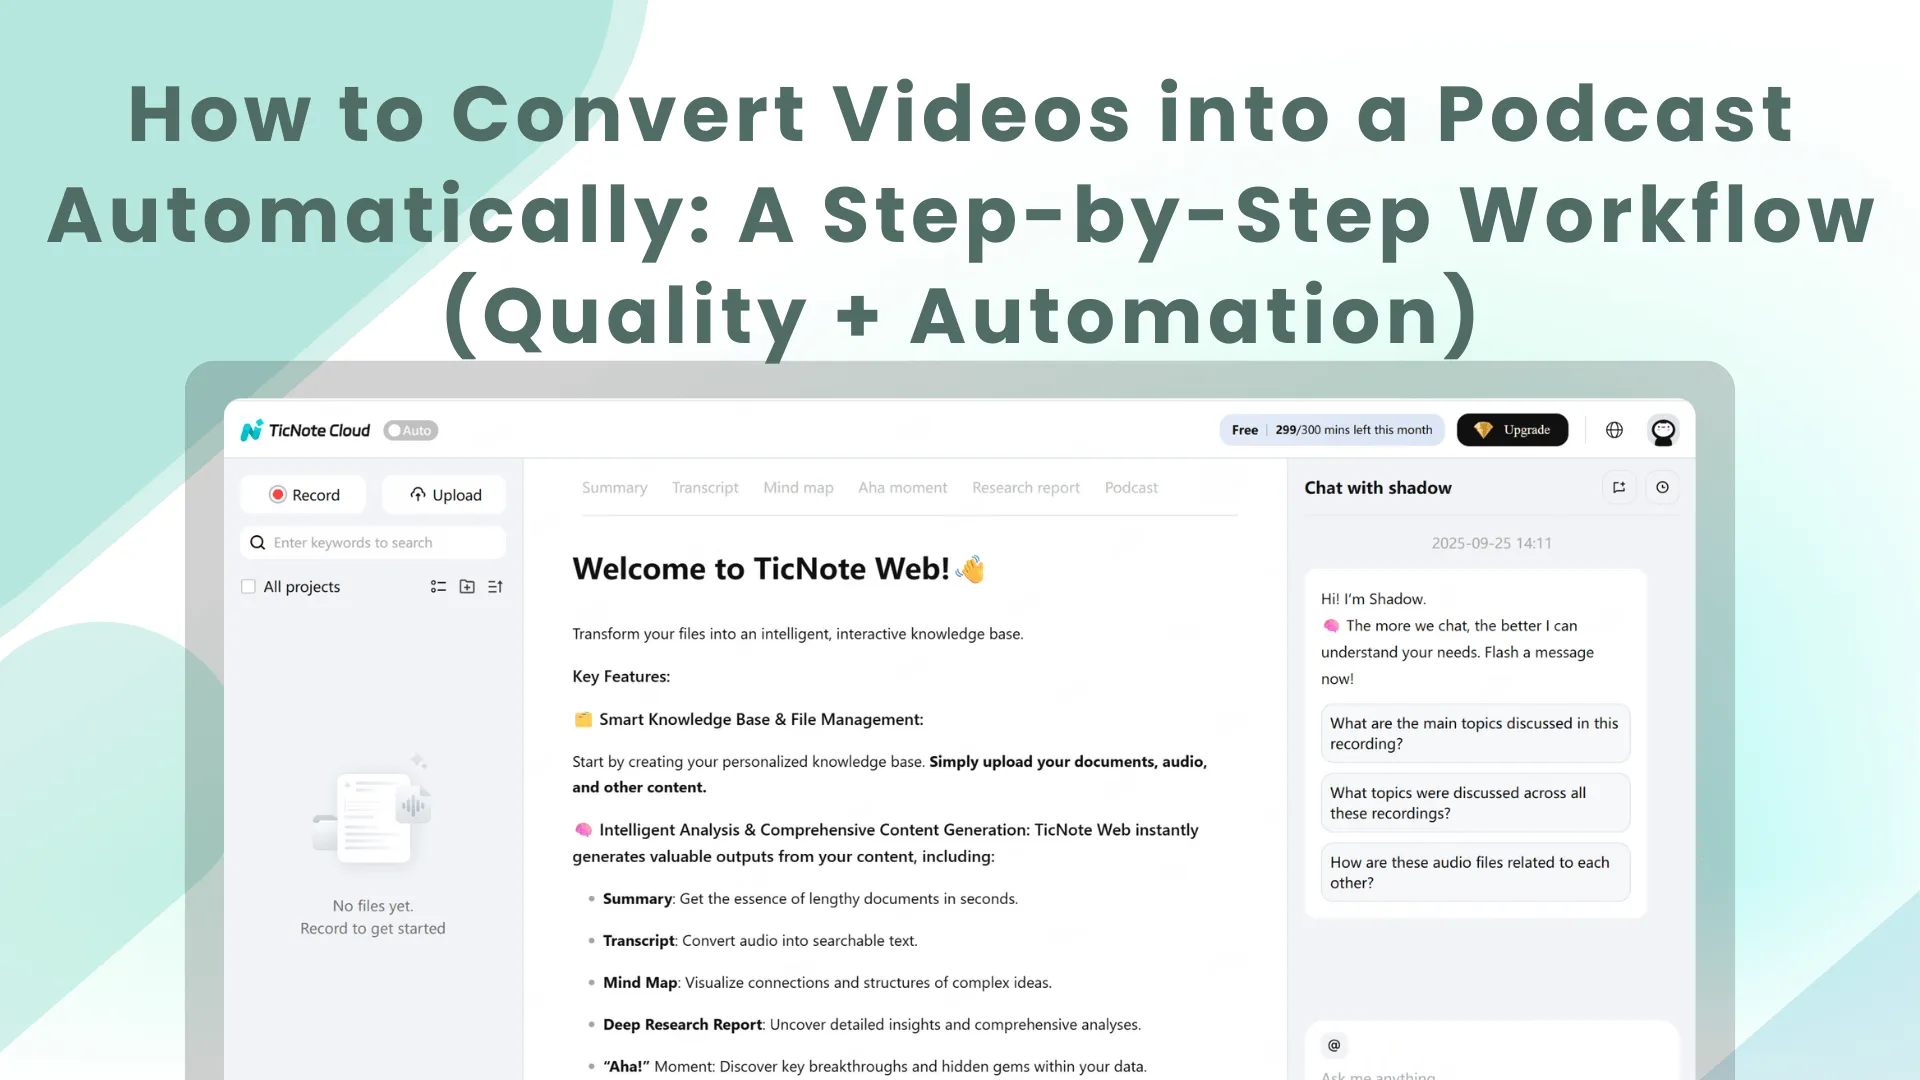
TL;DR: A fast, mostly automatic workflow to repurpose video into a podcast
Try TicNote Cloud to speed up how to Convert Videos into podcasts automatically: upload your video, export clean audio, then publish it like a normal episode. "Automatic" mostly means you automate repeatable steps like conversion, loudness targets, tagging, uploads, and scheduling. You still do a quick human pass for edits, visual-only moments, and rights.
Problem: video audio often isn't podcast-ready, and fixing it every time is slow. That leads to uneven volume, missed tags, and confusing parts that relied on visuals. Solution: use TicNote Cloud for transcript-first cleanup and reusable outputs, so each repurpose takes minutes, not hours.
Minimum checklist before you hit publish:
- Permission: you own the content, music, and guest rights
- Audio basics: consistent volume, no clipping, no long silences
- File hygiene: clear file name, stable episode numbering
- Artwork: square, readable at small sizes
- Tags: ID3 filled (title, artist, show, year)
- Show notes: rewrite or explain any "as you can see" moments
How to Convert Videos into Podcast Automatically (3 workflow options)
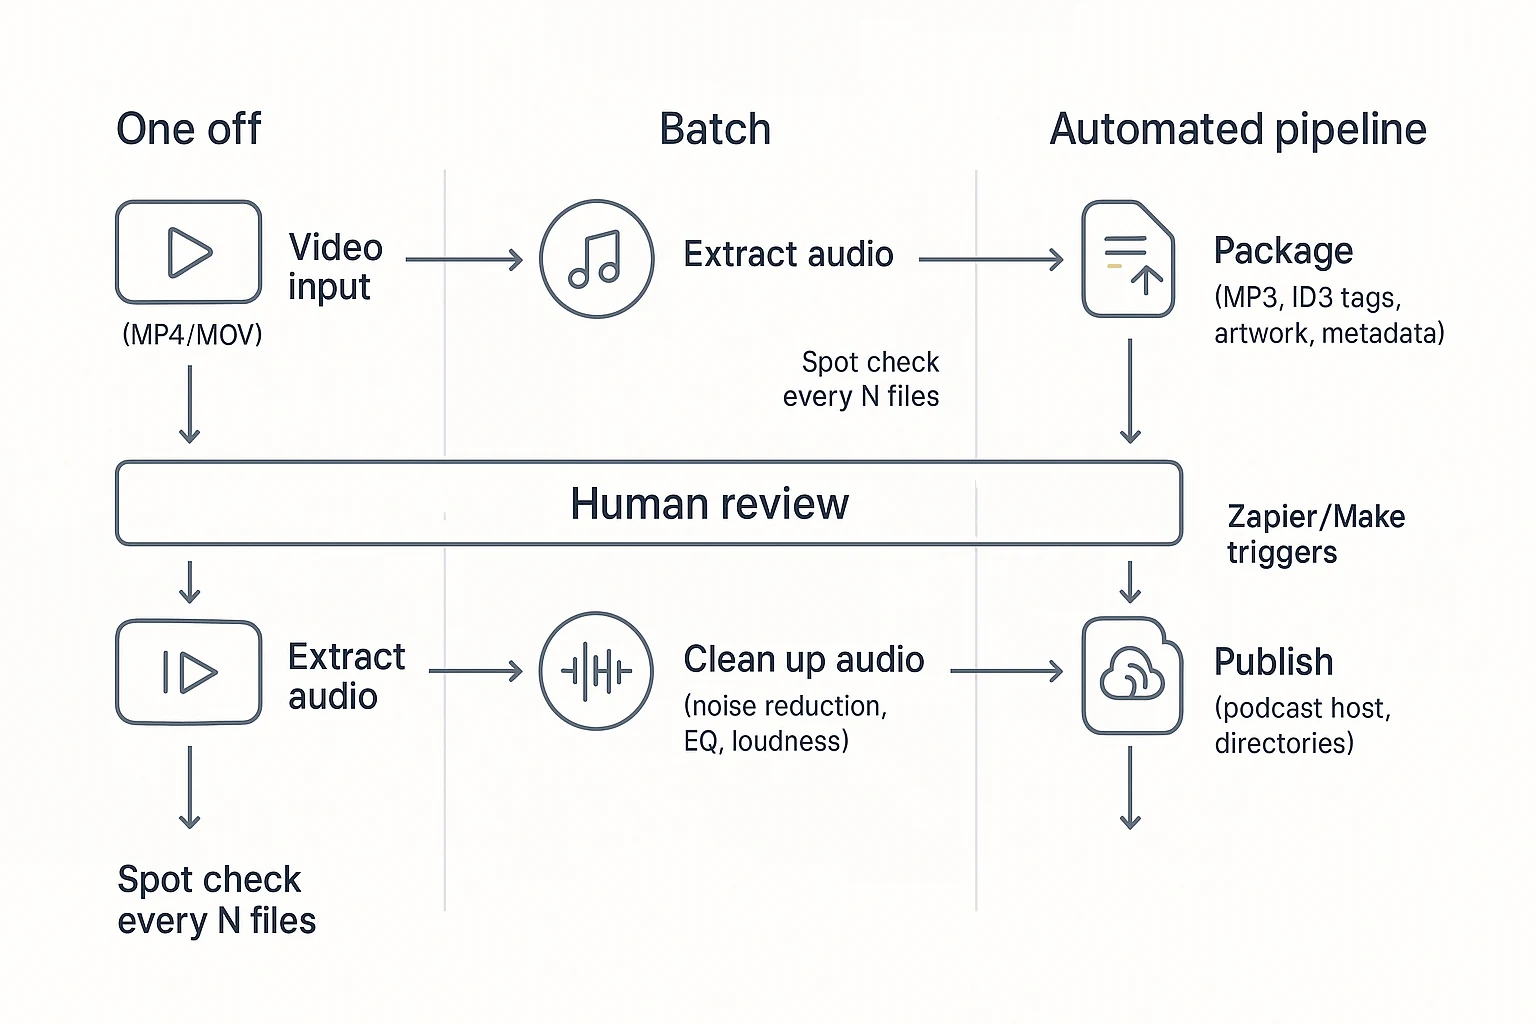
You can convert a video into a podcast automatically in three ways: a one-off conversion for speed, a batch workflow for back catalogs, or an integrated pipeline for weekly publishing. The best choice depends on how many episodes you have and how much control you need over audio, metadata, and review.
Option A: One-off conversion (best for a single episode)
If you only need one episode, keep it simple. Extract audio from your MP4 or MOV, run a cleanup preset (noise reduction and leveling), export to MP3, add ID3 tags (title, artist, show, year), then upload to your host.
Still, you must do a quick human review before you publish:
- Intro and outro are present and not cut off
- Dead air and long pauses are trimmed
- Any "as you can see on screen" lines are rewritten or removed
- Levels sound even (no whisper then shout)
Option B: Batch conversion (best for a back catalog)
For a back catalog, think in folders and rules. Use a folder based flow so every file gets the same naming and export settings. A simple structure keeps you sane: /source-videos → /exports → /published.
Batch checklist (don't skip this):
- Confirm sample rate and bitrate are consistent across exports
- Normalize loudness so episodes match each other
- Spot check every N files (for example, every 5th) for weird levels or missing sections
Option C: Automated pipeline with integrations (best for weekly shows)
If you publish weekly, build a pipeline you can trust. A new video lands in YouTube, a Drive folder, or your webinar tool, then a converter runs, audio cleanup follows, metadata is filled from a template, the host upload happens, and the episode is scheduled. Tools like Zapier or Make often act as the glue for triggers, file moves, naming rules, and a "ready for review" notification.
Here's a simple way to compare the three paths:
| Workflow option | Setup time | Control | Best use case |
| One off conversion | Low | Medium | A single episode, fast turnaround |
| Batch conversion | Medium | High | Back catalog republish, consistent settings |
| Integrated pipeline | High | Medium to high | Weekly show, repeatable release process |
One more lever: transcript first editing. If you need faster edits and cleaner show notes, start from the transcript and cut by text, then fix visual only references before export. This pairs well with a workflow that already includes quality checks, like this guide on turning content into a podcast with AI while keeping quality consistent.
Try TicNote Cloud for Free to edit from a transcript and draft show notes faster.
What should you prepare before converting a video to podcast audio?
Before you convert a video into podcast audio, do a quick prep pass. It prevents legal issues, saves edit time, and helps you hit consistent sound quality. A solid prep checklist also makes it easier to automate the rest of the workflow.
Confirm you can republish the audio (not just the video)
Owning the video file doesn't always mean you can distribute the audio as a podcast feed. Do a fast rights check first, especially if you plan to monetize.
Use this checklist:
- Guest releases: get written permission from guests and co-hosts (spoken consent is often unclear later).
- Music: confirm your intro, outro, and bed music are licensed for podcast use.
- Third party clips: remove or replace any TV, movie, or creator clips.
- Stock footage with audio: check if the license covers audio only distribution.
- Platform terms: confirm you're not breaking any upload or reuse terms.
Risk reduction step: if anything is questionable, cut that segment now before you export. It's faster than fixing it after your RSS feed is live.
Pick the best source file (quality in, quality out)
Start with the highest quality version you have. Prefer your original recording (WAV or high bitrate M4A) over a downloaded copy.
A few rules of thumb:
- Avoid re encoded files from YouTube downloads if you can access the original.
- If you recorded separate mic tracks, choose the cleanest voice track.
- If you only have a mixed track, plan on stronger noise reduction and leveling.
Plan for visual-only moments (so listeners don't get lost)
Video content often includes "as you can see" moments that don't work in audio. Mark these spots before you convert.
Listener first checklist:
- Explain charts and numbers in simple words.
- Read key on screen bullets out loud.
- Summarize demos with the outcome and steps.
- Remove long silent screen shares.
- Add a short voice insert if a visual is required.
Prep template (copy and fill once)
- Episode title:
- Episode number:
- 2 sentence summary:
- Links and resources:
- Guest name and bio:
How do you extract audio from video the automated way (without losing quality)?
If you want to convert videos into podcast automatically, start by extracting audio in a way that keeps quality stable. Your tool choice matters. Online converters are quick, but they may compress audio. Desktop apps give more control. Command line is best when you need repeatable, hands-off batches.
Pick the right tool path (and avoid privacy traps)
Here's a simple decision guide:
- Online converters: Fast for public videos. Risky for client work, since you upload files.
- Desktop apps: Better controls for format, sample rate, and loudness. Good for single episodes.
- FFmpeg (command line): Best for automation, folders, and batch jobs.
If you're handling paid courses or client webinars, avoid web converters. Uploading private files can break policy.
Batch extract with FFmpeg (best for control)
Use FFmpeg to pull clean audio from a video:
ffmpeg -i input.mp4 -vn -ac 1 -ar 48000 -c:a aac -b:a 128k output.m4a
What each flag does, in plain English:
- -i input.mp4: Your video file.
- -vn: Drop the video track.
- -ac 1: Make it mono (one channel). This is common for voice podcasts.
- -ar 48000: Set sample rate to 48 kHz for consistent processing.
- -c:a aac: Encode audio as AAC (good quality and small size).
- -b:a 128k: Target bitrate. 96k to 128k is fine for speech.
Batch a whole folder and keep filenames:
mkdir -p exports for f in *.mp4; do ffmpeg -i "f" -vn -ac 1 -ar 48000 -c:a aac -b:a 128k "exports/{f%.mp4}.m4a"; done
Quality guardrails:
- Don't re-encode twice. Extract once, then edit that file.
- When possible, copy the original audio stream (no quality loss):
- If the video already has AAC audio, try: ffmpeg -i input.mp4 -vn -c:a copy output.m4a
Use clean naming rules (so hosts don't get confused)
Use a consistent slug format like:
- showname-ep01-topic-title.m4a
- showname-ep12-2026-02-quiet-mic-fix.m4a
Rules that prevent publishing headaches:
- Use lowercase, hyphens, and numbers only.
- Use leading zeros for episode numbers (ep01, ep02).
- Skip special characters like &, /, ?, and apostrophes.
Quick batch checklist:
- One folder per show
- Raw videos in /raw
- Exports in /exports
- Same naming in file name and episode title
Last step: spot-check the start, middle, and end of one export. Then run the full batch.
How do you make video audio sound like a real podcast?
If you want your video to feel like a real podcast, focus on three things: less noise, steadier voice tone, and consistent volume. This is the step that makes "How to Convert Videos into Podcast Automatically" sound professional, even when the source was a webinar or YouTube upload.
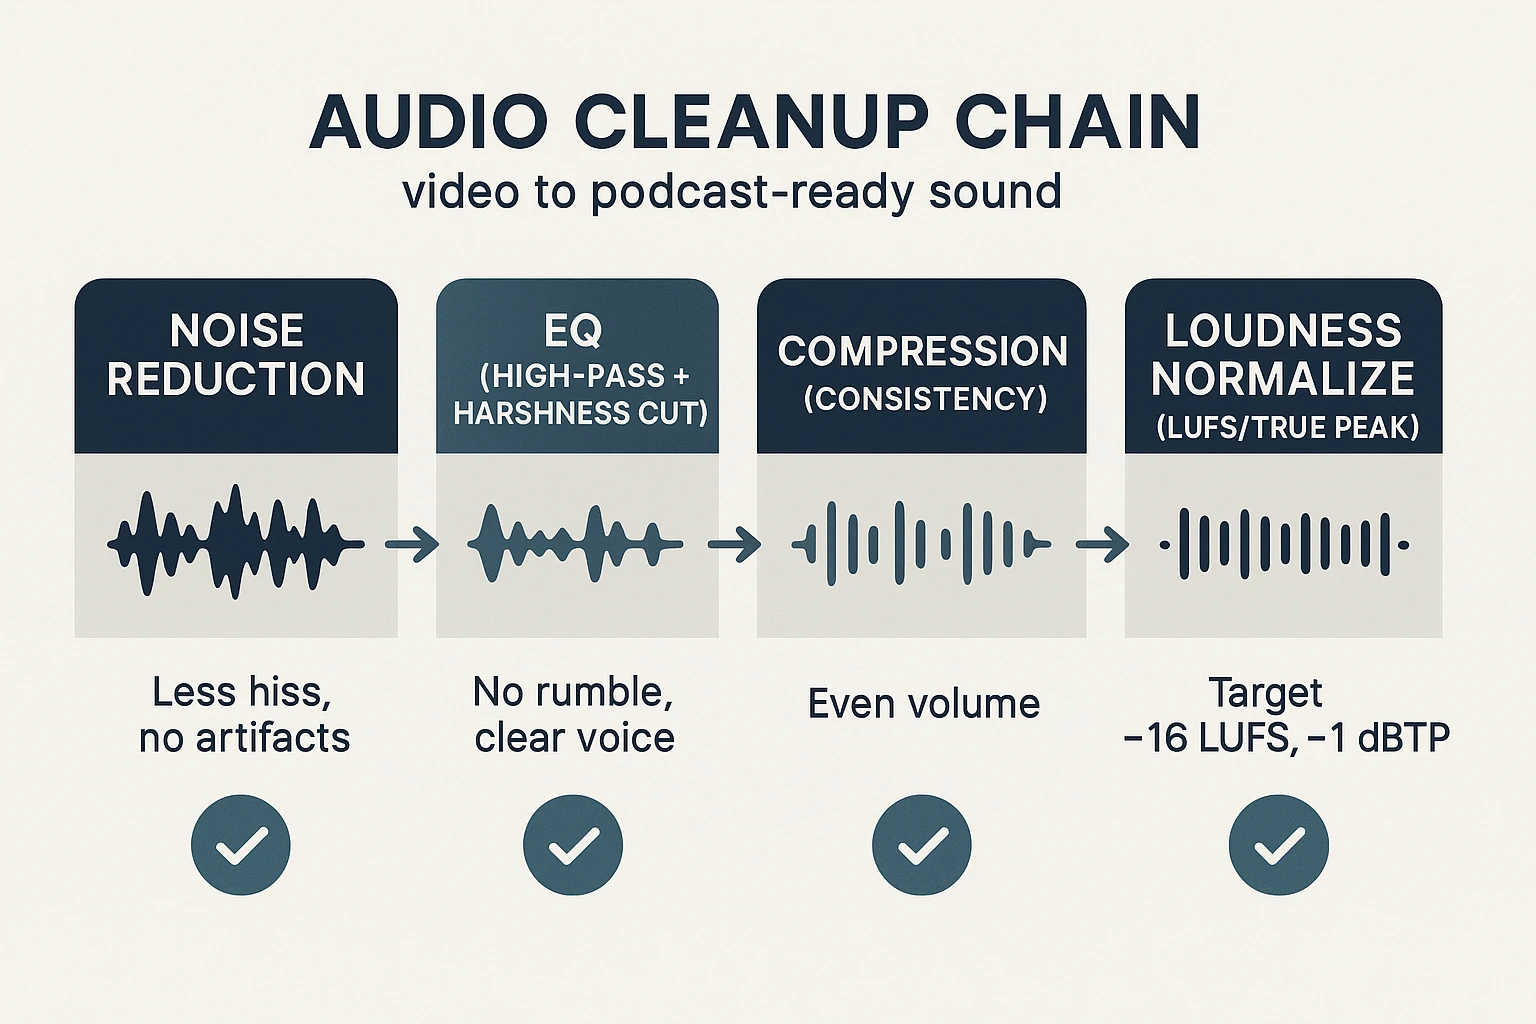
Use a simple cleanup chain (in this order)
Order matters because each step feeds the next. If you compress before you reduce noise, you'll often make the hiss and fan louder.
- Noise reduction (gentle)
- Goal: lower constant noise, not erase the room.
- "Good enough" approach: remove a little, then stop. If voices start to sound watery or robotic, you went too far.
- Common webinar issues:
- Laptop fan or AC hum: treat as steady noise.
- Echo (room reverb): noise tools won't fix it well; use less reduction and rely on EQ plus tighter mic technique next time.
- Inconsistent mic distance: expect level swings and tone changes; compression helps later.
- EQ (tone shaping)
- Start with a high-pass filter (also called low-cut) to remove rumble.
- Typical speech starting point: around 70 to 100 Hz, adjusted by ear.
- If the voice is harsh, cut a little in the "sharp" range (often 3 to 6 kHz).
- If it's boxy, reduce a bit around 200 to 400 Hz.
- Start with a high-pass filter (also called low-cut) to remove rumble.
- Compression (level control)
- Goal: make the voice feel even, so listeners don't ride the volume.
- Beginner-safe settings concept:
- Use a moderate ratio (about 3:1 to 4:1).
- Aim for a few dB of gain reduction on loud phrases.
- Add makeup gain only after you confirm it's not clipping.
- De-ess (tame "S" sounds)
- Use it only if "S" and "SH" are sharp.
- If the voice starts to lisp, back off.
Hit podcast loudness targets (and stop chasing "louder")
Podcast players reward consistency. Listeners quit when one episode is quiet and the next is blasting.
Podcast-ready audio spec (quick targets)
- Loudness target: about -16 LUFS for stereo (LUFS = perceived loudness)
- True peak ceiling: -1.0 dBTP (gives safety for encoding)
- No clipping: keep peaks below 0 dBFS at all times
- Consistent episodes: match loudness across your whole back catalog
- Chapters and ID3 tags: add if your host supports them (title, show, episode number, artwork)
Expert quote (placeholder)
- "Normalize to a consistent LUFS target and set a true-peak ceiling. Consistency beats 'louder' because it reduces listener fatigue and prevents codec clipping." (Audio engineer / podcast editor)
Choose mono vs stereo, sample rate, and MP3 settings
- Mono is fine for voice-only talk. It also reduces file size.
- Use stereo if you have music beds, ambience, or multiple mics with space.
- Pick one sample rate and stick to it across your workflow: 44.1 kHz or 48 kHz. Consistency helps avoid weird resampling artifacts.
- Export a WAV master for archiving.
- For delivery, use MP3 for wide compatibility:
- Speech-safe bitrate: 96 to 128 kbps (mono often sounds great at the low end)
Mini-checklist before you publish
- Listen on earbuds and a phone speaker.
- Confirm no drift, glitches, or "watery" noise reduction artifacts.
- Check that the intro, main content, and outro are similar in volume.
Keep it simple, or go deeper
- Stop here (simple path): gentle noise reduction, high-pass EQ, light compression, loudness normalize, export.
- Go deeper: fix echo with room treatment, learn automation lanes for big level swings, and build presets per recording setup.
How can you edit with a transcript-first workflow (step-by-step example)?
A transcript-first workflow lets you edit faster by cutting words first, not waveforms. Below is a simple, end-to-end example using TicNote Cloud, from upload to podcast-ready outputs.
Web Studio: upload, generate a transcript, then export podcast assets
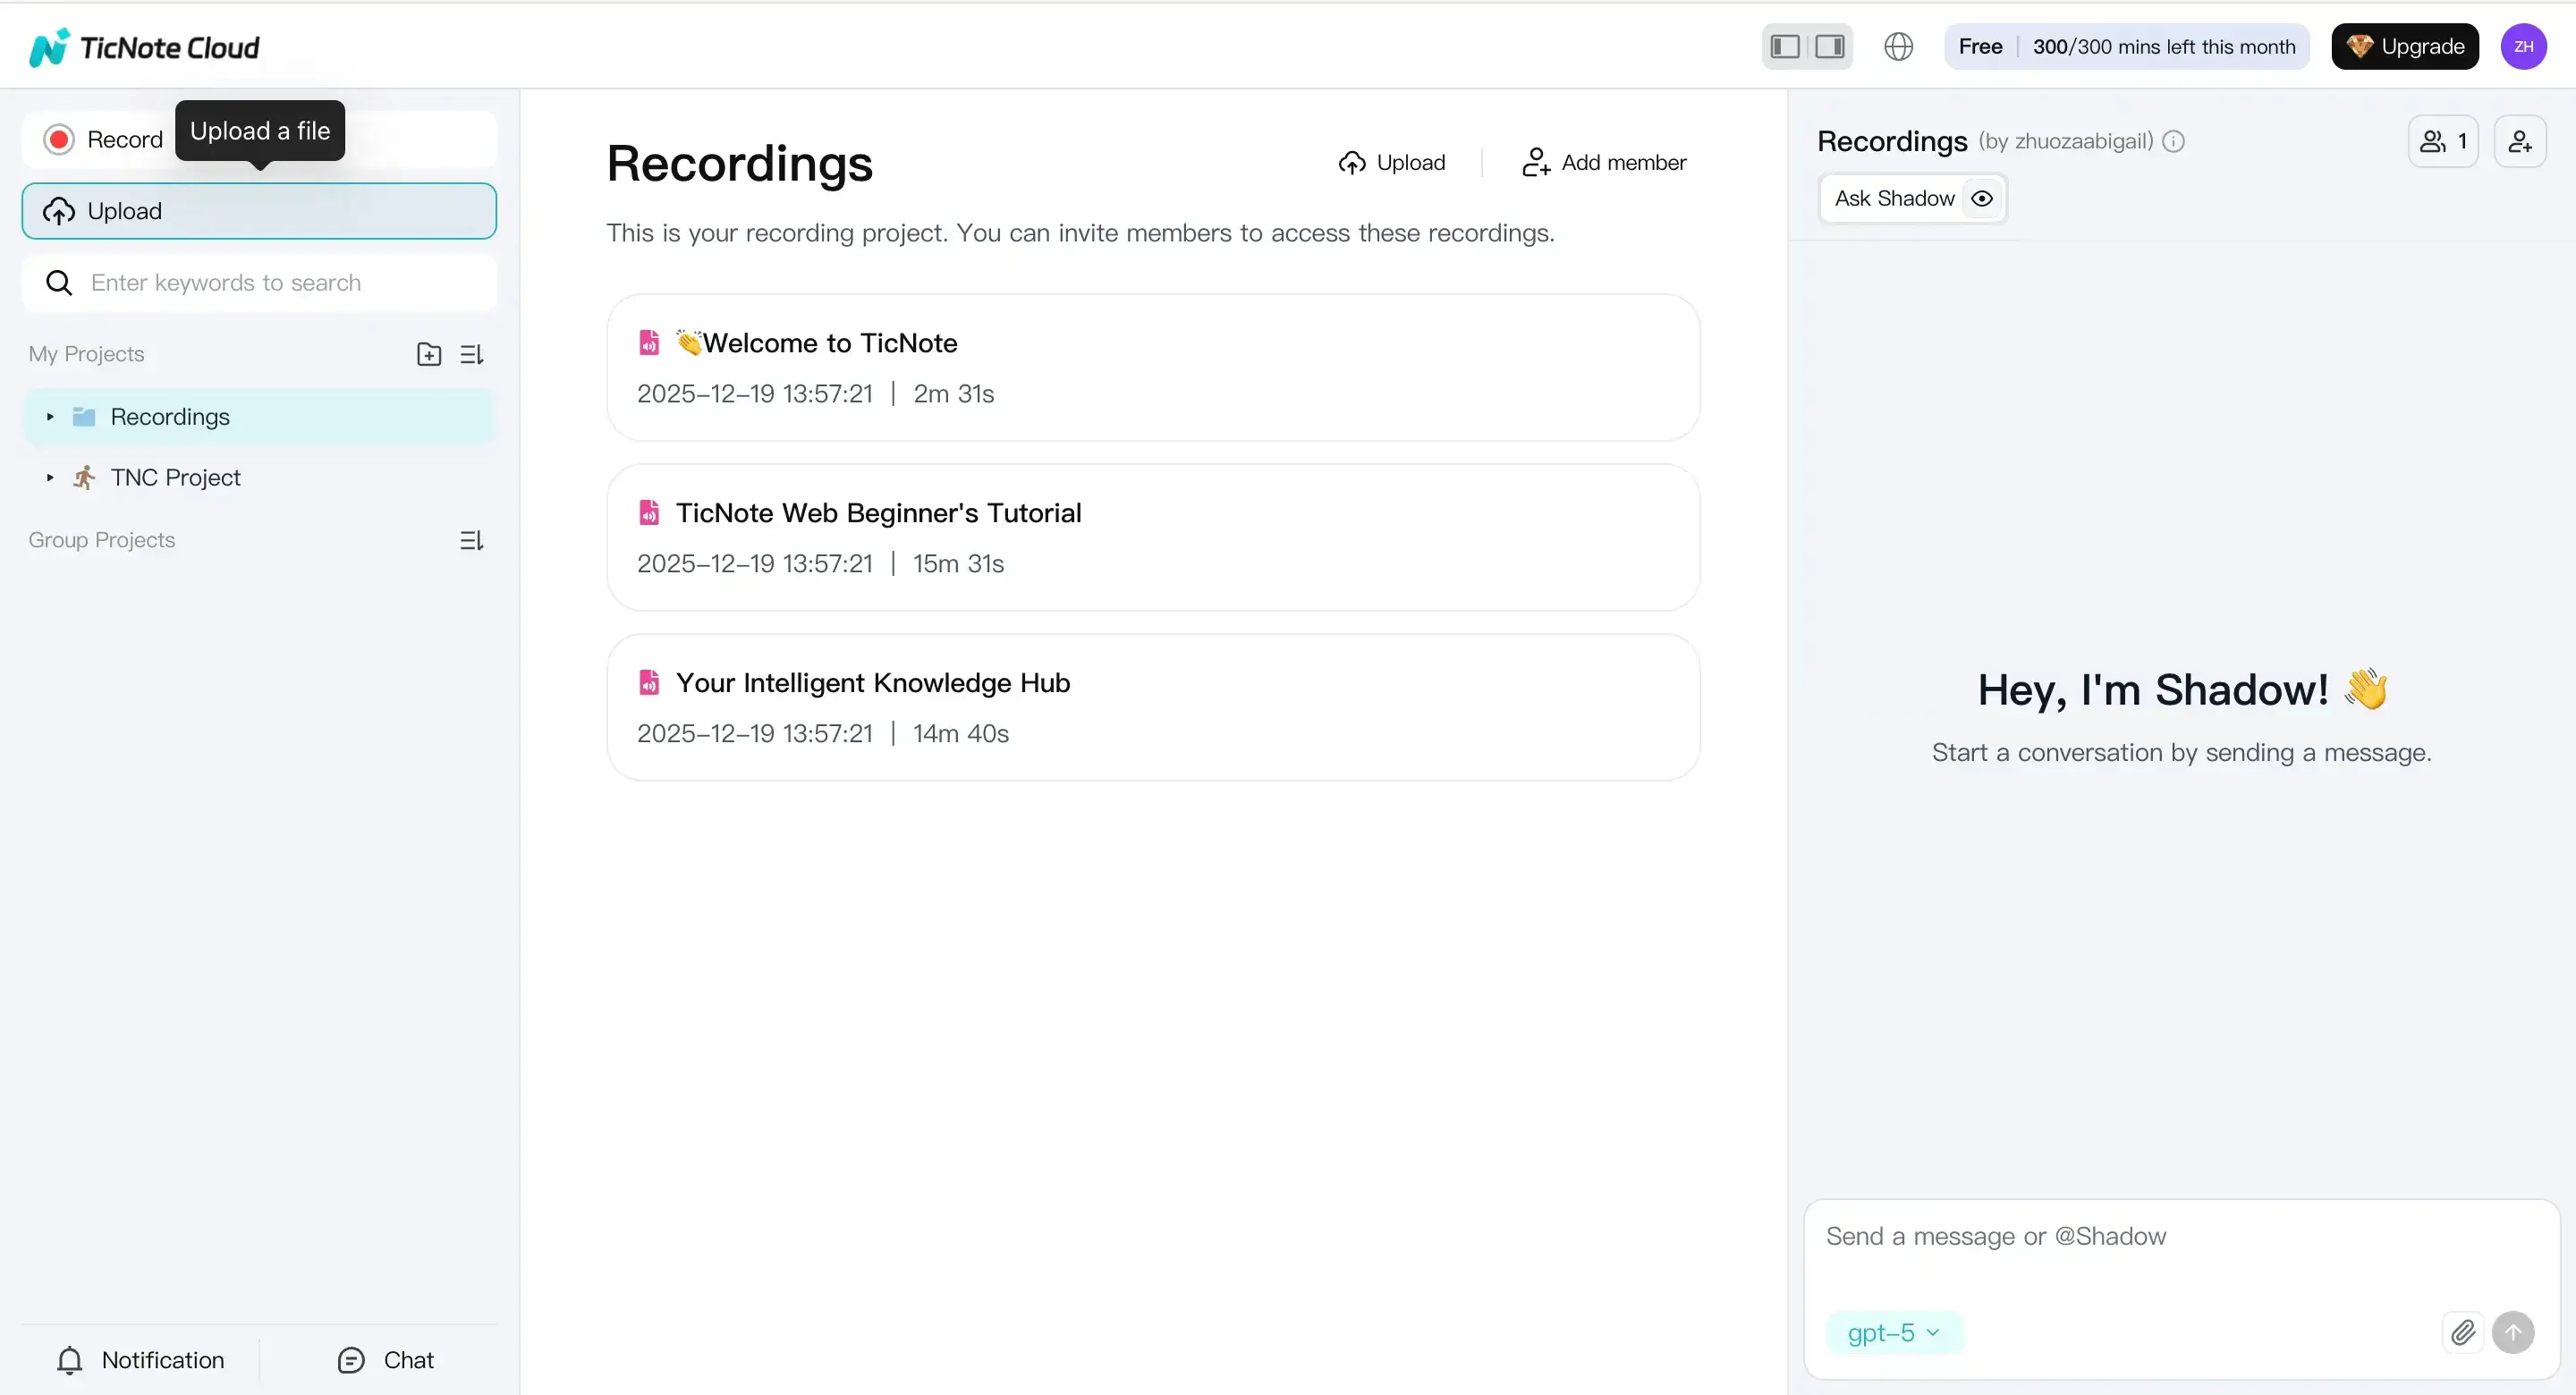
Step 1) Upload your file into the right project
Open TicNote Cloud Web Studio and start by creating a project for the show (or for a content series). This keeps your transcript, notes, and exports in one place for reuse.
Then click Upload and add your video or your extracted audio file. If you have supporting files like a run-of-show or outline, upload those too so your notes and edits stay consistent.
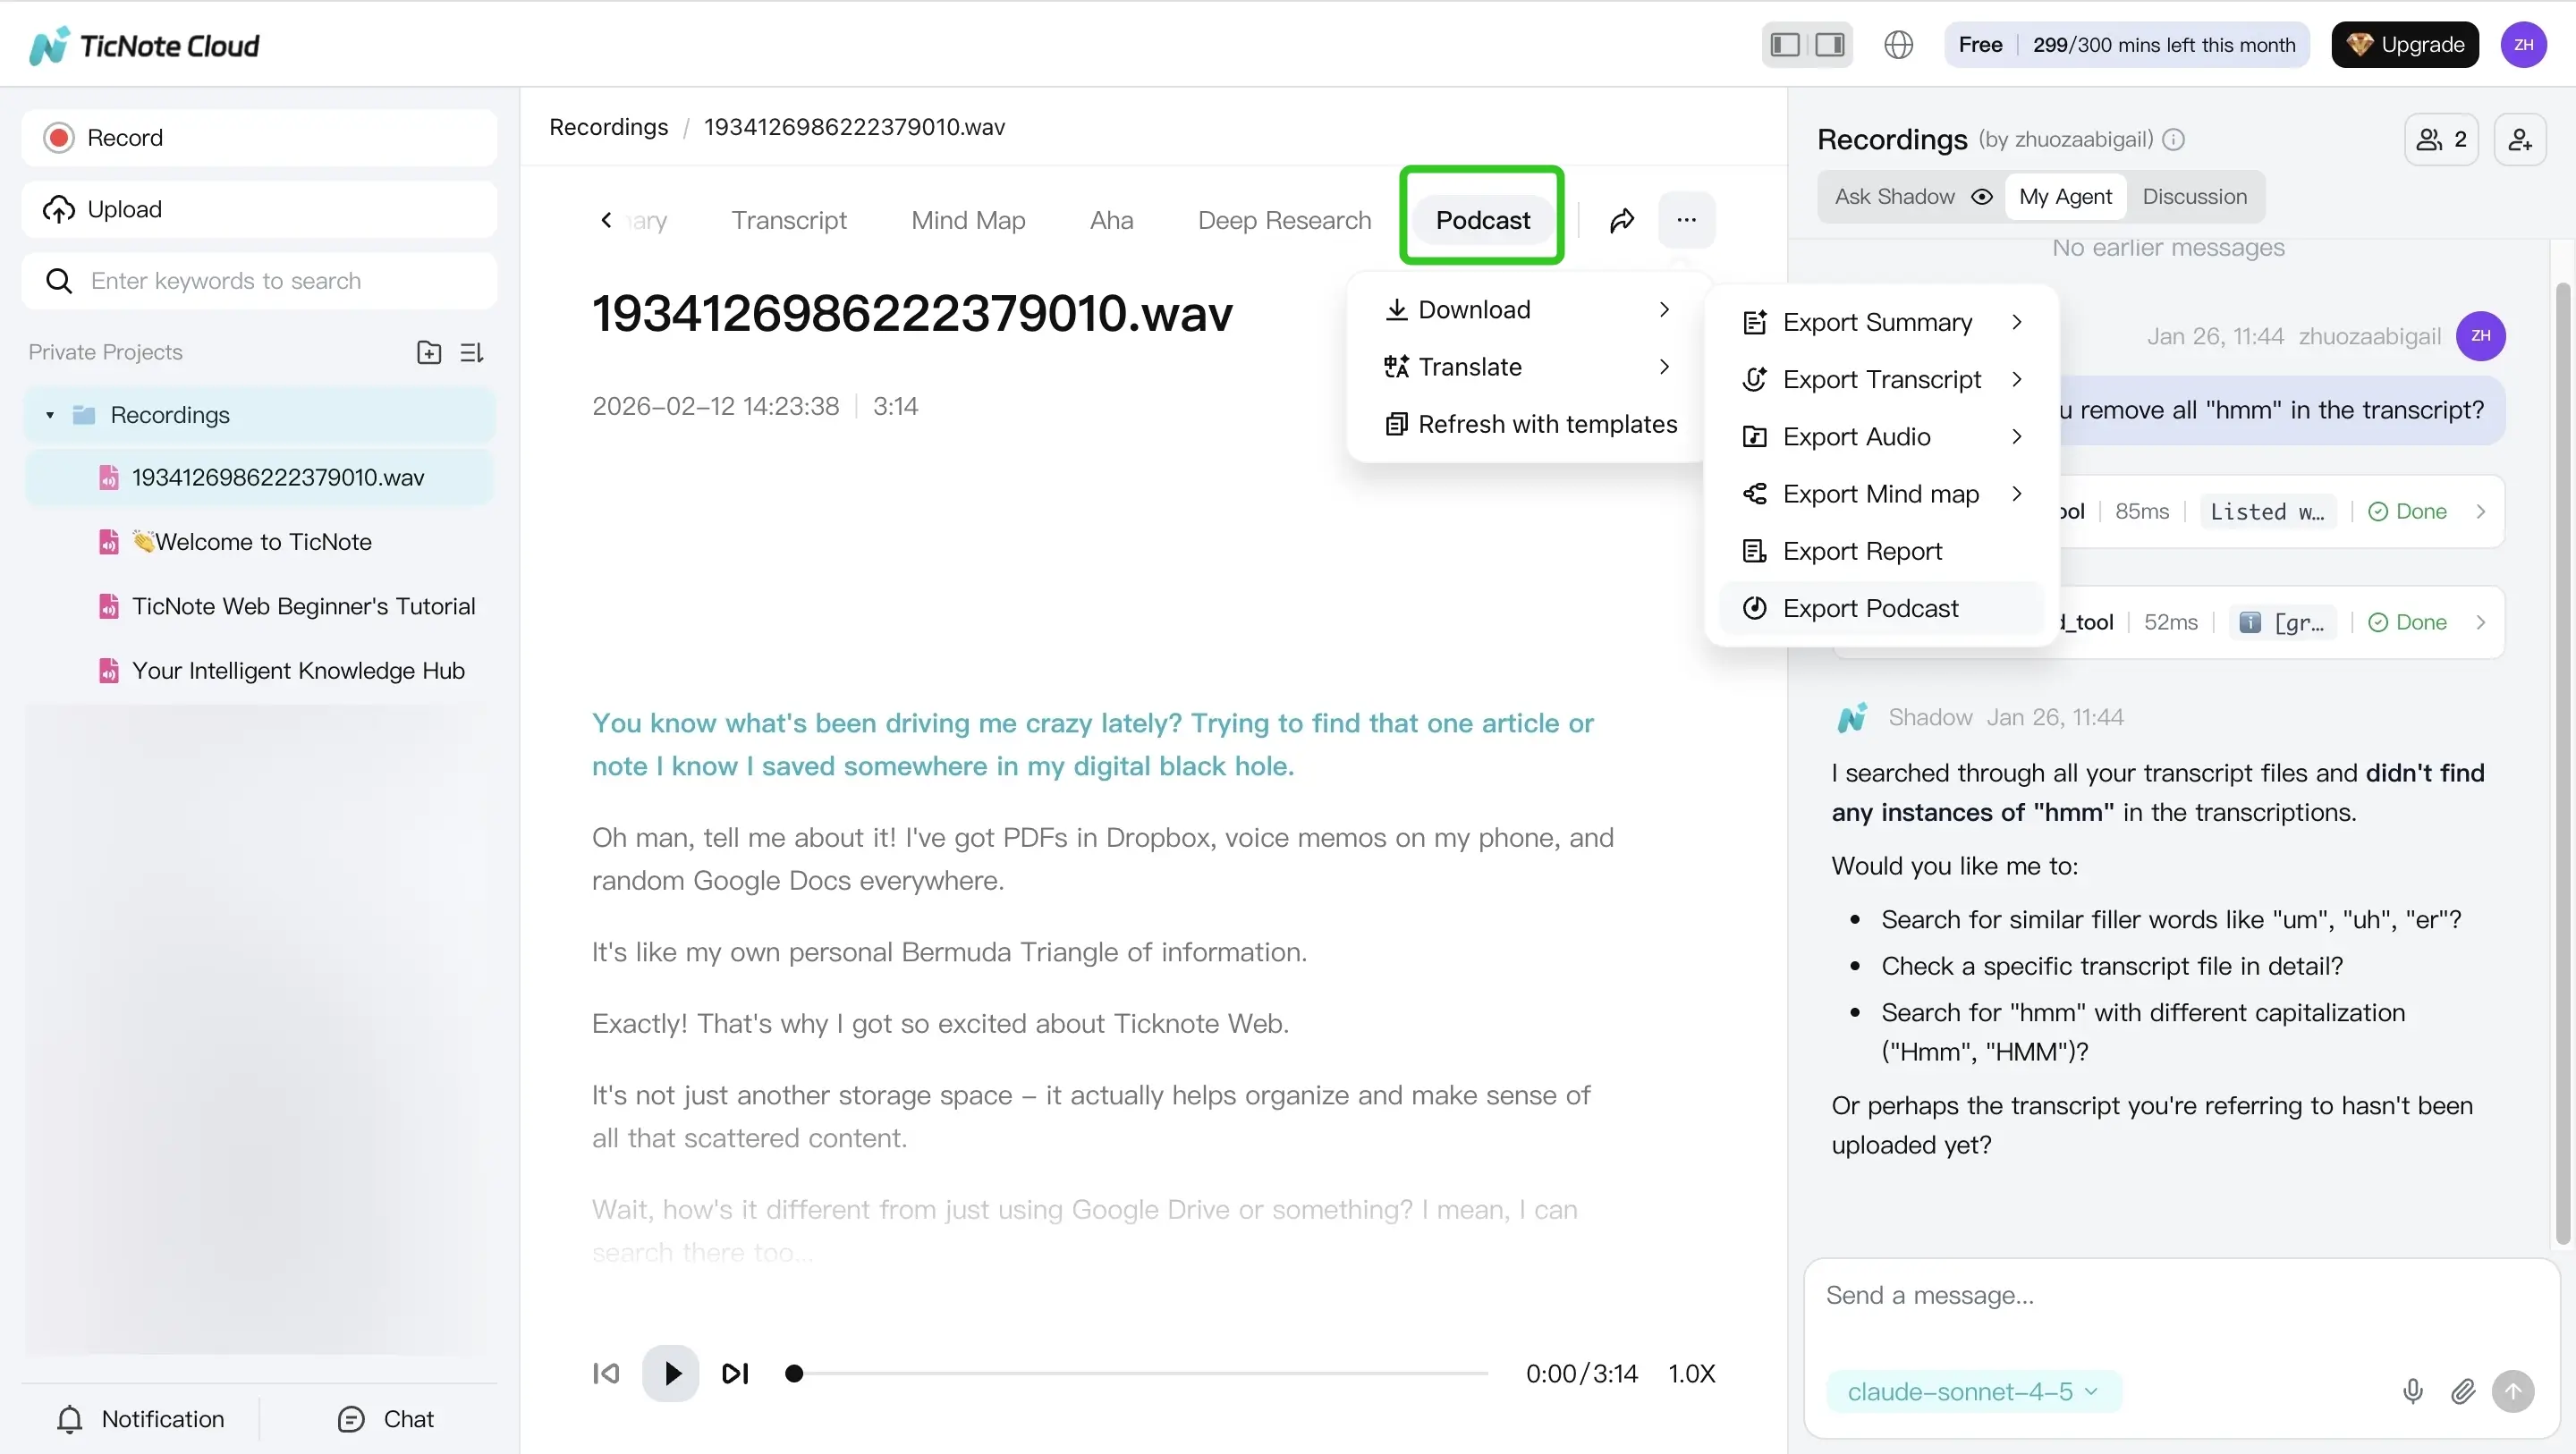
Step 2) Generate the podcast output and review the transcript
After the file processes, go to the Podcast tab. You'll see a podcast version generated from your upload, along with the transcript you'll use for edits.
Before you export anything, do a quick transcript pass:
- Check speaker labels so your show notes don't mix people up.
- Mark key moments that should become timestamps.
- Flag visual-only lines like "as you can see" that won't work in audio.
Edit by text: the simple transcript-first outline
Here's a clean way to edit without getting lost:
- Search and remove filler words (like "um," "you know," repeated starts).
- Fix visual references for audio listeners. Replace "on this slide" with a short spoken description, or cut it if it adds no value.
- Turn your cleaned transcript into show notes. Write a 2 to 4 sentence summary, then add timestamped bullets for the main points.
Export what you need for the rest of the pipeline
Once it reads clean, export assets that plug into the rest of your podcast workflow:
- Transcript export (TXT) for archiving, SEO, or a podcast transcript page.
- Summary or show notes export (Markdown, DOCX, or PDF) for your episode page.
- Audio export (WAV) for final mastering and loudness matching.
Inline tip: if you want to see this in action, Try TicNote Cloud for Free or use the same flow to Create your first transcript and show notes in minutes.
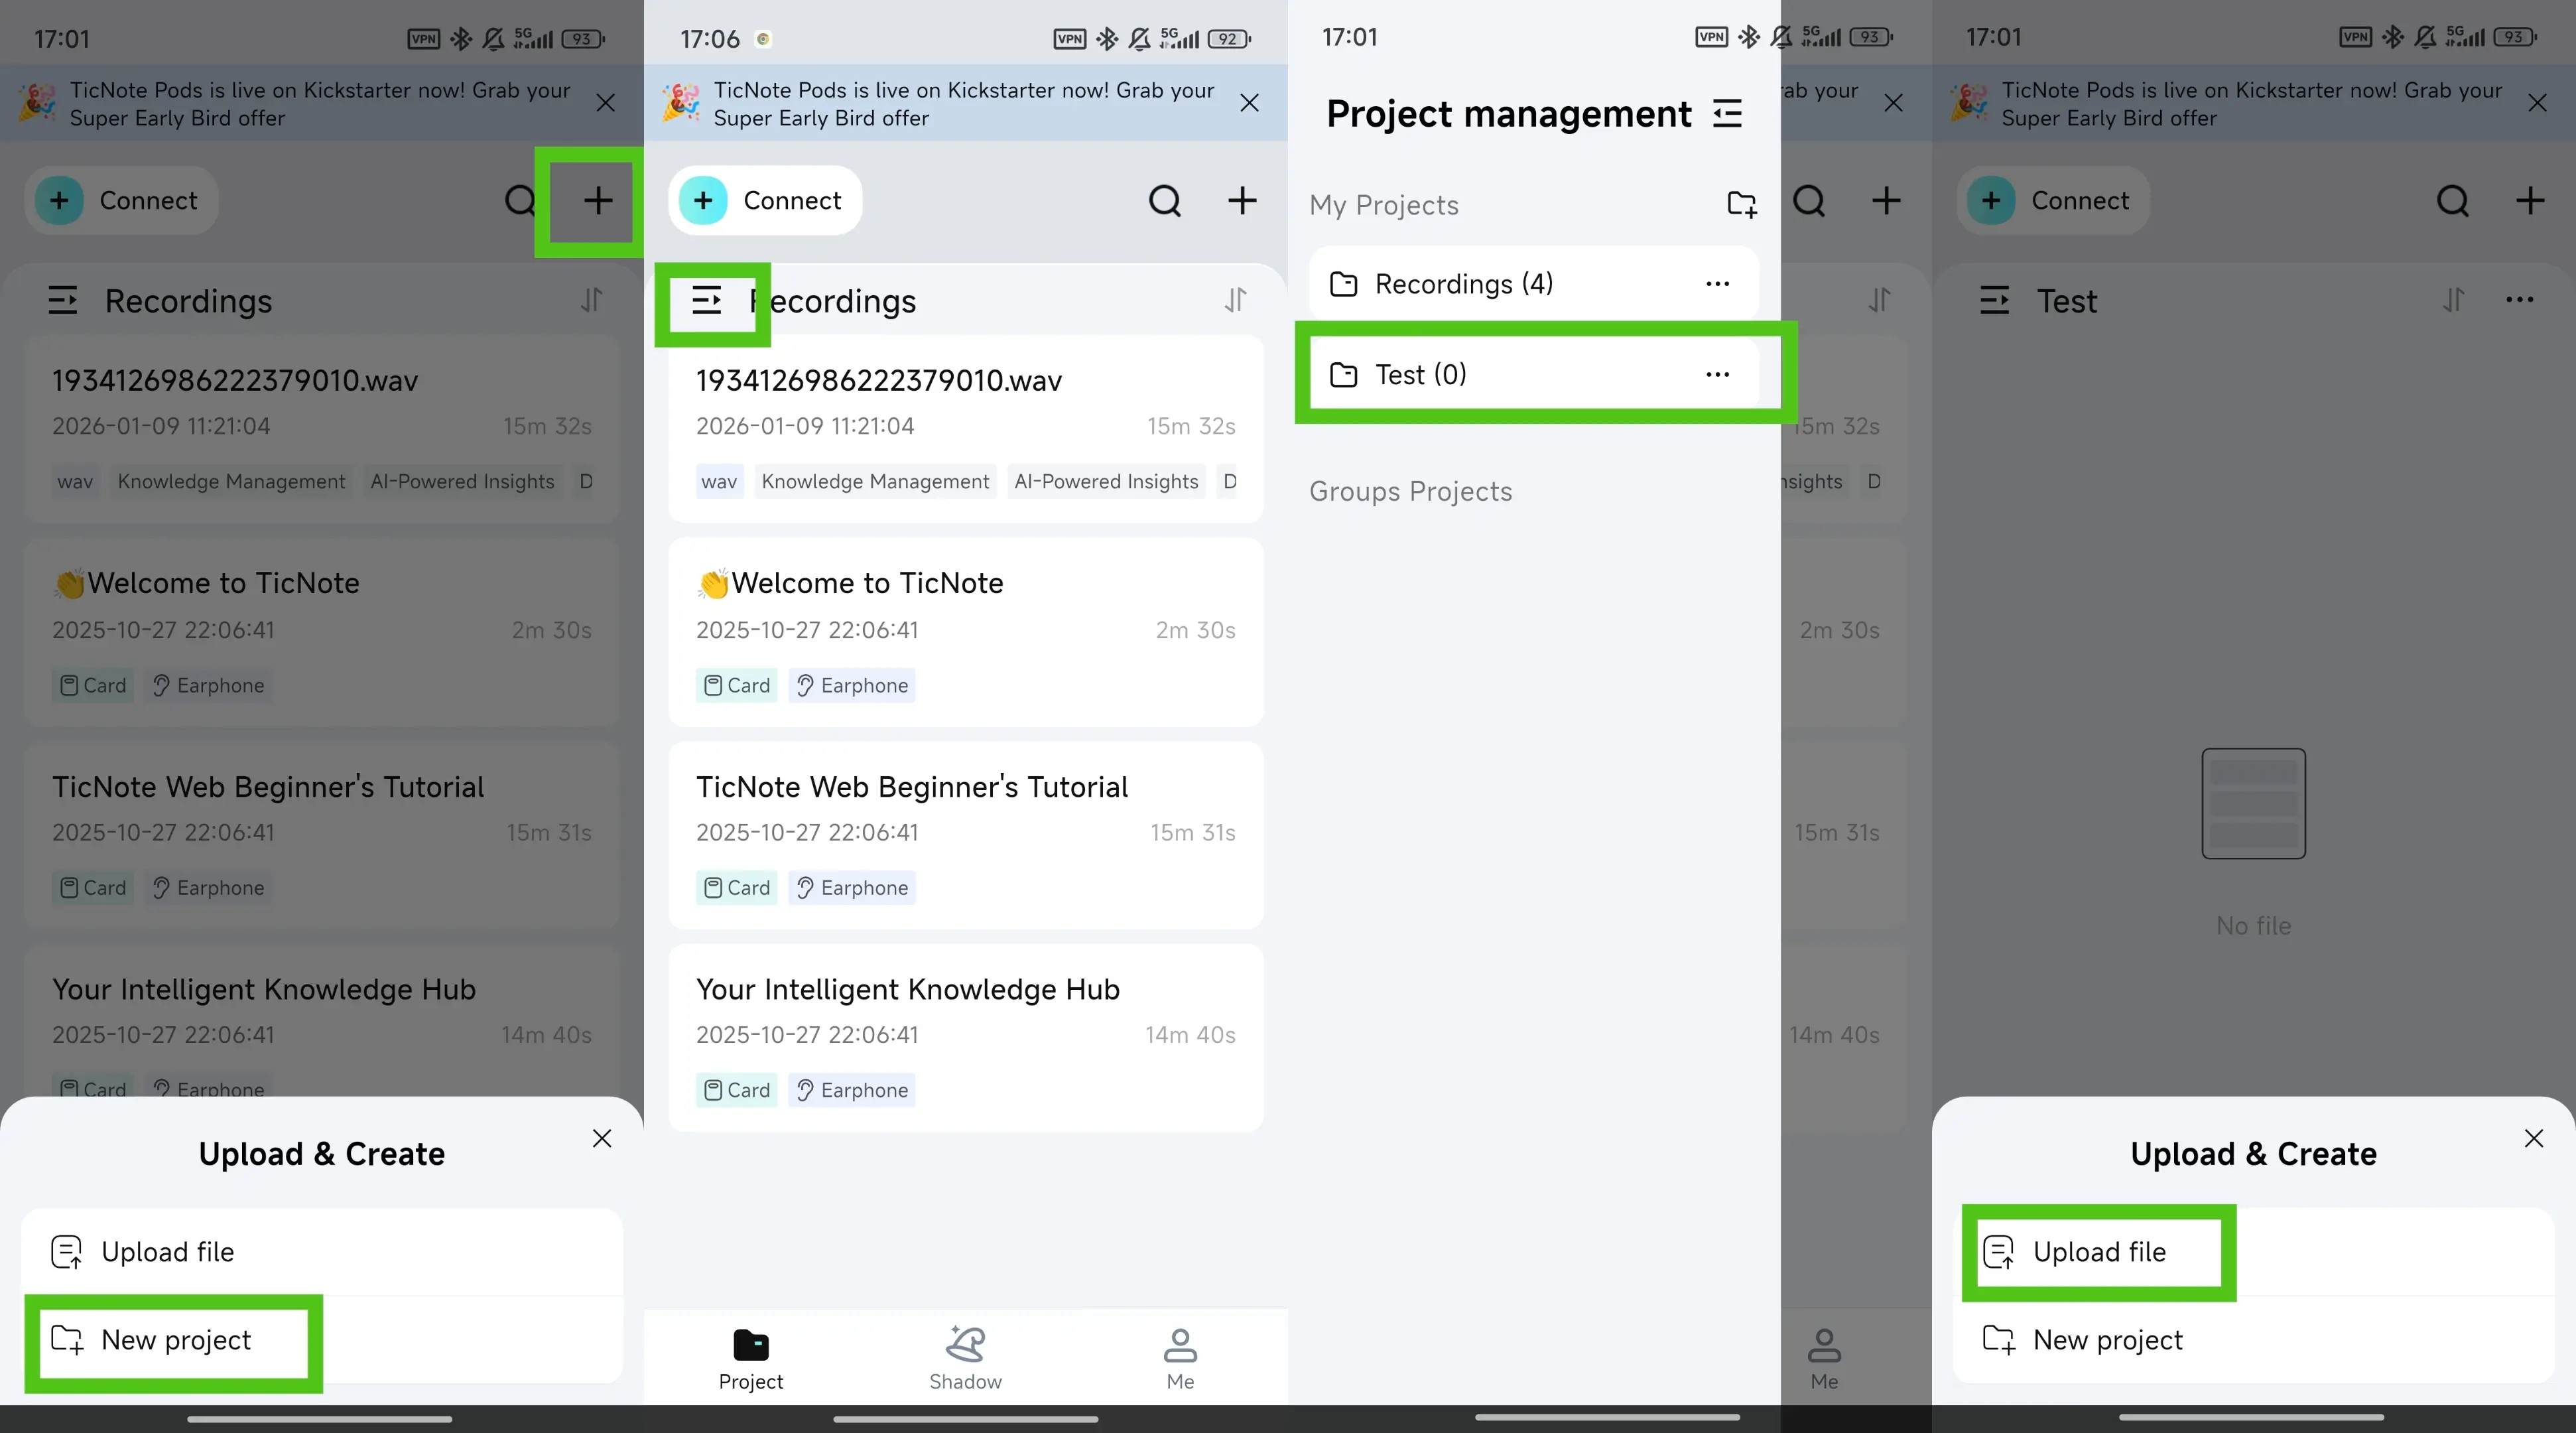
App (iOS/Android): quick version of the same flow
On mobile, the idea stays the same. Open the TicNote app, tap the add button, and upload your video or audio into the same project as your desktop workflow.
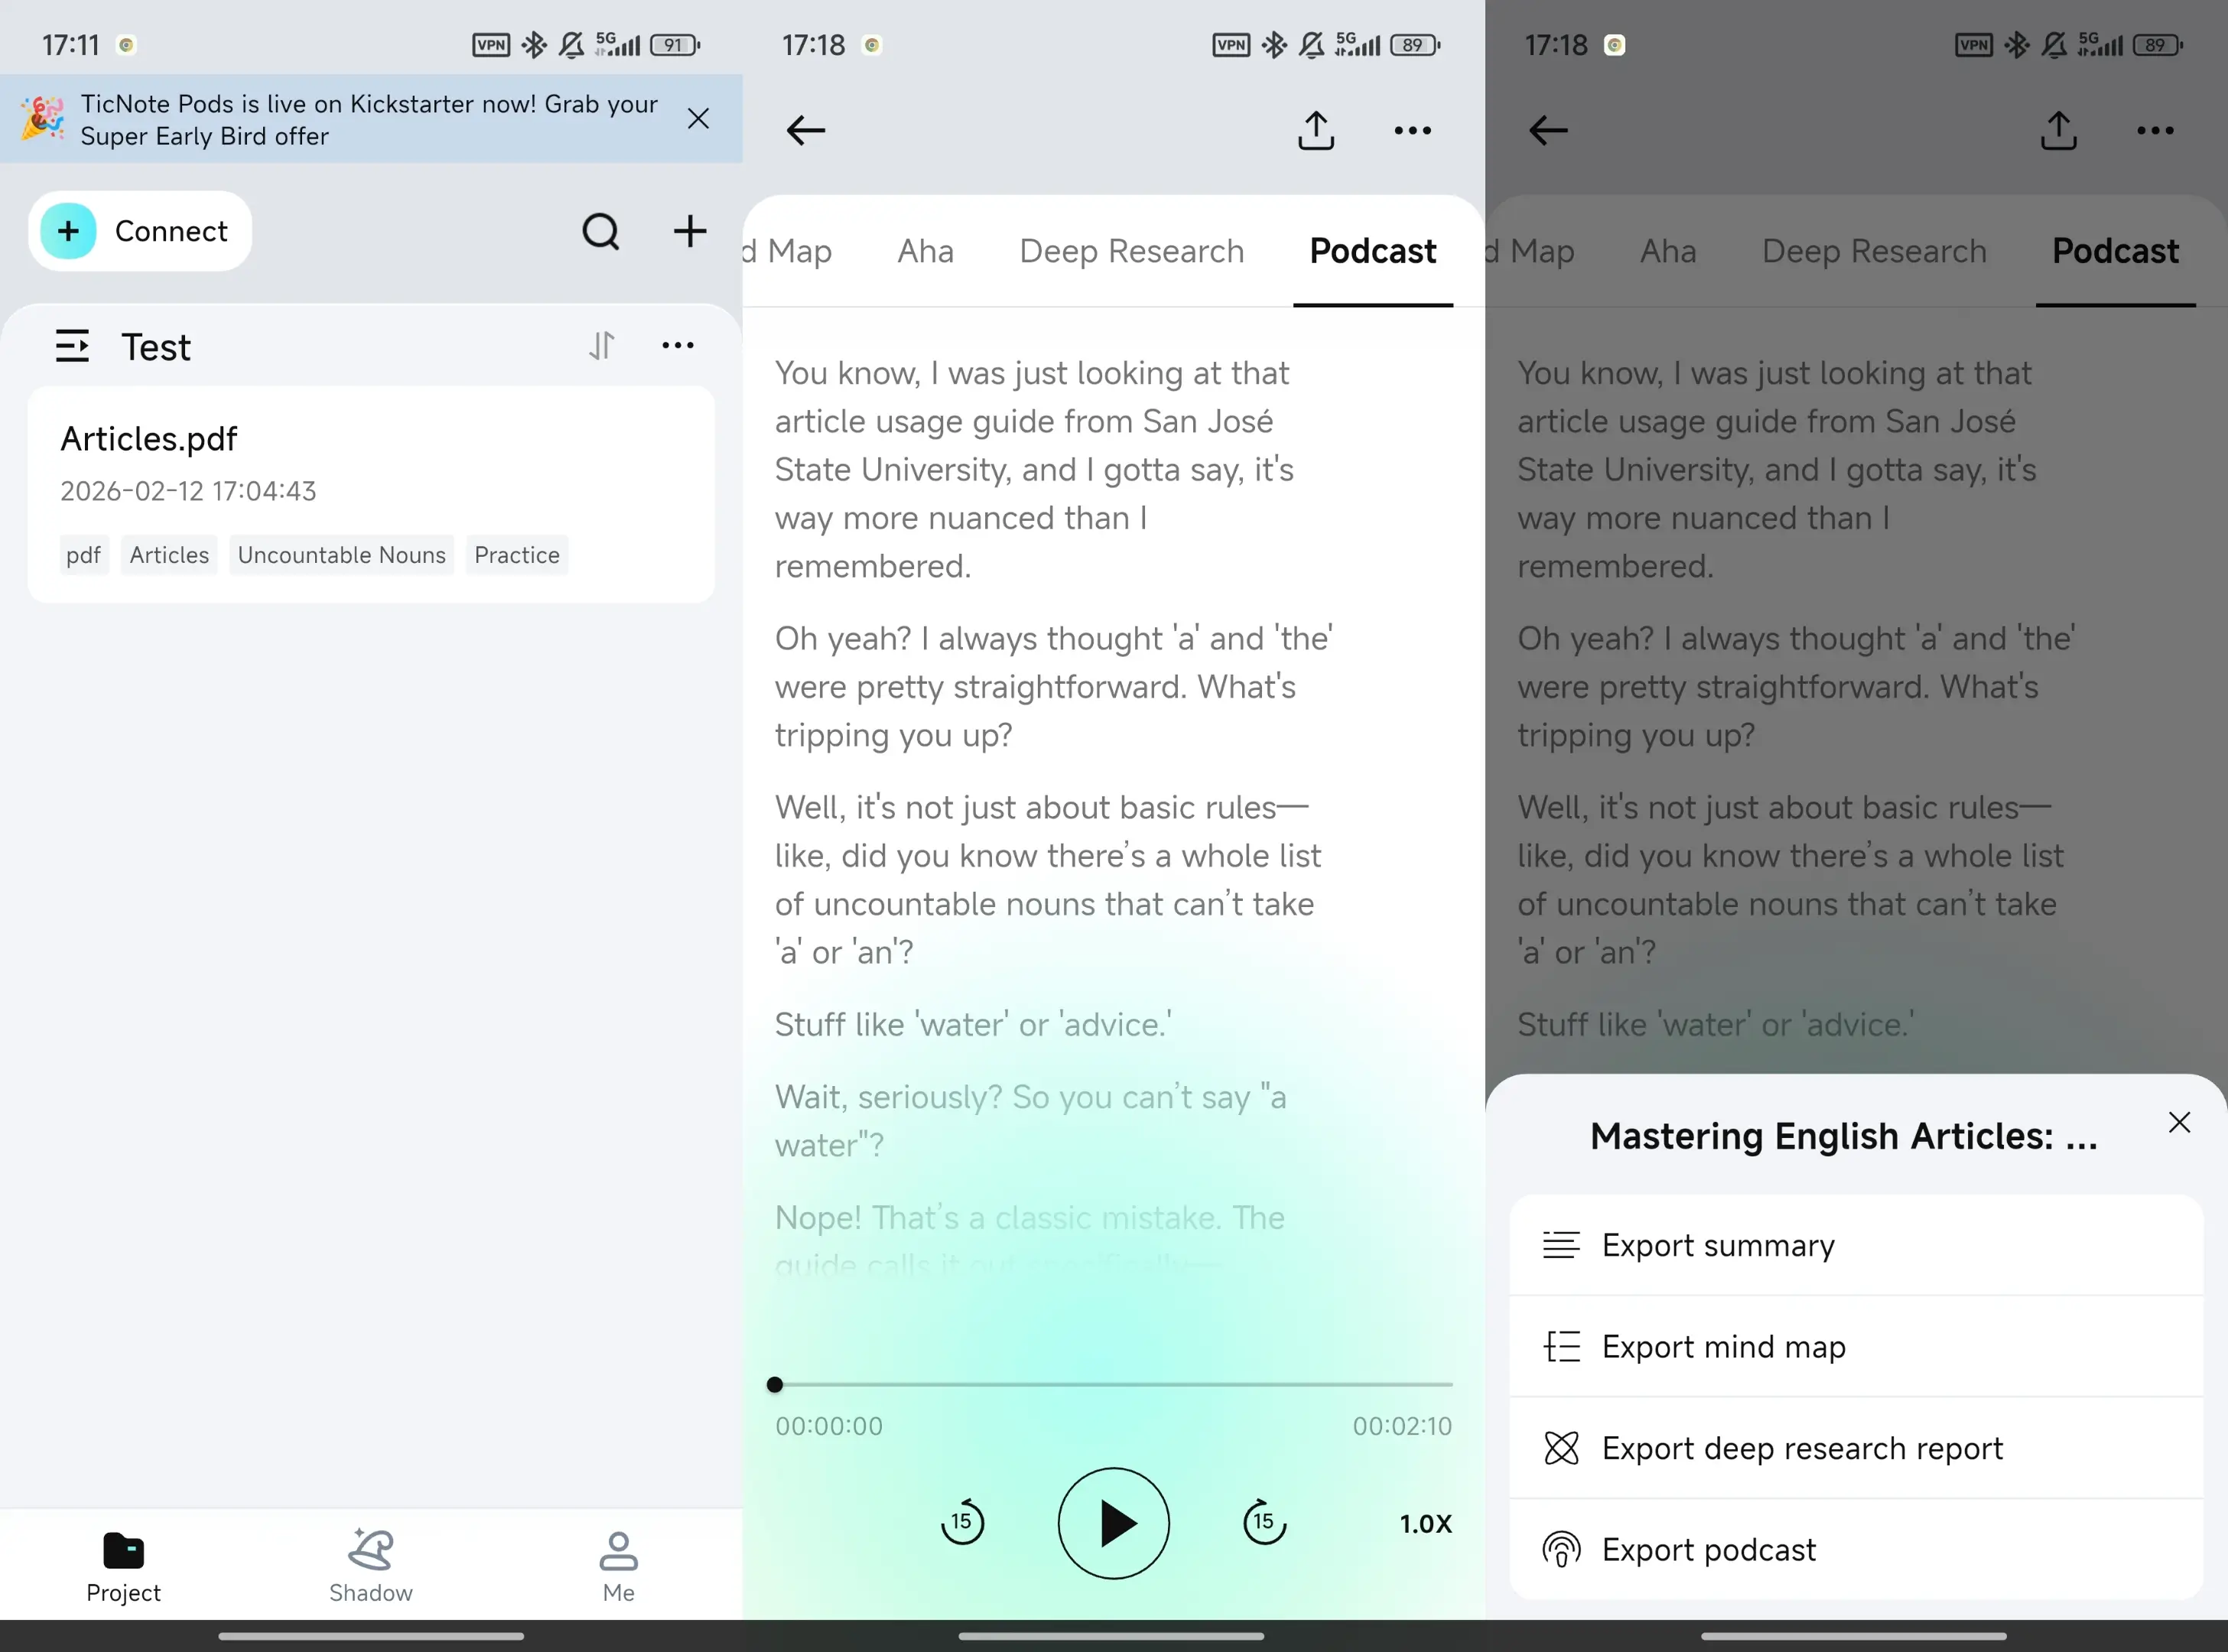
Next, tap the Podcast tab. From there, use the three-dots menu to export the podcast output in the format you need, then share it with your hosting workflow.
Human review checklist (don't skip this)
Even with automation, do a final listen:
- Confirm cuts didn't change the meaning.
- Re-listen to transitions to catch awkward jumps.
- Make sure show notes explain any visual moments.
Try TicNote Cloud for Free to create a transcript-first edit and export podcast assets faster.
How do you package the episode for publishing (metadata, artwork, and tags)?
Packaging is the last step before your host and directories see your show. Do it right once, and every episode looks consistent, plays cleanly, and is easier to find. Here's the simple checklist for metadata, artwork, and show notes when you repurpose video into audio.
Add the ID3 tags players actually read
ID3 tags are the fields stored inside the audio file (usually MP3). Most podcast apps use them as a fallback, and they help with downloads shared outside your host.
Prioritize these tags:
- Episode title
- Show name (Artist)
- Episode number
- Date (release date or year)
- Genre (Podcast)
- Embedded cover art
Metadata template (copy and reuse):
- Show (Artist): {Show Name}
- Episode Title: {Episode Title}
- Episode Number: {###}
- Season: {#}
- Date: {YYYY-MM-DD}
- Genre: Podcast
- Comment: Recorded from {Source Video Title} | © {Year} {Owner}
- Cover Art: {square JPG/PNG}
Choose artwork rules and safe defaults
Aim for one square image that stays readable on a phone. For directory specs, Apple Podcasts Connect Help — Artwork requirements (2025) says cover art must be at least 1400 x 1400 pixels and at most 3000 x 3000 pixels.
Artwork checklist:
- Short show name (3 to 5 words max)
- High contrast and big type
- Don't use tiny subtitles
- Keep colors and layout consistent each week
Use chapters and show notes the right way
Chapters help most on long tutorials, webinars, and interviews. If your episode is short and linear, they're optional.
Show notes checklist:
- 2 to 3 lines on what the episode covers
- Key links and resources mentioned
- Guest name and links (if any)
- Timestamps or chapter list (if used)
- Note: "This episode was adapted from video."
Do a quick packaging QA pass
Before you publish:
- Confirm the embedded cover art shows up in a player.
- Play the file on your phone and check the start and end.
- Make sure the episode title matches what you entered in your host.
How do you publish and distribute automatically (host + directories + scheduling)?
Once your audio is podcast-ready, automation is mostly about choosing the right host and setting repeatable defaults. The goal is simple: upload once, schedule it, and let your RSS feed push episodes everywhere with minimal clicks.
Choose a host: automation features that save real time
A podcast host is the system that stores your audio, creates your RSS feed, and sends updates to listening apps. For an automation-first workflow, look for:
- RSS feed generation (no manual XML work)
- Scheduled publishing (set date and time once)
- Bulk upload (great for back catalogs)
- Show-notes templates (reuse formatting and sections)
- Directory connections (Apple Podcasts, Spotify, etc.)
- Dynamic ad markers (optional, if you plan to monetize later)
Automation-friendly host checklist (copy/paste):
- Can I schedule episodes and change time zones?
- Can I bulk upload audio and auto-fill titles?
- Does it reuse a show-notes template per episode?
- Does it support episode numbers, seasons, and trailers?
- Can it push to major directories from one dashboard?
- Does it provide analytics for downloads and retention?
If you're still planning your stack, this podcast hosting and launch checklist helps you pick a setup that won't fight your workflow.
Submitting once vs syndicating everywhere
You submit your show once per directory, but you publish episodes once. The directories read your RSS feed, then fetch new episodes as you release them.
What you'll usually need for submissions:
- Podcast name and short description
- Category and language
- Cover art (square, high-res)
- Author name and contact email
- Your RSS feed URL (from the host)
Build a simple promo loop (that stays lightweight)
After publishing, reuse the same assets each time:
- Cut 2 to 4 short highlights for social.
- Post an episode page with the transcript for readers and SEO.
- If you have guests, send them copy-and-paste sharing text.
A basic automation loop looks like this: publish, auto-create tasks, auto-draft social posts, then approve them yourself. Keep watching downloads and retention, then refine your audio chain and your templates, not your tool stack.
Try TicNote Cloud for Free to turn transcripts into show notes and episode pages faster.
What can TicNote Cloud do that most video-to-podcast tools cannot?
Most video-to-podcast tools stop at "export audio." TicNote Cloud goes further by turning each episode into a searchable library you can reuse. That matters when you want quality plus automation for How to Convert Videos into Podcast Automatically, not just a one-off WAV.
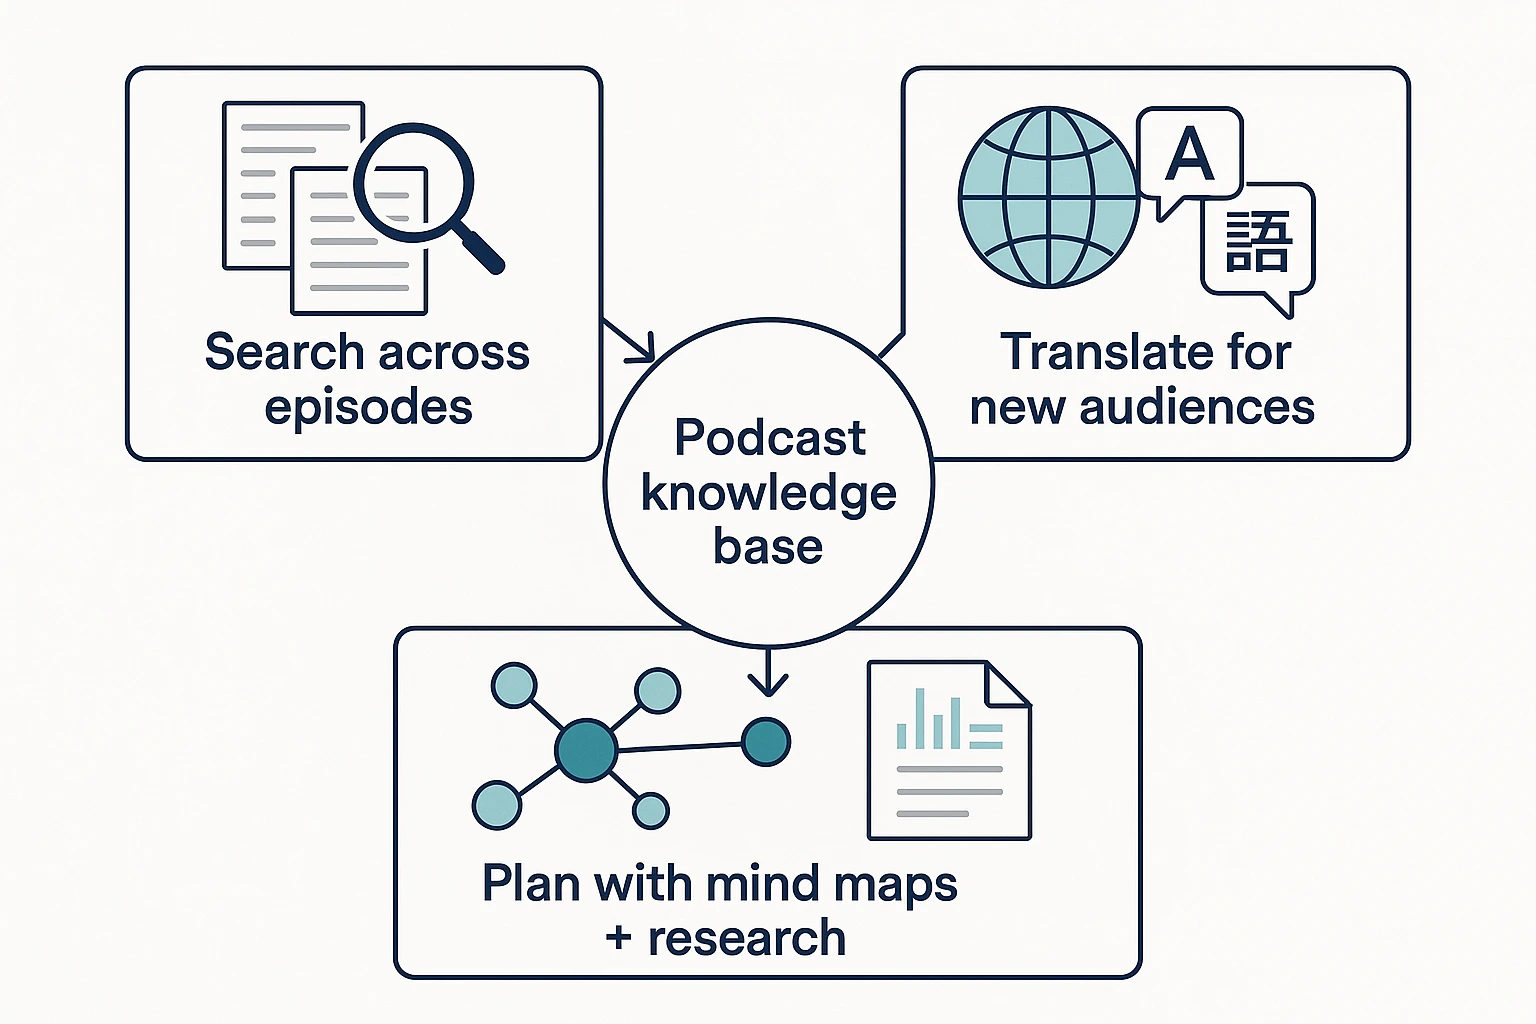
Ask across past episodes (not just one file)
TicNote Cloud is built like a second brain. With grounded Q&A in Shadow, you can search across many transcripts to find patterns, callbacks, and ready-to-reuse segments.
Try prompts like:
- "What did we say about onboarding across the last 10 webinars?"
- "Pull the best soundbites about pricing objections."
- "List recurring questions we should answer in every episode."
Use Shadow as your interface for this: Chat with your notes using Shadow.
Translate show notes to reach new listeners
If your audio stays in one language, your reach stays capped. TicNote Cloud can translate summaries and show notes (and if you want, full transcripts) into 100+ languages.
Simple rule: translate after the final edit. That way you don't redo work when you cut or rewrite sections.
Plan tighter episodes with mind maps and deep research
Mind maps help you see the episode structure at a glance. You can spot tangents fast and tighten the flow before you publish.
Deep research reports help when one long webinar should become a series. You can turn one recording into a multi-episode outline with clear themes and subtopics.
Mini use case (outline): A YouTuber publishes weekly videos, then spins up an audio feed. They use the transcript to cut tangents, rewrite visual-only lines, and reuse a growing FAQ list across episodes.