

TL;DR: A simple way to transcribe podcast audio and publish a clean transcript
To transcribe a podcast fast and still publish clean text, use an automatic tool like TicNote Cloud to turn your MP3 or WAV into a draft, then do a quick edit pass and export a simple TXT transcript.
You don't want to spend hours fixing messy text. But raw transcripts often include wrong names, no paragraphs, and missed speakers. A tool like TicNote Cloud helps you go from audio to a readable transcript, then clean it up in one workspace.
- 3 fastest workflows:
- DIY (manual): play the episode, type it, and format it; best for short audio or strict verbatim.
- Tool-based (auto plus light edit): upload audio, then clean the text; best for most creators.
- Pro (human service): outsource transcription and cleanup; best for complex audio or speed.
- What you'll have at the end:
- A clean podcast transcript format with speaker labels (who said what), consistent paragraphs, and optional timestamps.
- Optional add-ons: short summary, show notes, quote pulls, and translation.
- 5-minute checklist:
- Confirm it's the full episode file.
- List speaker names and tricky terms (brands, acronyms).
- Pick verbatim or cleaned-up.
- Decide if you need timestamps.
- Choose a method that fits time, budget, and privacy.
How to transcribe a podcast step by step (beginner workflow)
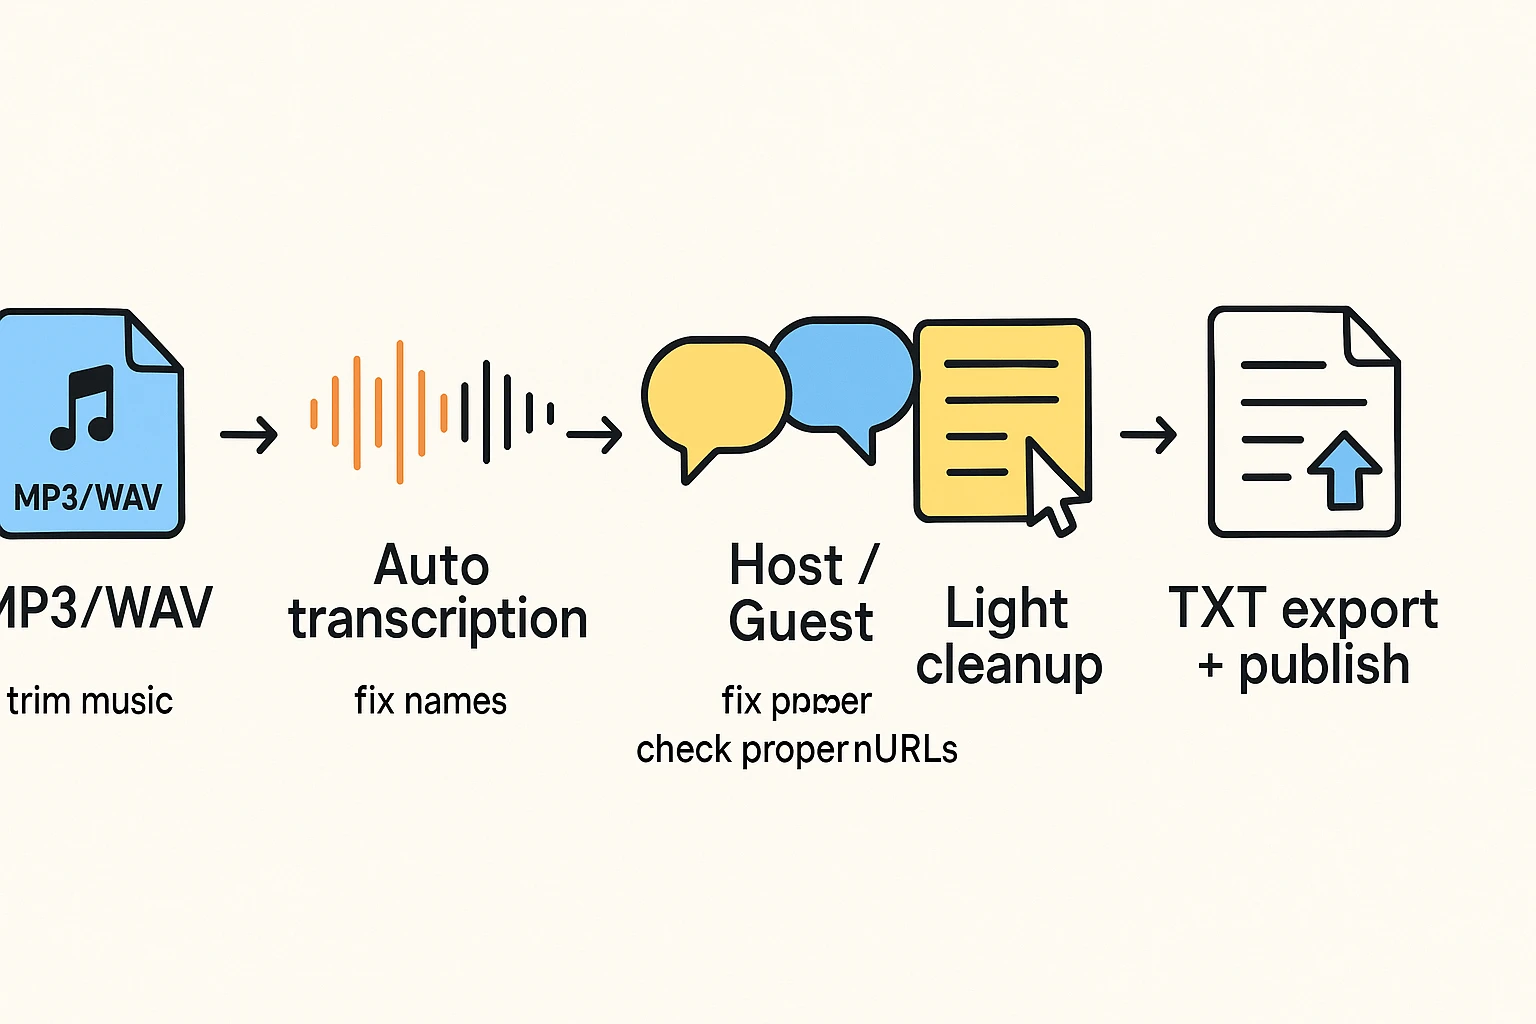
If you want to learn how to transcribe a podcast, use this simple loop: start with the cleanest audio you have, run auto transcription, then do a quick cleanup so the transcript reads well on a web page. The goal is not perfection on pass one. It's a publish-ready draft you can trust.
1) Prepare your audio file (clean input = fewer fixes)
Start by picking the best source you have.
- Use WAV when you can. It's less compressed.
- MP3 is fine for most shows, especially if it's high quality.
- For easiest uploads, use a single mixed track (one file).
If you record multi-track audio, do a quick mixdown first. That means you export one file that includes all voices at a balanced level. Most transcription tools handle a single track better.
Also, trim what you don't need.
- Cut long music beds in the intro and outro.
- Remove dead air at the start.
- Keep only what you plan to publish.
That saves time and reduces weird word guesses during music.
2) Upload or record, then run auto transcription
You have two paths: upload a finished episode, or record live while you talk. Uploads are simpler for most podcasters because you can clean the audio first.
For a tool-based workflow in TicNote Cloud (Web Studio): create a project, then upload your MP3 or WAV.
[[IMG:web1 alt="Upload a file to a project in TicNote web studio"]]
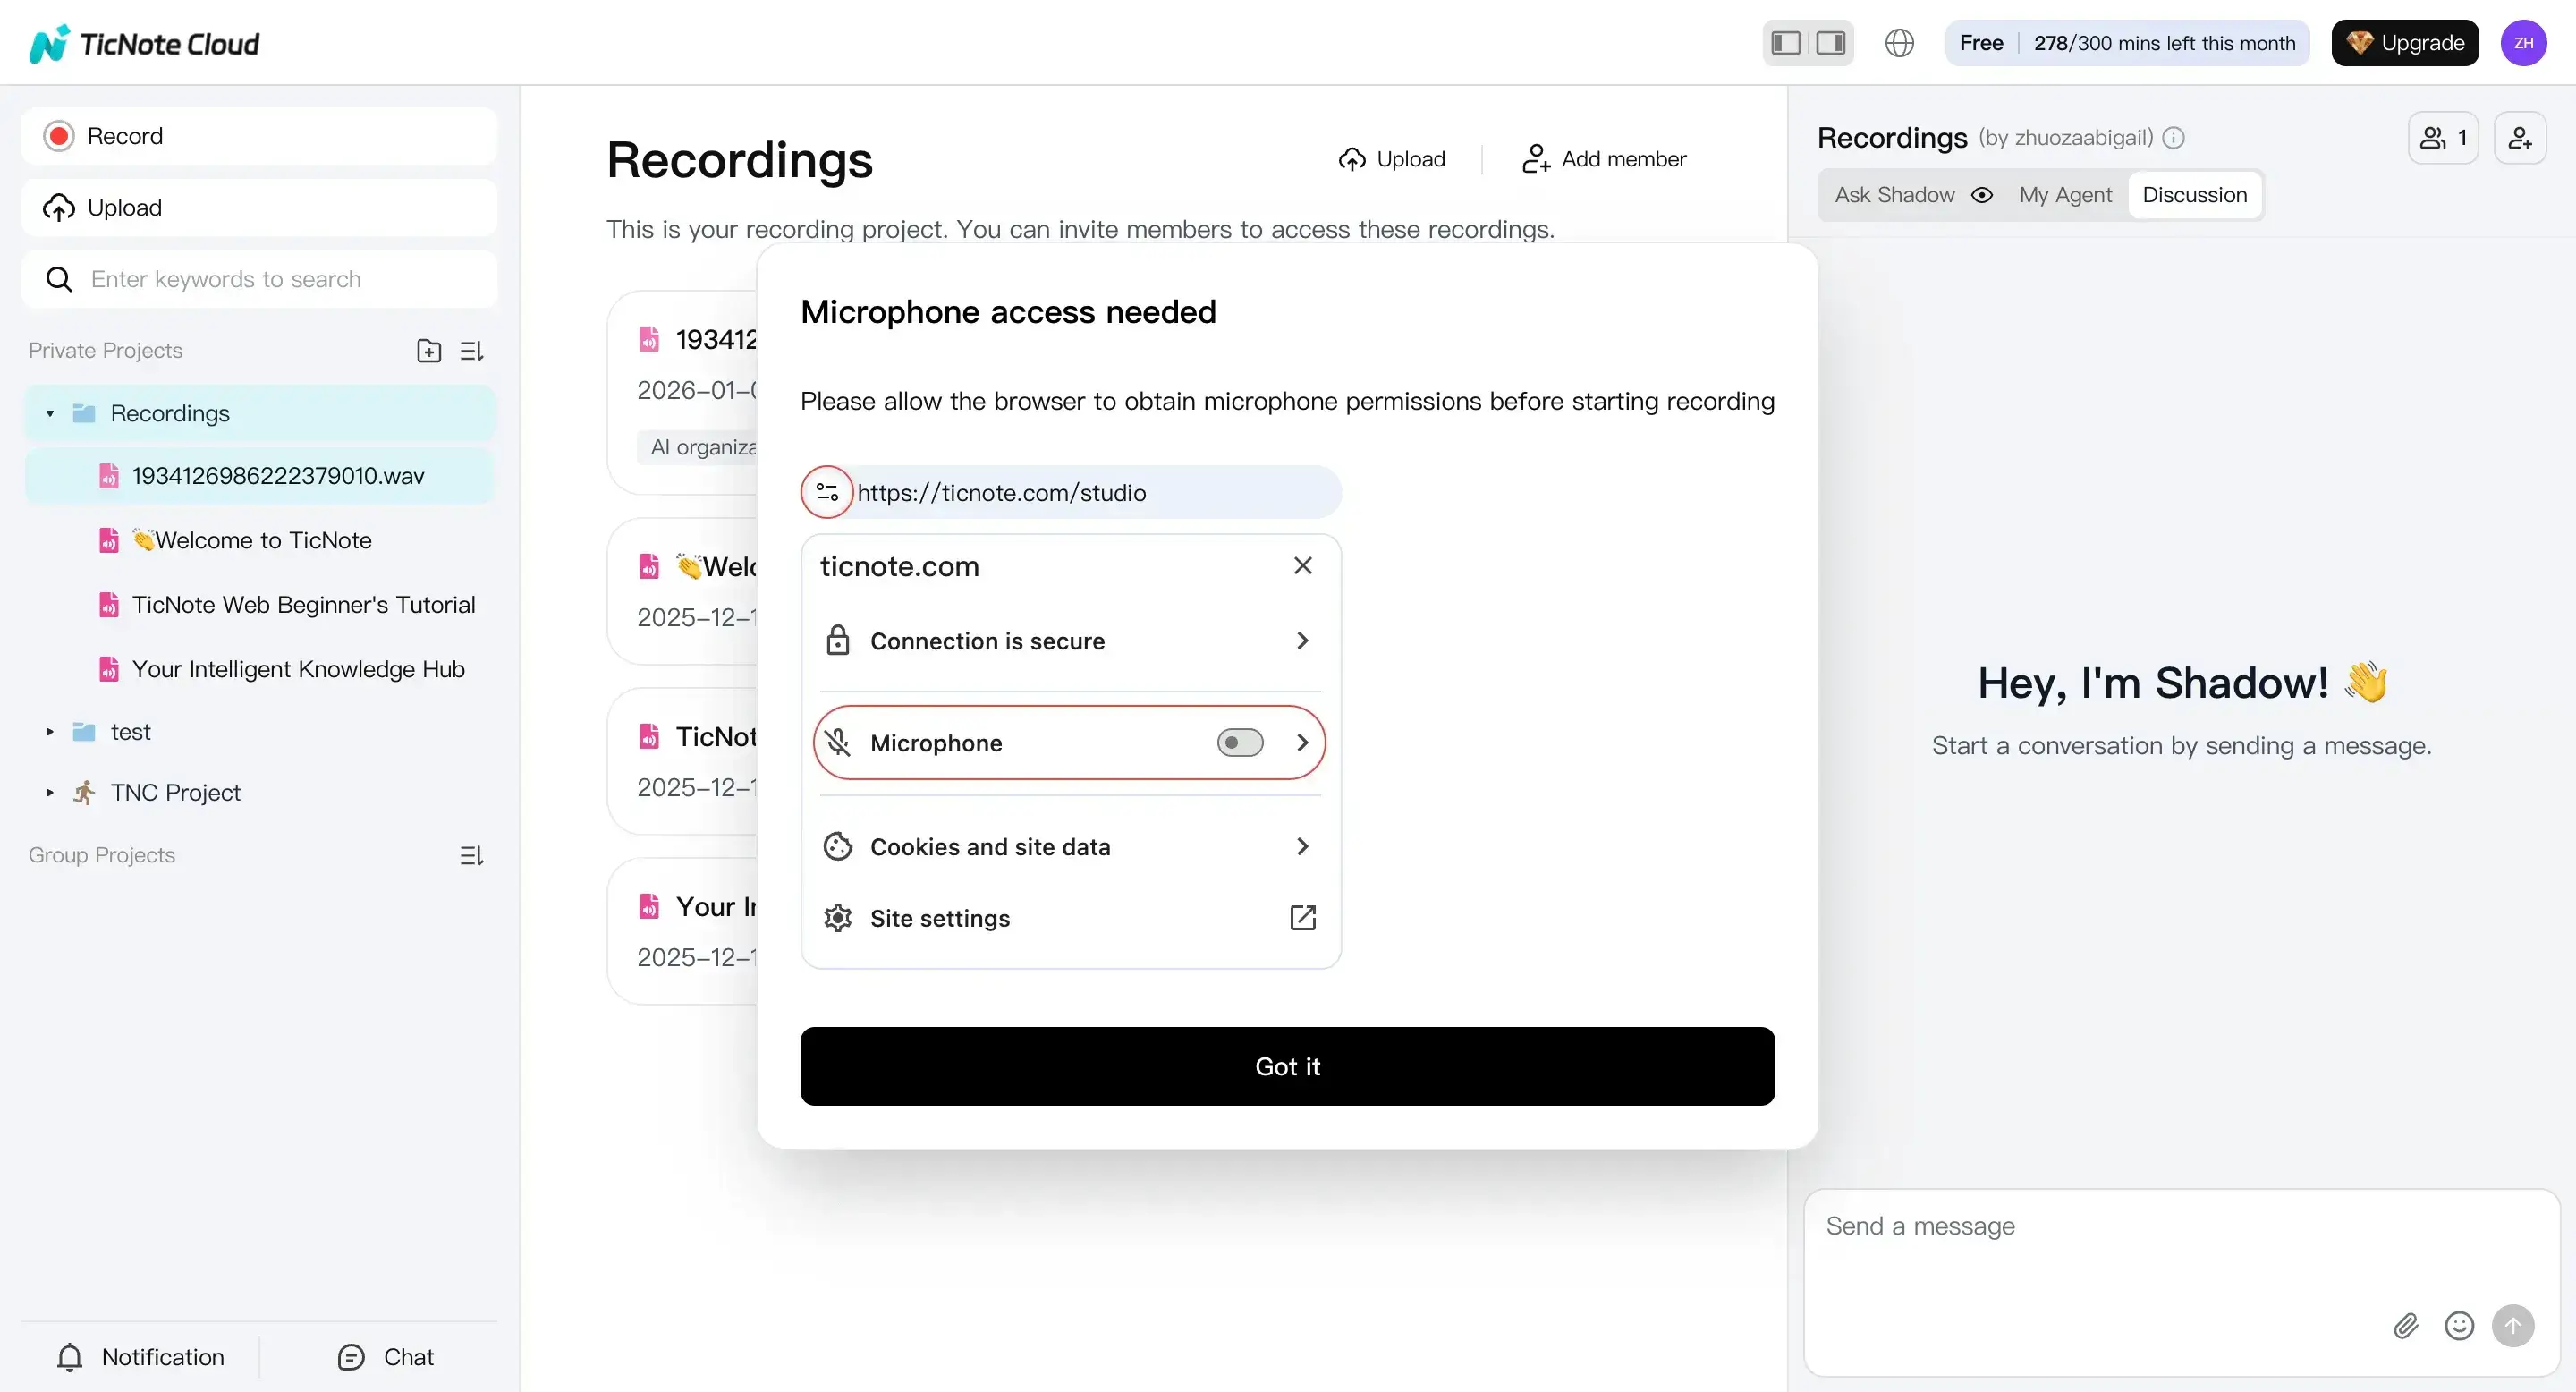
If you're recording instead, click Record and allow mic access. When you stop, the file saves to your Recordings project.
[[IMG:web2 alt="Enable microphone access in the TicNote web studio"]]
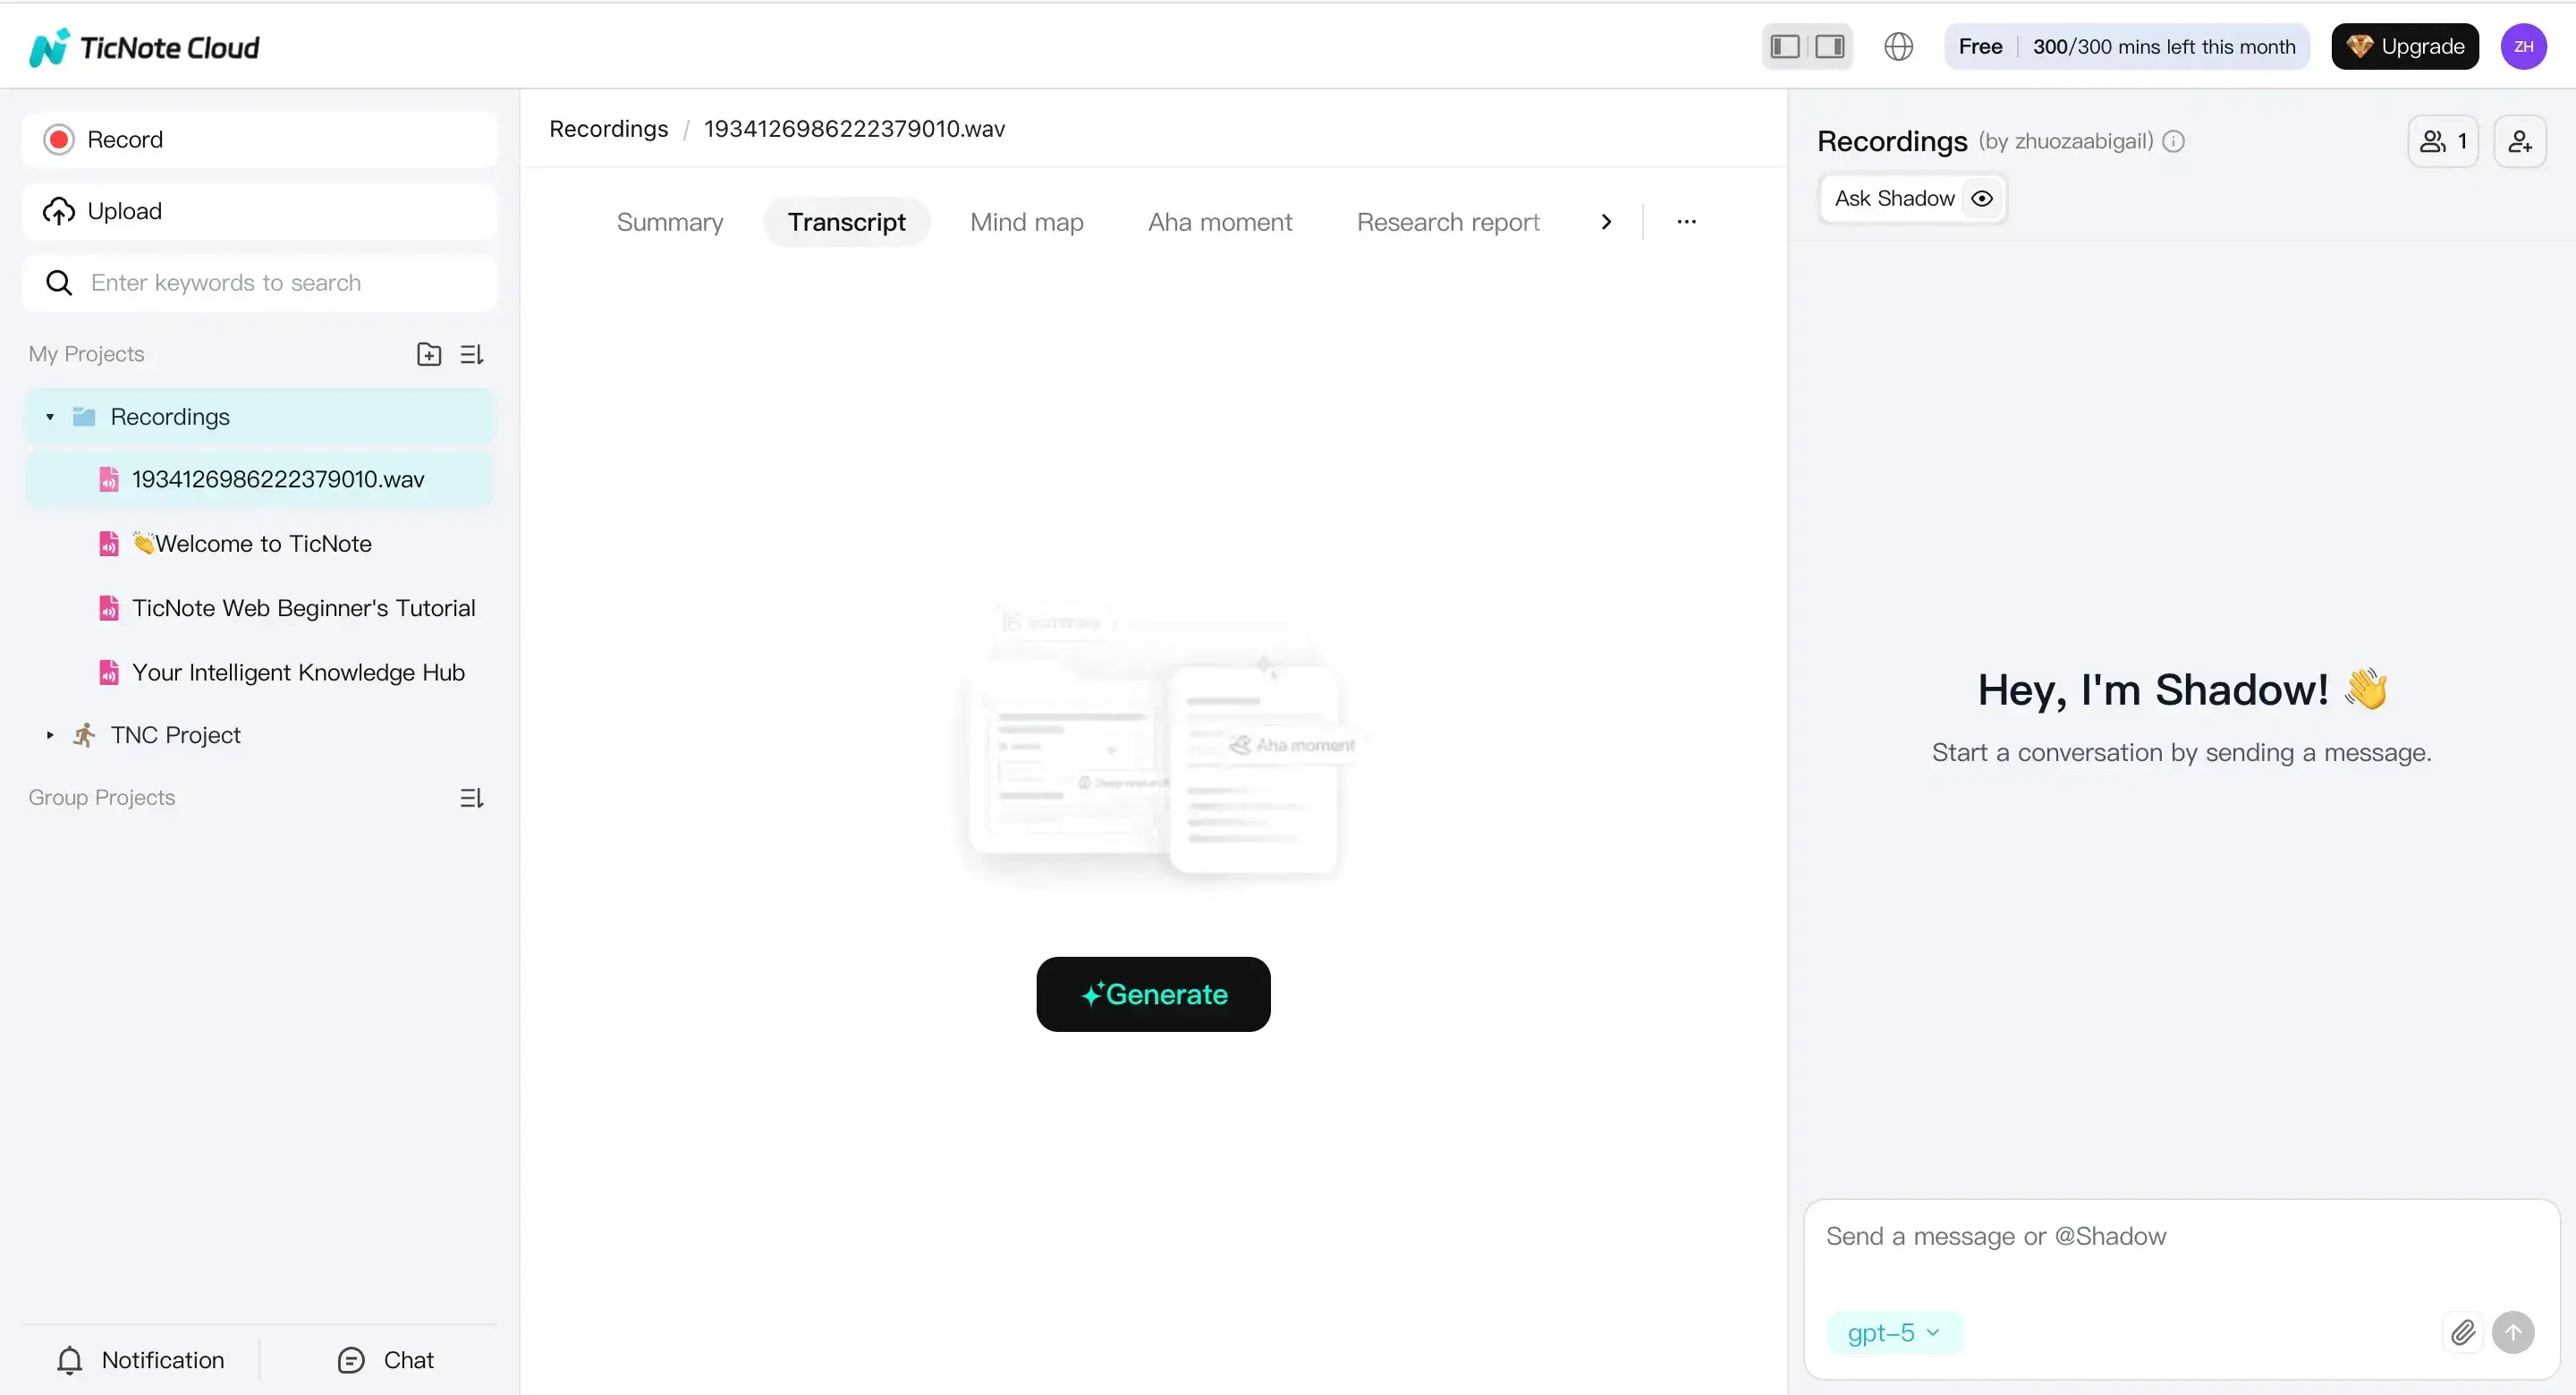
Next, select the file, open the Transcript tab, and generate the transcript.
[[IMG:web3 alt="Click the generate transcript button on TicNote web studio"]]
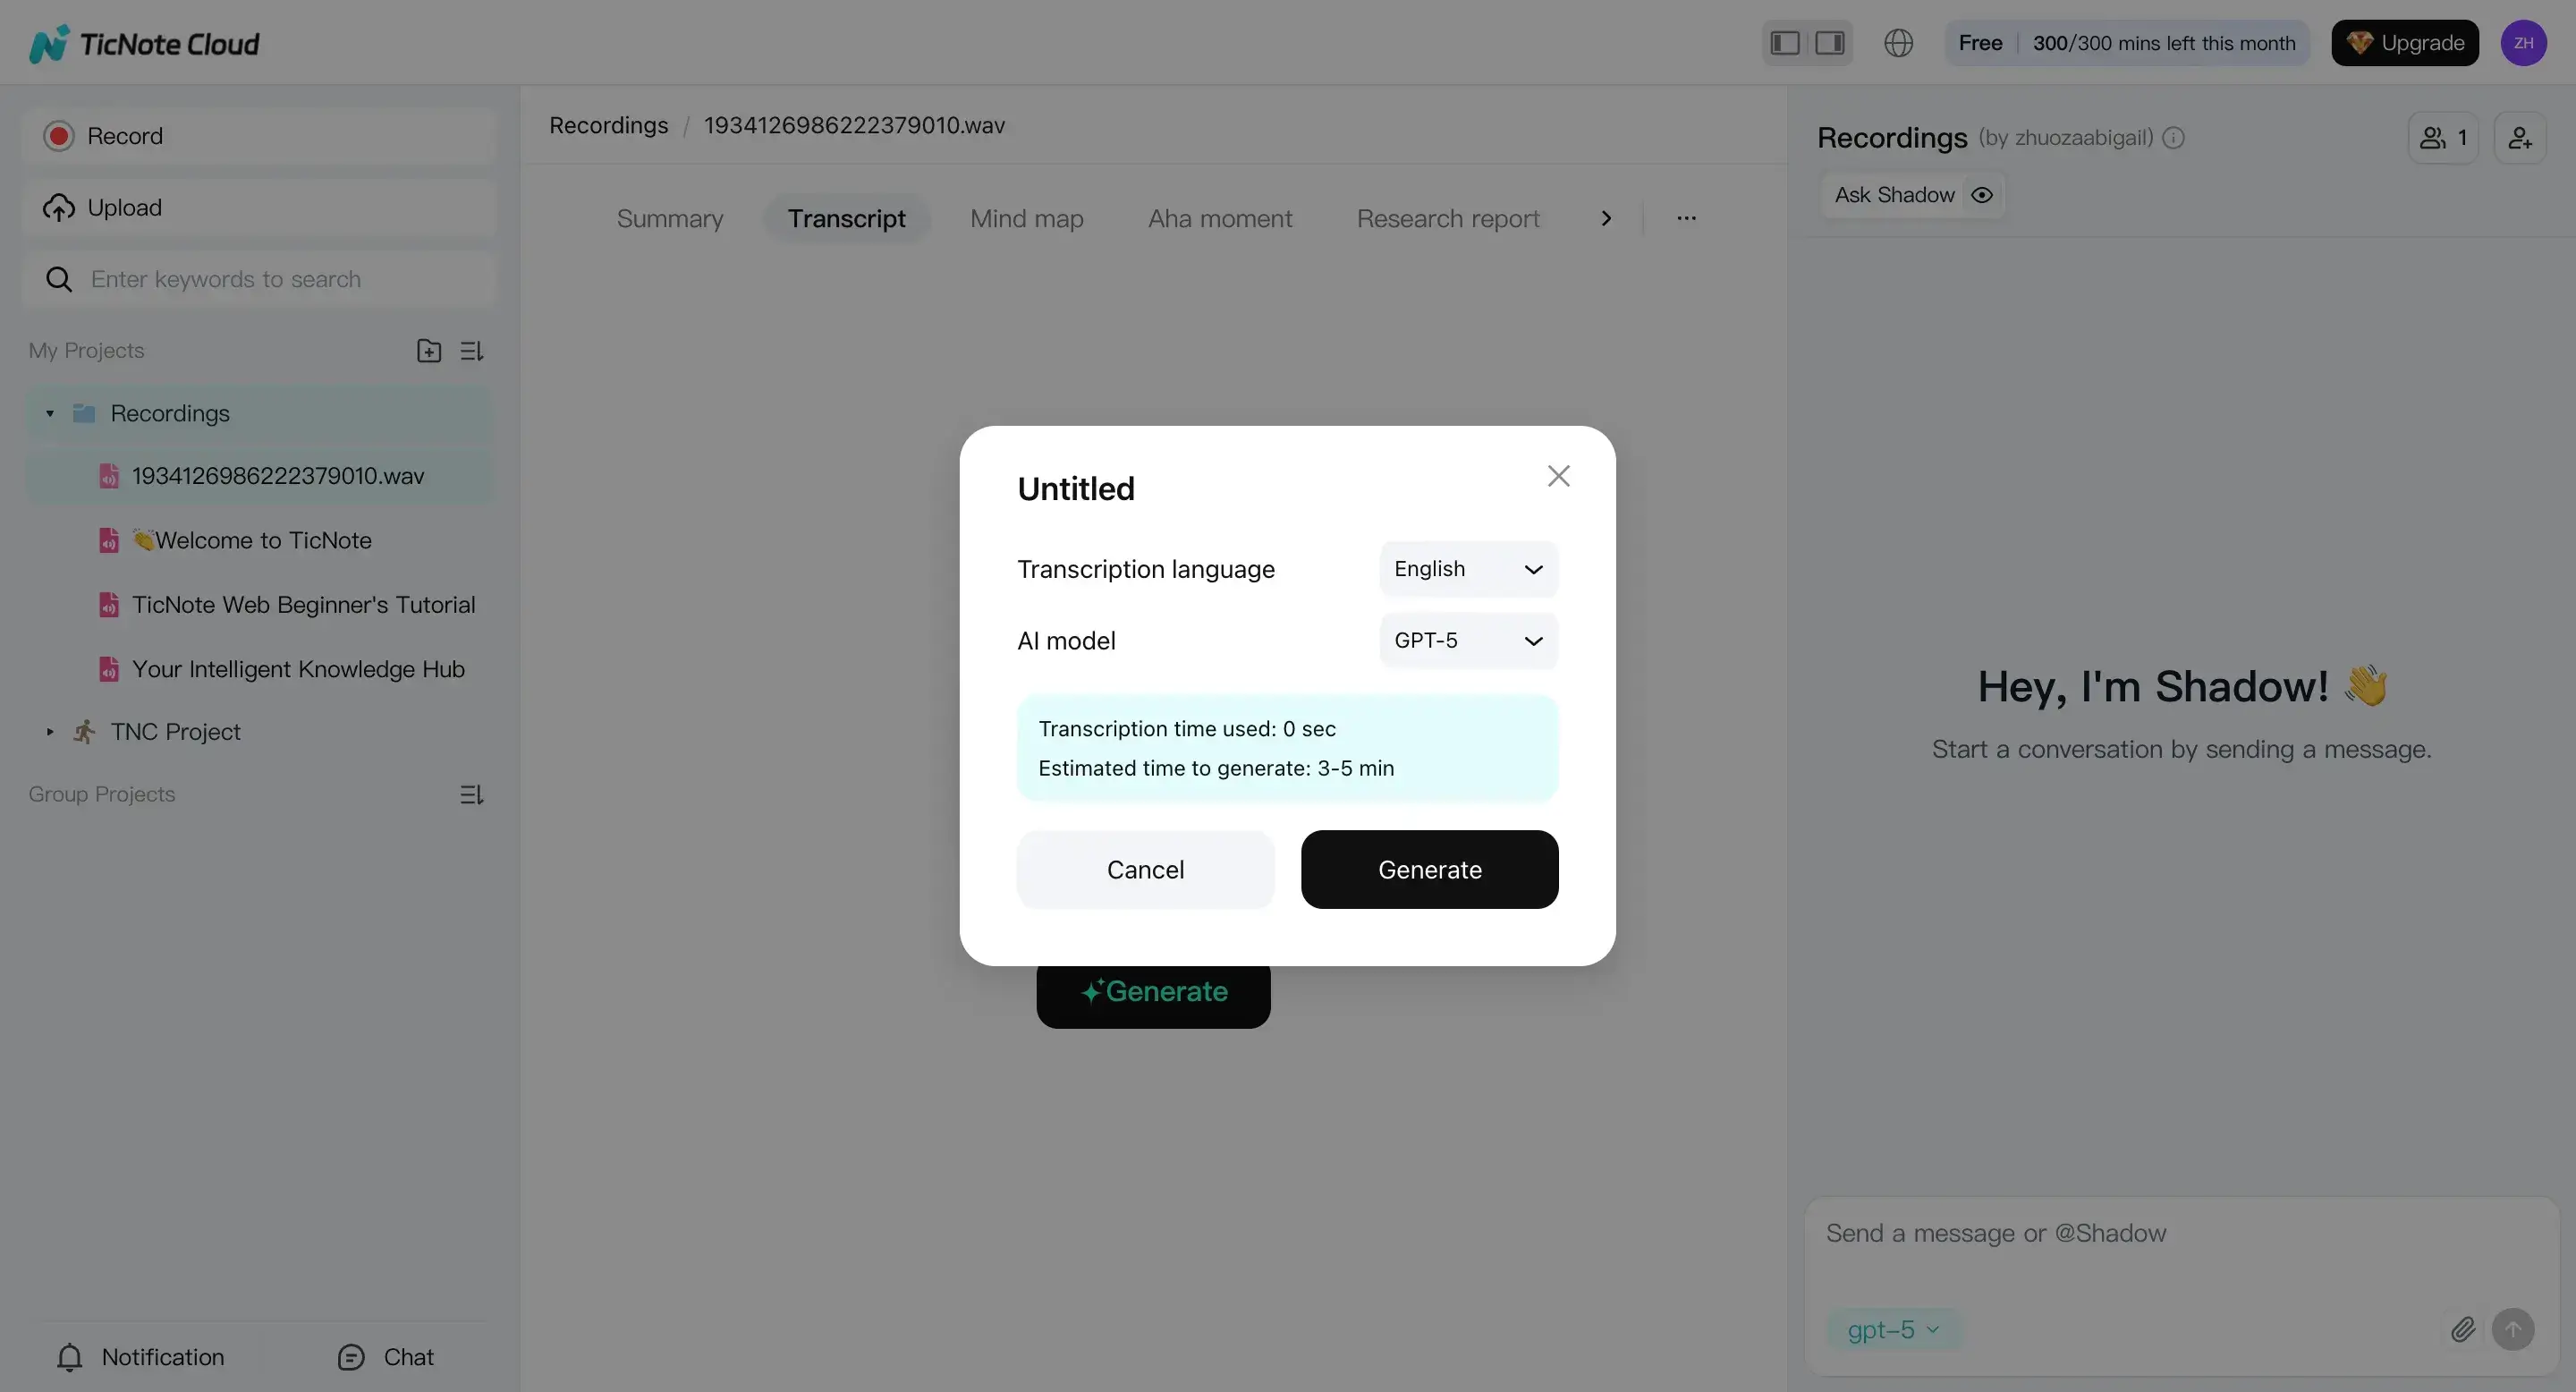
In the settings, choose the spoken language and the AI model options shown, then confirm and let it finish.
[[IMG:web4 alt="Select transcription language and AI model in the TicNote web"]]
Tip: don't edit while it's still running. Wait for a complete draft first.
3) Fix speaker turns and lock in names
A transcript is only useful if readers can follow who said what. Start by turning diarization (speaker detection) into clean labels.
- Rename "Speaker 1" to "Host" or your real name.
- Use "Guest 1" and "Guest 2" if you need simple labels.
- Keep the same naming style across episodes.
Then scan for common diarization mistakes:
- Interruptions that get split wrong
- Two people merged into one block
- Short reactions assigned to the wrong person
Quick rule: if a block has two voices, split it. If one person's thought gets chopped up, merge it.
4) Edit for readability (light cleanup, not a rewrite)
Now do a light edit so it reads like a web transcript.
Use this checklist:
- Remove repeated words, stutters, and obvious filler (but keep meaning).
- Fix proper nouns (people, brands, places) and episode-specific terms.
- Check numbers, dates, and URLs carefully.
- Standardize caps for names and show segments.
Don't over-edit. Keep quotable lines intact. If a guest speaks casually, let it stay natural.
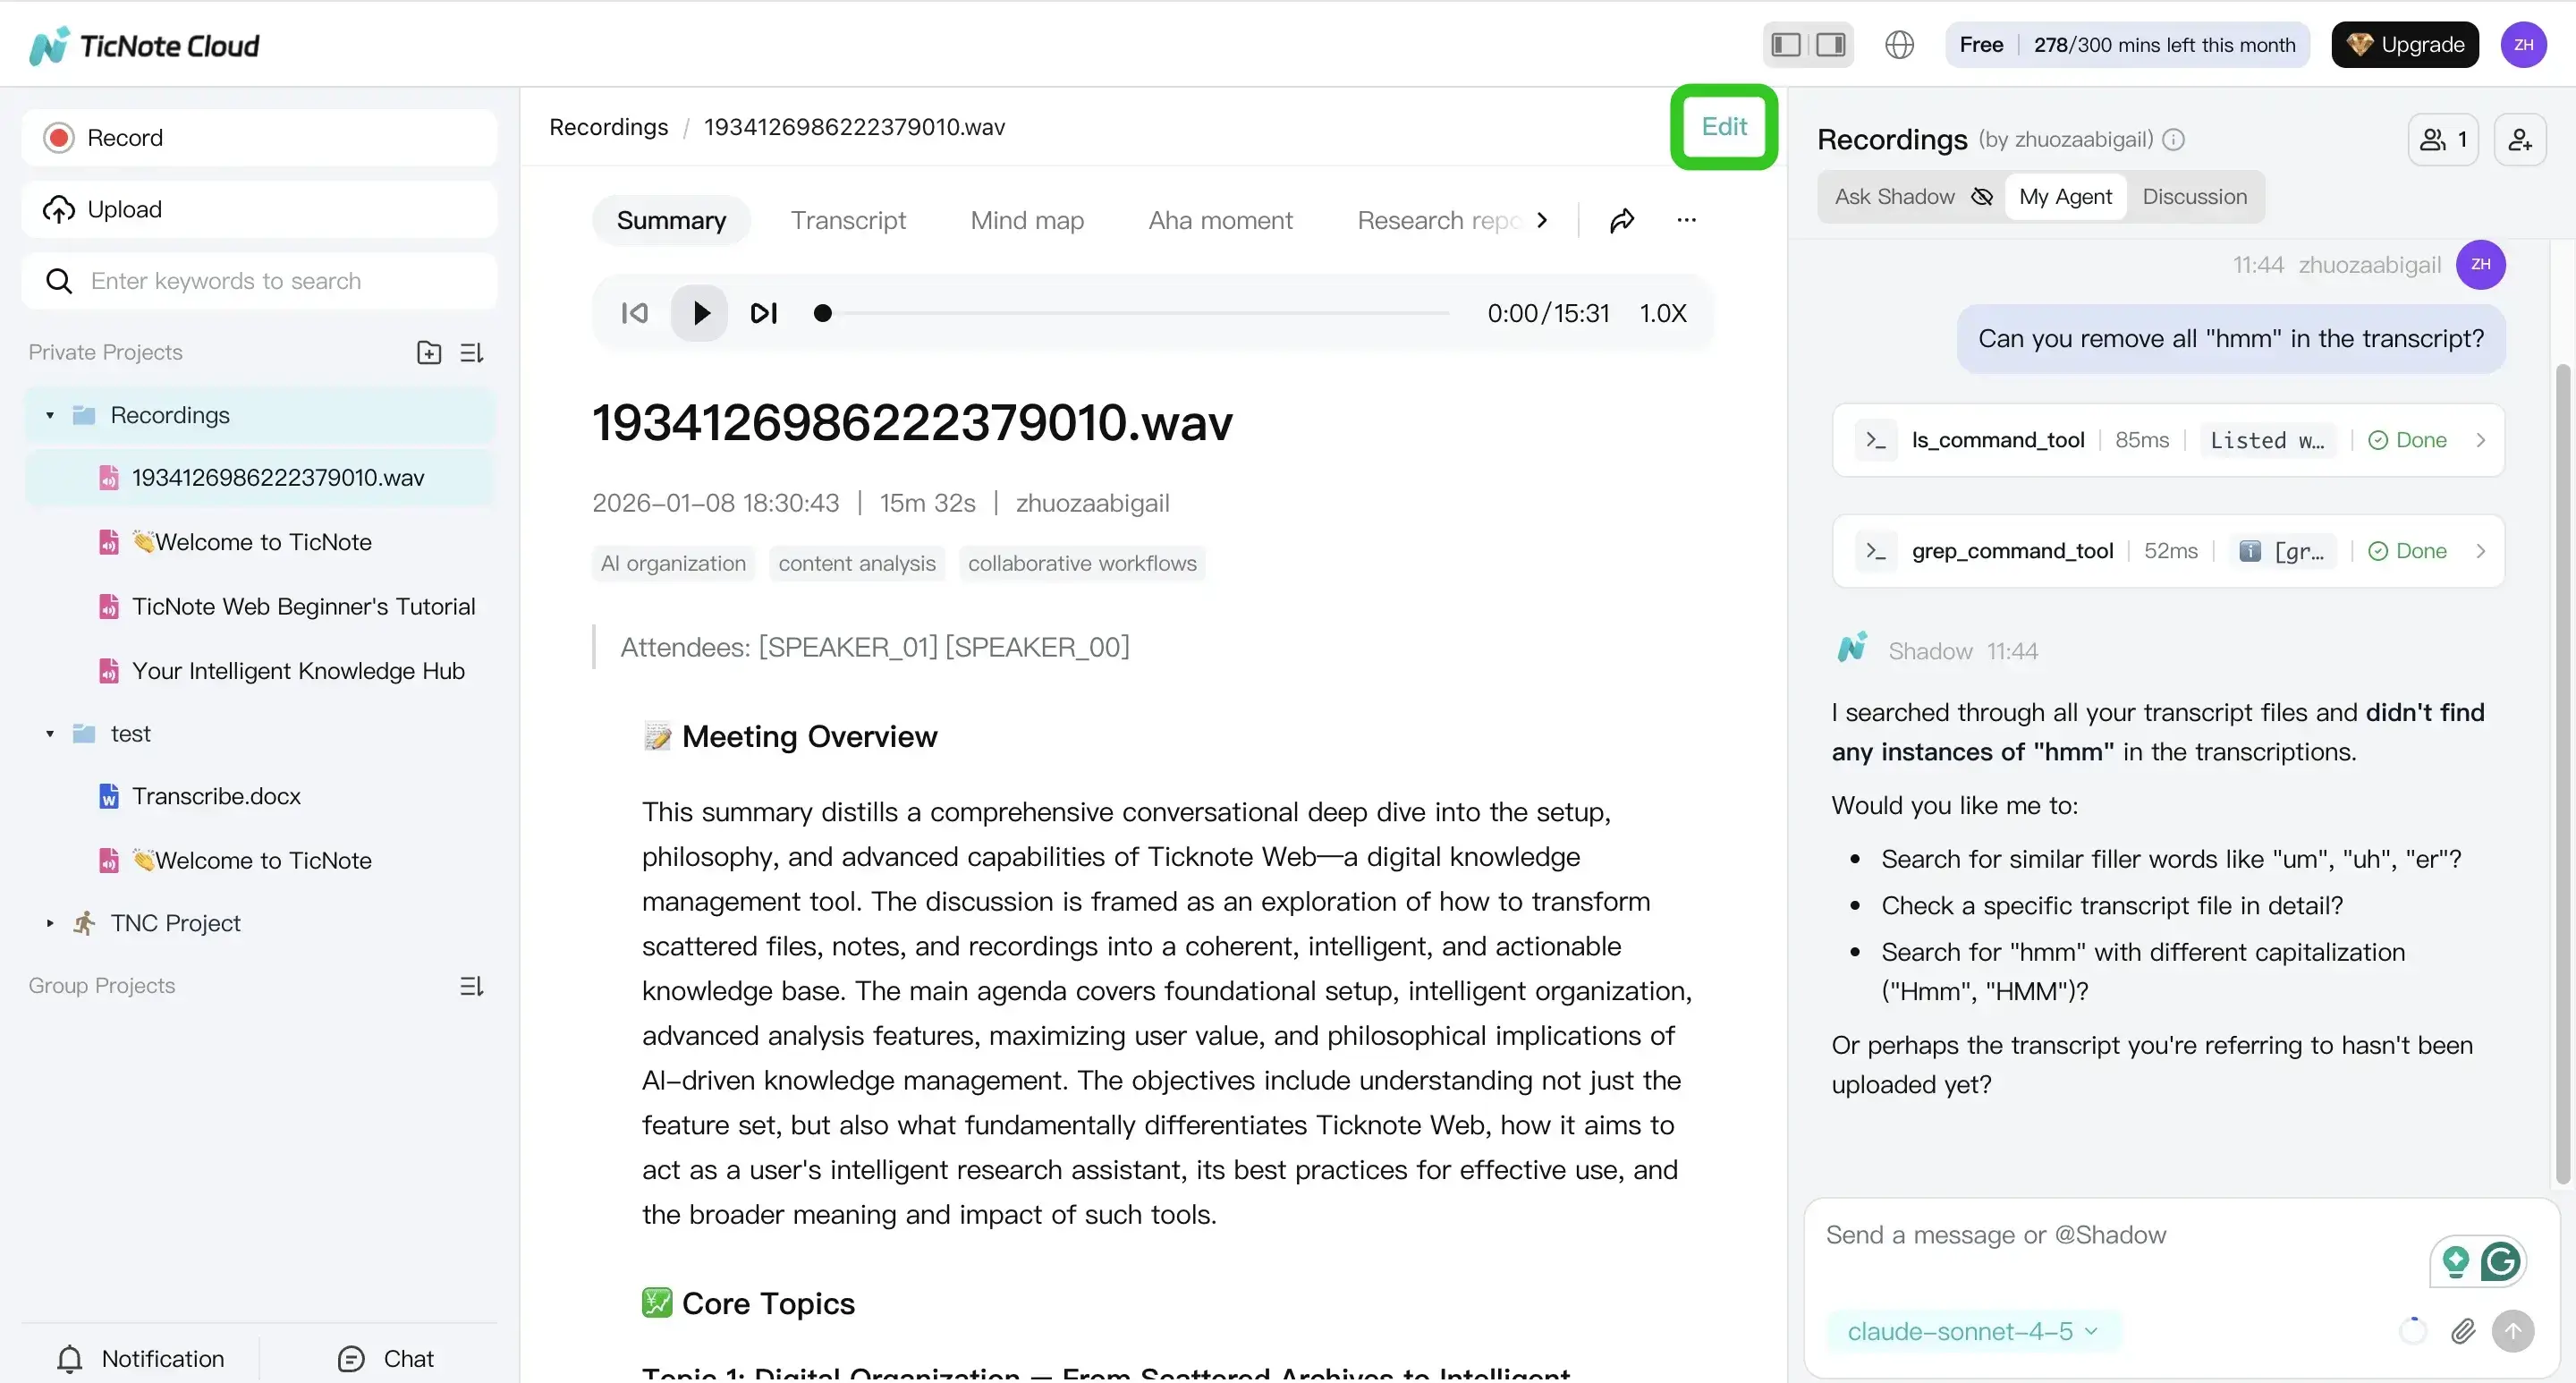
If you want help speeding this up, review the transcript in the editor and use AI support to suggest cleanups.
[[IMG:web5 alt="Edit transcription manually or using Shadow AI in the TicNote web"]]
5) Export a publish-ready transcript (TXT plus notes)
Finally, export in the format your publishing workflow needs.
Most teams use:
- TXT for a CMS paste-in
- A formatted notes file when you need structure (for editors)
In TicNote Cloud, open the menu and export the transcript from the Download options.
[[IMG:web6 alt="Export transcript as different formats in the TicNote web"]]
Before you publish, add three small items at the top:
- A 1 to 2 sentence intro ("This transcript is from Episode X…")
- Key links mentioned (guest site, resources)
- An accessibility note like "Lightly edited for clarity"
One last skim: speaker labels, paragraph breaks, and timestamps if you use them.
If you want a broader set of workflows, this guide also covers transcribing audio for different use cases so you can reuse the same process for meetings, interviews, and research.
Try TicNote Cloud for free to turn podcast audio into a clean, editable transcript.
What should you prepare before you transcribe a podcast?
A clean transcript starts before you hit "transcribe." If you prep your audio, names, and episode details first, you'll spend less time fixing errors later. It also helps you publish faster and get more SEO value from the same episode.
Check audio quality first (noise, distance, levels)
Transcription tools do best with clear speech and steady volume. So do a quick listen to the first 60 seconds and one "noisy" part.
Focus on these basics:
- Keep volume steady. Avoid big jumps between speakers.
- Watch for clipping (distorted audio when levels are too high).
- Reduce hum, hiss, and room echo when you can.
- If you can't re-edit the audio, plan extra time to proof the hard parts.
A practical trick: note the time ranges where people talk over each other or laugh. Those spots often need manual cleanup.
Make a "spellings list" for names and special terms
Most transcript mistakes come from proper nouns. Before you transcribe a podcast, build a short list of words you want spelled exactly right.
Include:
- Host and guest names (plus preferred capitalization)
- Company and product names
- Acronyms and industry terms
- Any non-English words, nicknames, or code terms
To confirm spellings, grab the guest bio link or LinkedIn page. This is also where you can check job titles and company names.
If your show includes interviews, the same prep applies. This guide on interview transcription best practices covers a repeatable way to collect names and context before you start.
Gather metadata you'll want to publish later
Don't wait until the transcript is done to hunt for links. Collect your "episode package" up front so your final transcript is easy to publish.
At minimum, gather:
- Episode title and a 1 to 2 sentence summary
- Sponsor reads and any required disclaimers
- Links mentioned in the episode (products, studies, newsletters)
- Any chapter markers you already use
Also decide how you'll show ads in the transcript. For example, you might label them as "Sponsor message" and keep them in their own short section.
If podcast transcription for SEO is your goal, jot down a few target topics or keywords. Later, you can add helpful headings based on those topics without stuffing keywords into the dialogue.
Which podcast transcription method fits your time, budget, and privacy needs?
The best method depends on what you can trade: time, money, or control. Most creators get the fastest path to publish by using automatic transcription for a solid first draft, then doing a short edit pass. But if you need strict confidentiality or true verbatim text, you may choose a slower route.
Choose manual transcription when control matters most
Manual typing still makes sense in a few cases:
- Short episodes, like 5 to 15 minutes
- Legal-grade verbatim needs (every false start and filler word)
- Extreme privacy rules where audio can't leave a secured device
The tradeoff is real. Manual work is the slowest option, and it's tiring. It also varies by who types it. If you go this route, plan a clear style guide (speaker names, punctuation, and what to do with "um").
Use automated transcription tools for the best speed-to-draft
For most people learning how to transcribe a podcast, automated tools are the best default. You get a draft in minutes, then you edit for names, terms, and clarity.
When you compare tools, prioritize:
- Speaker labels (diarization, meaning "who said what")
- An editor that lets you fix text fast
- Exports you can publish (TXT, DOCX, PDF, Markdown)
- Language support if you host or interview across regions
One reminder: accuracy is not only about the tool. Clean audio and editing time matter just as much.
Decide between local AI and cloud tools (privacy vs setup)
Local AI tools can be a good fit if you want tight control. Audio can stay on your machine, and you can limit access. But you also take on the setup, hardware needs, and updates. If something breaks, it's on you.
Cloud tools are usually the quickest start for small teams. You upload, transcribe, and edit from anywhere. The key is policy: check privacy terms, who can access files, and how long data is kept.
Quick comparison: speed, cost, effort, and accuracy
Use this grid to pick a starting point, then adjust based on your episode length and your QA needs.
| Method | Speed | Cost | Effort | Typical accuracy after editing | Best for |
| Manual (DIY) | Slow | Low | High | High | Short episodes, strict privacy, verbatim needs |
| Automated tool + edit | Fast | Low to mid | Mid | High | Most creators and teams publishing weekly |
| Human service (done-for-you) | Medium | High | Low | High | Busy teams, high stakes content, limited editor time |
If you're torn, start with "automated + edit" for one episode. Track how long cleanup takes. That number will tell you if you should stay DIY, upgrade tools, or outsource.
How do you check transcription accuracy and fix common errors?
Accuracy checks don't need to take hours. The fastest way to review a podcast transcript is to spot-check the highest-risk moments, fix repeated errors in batches, then decide if it's worth re-running the transcription. This section gives you a simple QA routine you can repeat every episode.
Run a quick 3-pass QA (spot-check the risky parts)
Instead of reading every line, do three short checks. You'll catch most issues fast.
- First 2 minutes: confirm the right language, speaker labels, and punctuation.
- A noisy or multi-speaker segment: find a section with overlap, laughter, or crosstalk.
- Sponsor read or numbers-heavy part: listen for prices, dates, coupon codes, and URLs.
If you can play audio while reviewing, use 1.25x to 1.5x speed. If you can't, focus on parts with names, numbers, and fast back-and-forth.
Keep a tiny "recurring issues" list as you go:
- A name the tool keeps misspelling
- A term it hears wrong (brand, feature, niche jargon)
- A speaker it keeps mixing up
That list turns random edits into fast find-and-replace fixes.
Fix names, numbers, and technical terms first
These are the errors readers notice most. They also break trust.
Use this cleanup order:
- Names and proper nouns: compare against your spellings list. Correct it once, then run find/replace.
- Numbers: pick one style and stick to it. For example, write $12.99 (digits) or "twelve ninety-nine" (words). Use the same rule for dates and times.
- URLs and emails: double-check every character. Transcripts often turn "dot" into words or drop hyphens.
- Product and feature names: verify exact casing and spacing. Small changes can confuse search and readers.
If you publish often, it also helps to link to a deeper standard for detail level and review, like this guide on verbatim vs clean transcripts and QA.
Handle crosstalk, accents, and low-quality audio without over-editing
Messy audio is normal in podcasts. Your job is clarity, not perfection.
- Crosstalk and overlaps: split the lines and keep the main idea. Add a short bracket note only when needed, like "[talking over each other]".
- Accents causing repeated mistakes: add context with clear speaker names and consistent domain terms. That often reduces confusion in later edits.
- Hard audio: if a full section is wrong, don't fight it line by line. Re-export cleaner audio if you can (noise reduction, level balance), then transcribe again.
Re-run vs edit (simple time-saving rules)
Use this decision checklist to avoid wasting time:
- Re-run transcription when:
- Speaker separation is unusable (everyone becomes "Speaker 1").
- The wrong language was detected.
- Errors are everywhere, not just in a few spots.
- Edit the transcript when:
- Mistakes are clustered in a few sections.
- Most problems are names, punctuation, or formatting.
Finally, define "good enough" before you start:
- Blog repurpose: clean, readable, light edits are enough.
- Accessibility transcript: prioritize accuracy and clear speaker turns.
- Quote search and internal reuse: correct names and key terms first.
- Legal record: consider professional review and stricter standards.
How should a podcast transcript be formatted for publishing and SEO?
A good transcript is easy to scan, easy to quote, and easy to understand. For publishing and SEO, you're not just turning audio into text. You're turning a conversation into a page that reads well, matches your episode structure, and supports accessibility.
One key reason to publish a transcript is accessibility. The Web Content Accessibility Guidelines (WCAG) 2.2 (2023) note that Success Criterion 1.2.1 (Level A) requires "An alternative for time-based media is provided that presents equivalent information for prerecorded audio-only content."
Use consistent speaker labels (and fix "Speaker 1")
Speaker labels are the backbone of a readable transcript. Pick a naming style and stick with it for the whole episode.
Use stable labels like:
- HOST:
- CO-HOST:
- GUEST (Full Name):
If you have multiple guests, write the full name the first time. Then switch to a short name that still stays clear. For example, GUEST (Dr. Maya Lee): becomes MAYA: after the first intro.
Also, make sure diarization (who said what) matches real people. Don't publish Speaker 1 and Speaker 2 unless you truly can't identify voices.
Break text into short, readable paragraphs
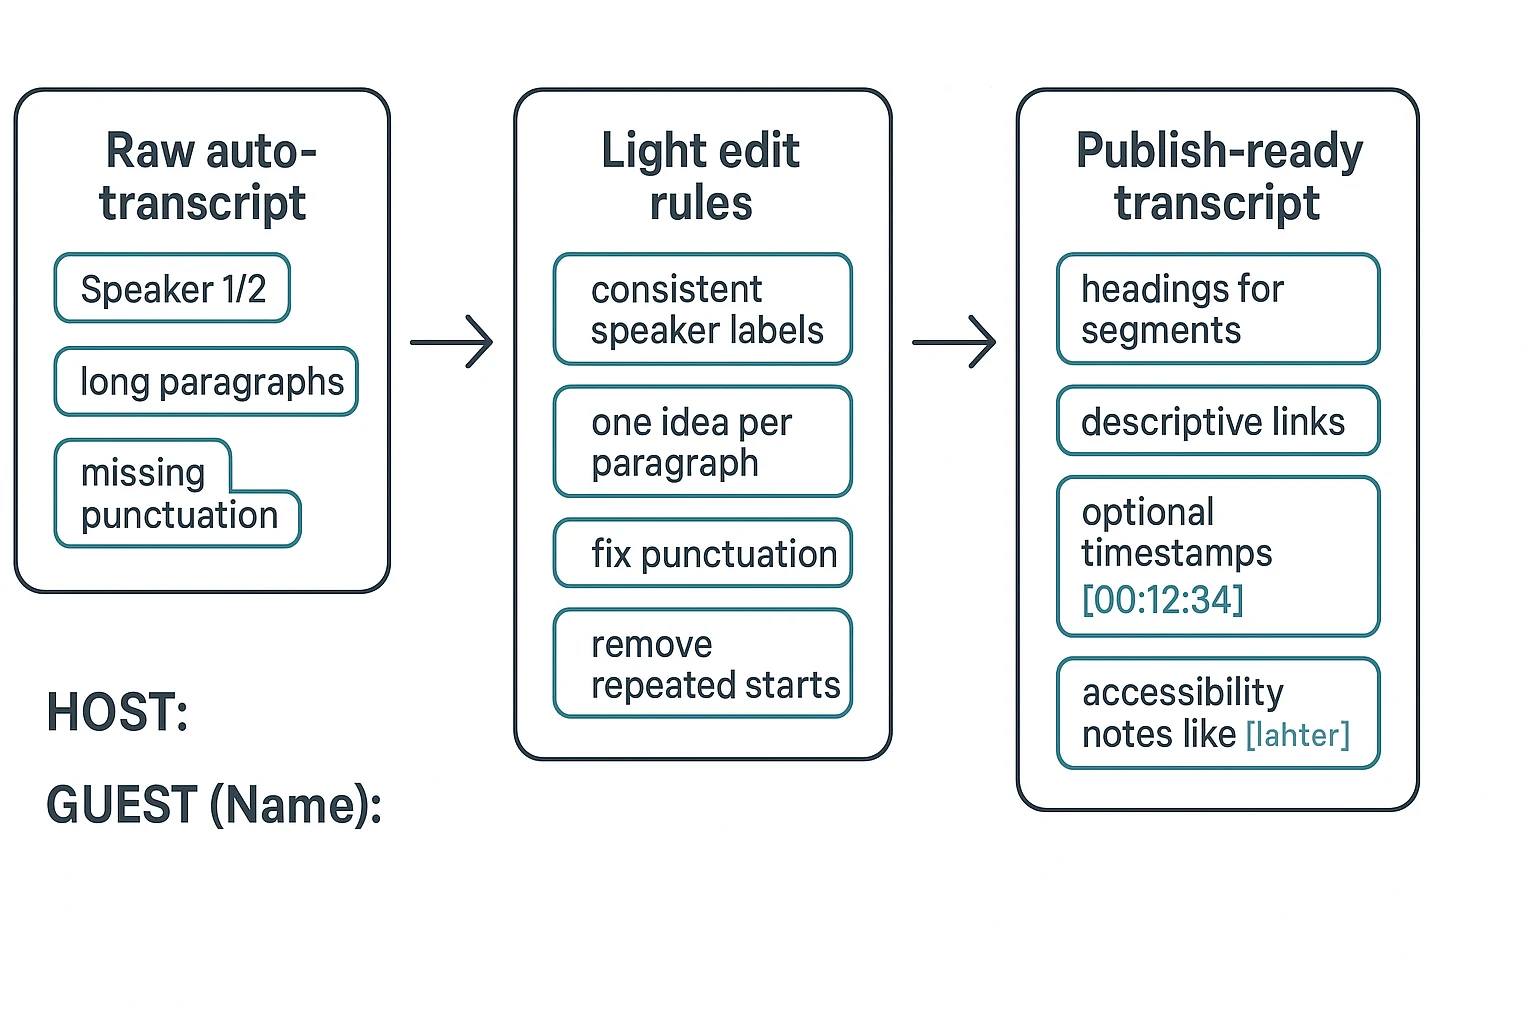
Raw transcripts often become a wall of text. Fix that first.
Use these rules:
- One idea per paragraph.
- Split long answers every 2 to 4 sentences.
- Add light punctuation and capitalization so it reads like writing.
If you're creating a "cleaned" transcript, you can remove repeated starts and filler. For example, "Yeah, yeah, so, like…" can become "Yeah. So…" Keep the meaning the same.
Add timestamps only when they help the reader
Timestamps are useful, but they can hurt flow if overused.
Include timestamps when:
- People will jump around to sections.
- You have chapters and want alignment.
- You plan to quote exact time references.
Skip timestamps when:
- The transcript is mainly for reading.
- Your goal is a clean SEO and accessibility page.
If you use them, standardize the format. A common choice is [00:12:34]. Place timestamps at speaker turns or topic shifts, not mid-sentence.
Make the page scannable with headings, links, and clear context
Don't start with the transcript cold. Add a short intro above it that includes:
- Episode topic in one sentence
- Guest name and a short description
- A few key resources mentioned in the episode
Then add headings for major parts so readers can scan:
- Intro
- Topic 1
- Q&A
- Outro
For links, use descriptive anchor text. Avoid "click here." And keep navigation simple so screen readers can move through the page easily.
Copy-and-paste transcript template (two variants)
Here's a publish-ready layout you can reuse.
Variant A: No timestamps (best for readability)
- Episode Title:
- Show Name:
- Episode Number:
- Guest:
- Publish Date:
- Short Episode Summary (2 to 3 sentences):
- Key Links/Resources:
Transcript
INTRO
HOST: Welcome back to...
GUEST (Full Name): Thanks for having me...
TOPIC 1: [Name the topic]
HOST: First question...
GUEST: Here's how I think about it...
OUTRO
HOST: Where can people find you?
Variant B: With timestamps (best for jumping)
- Episode Title:
- Show Name:
- Episode Number:
- Guest:
- Publish Date:
- Short Episode Summary (2 to 3 sentences):
- Key Links/Resources:
Transcript
INTRO
[00:00:00] HOST: Welcome back to...
[00:00:18] GUEST (Full Name): Thanks for having me...
TOPIC 1: [Name the topic]
[00:05:12] HOST: Let's talk about...
[00:05:30] GUEST: The big mistake is...
Mini style guide for non-speech moments
Keep these cues simple and consistent:
- [music] for theme music or transitions
- [laughter] for audible laughter
- [crosstalk] when people overlap
- [pause] only when it changes meaning
Use brackets, not parentheses, and don't over-tag. If it doesn't help the reader, cut it.
How to transcribe podcast audio with a tool (example workflow)
If you want to know how to transcribe a podcast without complex setup, a tool like TicNote Cloud gives you a simple path: upload the episode, generate a transcript, clean it up, then export in a publish-ready format.
Web Studio (step by step)
1) Upload an episode file, or record audio only
Start by creating a project so each episode stays organized. In TicNote web studio, create a new project and use the Upload button to add your MP3 or WAV.
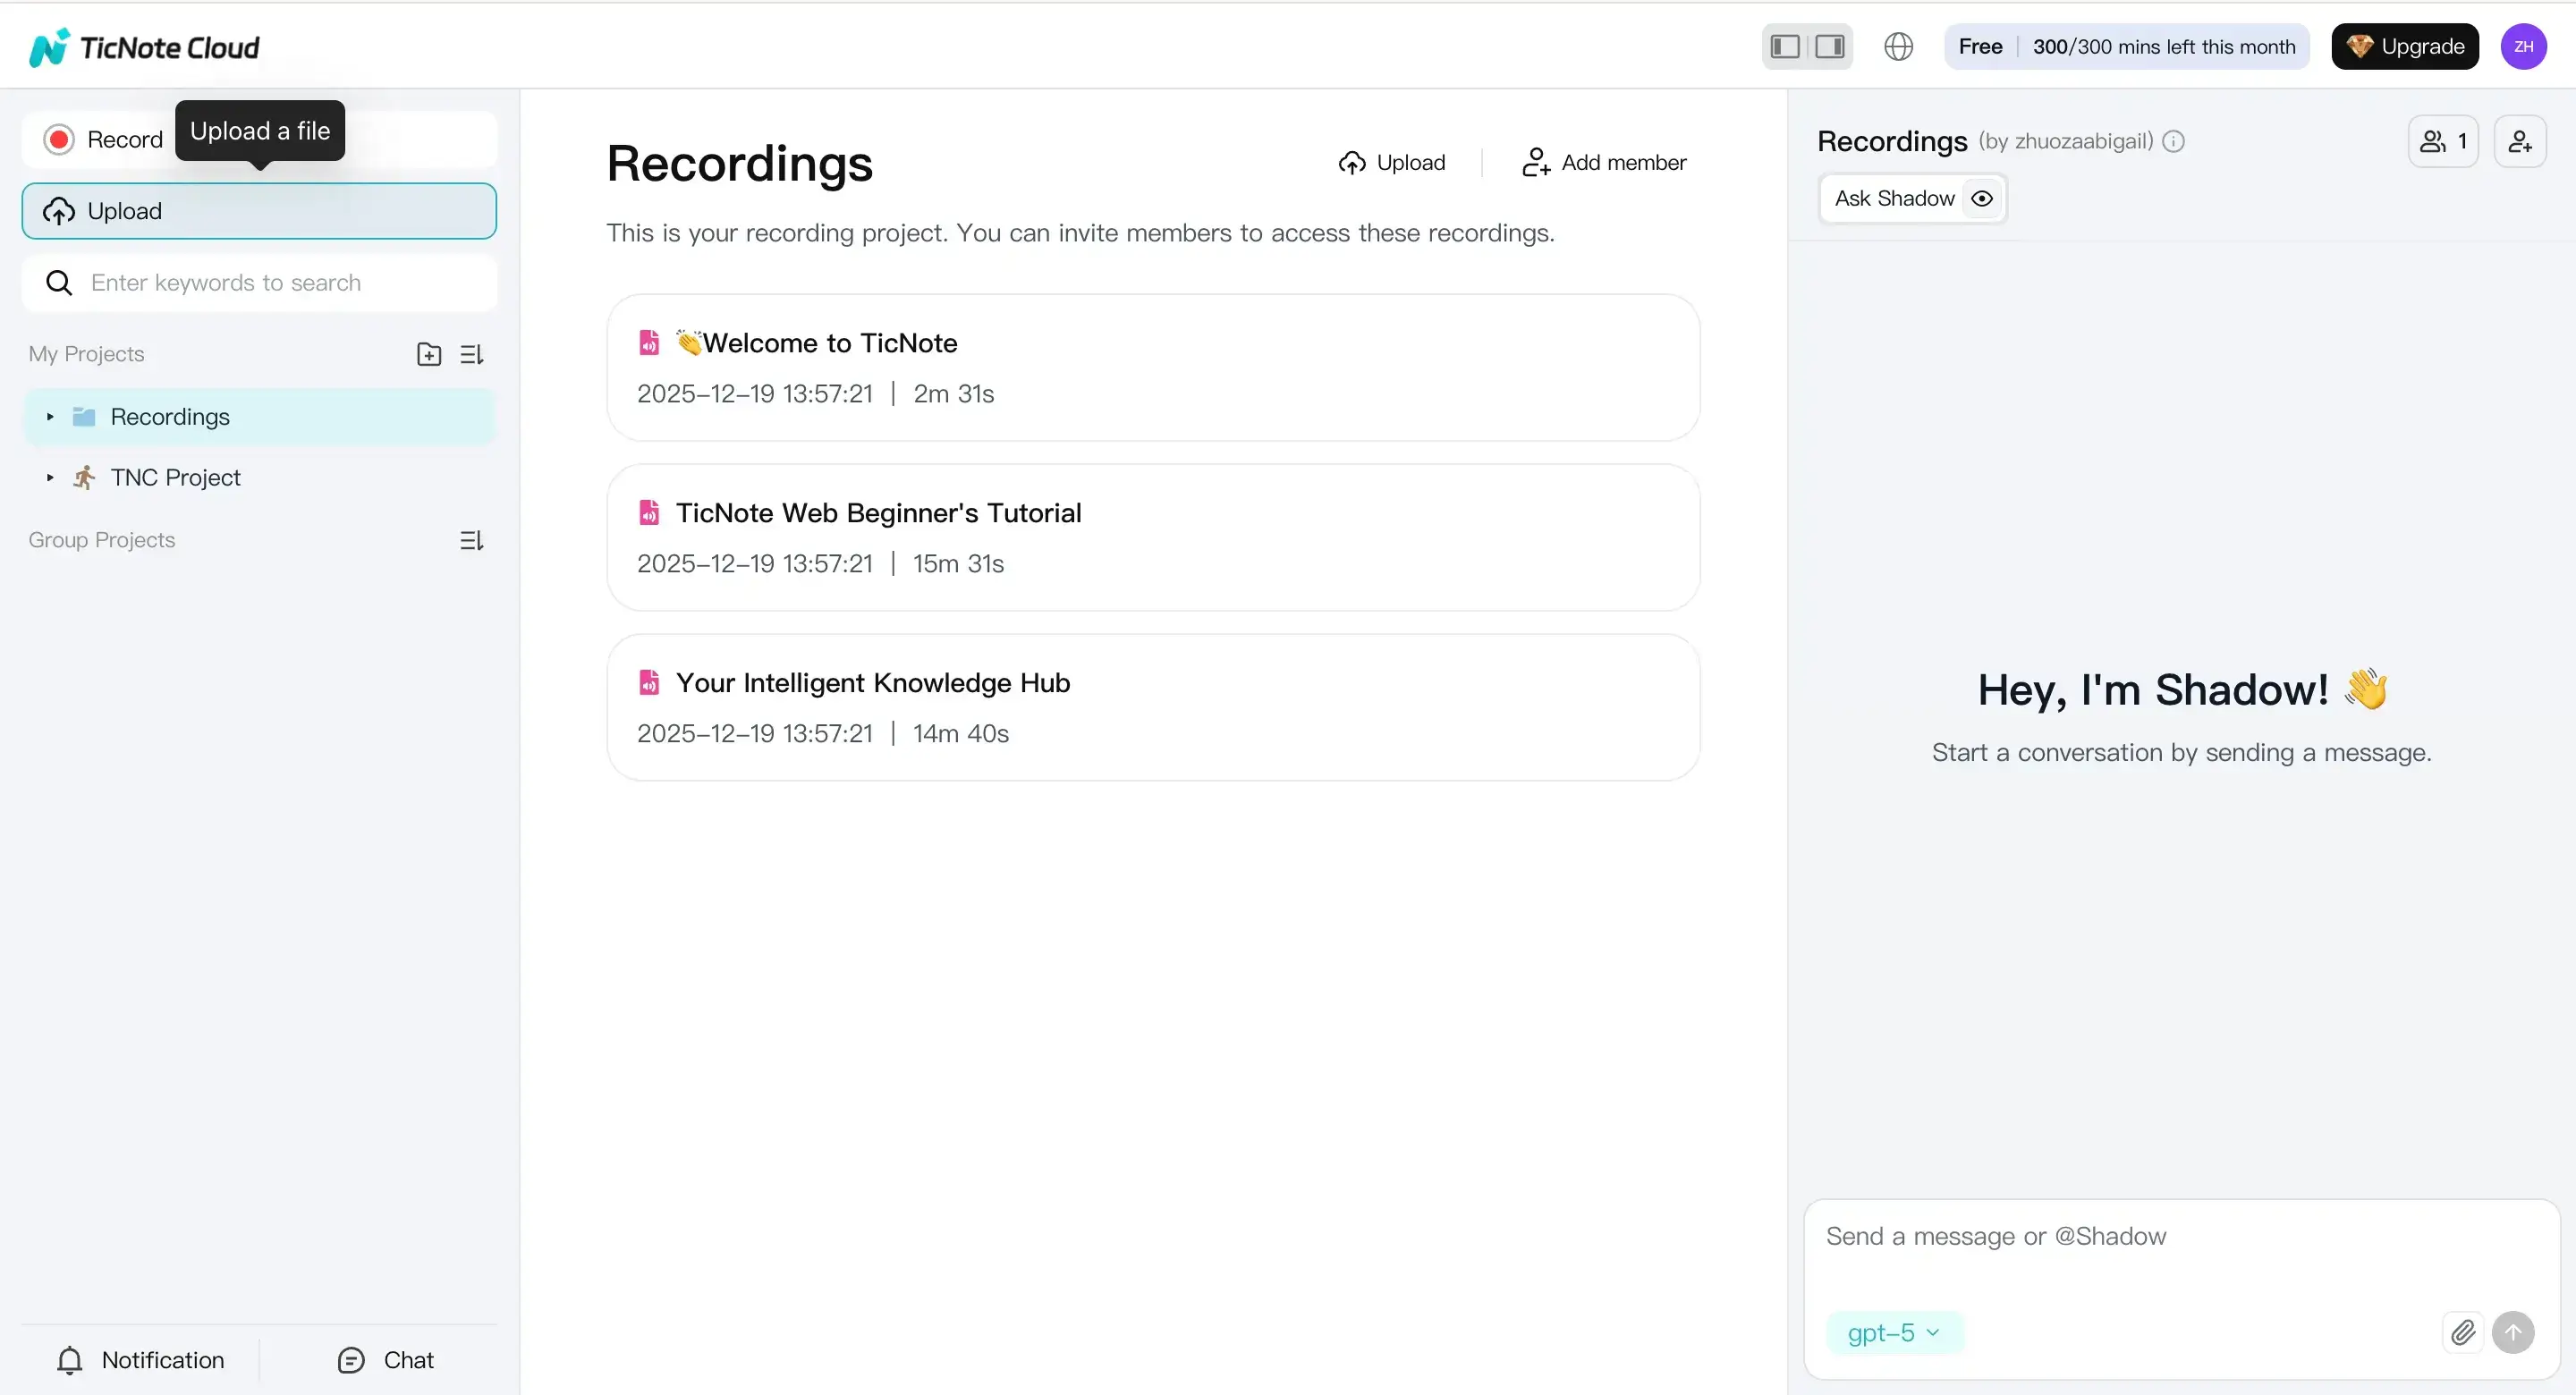
If you do not have a finished file yet, you can record instead. Click Record, allow microphone access, and finish the recording. TicNote saves it to the default Recordings project so you can transcribe it next.
Natural CTA spot: Upload an episode and generate your first transcript.
2) Generate the transcript with the right settings
Once the upload or recording is ready, pick the file from the left panel. Open the Transcript tab, then click Generate.
In the pop up, choose the spoken language and the AI model, then confirm. This small step matters. A wrong language choice can create messy text and more edits later.
3) Review and polish the transcript, notes, and extras
Read the transcript end to end. Fix speaker labels (who said what) and correct names, brands, and places.
After that, use built in AI help to speed up the cleanup and publishing tasks. For example, you can ask Shadow AI to:
- remove filler words and clear repeats without changing meaning
- turn the conversation into structured show notes from a template
- write a short episode summary and key takeaways
- translate the transcript if you publish in more than one language
You can do this while keeping everything in the same project. That makes it easier to reuse later.
4) Export in a format your site can publish
When the transcript reads clean, export it for your CMS. In TicNote web studio, open the three dots menu, choose Download, then Export Transcript.
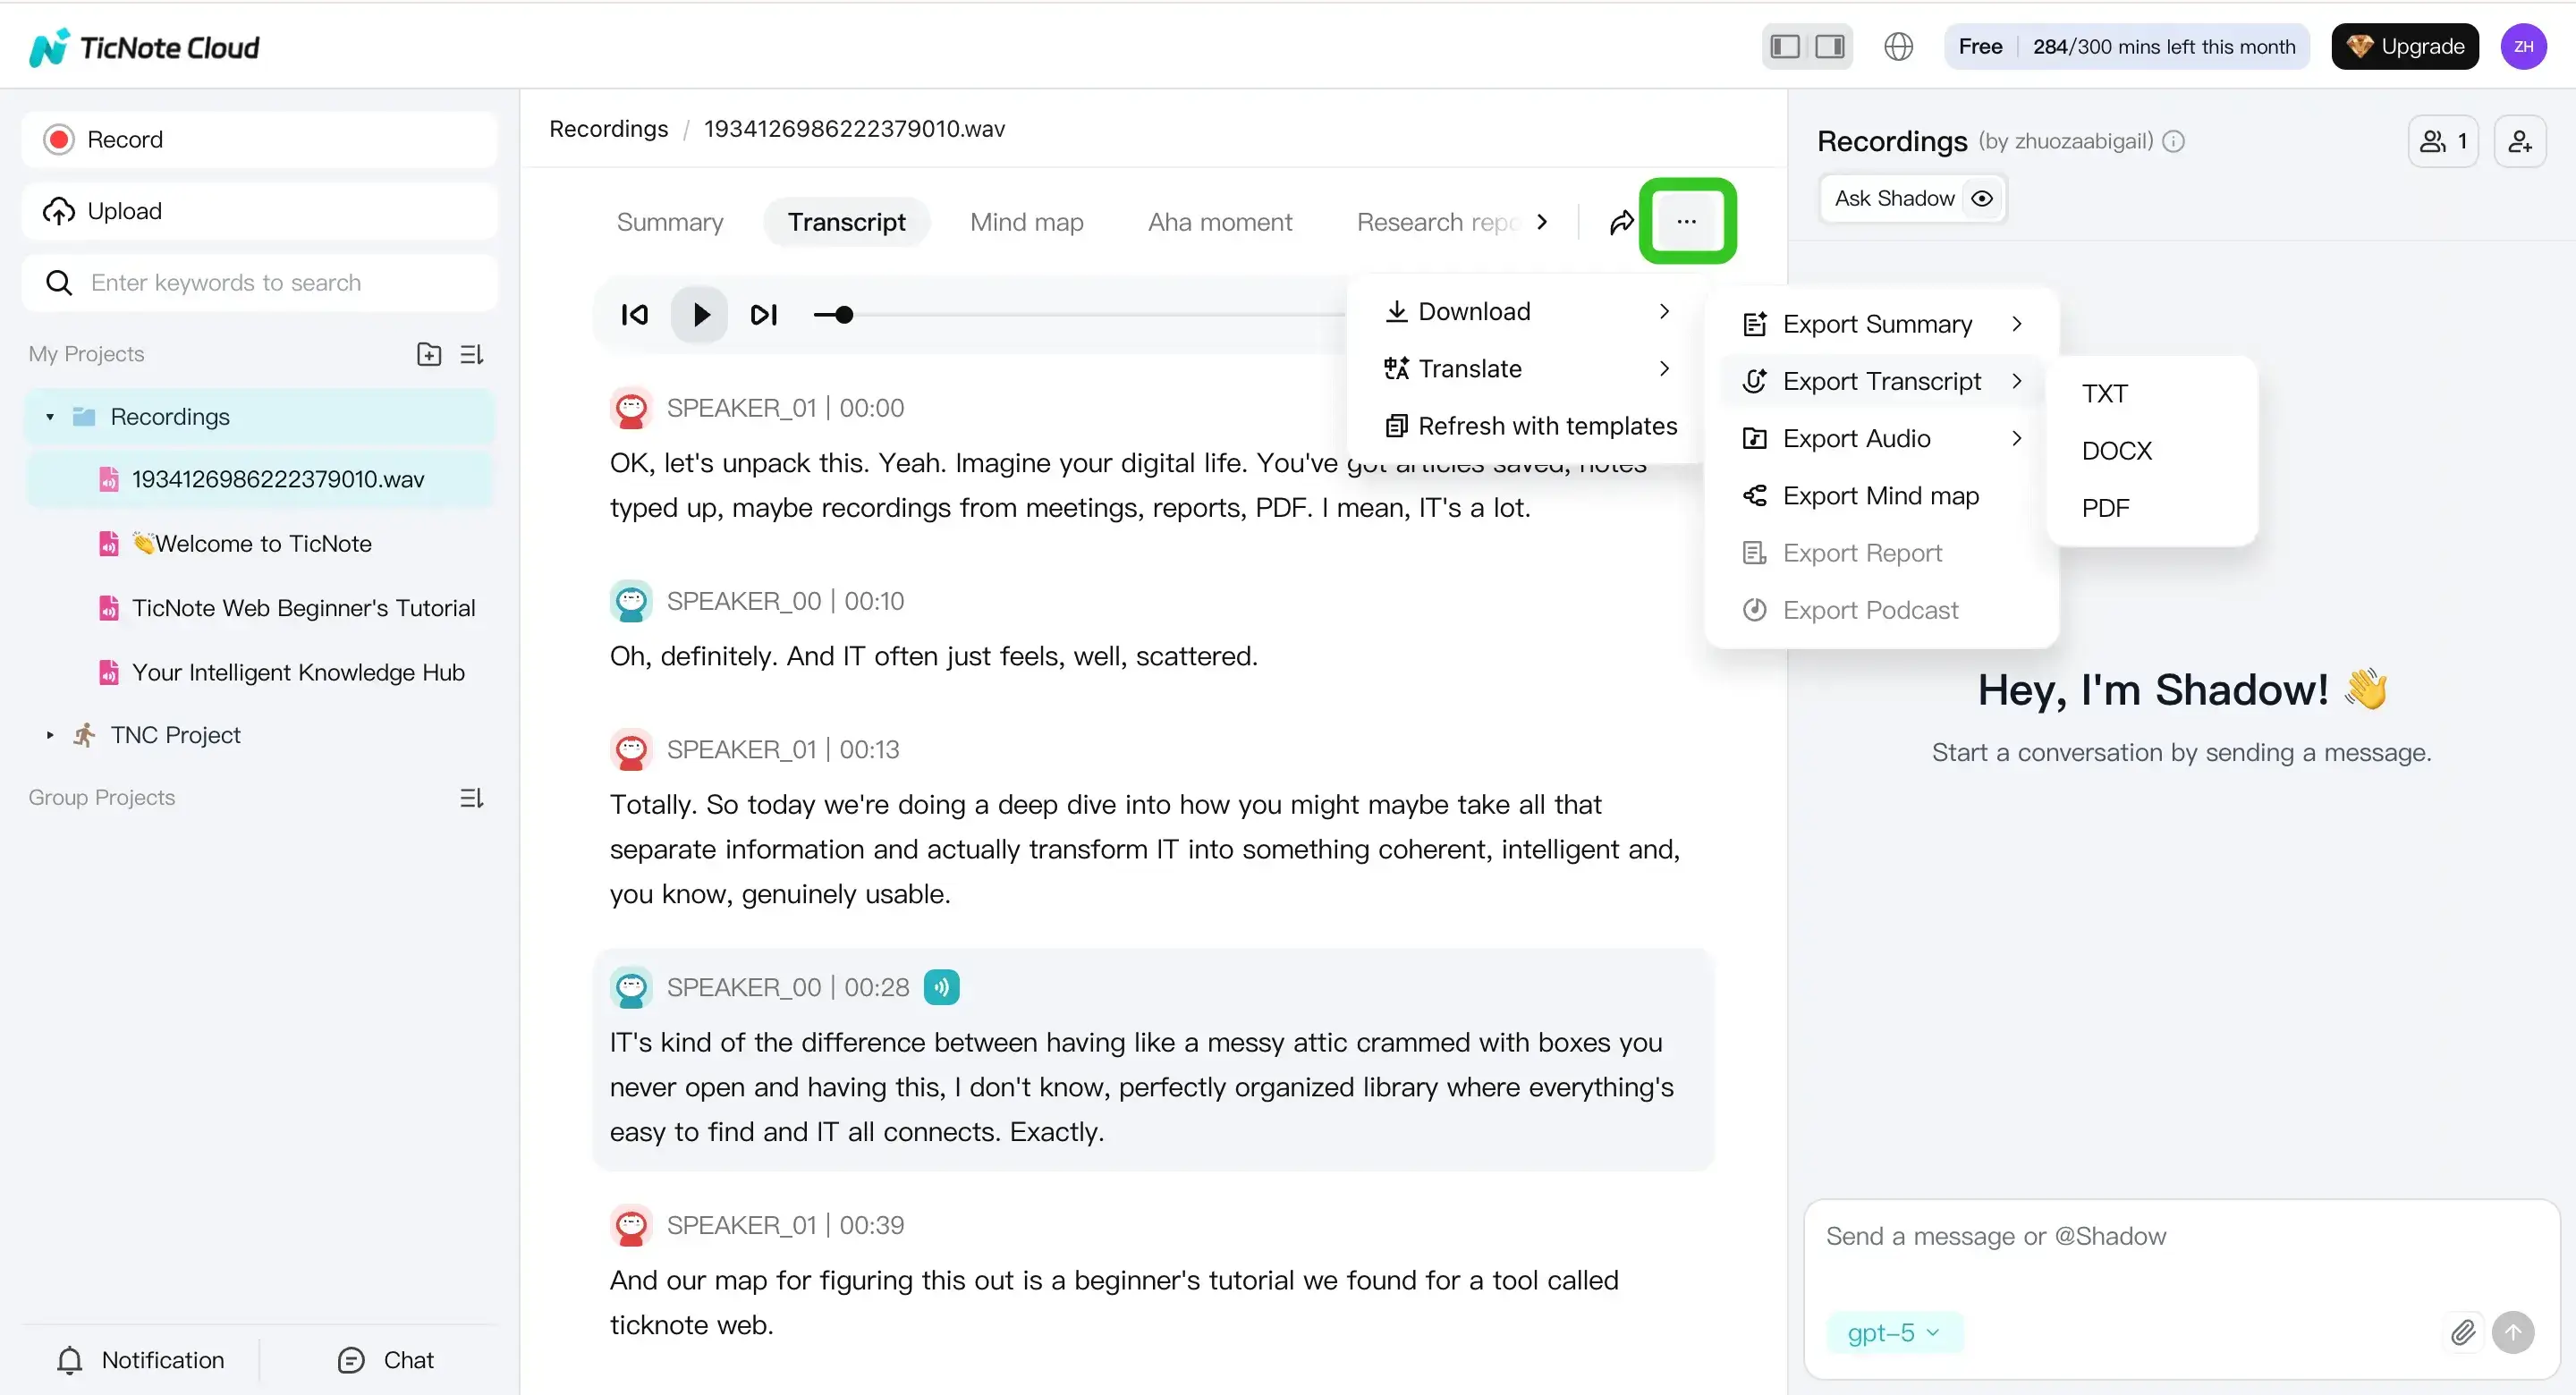
For most sites, TXT is best for the raw transcript. If you also need formatted show notes, export your summaries as Markdown, DOCX, or PDF. Before you publish, do one last pass for links, sponsor reads, and overall readability.
Natural CTA spot: Create a project for your podcast to organize transcripts and summaries.
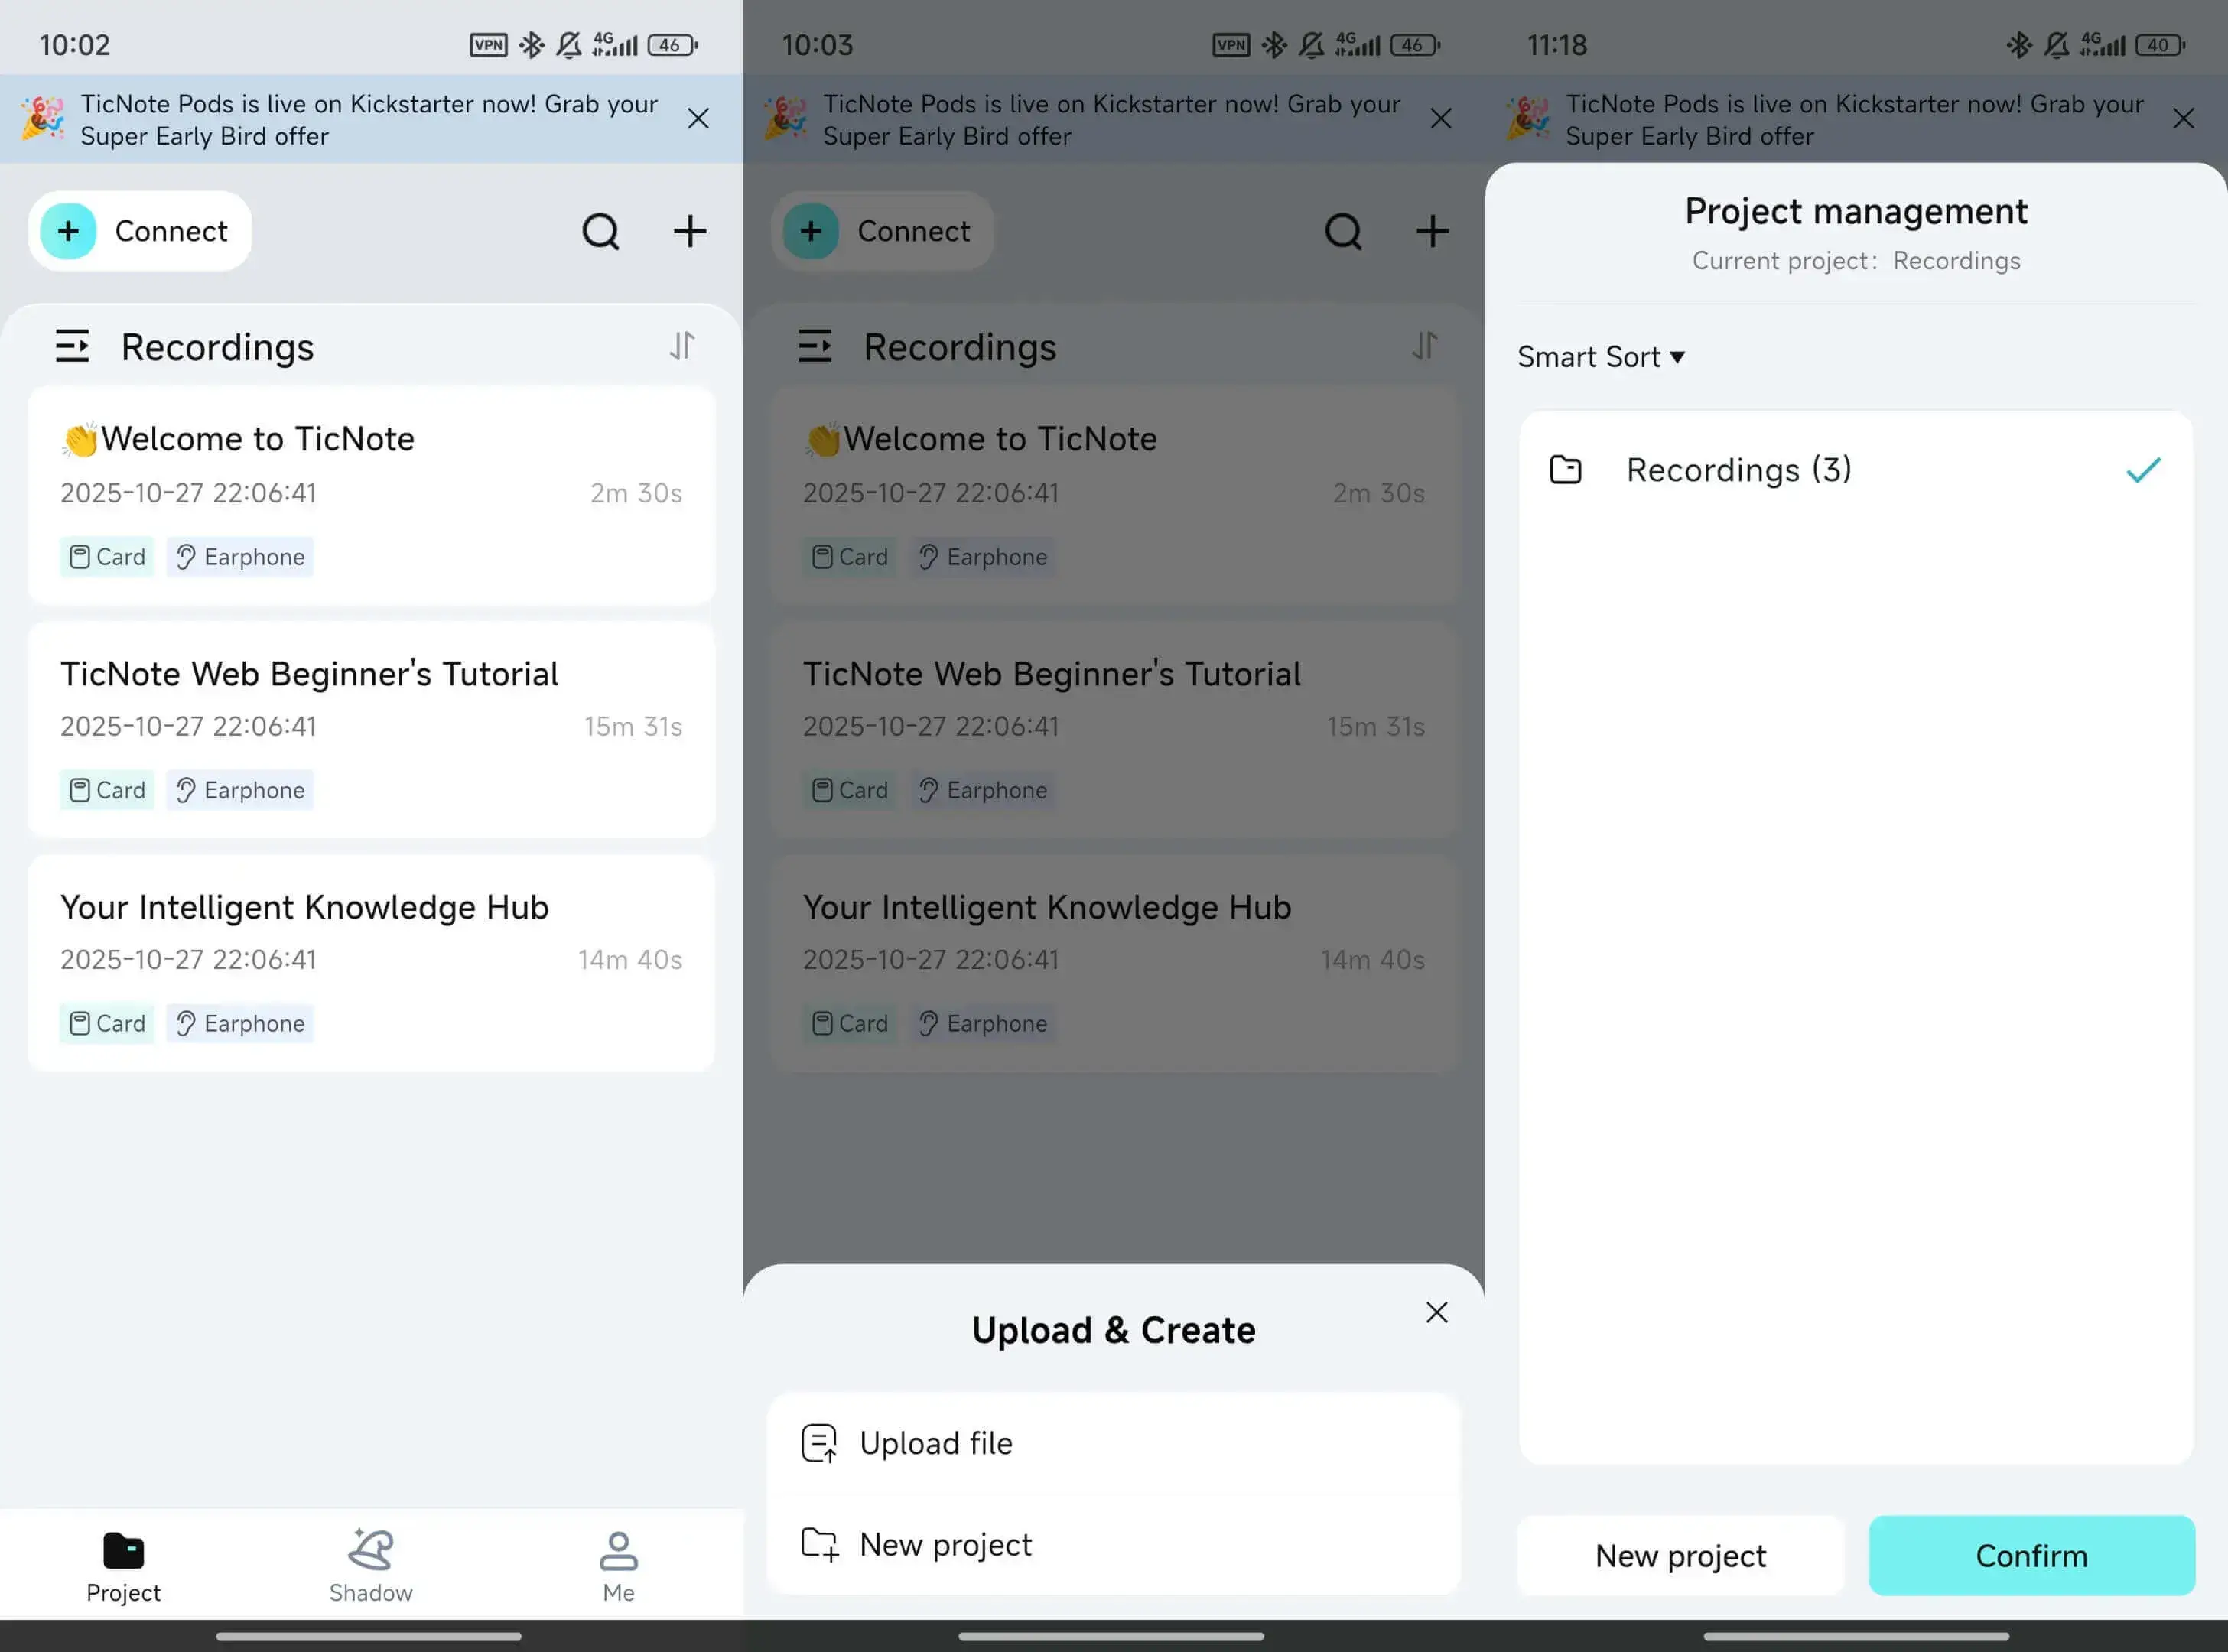
App (mobile) workflow (short version)
When you are away from your desk, you can still move fast. Open the TicNote app, upload or record into a project, generate the transcript, then review and export.
What makes TicNote Cloud a strong alternative to basic podcast transcription tools?
Basic transcription tools give you text. TicNote Cloud helps you turn that text into a system you can reuse. It's built for creators who want to transcribe a podcast, clean it up, and then publish and repurpose it without juggling five apps.
Keep episodes tidy with project spaces
Instead of a long, messy file list, you can set up one project per podcast or season. Then keep each episode's transcript, summary, mind map, and related docs in the same place.
A simple naming pattern makes search faster later:
- S01E07 Guest Name Topic
- 2026-02-Interview Guest Name
- Bonus Mini Episode Topic
This matters when you need to pull a quote weeks later.
Search across episodes with Shadow cross-file Q&A
When you have multiple transcripts, the hard part is finding what's worth using. With Shadow cross-file Q&A, you can ask questions across episodes to surface:
- Best quotes on a topic
- Recurring themes and story arcs
- Mentions of products, books, or frameworks
That makes it easier to build content clusters without re-listening. If you're also weighing general AI options, this guide on whether ChatGPT can transcribe audio and what the limits are can help you choose a workflow.
Repurpose faster with mind maps and deep research reports
For each episode, a mind map gives you a quick "whole episode" view. It's useful for planning show notes, blog sections, and clip ideas.
When you need something more structured, a deep research report can turn a long transcript into a tighter brief with clearer takeaways.
Control access with privacy by design
"Private by default" means your workspace content isn't public, and access is controlled by who you invite. For small teams, that's practical: keep sensitive guest episodes in a restricted project, and only share what your editor or VA needs.

What are the key privacy, consent, and retention rules for podcast transcription?
Podcast transcripts are great for reach and SEO, but they also turn a casual talk into searchable text. That changes the privacy risk. Before you transcribe a podcast, set clear rules for consent, what you will not publish, and how long you keep files.
Get clear consent to record and transcribe
Ask for permission before you hit record. Do it for co hosts, guests, and anyone who calls in. Use simple language like, "We record and transcribe this episode for editing and publishing."
If you take live questions, add consent in more than one place:
- A pre call notice (a short line read by the host)
- A signup form checkbox
- A confirmation email with the same wording
Laws vary by country and even by state or province. When you are unsure, use the stricter approach and get consent from everyone.
Redact sensitive topics before you publish
Not everything said on mic should go online as text. Remove or mask:
- Personal data (full names, emails, addresses, phone numbers)
- Health information
- Financial details
- Passwords, private links, or account numbers
- Anything marked "off the record"
Pick one redaction style and stick to it. Use [REDACTED] when the fact of a removal matters. Or delete the line if it adds no value. Either way, keep the surrounding meaning honest so readers are not misled.
Limit access and set a simple retention policy
Treat raw audio and draft transcripts as private working files. Only the people who need them should have access. If you handle client podcasts, keep each client in a separate workspace or project, so files do not mix.
Set a retention rule you can follow. For example:
- Raw audio: keep for X days after publishing
- Draft transcripts: delete after final approval
- Final transcript: keep while the episode is live
This aligns with the idea of storage limitation, where personal data should be kept only as long as needed for the purpose, as stated in Regulation (EU) 2016/679 (General Data Protection Regulation), Article 5(1)(e) (2016).
Publish with care: quotes need context
Tell readers what they are getting. Label your transcript as verbatim (word for word) or lightly edited (cleaned for clarity). Do not "clean up" a quote into a new claim. Keep the speaker's intent intact.
If you shorten a long section for the page, mark it clearly. You can note that the transcript is abridged and point readers to the full episode audio for full context.
