

![Transcribe Audio to Text on iPhone — Free & Fast (2026) [Hands-on Tested]](https://cdn-digitalhuman-pb.weta365.com/voice-recorder-prd/static/backend/2026/01/30/2017173138749571074.webp)
TL;DR: The fastest ways to transcribe on iPhone (and when to use each)
If you want to know how to transcribe audio to text on iPhone fast, pick the tool that matches your situation. Use iOS Dictation for quick notes you can speak now. Use Live Captions for real-time listening when you can’t replay audio. Use Voice Memos transcription if it appears for your language and region. Use an upload-based workflow for long files, noisy audio, multiple speakers, or clean exports.
You can lose time fixing messy transcripts. That’s worse when you need share-ready notes fast. If you want a clearer upload, review, and export path, you can try TicNote Cloud for Free and keep transcripts and summaries organized in one searchable workspace.
Pick this if: students need lecture notes fast, creators need scripts and captions, and meeting-heavy roles need accurate transcripts plus clean TXT, DOCX, PDF, or Markdown outputs.
How to transcribe audio to text on iPhone (Voice Memos, Files, and recordings)
To transcribe means to turn spoken audio into editable text. If you’re trying to figure out how to transcribe audio to text on iPhone, start by finding where your audio lives: Voice Memos, the Files app (iCloud Drive), Messages, or another recording app.
Start here: where is your audio file?
Most iPhone audio falls into one of these buckets:
- Voice Memos: quick notes, interviews, class reminders.
- Files/iCloud Drive: saved M4A, MP3, or WAV files.
- Messages or Mail: voice notes or attachments you can Save to Files.
- Other apps: Zoom, Teams, WhatsApp, or call recording tools that export a file.
If you need help with recording first, this guide on recording and transcribing from common iPhone apps maps the main sources.
What you’ll need (so it works the first time)
- iOS version: some Apple features vary by iOS and region.
- Language settings: set the right spoken language for better results.
- Supported formats: M4A and MP3 are common, and many tools also accept WAV.
- Internet access: some transcription runs on-device, others require cloud processing.
Set expectations: short notes are easy, meetings are harder
Clean, single-speaker audio is the easiest to convert. Long meetings, cross-talk, and background noise often need more review, or a tool that’s built for long files and exports.
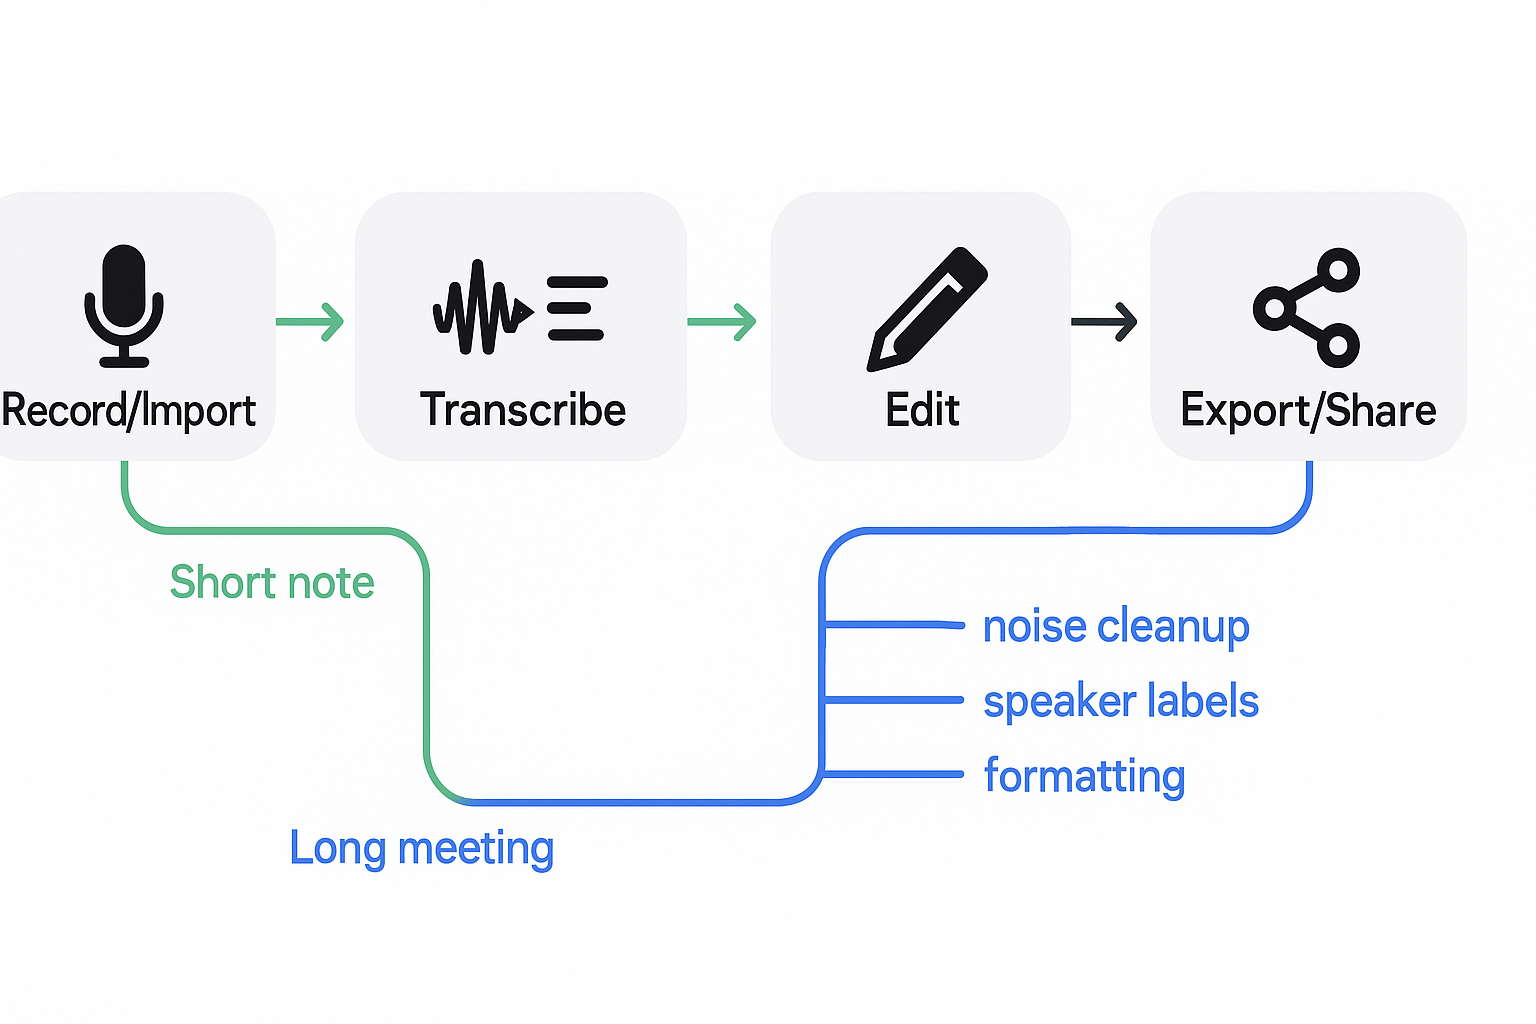
The simple end-to-end workflow
- Record or import an audio file.
- Transcribe to text.
- Edit names, punctuation, and key terms.
- Export or share as a clean file for notes, docs, or teammates.
What iPhone built-in transcription options can you use?
If you want to know how to transcribe audio to text on iPhone, start with Apple’s built-ins. They can be fast for simple needs. But they vary by device, language, and whether you need real file-based transcripts.
Use Voice Memos transcription (when it shows up)
In some iOS versions and regions, Voice Memos can show a transcript for a recording. This is different from just recording audio. A transcript is searchable text you can review and copy.
Best for:
- Quick notes you recorded in Voice Memos
- Short, clear, single-speaker clips
Use Dictation for speech-to-text while you talk
Dictation turns your live speech into text in real time. It’s great for drafting a message or note hands-free. But it won’t reliably convert an existing audio file into a full transcript.
Best for:
- Writing a note as you speak
- Capturing ideas on the go
Use Live Captions for real-time nearby audio
Live Captions shows on-screen captions while audio plays or while someone speaks near your iPhone. It’s helpful for accessibility and quick understanding. It’s not designed as an exportable transcript tool.
Best for:
- Following along in the moment
- Calls, videos, or in-person speech when you need captions
Built-in limits checklist
- Language and region support can be limited
- Speaker labels are often missing
- Punctuation can be inconsistent
- Noise and overlap lower accuracy
- Offline behavior varies by feature and device
If you already have an audio file, you’ll usually need an upload-based tool to convert it into clean, shareable text reliably.
How to transcribe an existing audio file step by step (upload → transcribe → review → export)
These steps use TicNote Cloud as the example because it keeps the full flow simple: import your file, transcribe it, clean it up, then export clean formats. It works iPhone-first, and it also works on the web when you want a bigger screen.
iPhone workflow: share your audio, transcribe, then export
Start with the file you already have, like a Voice Memo, interview, or meeting recording.
Get the audio into Files (or ready to share). From Voice Memos, use Share to save the recording to Files (or share it straight to an app).
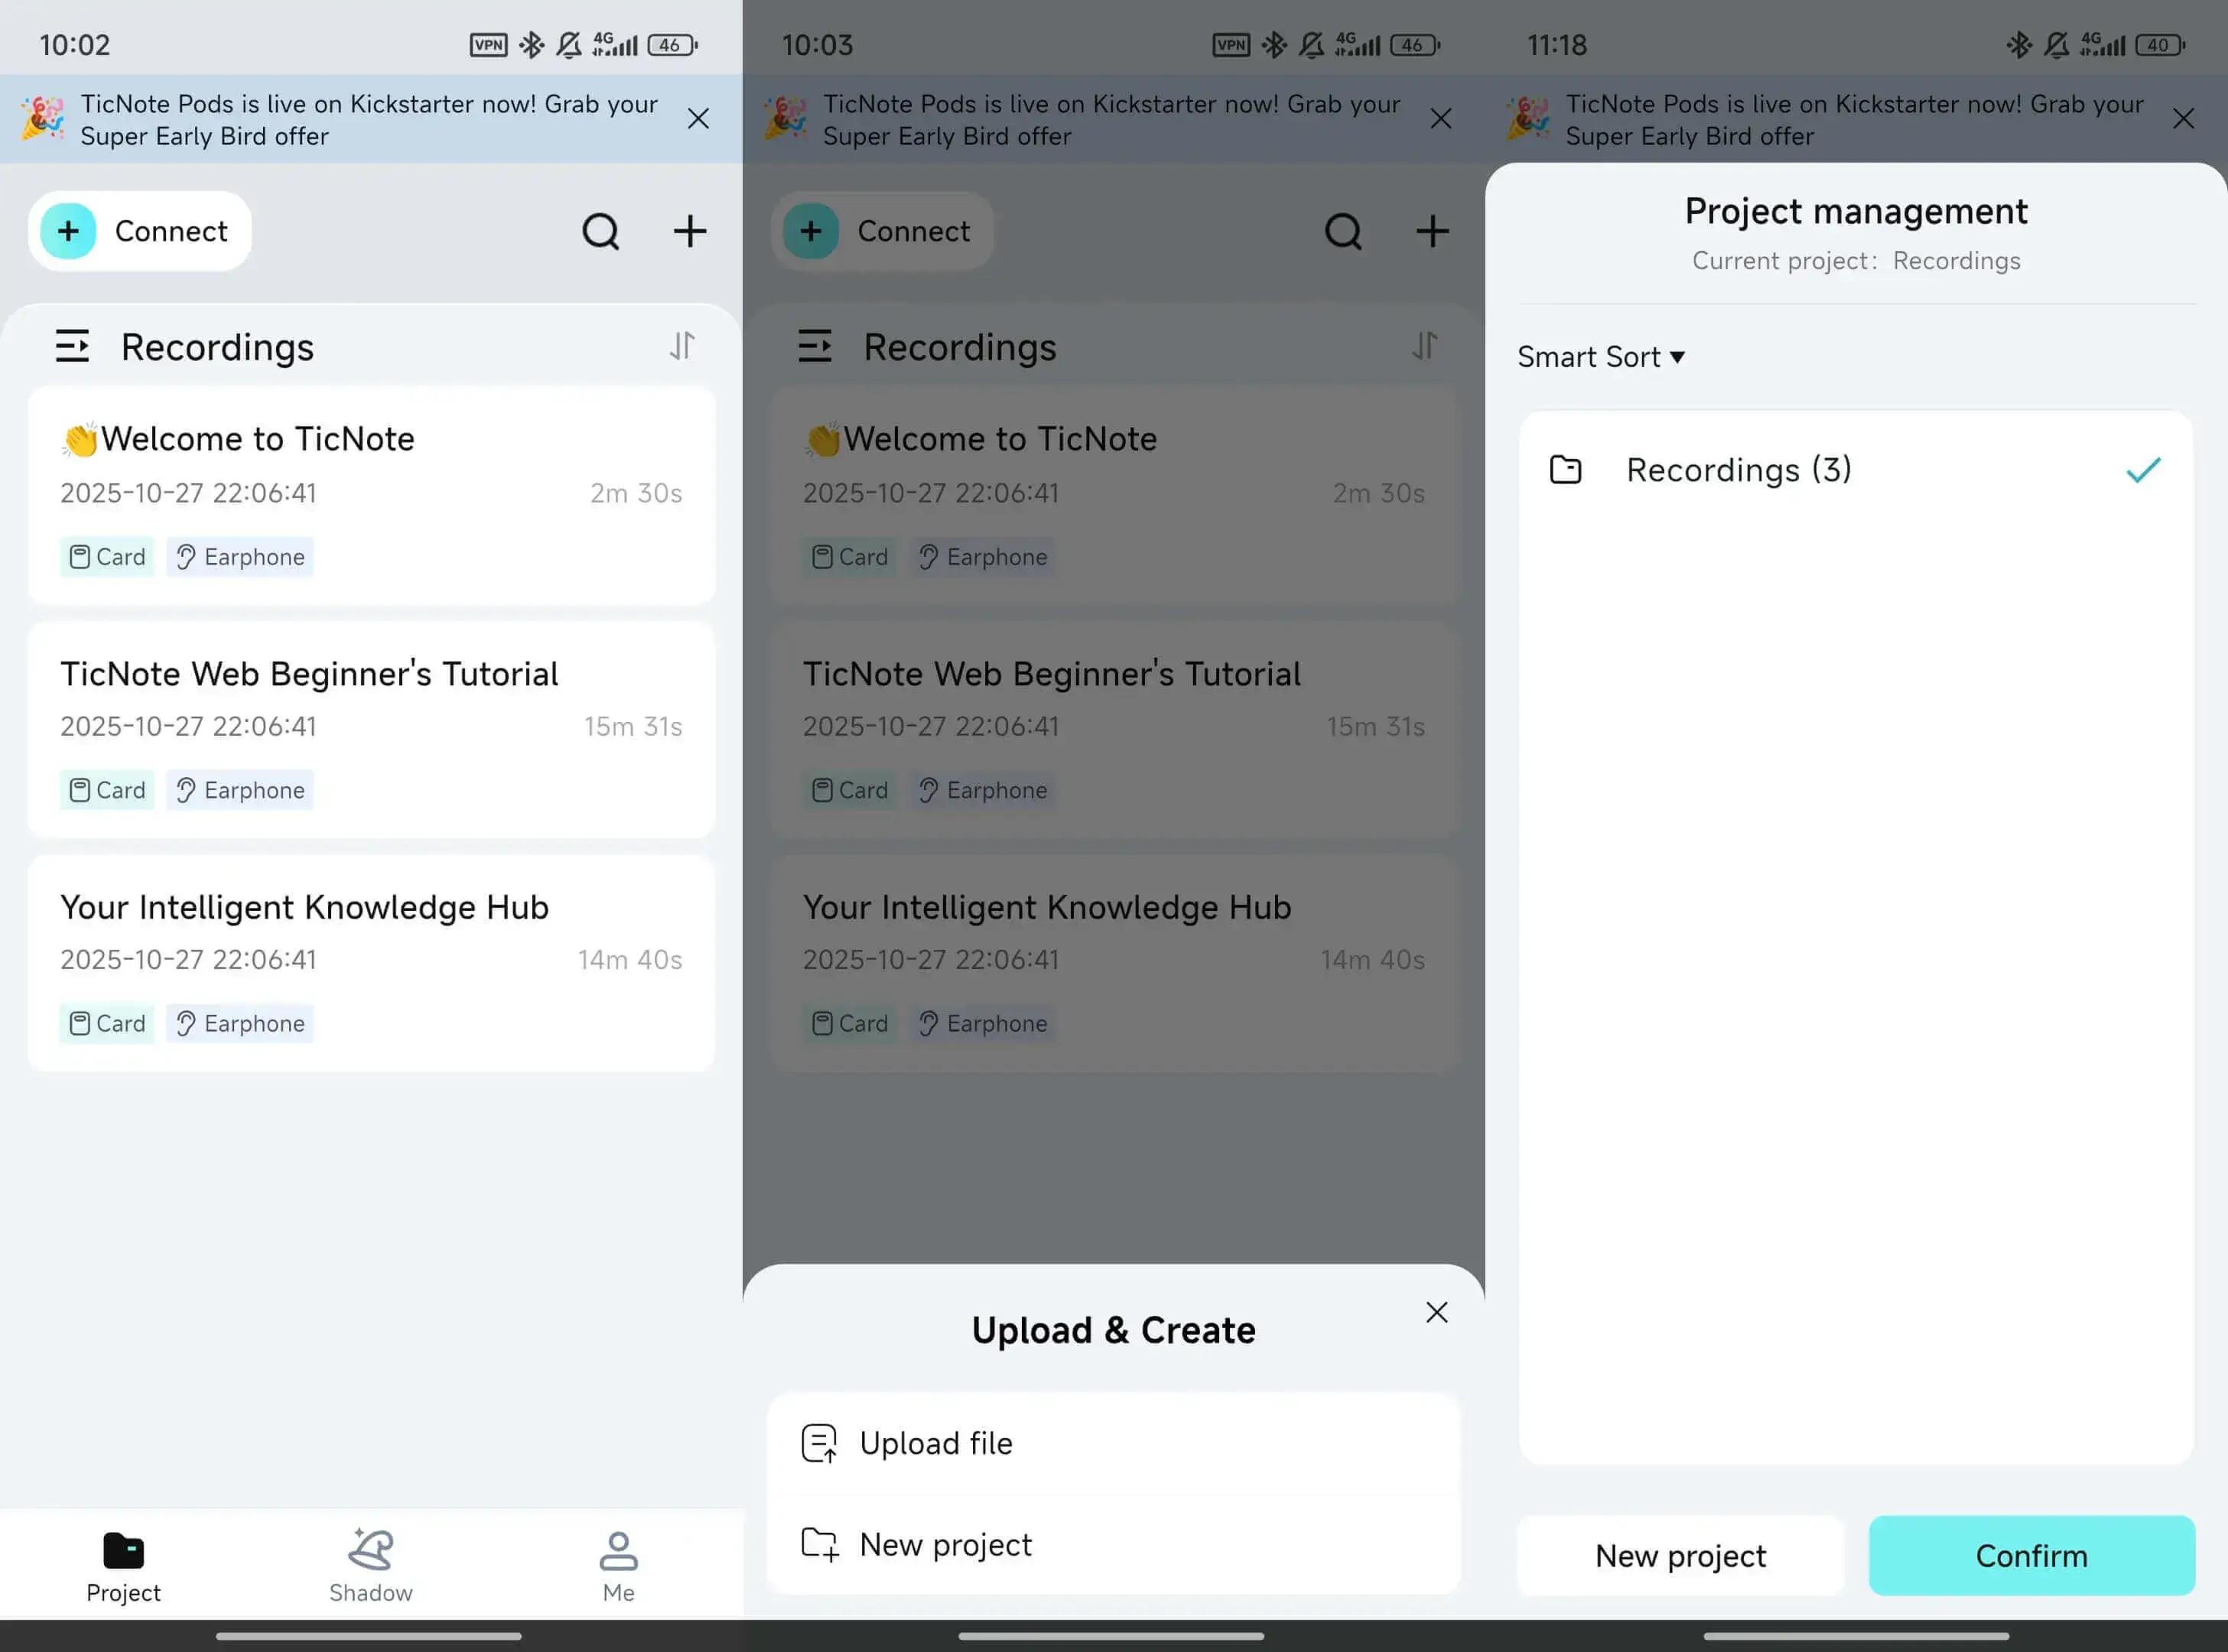
Select the language and AI model.
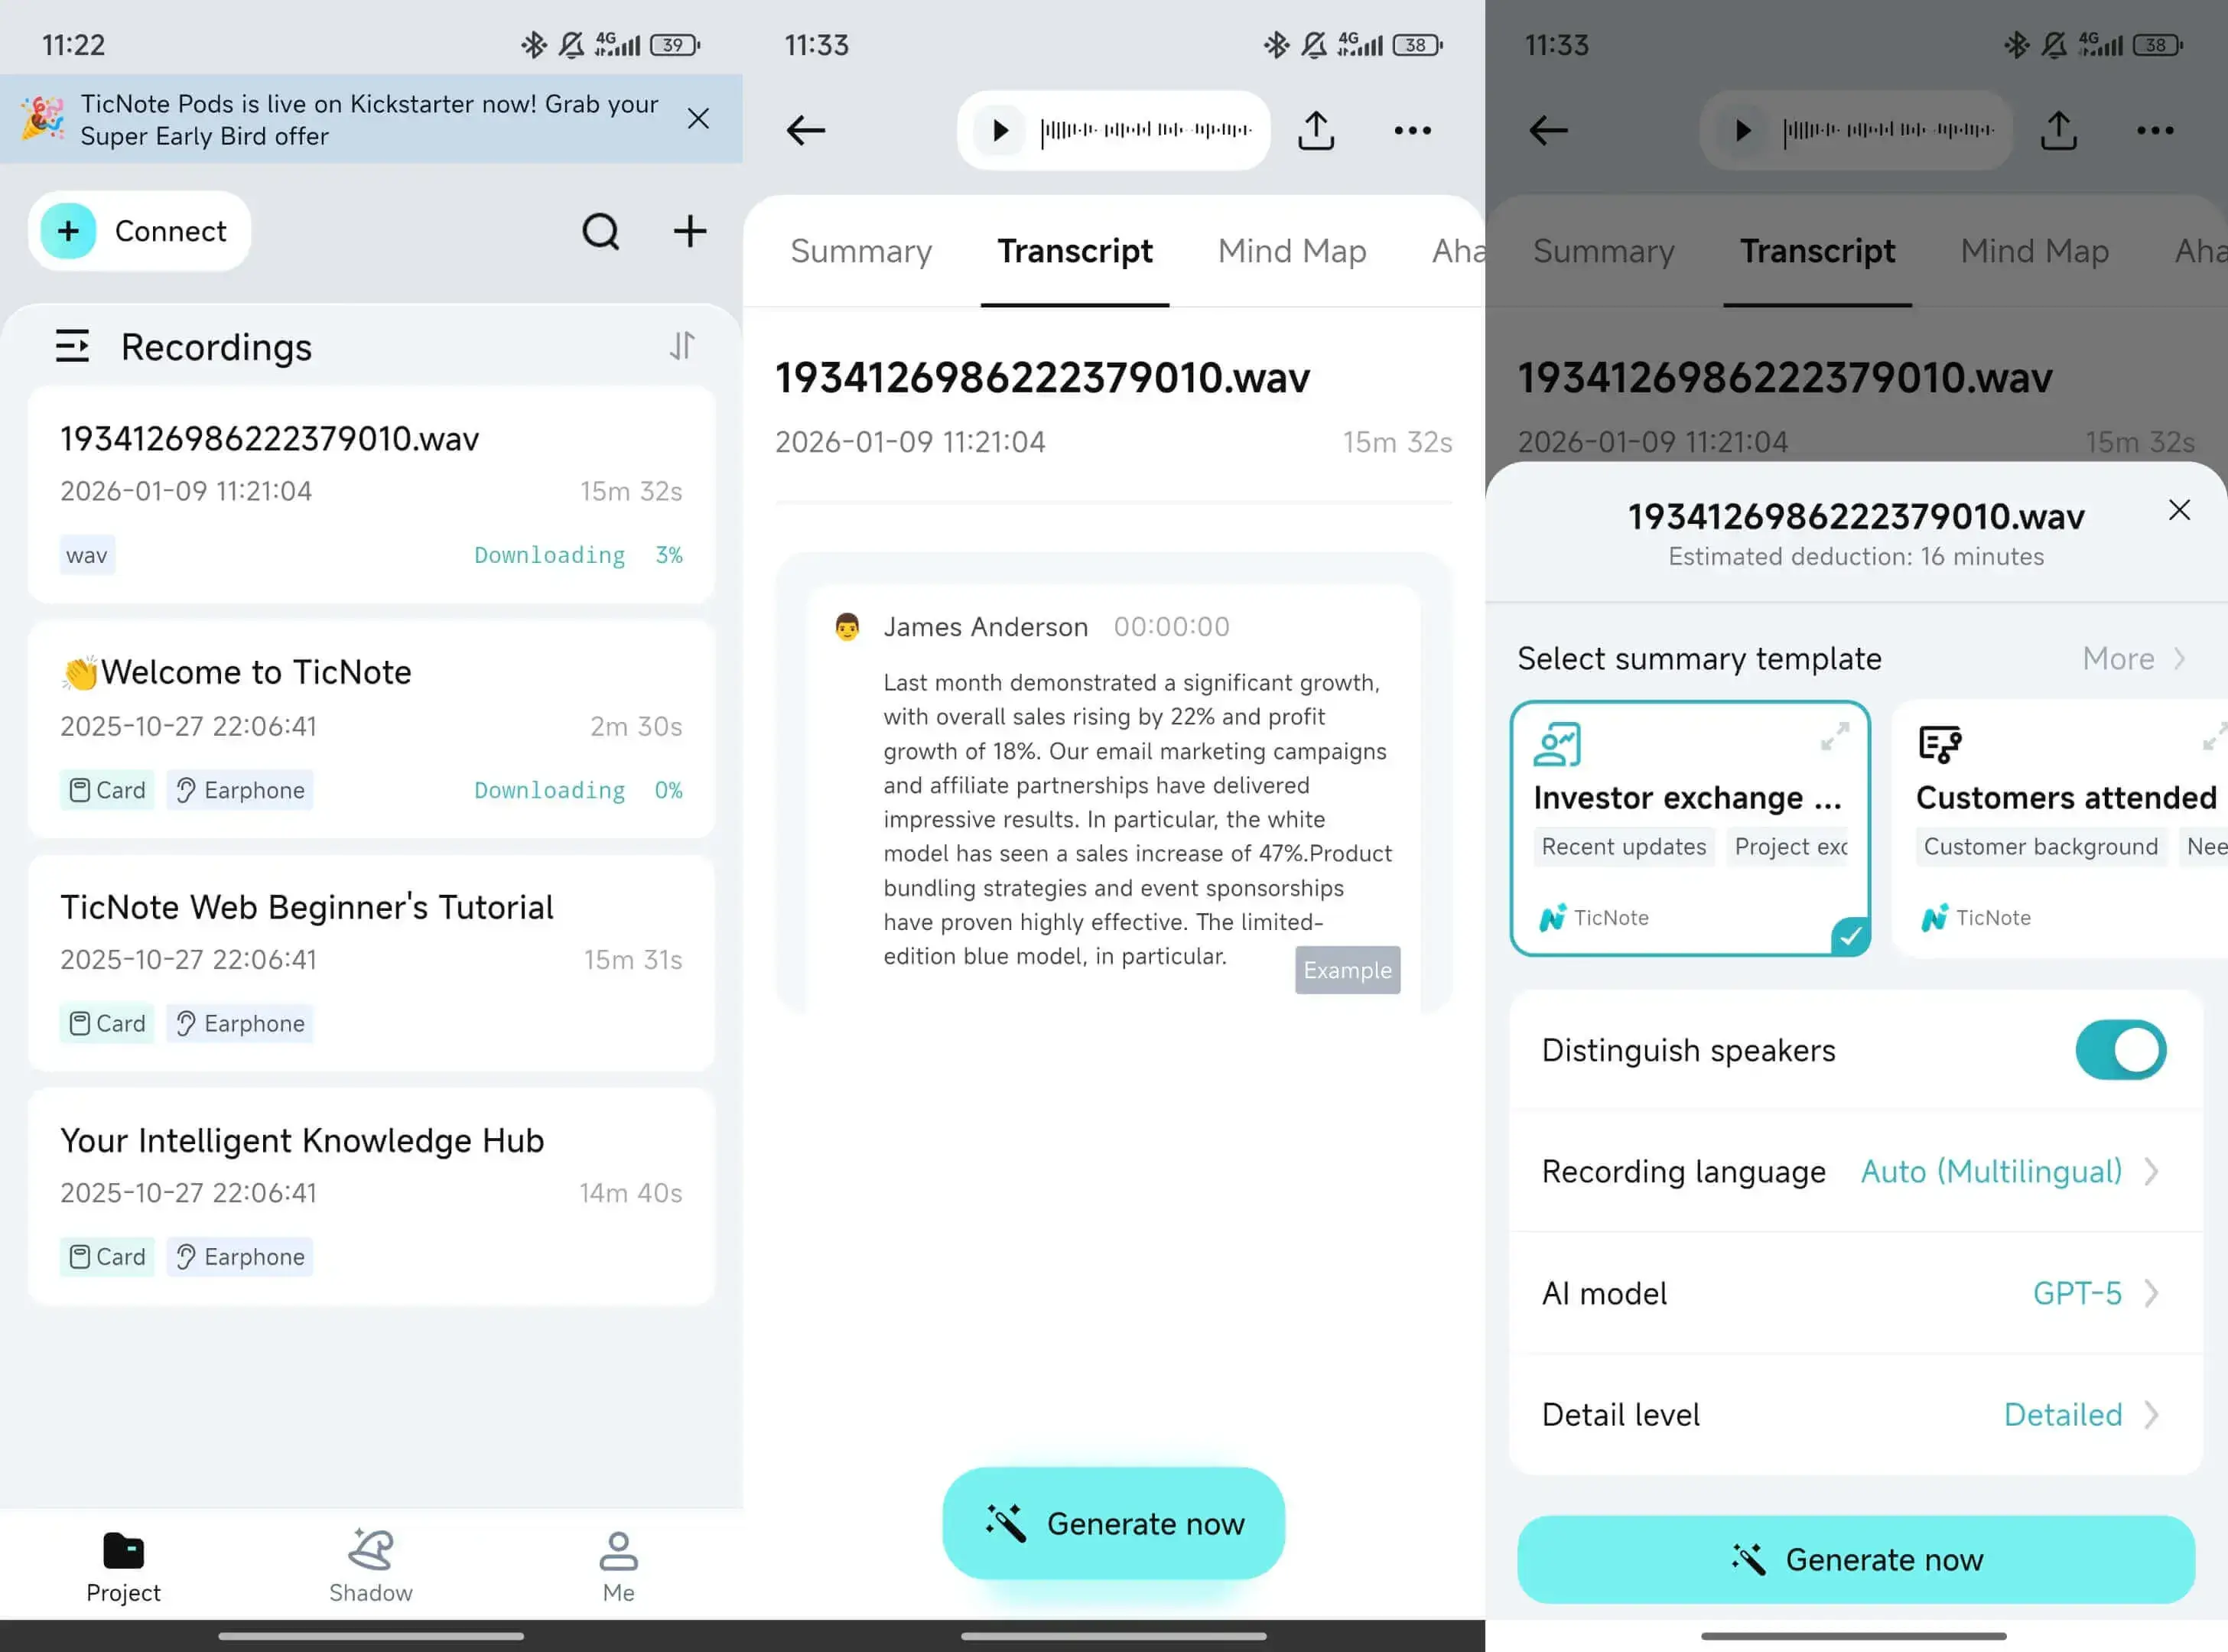
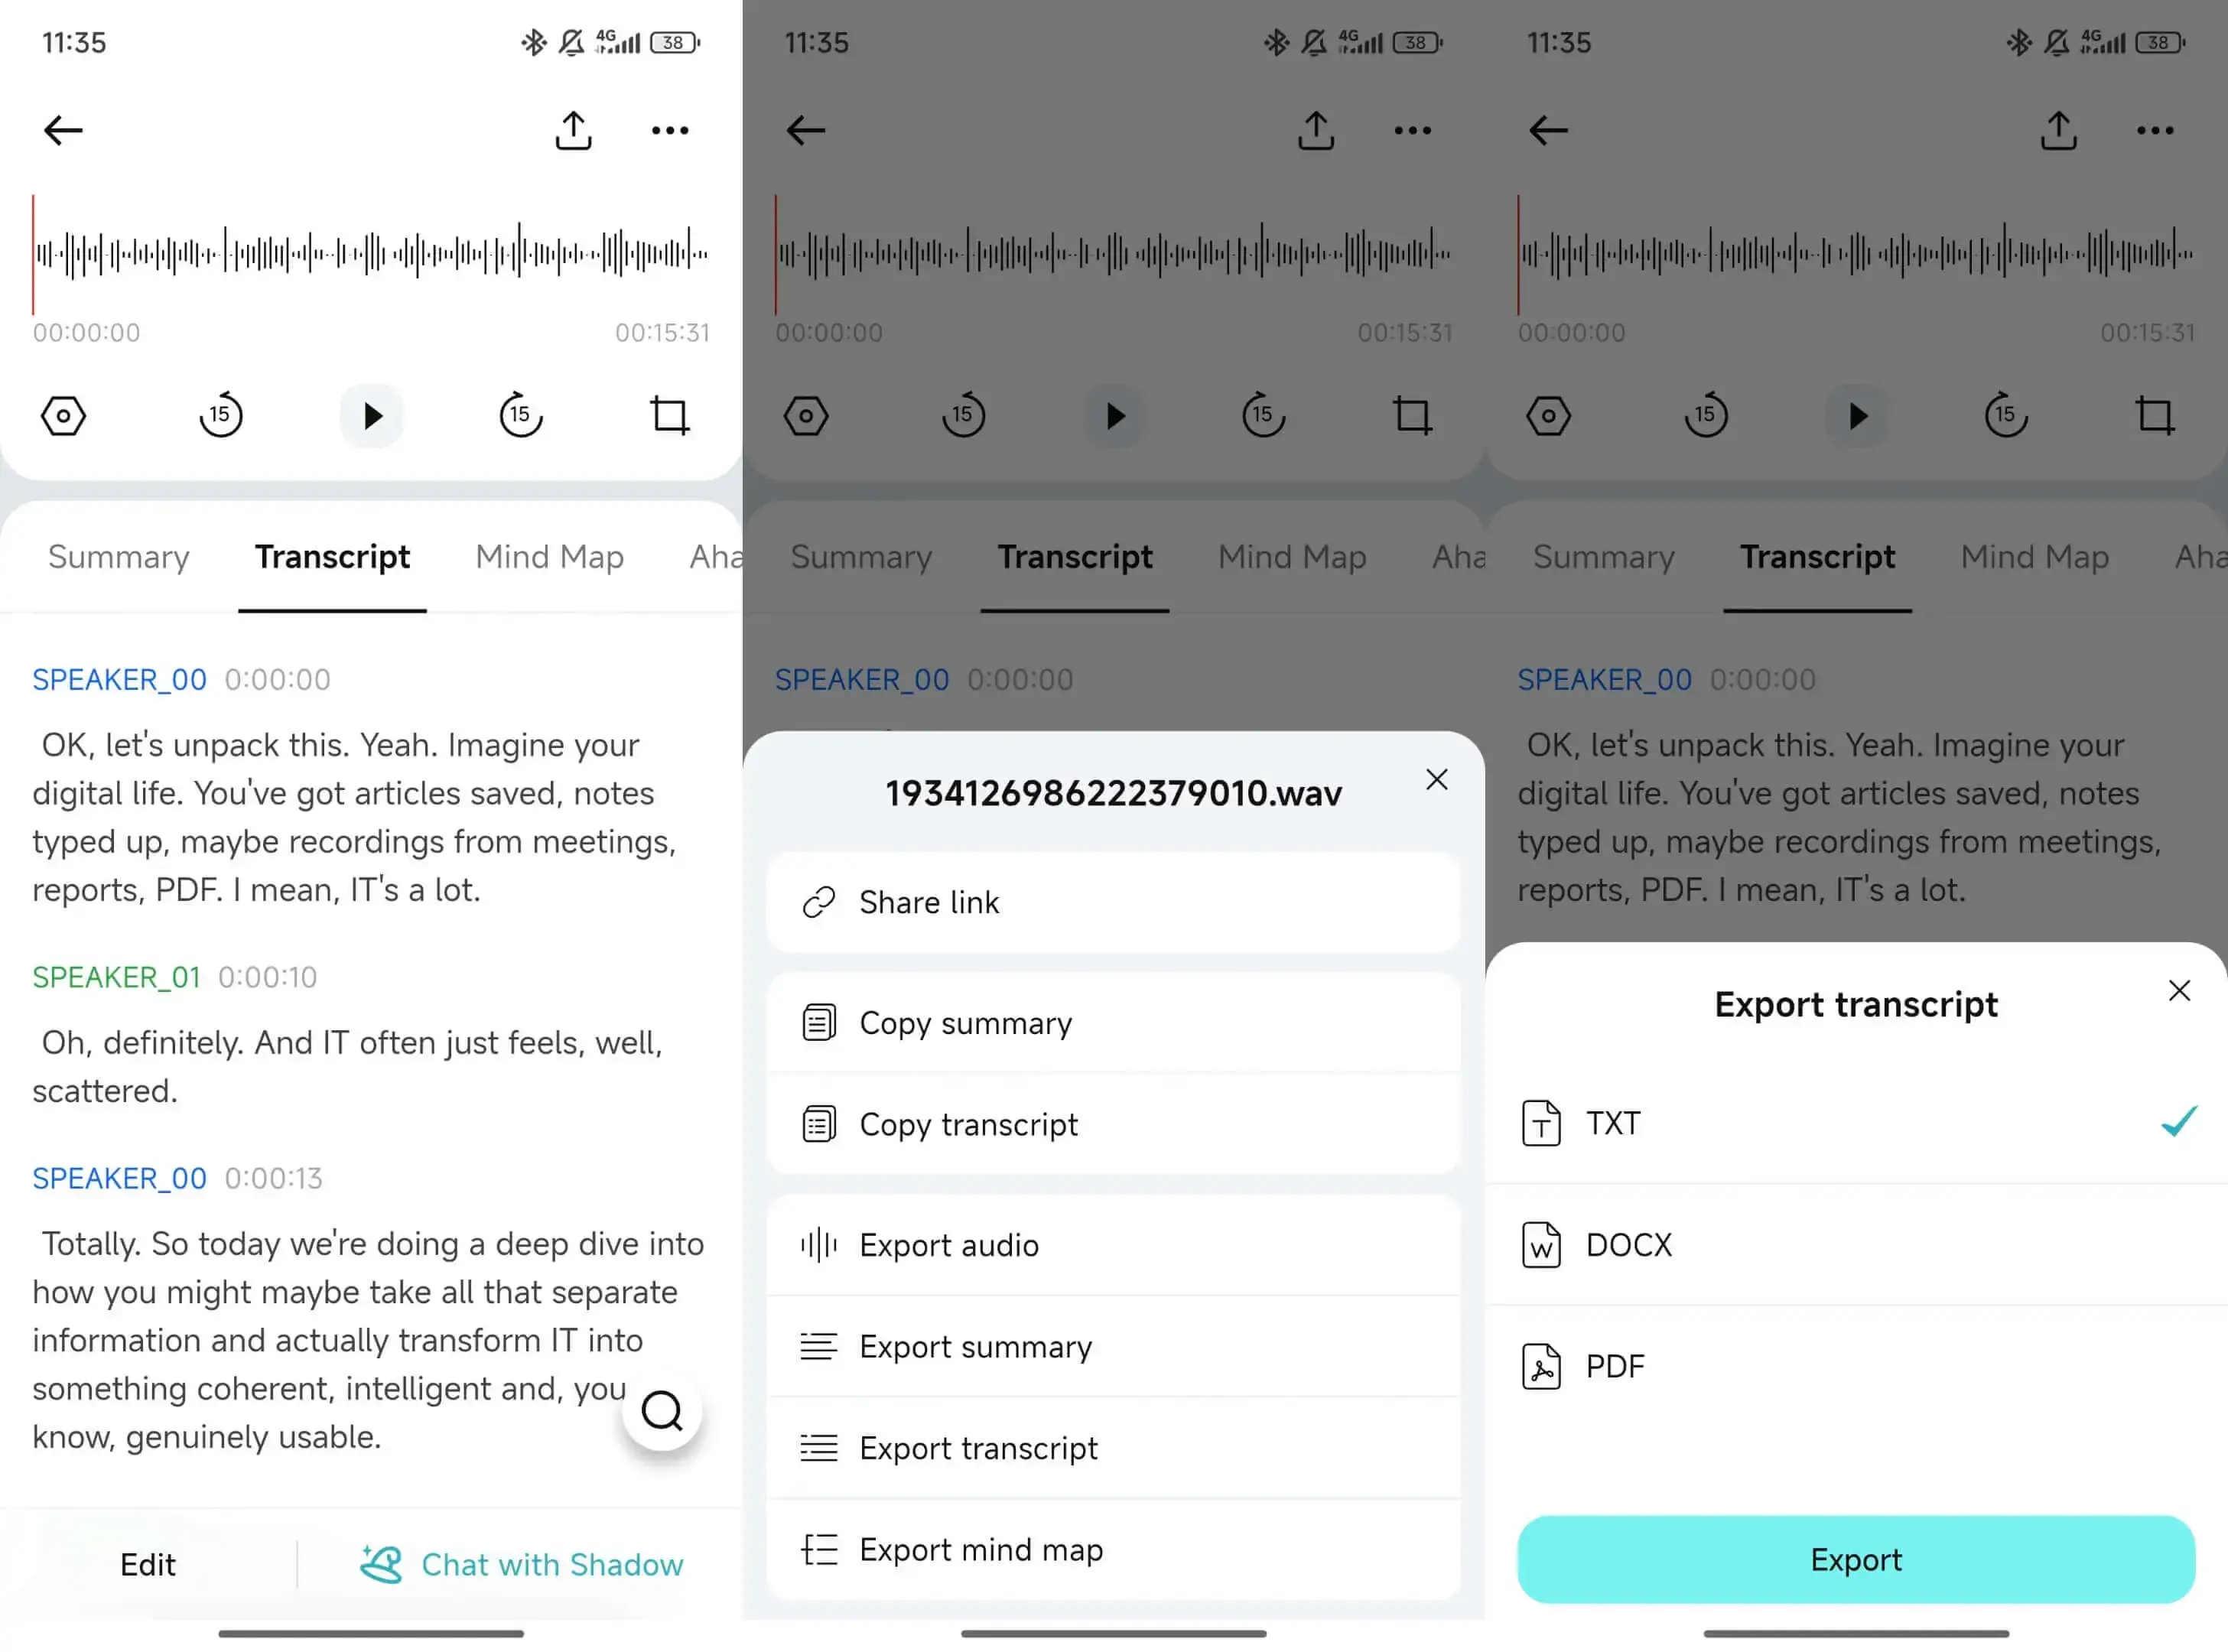
Edit the transcript and export.
Tip: before you upload, make sure the recording is fully saved and not still syncing.
Web workflow: better for long files and faster review
If the file is long, web is often easier.
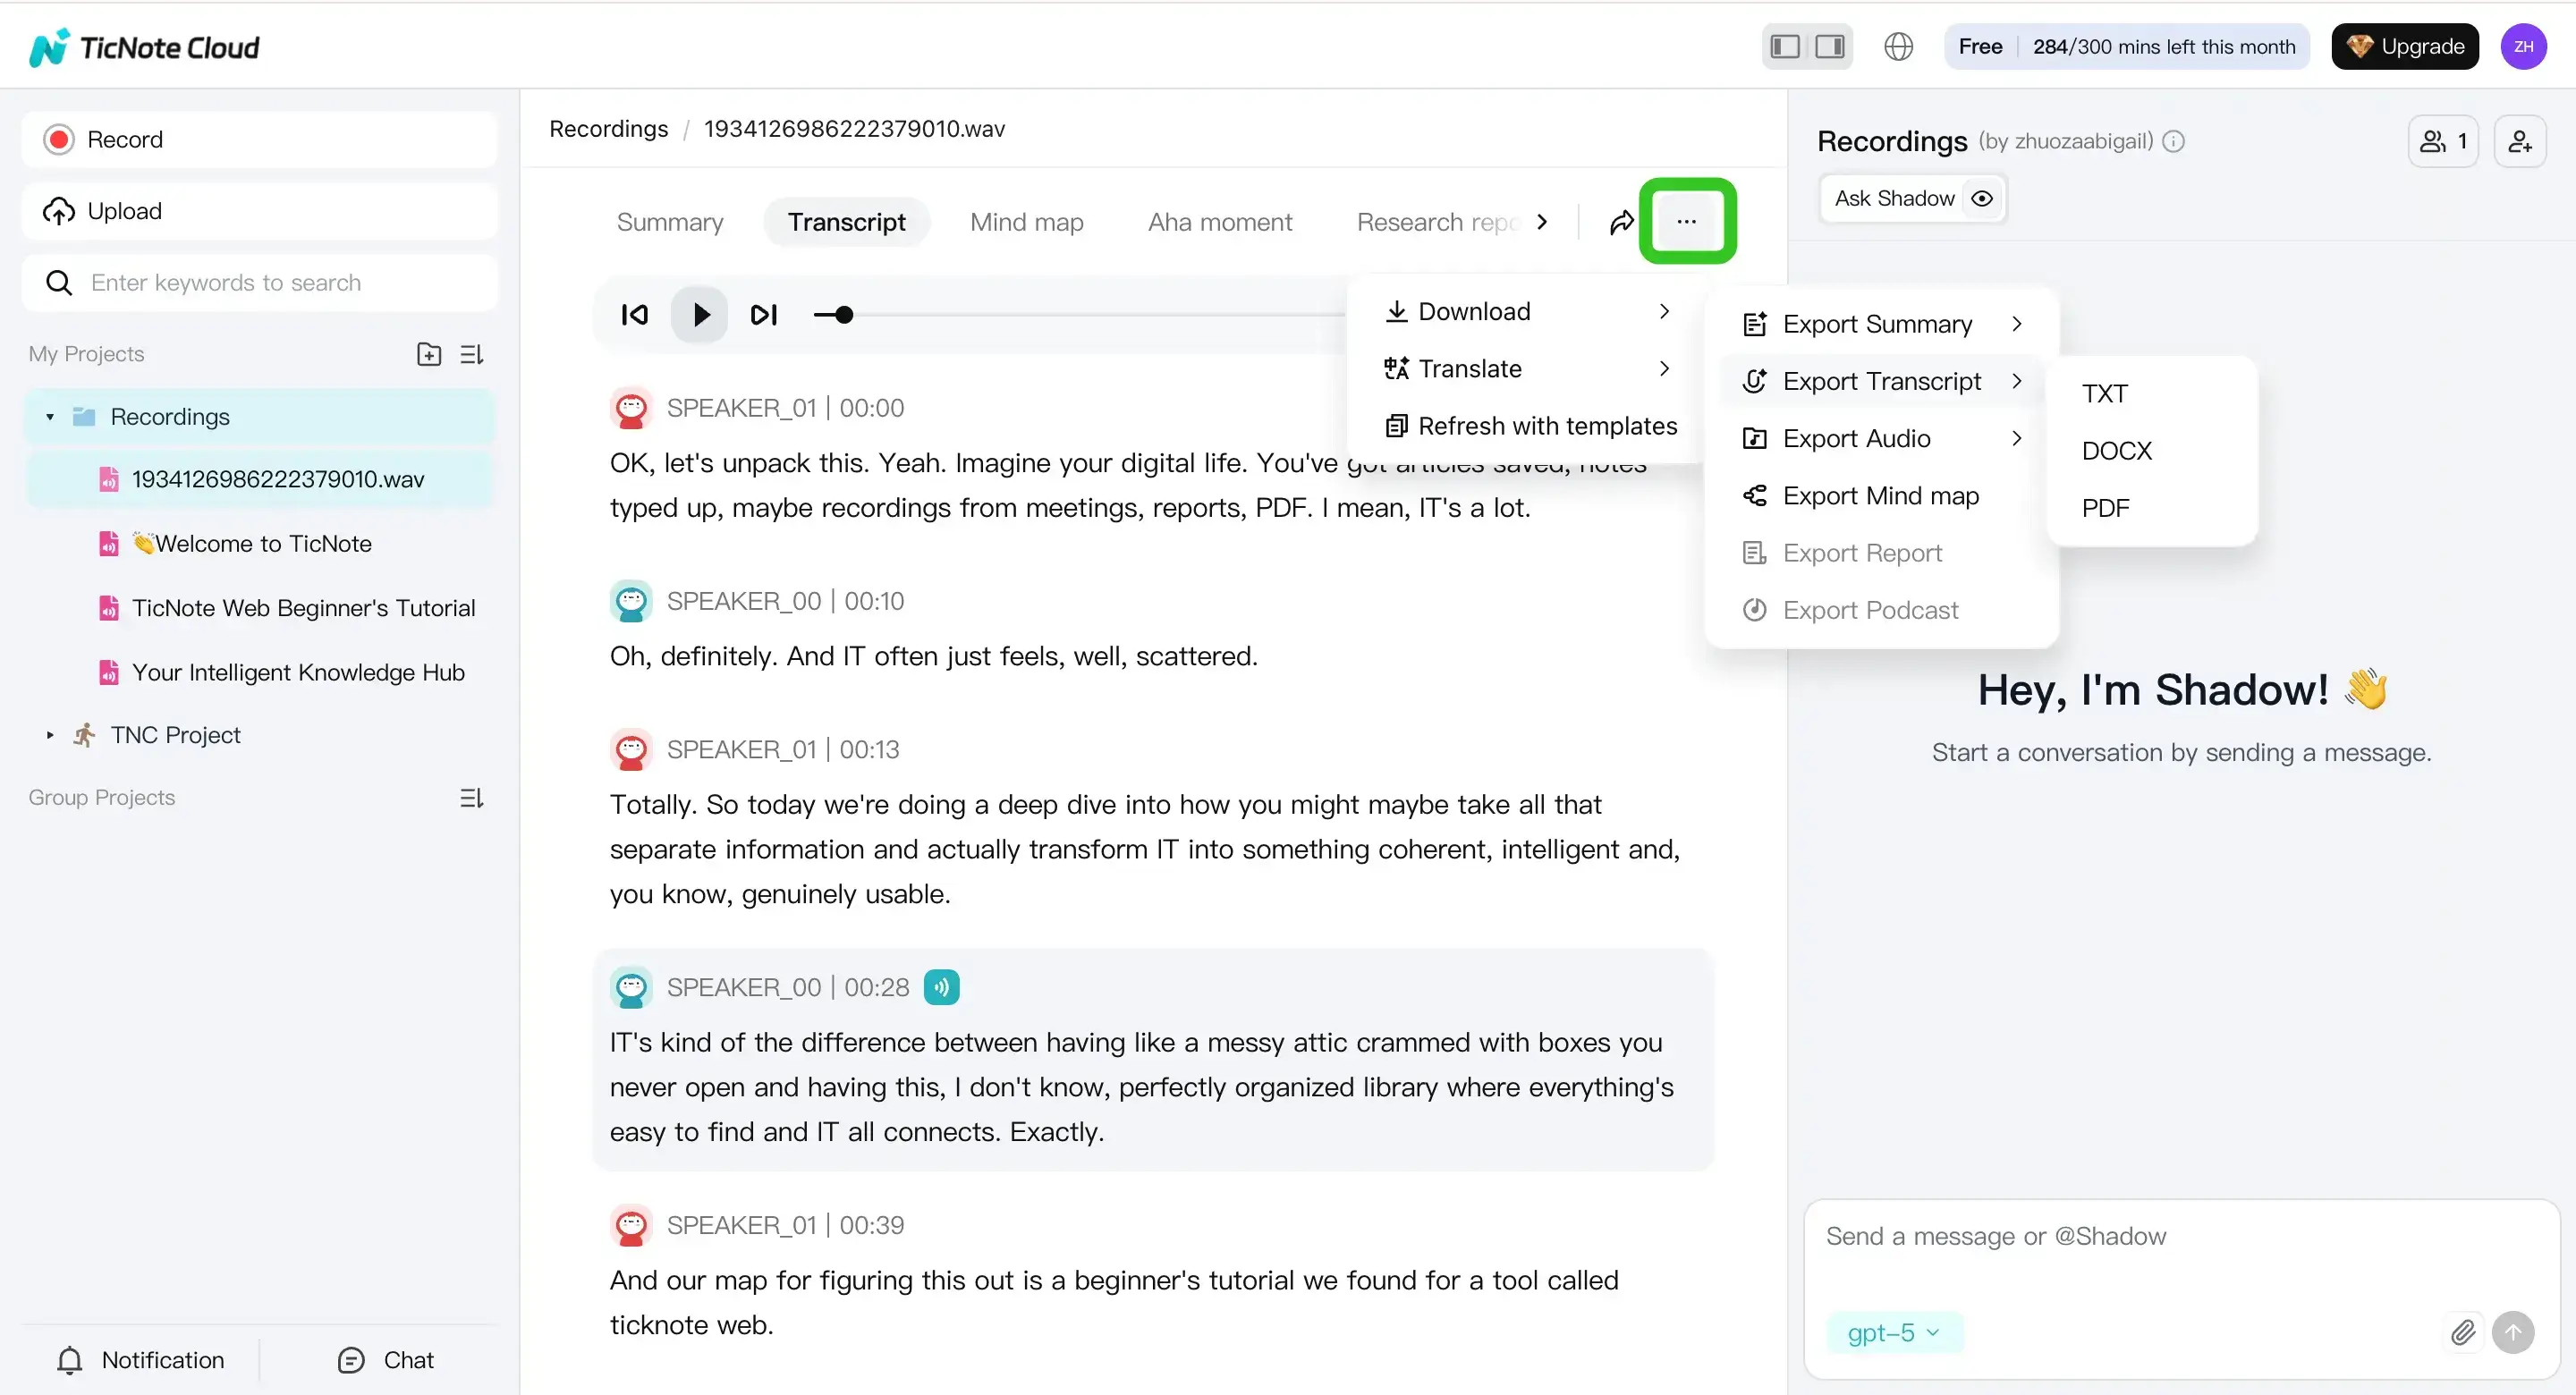
If you want more scenarios, this guide also covers end-to-end transcription workflows for meetings and podcasts while keeping exports clean.
How can you edit, format, and share your transcript from iPhone?
After you transcribe audio to text on iPhone, do a quick edit pass before you share it. Start with high-impact fixes first, then clean up the layout. You’ll get a transcript people can scan, search, and act on.
Do a 3-pass edit on your phone
- Fix names, acronyms, and terms first. These errors break trust fast. Use Find to fix repeats (like “Jon” vs “John,” or “OKR” vs “OCR”).
- Split long blocks into short paragraphs. Aim for 1 idea per paragraph. If it’s a meeting, separate each speaker change.
- Remove filler only when it helps. Cut “um,” “like,” and repeats, but don’t change meaning. If a sentence gets unclear, keep it.
Format it for real use
Add structure so someone can skim:
- Headings: Agenda, Decisions, Risks, Next steps
- Bullets: Use for key points
- Action items block: Owner + task + due date
- Time cues: Add only when you’ll need them later (quotes, legal notes, editing clips)
Export format matrix (what to use when)
| Format | Best for | Why it works |
| TXT | Raw transcript | Small, clean, works everywhere |
| DOCX | Editing with others | Comments, track changes, easy formatting |
| Final sharing | Harder to edit, consistent layout | |
| Markdown | Notes and knowledge base | Great for headings, bullets, and search |
Share and keep it searchable
From your transcript view, use Share to send it to Files, Mail, or Notes, or paste into your team tool. Use a naming rule like: 2026-01-28_ClientName_Project_Topic so Spotlight and Files search find it fast.
For a meeting-focused workflow, see this guide on clean, searchable meeting transcripts.
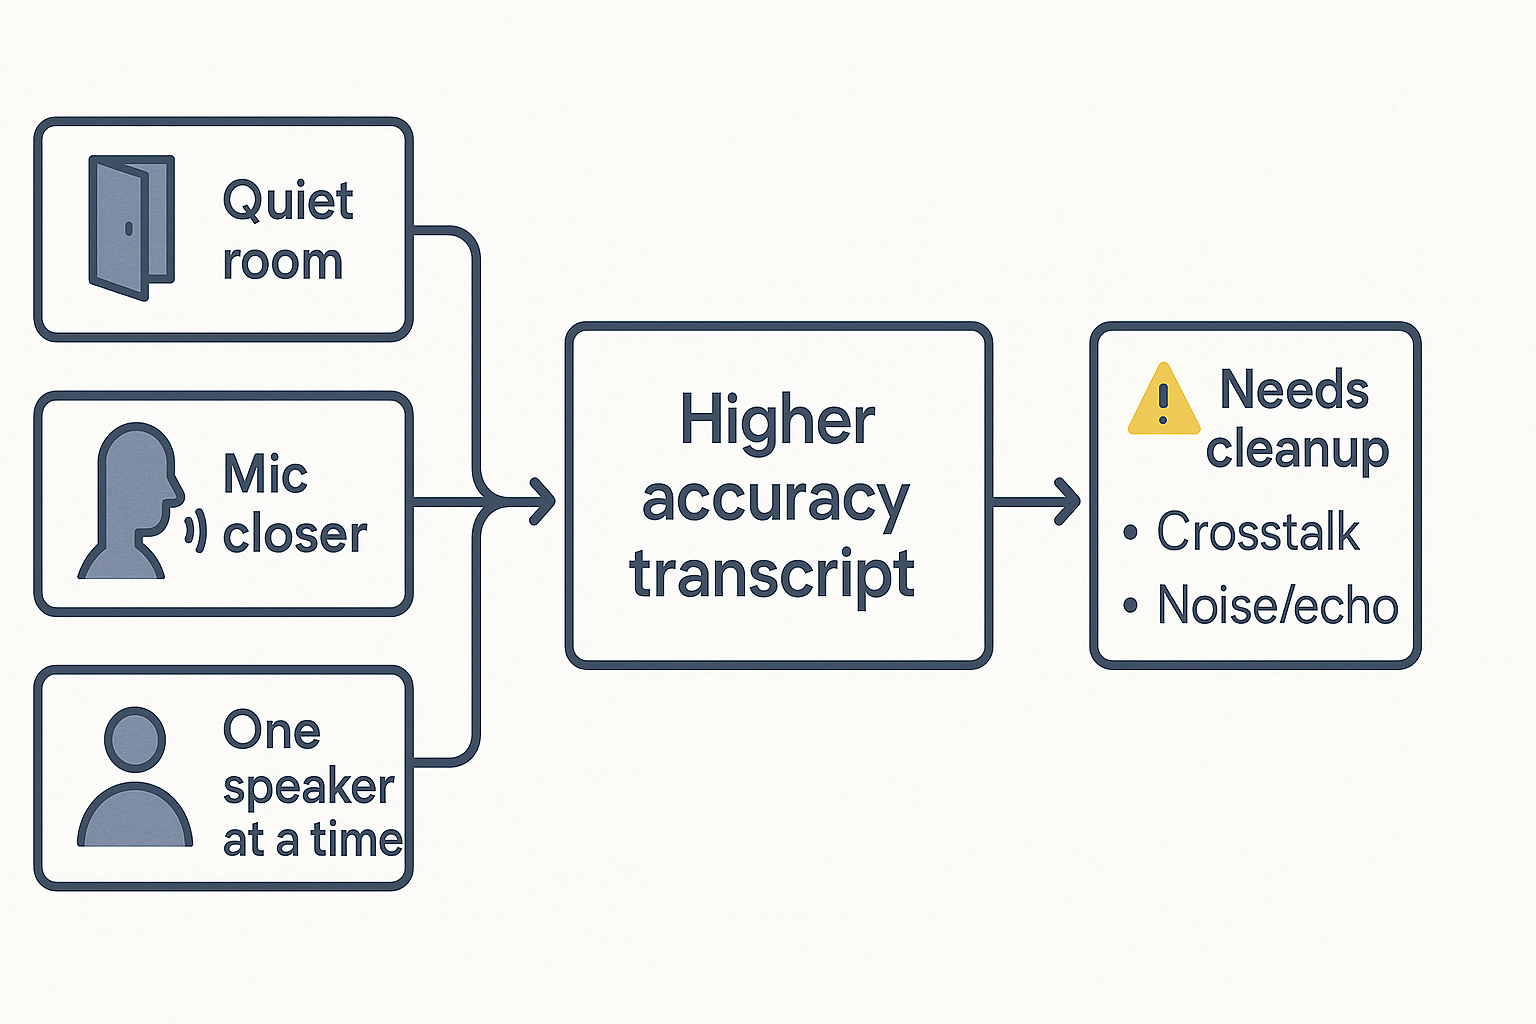
What affects transcription accuracy on iPhone recordings?
If you want to know how to transcribe audio to text on iPhone with fewer errors, start with the audio. Most “bad transcripts” come from noise, distance, echo, or people talking over each other.
Quick transcript-quality checklist
Before you record:
- Pick a quiet room and turn off fans and music.
- Keep the mic close, about a hand’s width away.
- Avoid echo, use soft spaces like curtains or a couch.
- Ask speakers to talk one at a time and pause between topics.
After you record:
- Skim the waveform or playback for peaks and muffled parts.
- Fix names and jargon first, then scan for missing sentences.
Common accuracy failure points (and what to do)
Accents and fast speech can blur words. Jargon and product names often get “autocorrected.” Crosstalk (overlap) makes dropped lines likely.
Multiple speakers are tough because phones record mixed audio. That’s why speaker labels often fail without separate mics.
Simple decision rule
If audio is clipped (crackly) or buried in noise, re-record. If it’s mostly clear, do a targeted cleanup pass: correct key terms, then search for repeated mistakes.
For longer interviews, use a repeatable interview transcription workflow so your review stays fast.
Privacy and security: is your iPhone transcription on-device or in the cloud?
When you transcribe audio to text on iPhone, the big privacy question is simple: where does the audio get processed? On-device transcription means your iPhone turns speech into text locally. Cloud transcription means some or all audio (or a copy of it) is sent to a server to be processed, then the text is sent back.
What changes when audio leaves your phone
If processing stays on your device, fewer parties can access the raw audio. But cloud tools can be faster, handle longer files, and often do better with accents or multiple speakers. The tradeoff is control: uploads create more points of risk, like account access, server storage, or sharing settings.
Safer habits for sensitive recordings
- Avoid public Wi Fi for uploads, use a trusted network.
- Don’t transcribe on a shared iPhone or shared Apple ID.
- Don’t send Voice Memos to unknown apps via the Share Sheet.
- Use strong passcodes and keep iOS updated.
Privacy claims worth checking in any app
Look for: encryption in transit and at rest, clear retention controls (how long audio and text are kept), and whether your content is used to train models. TicNote Cloud states data is private by default and not used to train AI models, which may fit teams who want searchable transcripts without giving up ownership.
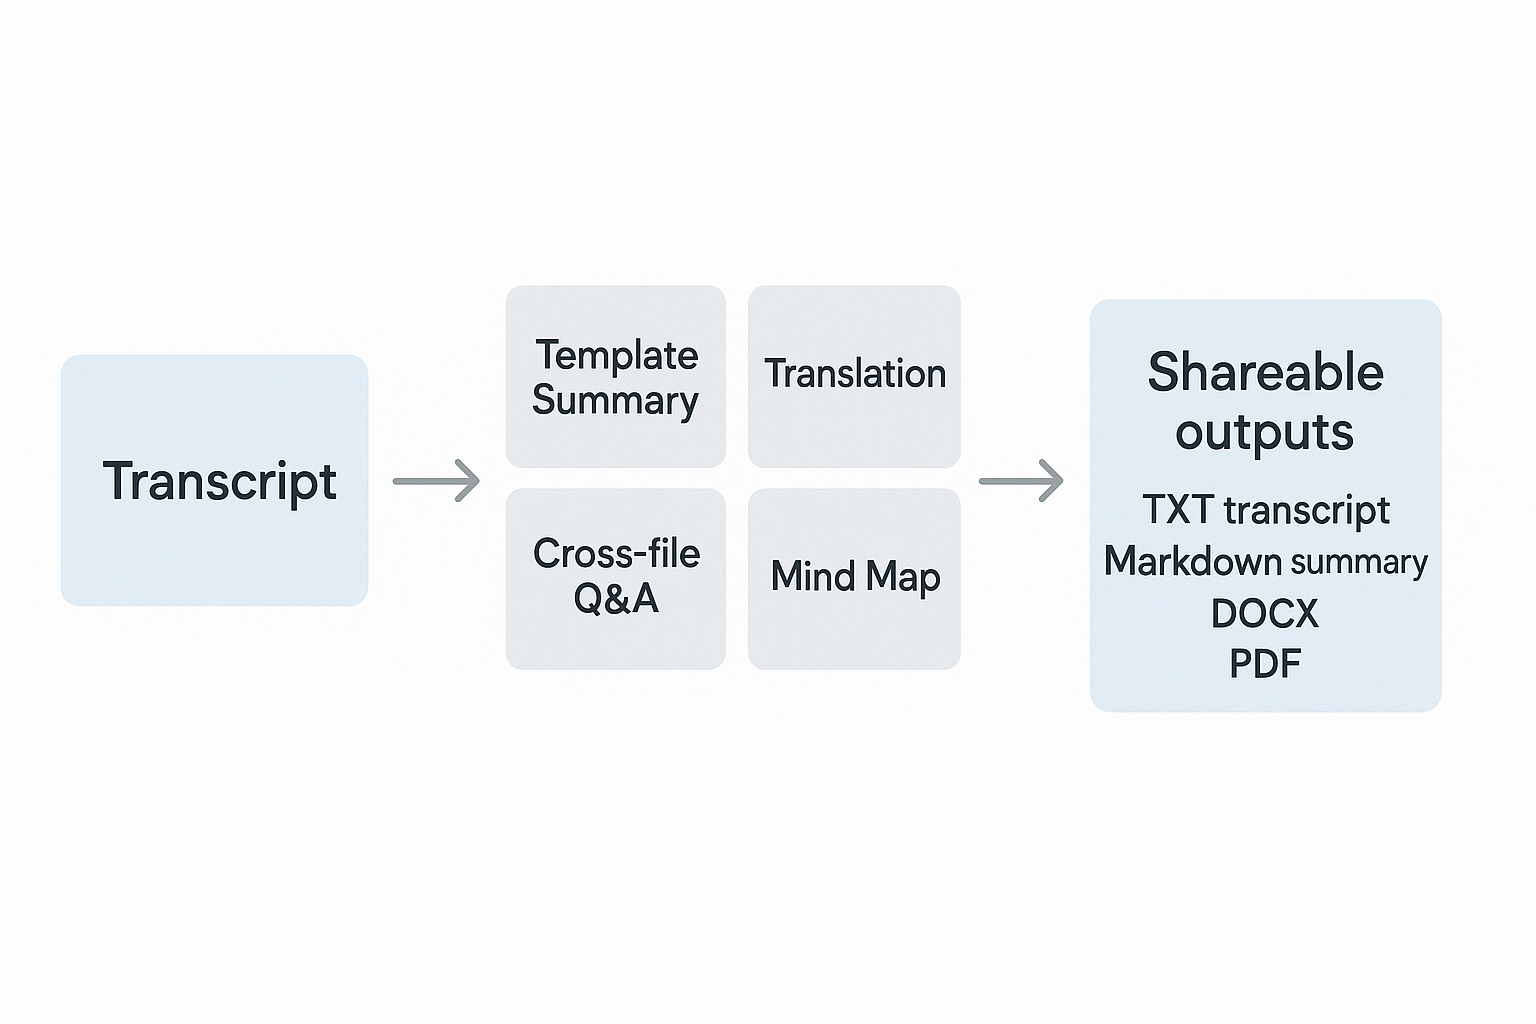
TicNote Cloud features that go beyond transcription (exclusive)
When you transcribe audio to text on iPhone, you still have work left. You need clean notes, clear next steps, and a way to find things later. TicNote Cloud helps you turn raw words into useful outputs you can reuse.
Turn long transcripts into meeting-ready notes
Instead of skimming a wall of text, you can turn a transcript into structured notes using templates. That’s useful when you handle client calls, lectures, standups, or 1:1s.
- Summary templates: pull out decisions, action items, owners, and follow-ups.
- Searchable projects: keep related recordings and notes in one workspace.
- Mind map view: scan big conversations fast, then drill in.
Translate for multilingual teams
Need to share the same notes across regions? TicNote Cloud can translate transcripts and summaries into 120+ languages. This helps when speakers switch languages, or when you need fast handoffs.
Ask questions across many recordings with Shadow
Once you have many voice notes, search gets painful. Shadow (the built-in AI chat) lets you ask questions across files, like “What did we decide about pricing?” or “List open action items from this week.” It answers based on your workspace, so you don’t have to re-open every file.
If you want to try it, you can sign up for TicNote Cloud for free and run your first transcript through templates, translation, and Shadow in one place.
Troubleshooting: why didn’t my iPhone audio transcribe?
If your audio won’t transcribe, it’s usually a share, file, format, or network issue. Use the quick fixes below to get from recording to text fast.
The Share or Upload option is missing
- Save the audio to Files first, then share from there.
- Long-press the file, tap Share, then scroll the Share Sheet to find your target app.
- Check permissions: Settings → your app → allow Microphone (for recording) and Speech Recognition (if the app uses it).
The file is too long or too large
- Trim dead air, then try again.
- Split the recording into parts (ex: 10 to 20 minutes each).
- If an app rejects the file on iPhone, try a desktop or web upload.
The format isn’t supported
- From Voice Memos, share or export as M4A.
- Avoid uncommon codecs or odd container types.
- If needed, convert first, see this guide on transcribing M4A files cleanly.
You’re offline or the connection is weak
- Some iPhone features can work on-device, but many tools need the cloud.
- Wait for stable Wi‑Fi or strong cellular, then re-run the job.
The transcript looks wrong
- Set the right language before you transcribe.
- Re-run with cleaner audio (closer mic, less noise).
- Do a quick edit pass: fix punctuation, names, and speaker turns.