TL;DR: What's the fastest AI workflow to repurpose a YouTube video into a podcast episode?
Use an AI workspace like TicNote Cloud to go from video upload to a clean transcript, tight audio edit plan, and publishable podcast assets fast. "Podcast-ready" means it stands alone without visuals, hits loudness targets, and includes notes and chapters, not just an auto-import.
Problem: Most YouTube audio breaks in podcast apps. It leans on visuals and has uneven levels. Solution: TicNote Cloud helps you spot visual-only gaps and turn the transcript into chapters and notes you can ship.
Best-fit videos: clear speech, low background music, minimal "as you can see" moments.
10-minute checklist: pick episode, export audio, transcribe, remove visual-only parts, tighten, set loudness, draft notes and chapters, upload to host, submit to directories. Human pass: names, sponsor reads, sensitive claims, and any links or resources mentioned.
How to Turn YouTube Videos into Podcasts with AI (start-to-finish workflow)
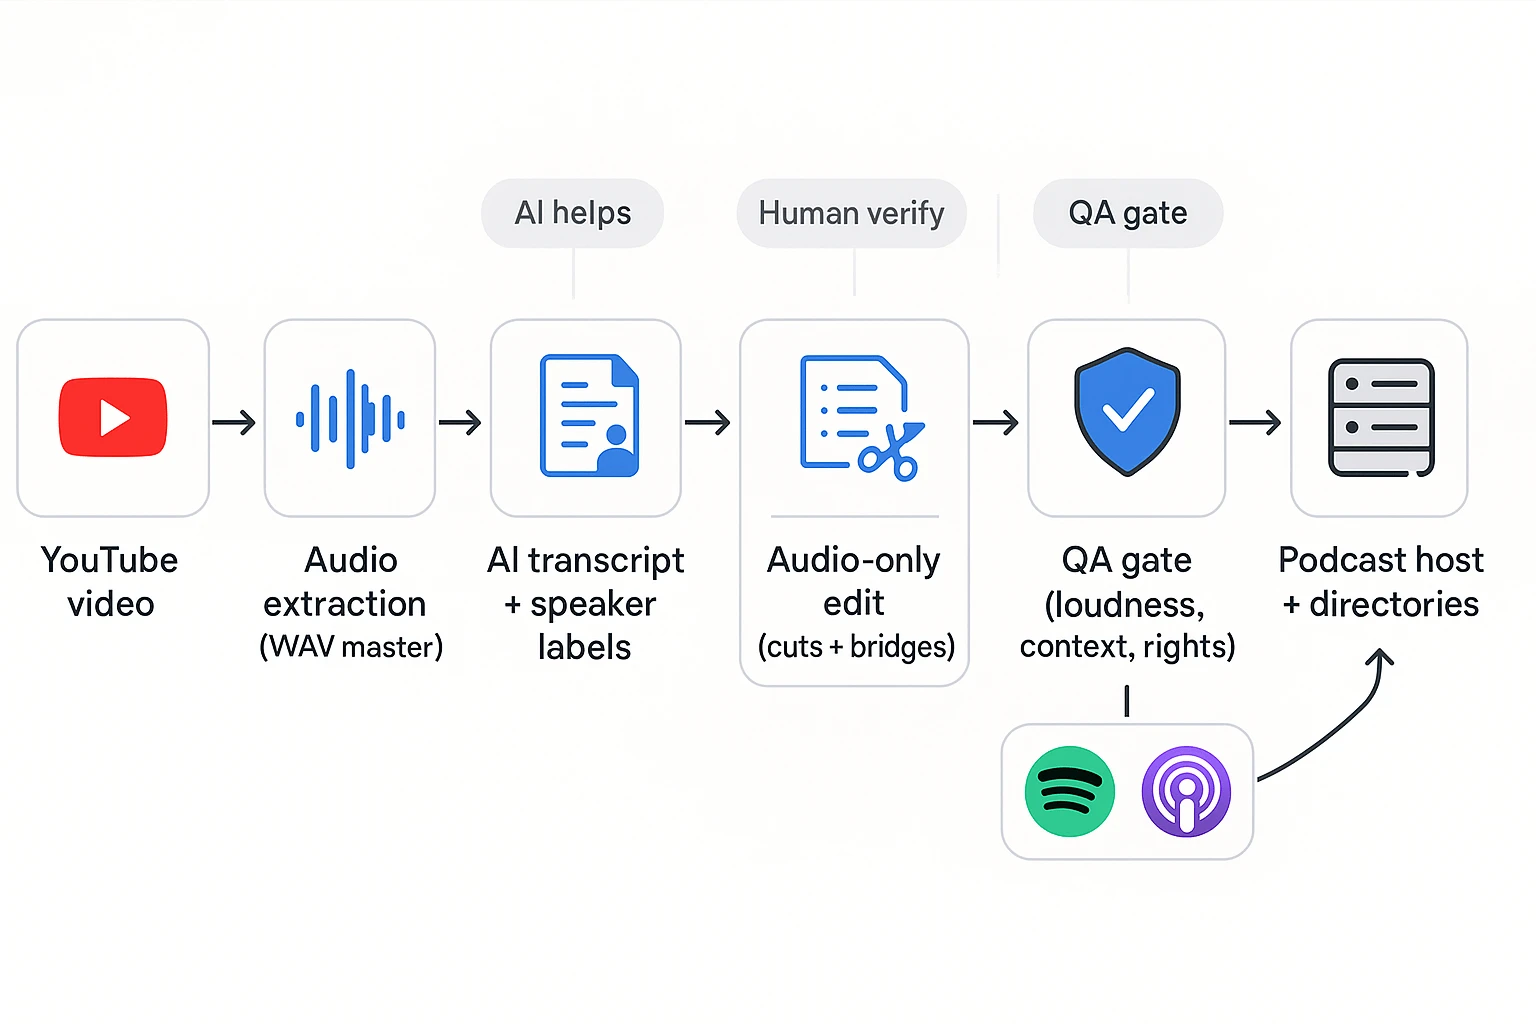
Your end goal is simple: a clean audio episode that makes sense without visuals, plus podcast metadata you can publish today. That means you need three outputs: (1) a high-quality master audio file, (2) an audio-first edit (cuts and short bridges), and (3) publish-ready text like a title, description, chapters, and show notes. AI can speed up the transcript, summaries, and structure, but a human should still verify meaning, flow, and rights.
Step 1: Pick the right YouTube episode and define the audio goal
Start by choosing what you're repurposing into audio. You have three common "repurpose targets":
- Full episode: minimal edits, best for talk-heavy videos.
- Edited audio cut: removes long pauses, visual demos, and tangents.
- Series feed: a consistent podcast format built from many videos.
Use this quick selection checklist before you invest time:
- The speech is clear and loud enough.
- The video has a simple structure (intro, points, wrap).
- It has few visual-only demos (screen shares, charts, "watch this").
- The mic sounds stable, not roomy or echoey.
- Background music is low or easy to remove.
Then set the listener promise. Write one sentence that answers: "What does the listener get in the first 30 seconds?" If you can't say it fast, the audio cut will likely feel slow.
Step 2: Extract audio safely (and keep a clean master)
Best case, use your original upload file. It's usually the cleanest audio you'll get. Next best is downloading your own video from YouTube Studio. Either way, you control quality and provenance.
Avoid third-party "rips" unless you must. They can downscale audio, add artifacts, and create account or rights risk.
For file choice, use WAV for editing (it's uncompressed and easier to process). Use MP3 for final distribution (smaller and standard for podcast feeds). You'll set exact export specs later, but this keeps your workflow clean.
Step 3: Use AI transcription to create an edit script
Before you touch audio, build a paper edit from text. Generate a transcript with:
- Speaker labels (so you know who said what)
- Timestamps (so you can jump to exact moments)
- A fast way to mark cuts and fixes
As you scan the transcript, tag three types of moments:
- Keep: core teaching, stories, clear Q and A.
- Cut: dead air, long resets, repeated points.
- Fix: visual-only lines ("as you can see") and missing context.
If you want a structured workflow beyond YouTube, you can follow a similar transcript to notes to chapters process for other content types too.
Step 4: AI-assisted cleanup (without making it sound robotic)
Now use AI to help you tighten, but keep a human ear on pacing. Aim for "clean and natural," not "perfect."
Focus your cleanup on:
- Shorten the intro. Keep the topic, who it's for, and why it matters.
- Remove "like and subscribe" blocks that don't serve podcast listeners.
- Reduce repeats and long run-ups to a point.
Then fix visual references. Replace them with simple audio context:
- "As you can see on the chart" becomes "Here's the pattern behind the numbers."
- "Watch me click this" becomes "The next step is to open settings and…"
Add short narrator bridges only where needed. One sentence is often enough to connect a cut or explain a missing visual.
Step 5: Generate chapters, titles, and show notes with AI
Once the audio plan is set, generate metadata from the transcript.
Chapters work best when they are:
- Clearly labeled with action words
- Consistent in style (same tense and format)
- Not spoilers (don't give away the punchline)
- Tied to real time ranges in the audio
For show notes, keep a repeatable structure:
- 2 to 3 sentence summary
- Key takeaways (3 to 7 bullets)
- Links and resources mentioned
- A simple CTA (subscribe, website, next episode)
For titles, create 3 to 5 options. Keep them keyword-aware, but written for humans. A good test is: "Would I click this in a podcast app?"
Step 6: Final human review and approval gate
Do one full listen-through before you publish. Your approval gate should catch issues that AI can miss:
- Clarity: no muffled sections or harsh volume jumps.
- Context: nothing depends on "seeing" the screen.
- Editing: no abrupt cuts mid-word or missing setups.
Run a quick compliance scan too:
- Music and SFX rights are clear.
- Guest permission matches your release terms.
- Any sensitive claims have a disclaimer where needed.
At the end, you should have a final audio file, show notes, chapters, and a title ready for your host.
Try TicNote Cloud for Free to turn a transcript into chapters and show notes faster.
What should you fix so the audio-only podcast doesn't feel confusing?
When you repurpose video into audio, your job shifts. You're now editing for ears, not eyes. The goal is simple: the story still makes sense with zero visuals. Do this well, and How to Turn YouTube Videos into Podcasts with AI feels like a real episode, not a ripped track.
Replace visual cues with one-sentence context
Video scripts lean on what's on screen. In audio, those lines become dead ends. Search your transcript for these common "visual-only" phrases:
- "As you can see"
- "On the screen"
- "Right here" or "This part"
- "I'll put it up"
- "Look at this chart"
- "I'm going to show you"
Rewrite pattern to use:
- Visual cue → one sentence that names the thing and why it matters.
Example: "As you can see, the retention drops here" → "Listener retention often drops after the intro, so tighten your first minute."
When should you re-record a line? If the missing visual changes the meaning (a chart, a step, a number). When can AI add a bridge? If you just need a short setup like "Next, we'll cover three fixes."
Cut YouTube-only calls to action and on-screen promo breaks
Remove anything that only works with a screen:
- "Smash like" and "comment below"
- End screens and "click the card"
- "Link on screen" or "QR code"
- Mid-roll visual promos ("watch this next video")
Keep CTAs that work in audio: "follow the show," "subscribe," and "check the links in the show notes." If you have sponsors, keep the segment, but label it clearly in audio ("Sponsor message") and return cleanly ("Back to the episode").
Move timestamps, links, and resources into show notes
Anything that was on-screen should become a link in the show notes. Use this simple split:
- Chapters: the major topics (what part of the talk you're in)
- Show notes: URLs, tools mentioned, files, and extra reading
Finish with two scannable blocks:
- What you'll learn: 3 short bullets.
- Resources: tool list and links in one place.
How do you create a podcast-ready audio file (settings + loudness targets)?
Podcast apps and listeners expect one thing: clear speech at a steady volume. When you repurpose video audio, your job is to make it "set-and-forget" for earbuds, cars, and smart speakers. Here's a good-enough workflow most creators can follow after you extract the audio in a "How to Turn YouTube Videos into Podcasts with AI" pipeline.
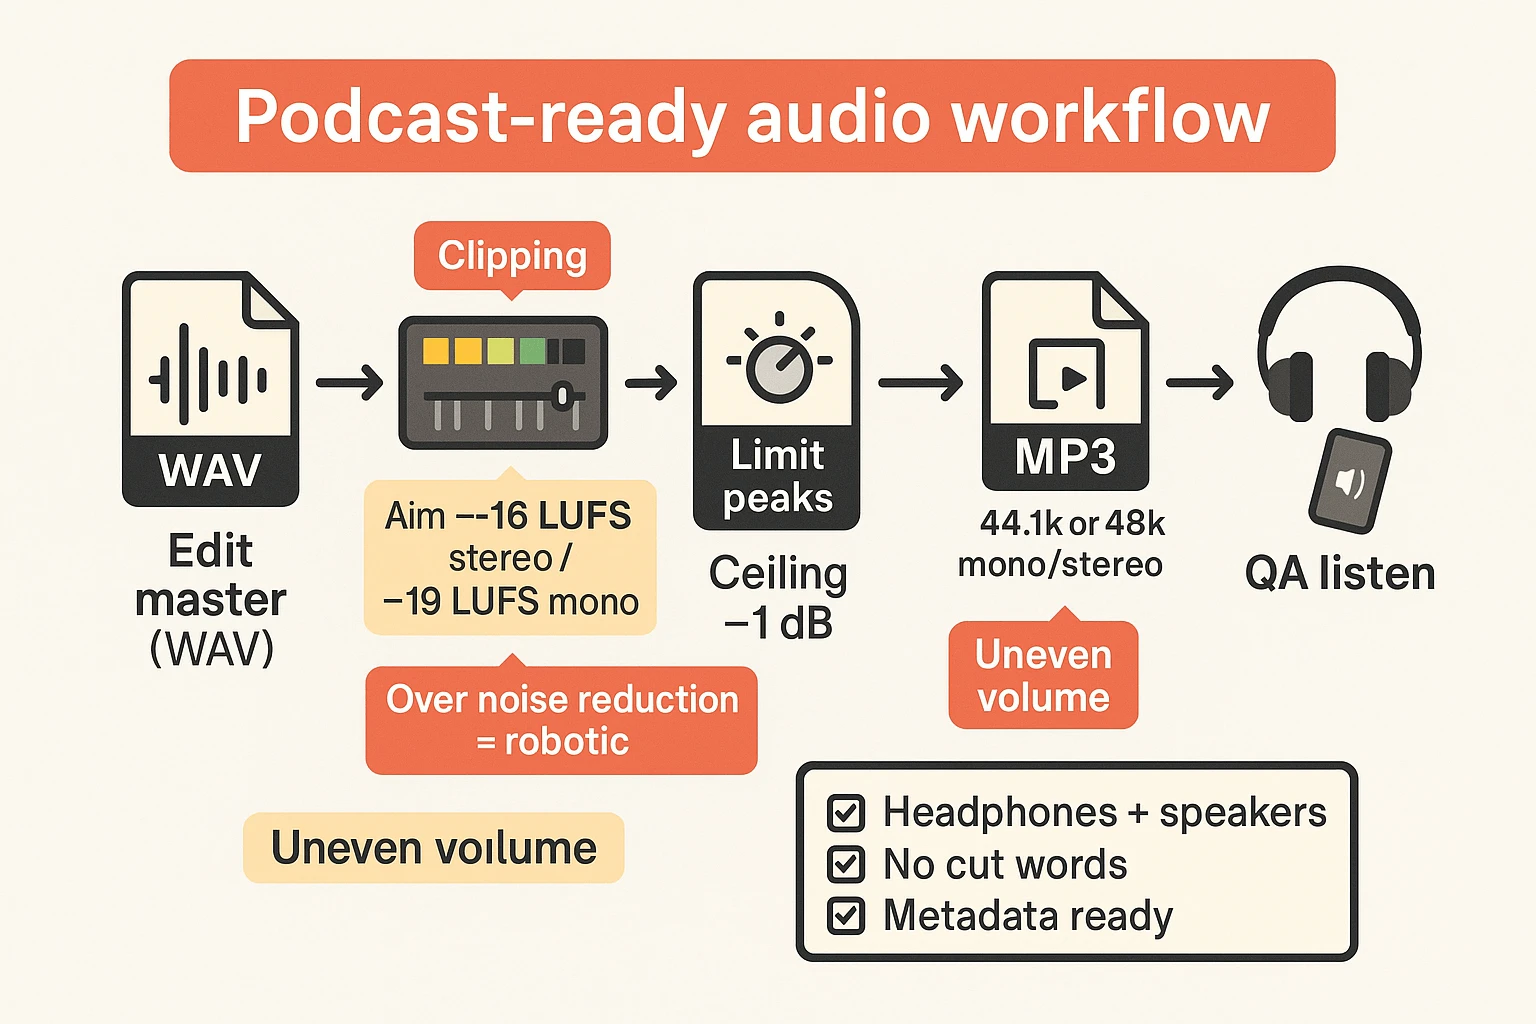
Pick simple export settings (master vs delivery)
Think in two files: one for editing, one for publishing.
- Editing master: Export or keep a WAV (lossless) master while you clean and edit. It holds up better if you run noise reduction or compression.
- Final delivery: Export a high-quality MP3 for upload in most podcast hosts.
- Mono vs stereo: If it's mostly voice, mono is fine and often smaller. If you use music beds or wide ambience, keep stereo.
- Sample rate: Stick with what your project started with (often 44.1 kHz or 48 kHz). Don't resample unless you must, since extra conversions can add small artifacts.
Normalize loudness (LUFS) and set safe peaks
LUFS is a loudness measure that matches how humans hear volume. "Integrated LUFS" means the average loudness over the whole episode.
Use these targets as a practical baseline:
- Integrated loudness: Aim for about -16 LUFS (stereo) or about -19 LUFS (mono) for spoken word.
- Peak ceiling: Set a true-peak or limiter ceiling around -1 dB to prevent clipping on playback.
- Be consistent: Save these as a preset so every episode lands in the same loudness range.
Reduce noise and level voice (but don't overdo it)
A little cleanup helps. Too much cleanup sounds fake.
- Noise reduction: Use it lightly. If the voice starts to sound watery or robotic, back off.
- Compression: Use gentle compression to tame jumps in volume. Avoid "pumping" where room noise swells between words.
- De-ess (if needed): If "S" sounds sting, a light de-esser helps. Keep it natural, not lisped.
Add intro, outro, and sponsor markers cleanly
Intros are useful, but they shouldn't scare listeners with a volume spike.
- Keep the intro short and match its loudness to the main voice.
- Fade music in and out. Don't hard-cut loud tracks.
- If you have sponsors, add clear transitions and markers so the break feels planned, not accidental.
Final QA checklist before you publish
Do this once, every time:
- Listen on headphones and phone speakers (you'll catch different issues).
- Trim dead air, but don't cut breaths so tight that words feel clipped.
- Check for cut-off words at edits and chapter transitions.
- Confirm metadata: episode title, episode number, show name, credits, and the explicit flag.
What are the legal and rights checks before republishing YouTube audio as a podcast?
Before you republish, run a quick rights check. This isn't legal advice. It's a practical checklist to lower takedown risk when you learn how to turn YouTube videos into podcasts with AI.
Music, sound effects, and Content ID risks
"Allowed on YouTube" doesn't mean "licensed for podcasts." YouTube may let a track stay up with ads. A podcast feed can still get a claim.
Check your audio for:
- Intro music, stings, and background beds
- Sound effects pulled from packs
- Clips from other creators, shows, or news
If you find copyrighted pieces, pick one fix:
- Replace the music with a properly licensed track (podcast use, not just YouTube use)
- Remove the segment completely
- Re-record the section with clean audio
Guest releases and permissions (especially for interviews)
If someone else is in the episode, confirm you can redistribute the audio-only version. Do this even if they agreed to the YouTube upload.
Confirm in writing:
- They consent to podcast distribution (RSS, Spotify, Apple)
- Who owns the final recording if it was co-produced
- Any limits on ads, sponsors, or clipping
Also flag sensitive topics. If there's health, finance, or legal talk, consider a short spoken disclaimer.
Platform terms: what to review in YouTube and your host
Read the platform rules like a checklist. For YouTube, note that the YouTube Terms of Service state: "Apart from the exceptions allowed by law, no part of the Service or any Content may be copied, reproduced, distributed, transmitted, broadcast, displayed, sold, licensed, altered, modified or otherwise used for any other purposes whatsoever without the prior written consent of YouTube and, where applicable, the respective licensors of the Content."
Then check your podcast host rules for:
- Music licensing requirements
- Prohibited content and trademark use
- DMCA or takedown steps (and how they notify you)
When to re-record a disclaimer or remove a segment
If the video relies on visuals, fix it before you publish. If the episode includes unverified claims, remove them or add a clear correction.
Use this pre-publish "rights checklist" each time:
- Do I own or license every sound in the file?
- Do guests consent to podcast redistribution?
- Do I have releases for clips, quotes, and brand assets?
- Does the audio include needed disclaimers?
- Can I document sources and edits if challenged?
Which publishing route should you use: podcast host sync, RSS, or manual uploads?
After you turn a video into audio, publishing is the next fork. The best route depends on one tradeoff: speed vs control. Here's a simple way to choose when you learn How to Turn YouTube Videos into Podcasts with AI.
Quick decision matrix (speed, control, quality)
| Route | Speed | Control | Quality risk | Best for |
| Host sync or auto import | Fastest | Low | Medium | Back catalog or simple shows |
| RSS first workflow | Fast | Medium | Low | Most creators who want stability |
| Manual uploads | Slowest | Highest | Lowest | Flagship episodes and rebrands |
What can break with auto import
Auto import is great until it isn't. Common issues include:
- Wrong episode order from playlist sorting.
- Episode numbers that don't match your show.
- Missing show notes or chapters.
- Wrong artwork, title casing, or explicit flag.
- Audio that sounds worse after re-encoding.
If your show depends on clean chapters and notes, these misses add up.
How to troubleshoot sync failures (before you give up)
Use this quick checklist:
- Confirm the exact source playlist or feed. Make sure it's public.
- Check permissions on the channel, host, and any connected accounts.
- Use clear file names and consistent episode titles.
- Look up the refresh interval and wait a full cycle.
- Scan for duplicates and delete only after you confirm the new item is stable.
Still messy? Switch to manual uploads for a few key episodes. It's often the fastest fix.
Keep one "single source of truth" for metadata
Pick one place where titles, episode numbers, descriptions, and explicit status live. Then copy from there into your host, YouTube, and any tools you use. This prevents "metadata drift" where each platform ends up with a slightly different version.
If you want a clean baseline before you publish, use this minimal vs pro podcast launch plan to match your route to your goals and time.
How do you publish and distribute to Spotify and Apple Podcasts (without missing specs)?
After you turn a video into audio, publishing is mostly metadata work. The goal is simple: don't get rejected, and don't confuse listeners. Whether you host the show yourself or use a podcast host, treat Spotify and Apple as strict directories with clear rules.
Nail the basics first: artwork, name, and categories
Before you submit anything, lock these in:
- Artwork: Use a square image, high contrast, and large text. Keep it readable at phone size. Avoid tiny words, thin fonts, or clutter.
- Show name: Keep it short and clear. Don't stuff keywords. If it reads like spam, it can hurt trust.
- Categories: Pick categories that match the promise. If your episodes teach, "Education" fits. If they're interviews about startups, try "Business."
Submit to Apple Podcasts: prevent the common rejections
Apple usually rejects shows for feed errors, not content quality. Do these checks before you click submit:
- Validate your RSS: Make sure the feed loads, links work, and your episode audio URLs resolve.
- Required fields: Confirm show title, description, author, language, and artwork are present.
- Explicit flag: Set it correctly at the show level and episode level. A mismatch is a fast way to get blocked.
- Audio format sanity check: Episodes should be playable and not behind logins.
If you get approved, edits don't always show up right away. Give changes time to propagate across the directory.
Submit to Spotify: claim ownership and clean episode metadata
For Spotify, you'll typically submit and manage the show inside Spotify for Creators. The key steps are about ownership and avoiding duplicates:
- Claim the show: Verify you control the RSS feed and email tied to it.
- Episode metadata: Keep titles human. Put the "why listen" in the first line of the description. Use season and episode numbers only if you'll stay consistent.
- Avoid duplicates: If you're moving hosts, don't submit a second feed with the same show. Migrations create duplicate listings and split analytics.
Track the right signals after launch
In the first 2 to 4 weeks, watch:
- Listeners and downloads: A baseline for future comparisons.
- Completion rate: Low completion often means the intro is too long or the audio is hard to follow.
- Link clicks: Add UTM tags to links in show notes so marketing can track results.
One small habit helps a lot: keep episode naming consistent so reporting stays clean.
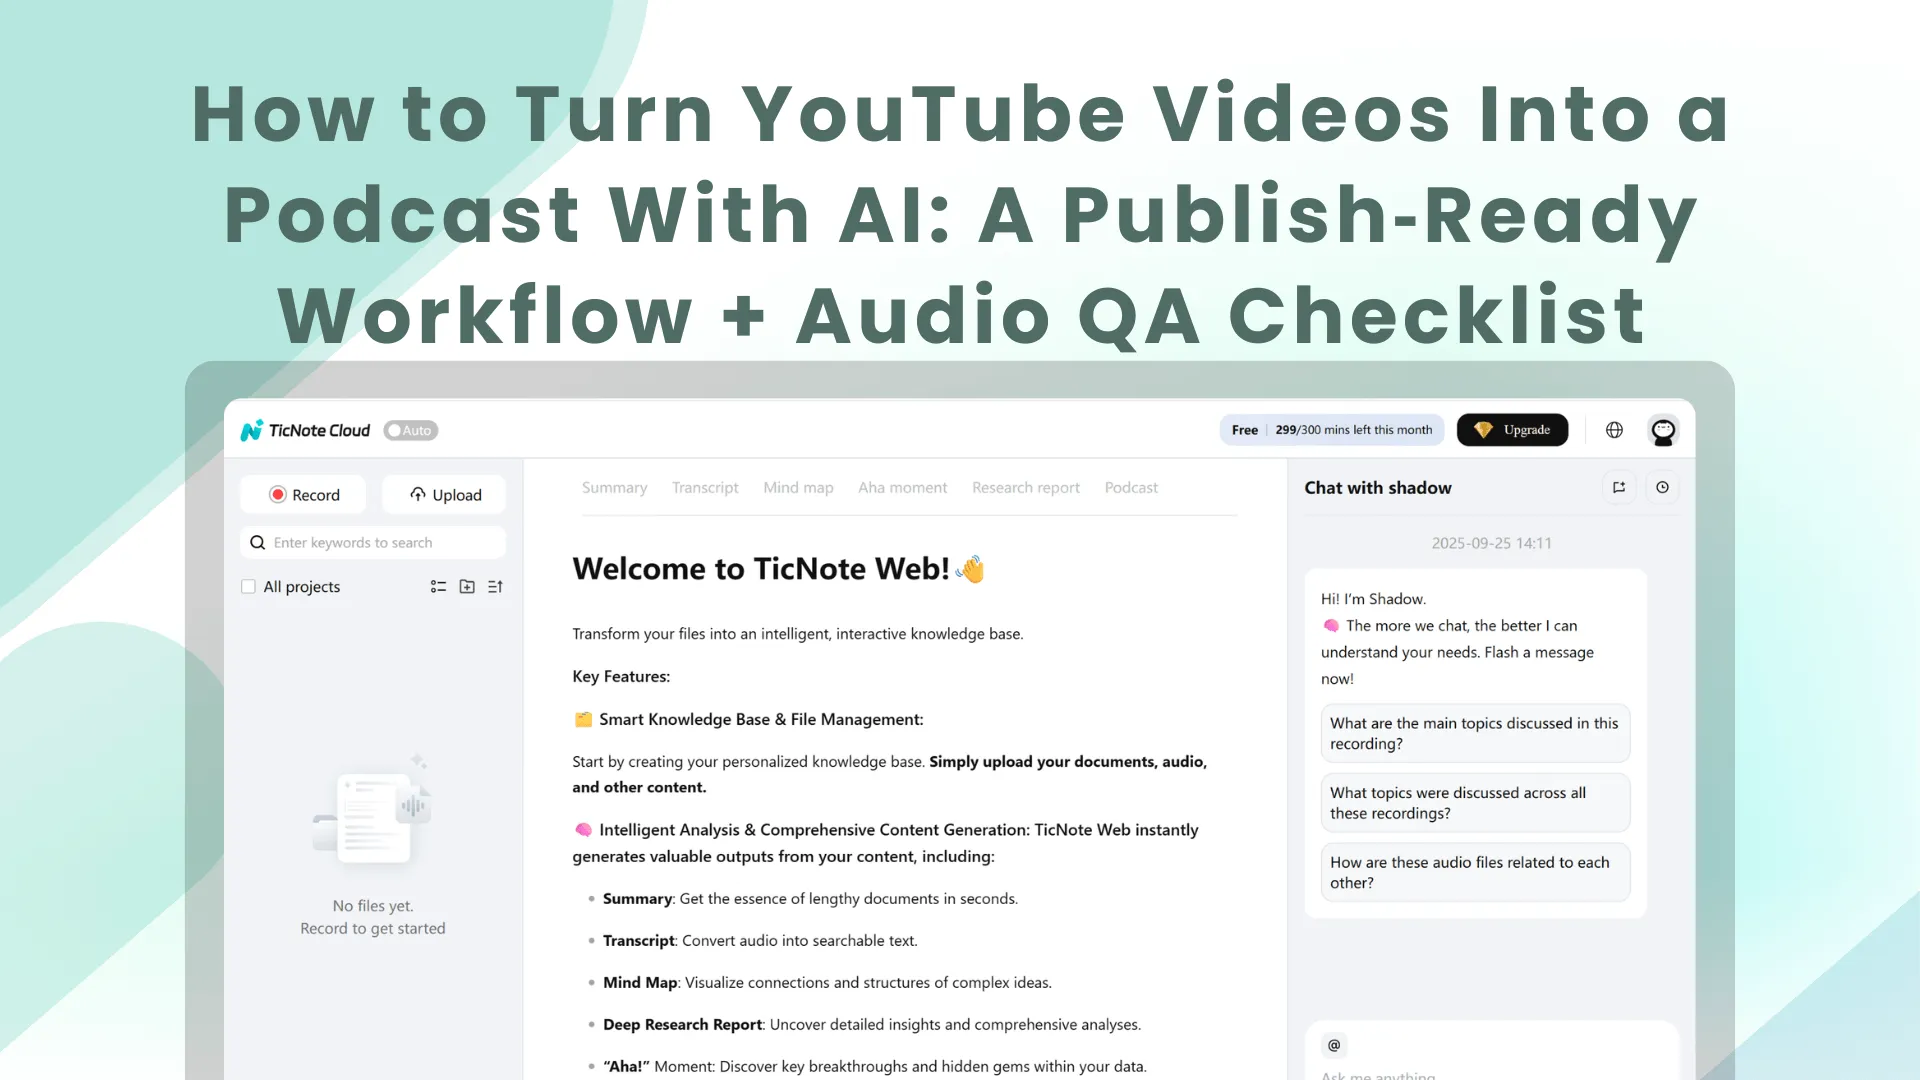
How to run the transcript → notes → chapters workflow (example using TicNote Cloud)
We'll demonstrate the steps using TicNote Cloud as an example tool. You can apply the same logic in other tools. The goal is simple: turn one YouTube file into a clean transcript, structured notes, clear chapters, and export files you can drop into your edit and publish pipeline.
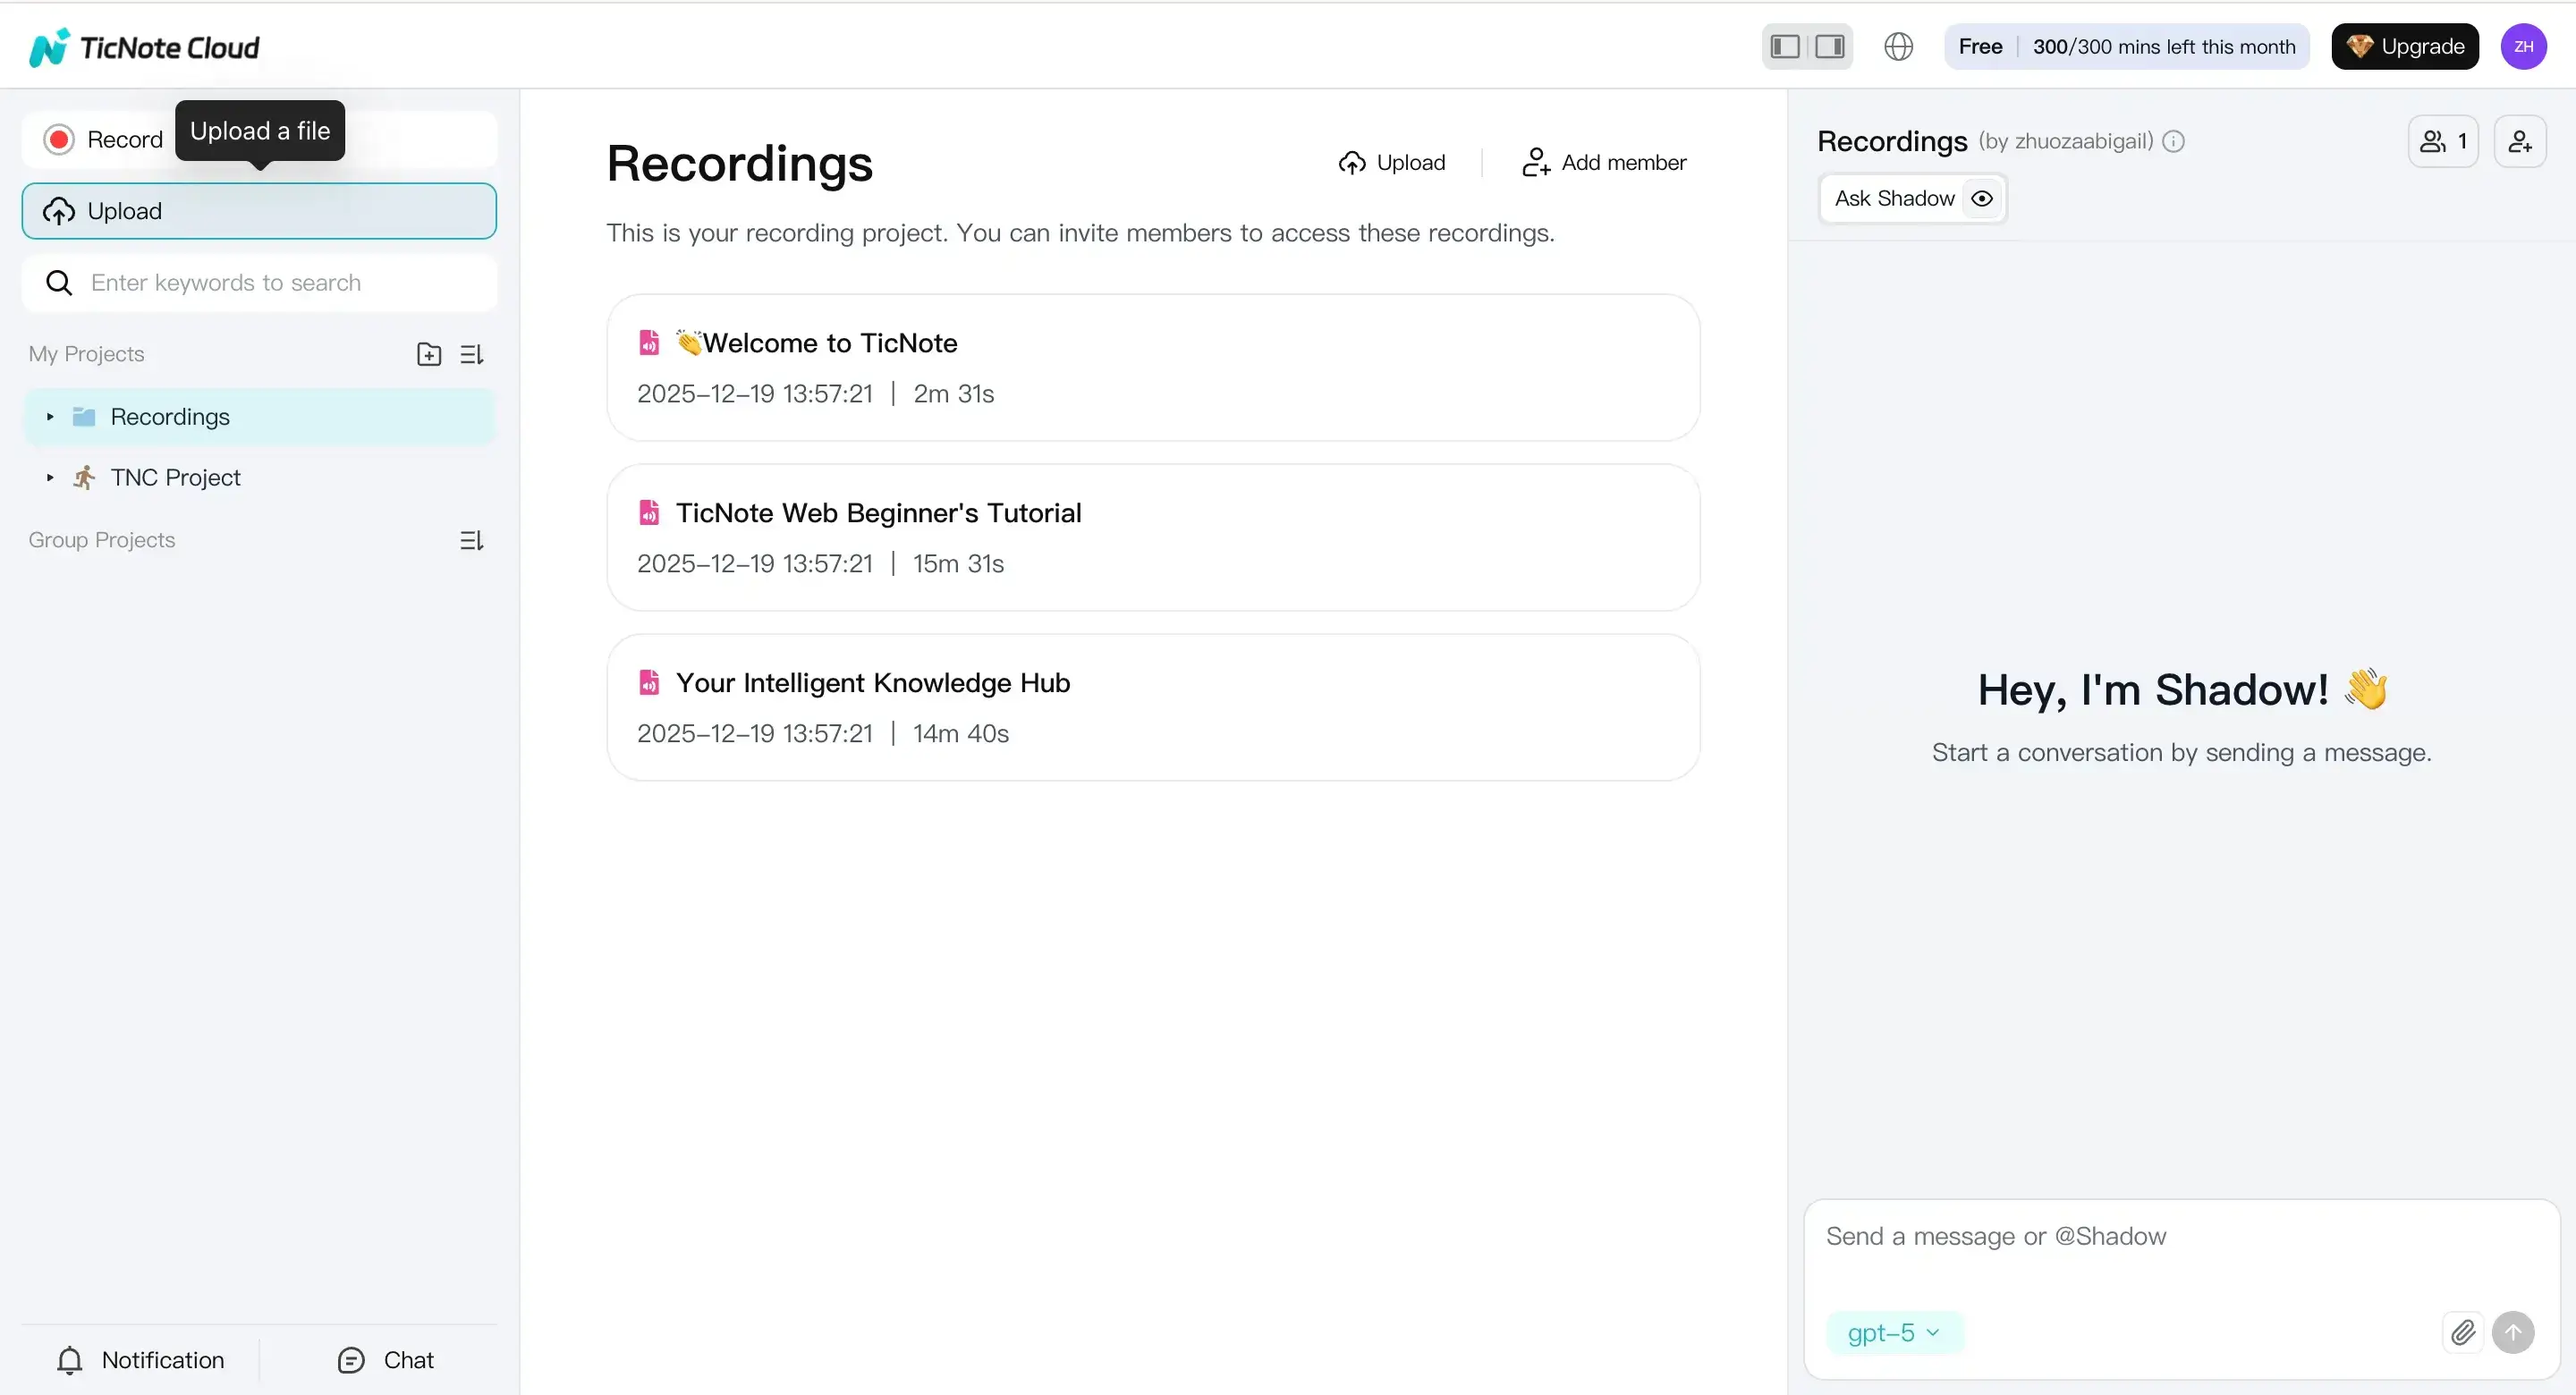
Web Studio: upload once, export all episode assets
- Upload your source file and keep it organized
Start by creating a new project for the episode, then upload your source file. TicNote Cloud supports common inputs like audio and video files, plus documents such as PDF and Word. Name the project and file using a consistent pattern (for example: "ShowName E12 Topic Raw"). It saves time later when you're tracking edits and versions.
- Generate the transcript, then build podcast assets
Once the file is processed, generate your transcript first. Then use it to produce podcast-ready outputs you can publish fast:
- Show notes summary: a tight overview for your episode page and RSS description.
- Chapters: clear segment titles and timestamps (great for Spotify, Apple, and YouTube chapters).
- Title ideas: a short list you can test against your SEO goals.
- Translation (optional): translate the summary if you publish in more than one language.
- Mind map (optional): a quick way to see the episode structure and spot missing context.
To get the podcast view and export options, open the Podcast area for the file and export what you need.
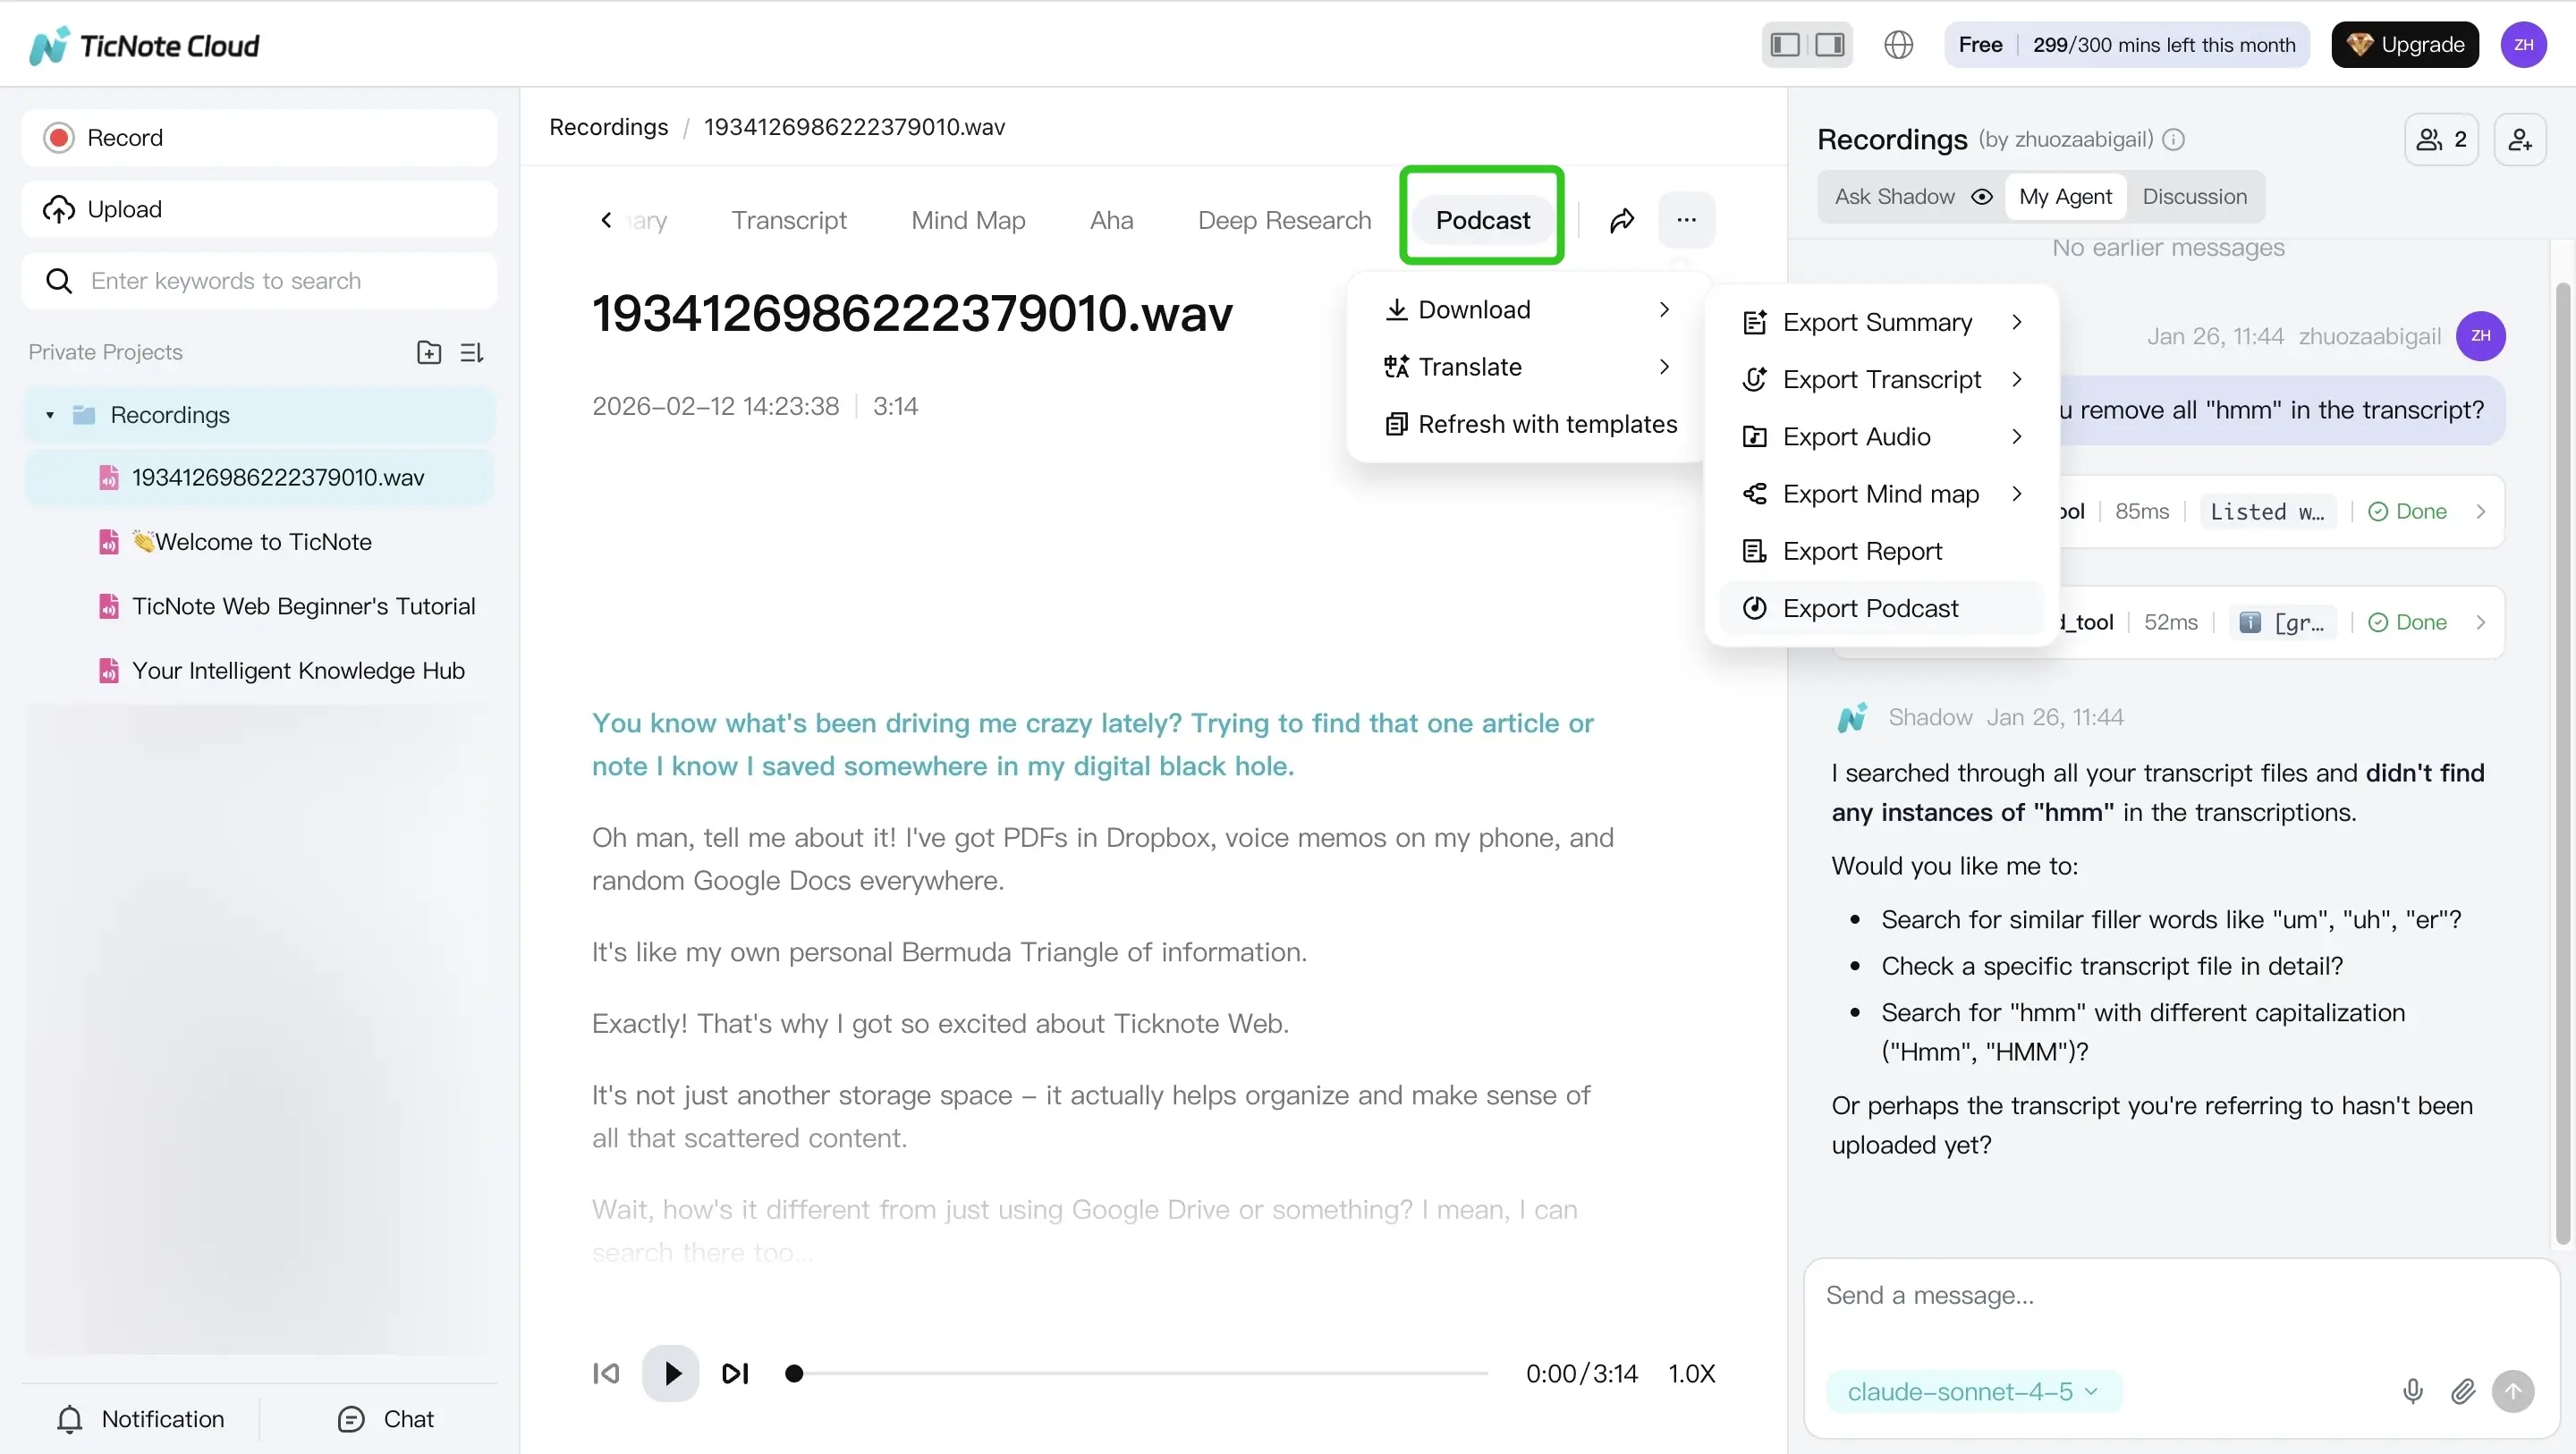
Here's how the exports typically fit your pipeline:
- Transcript (TXT): use it for editing, caption cleanup, and episode pages.
- Notes (Markdown, DOCX, PDF): use Markdown for web publishing, DOCX for editing with a team, and PDF for approvals.
- Audio (WAV): use it as the source for your DAW editor (where you'll set loudness and final delivery specs).
If you're also repurposing non-video sources, this same workflow works well for docs too. For example, you can adapt it when you turn a PDF into a podcast and still end up with the same publishable assets.
Mobile app: quick uploads and exports when you're away from your desk
- Upload a file into the same episode project
On mobile, tap the add button to upload your file into a project. Keep the same project naming as your web workflow so everything stays grouped by episode.
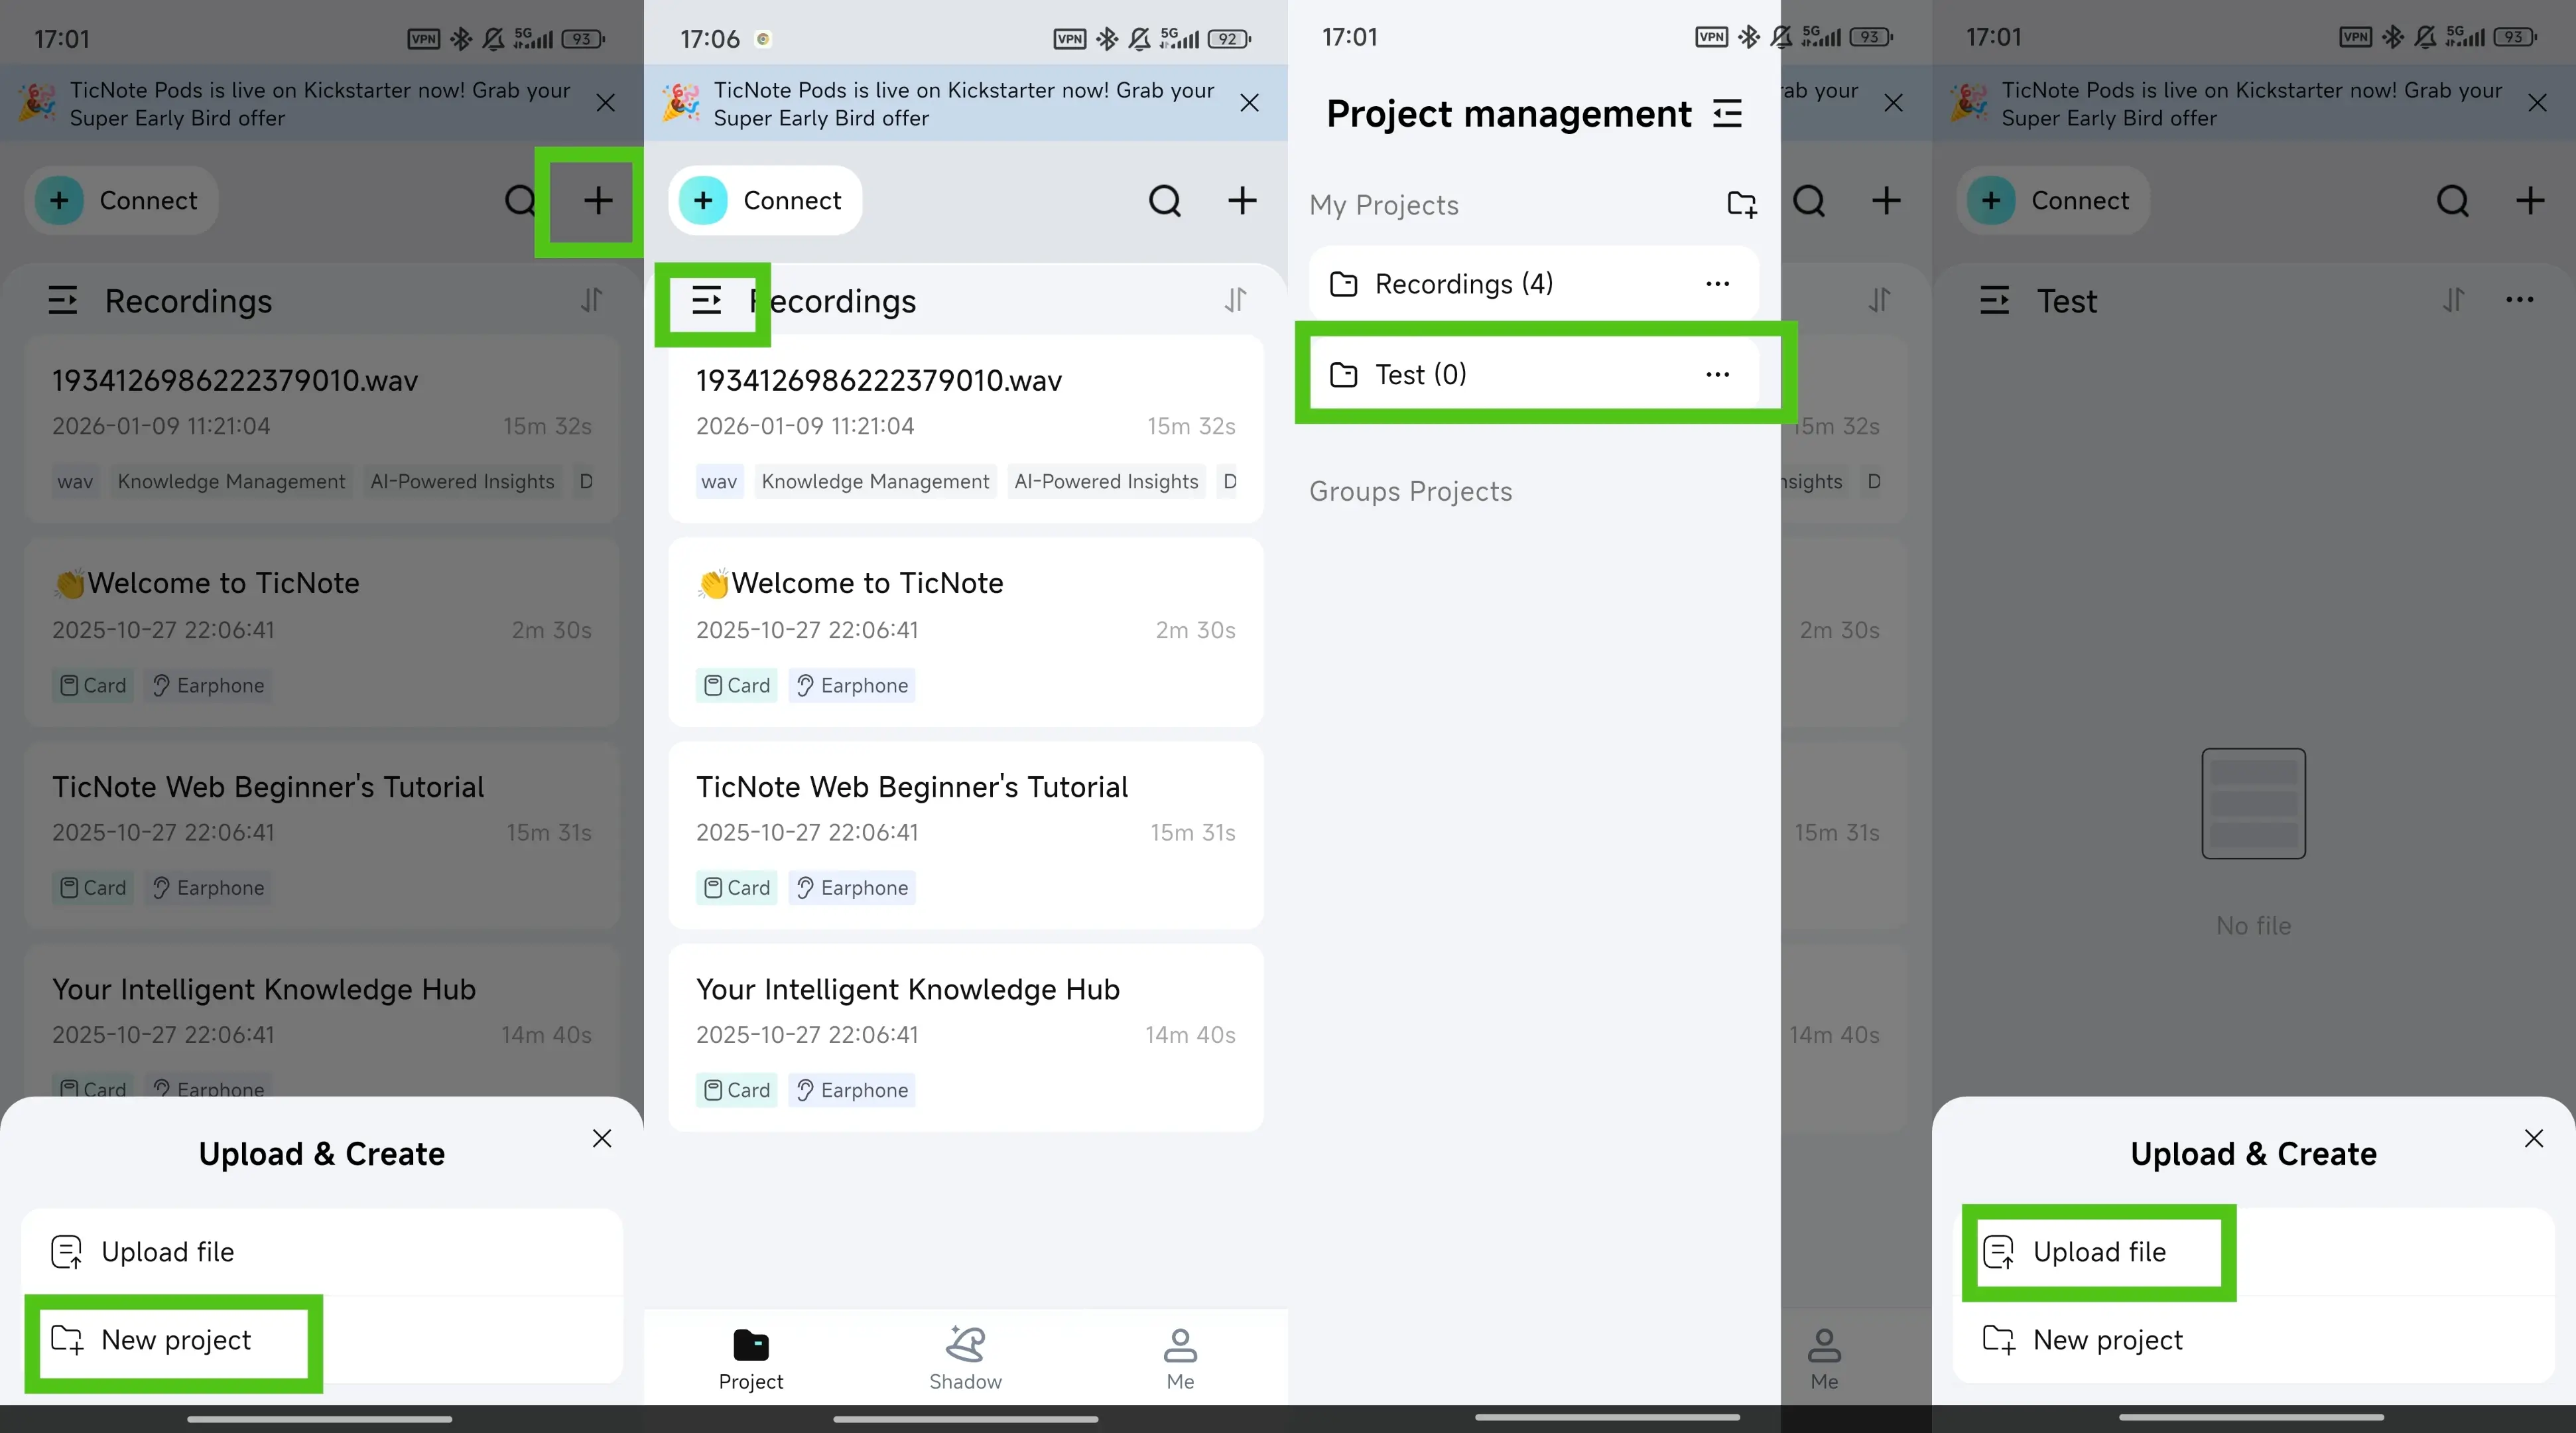
- Generate and export your podcast assets
Open the Podcast tab to export the generated podcast. Do a fast review of the transcript and notes before you share them to your editor or publishing workflow.

Quick human review checklist (don't skip this)
Before you publish, do a short pass inside your transcript and notes workflow:
- Fix names, brands, and acronyms (AI often misses these).
- Remove or rewrite visual-only references (for example: "as you can see here").
- Verify links and calls to action in show notes are correct.
- Confirm final loudness and audio specs are handled in your audio editor or DAW, not in the note tool.
What's exclusive to TicNote Cloud for podcast repurposing (and hard to replace)?
When you turn YouTube videos into podcasts with AI, most tools can transcribe. The real gap is what happens after: keeping a series consistent, fixing assets fast, and handling sensitive audio with care. Here are three capabilities that are hard to swap out once your back catalog grows.
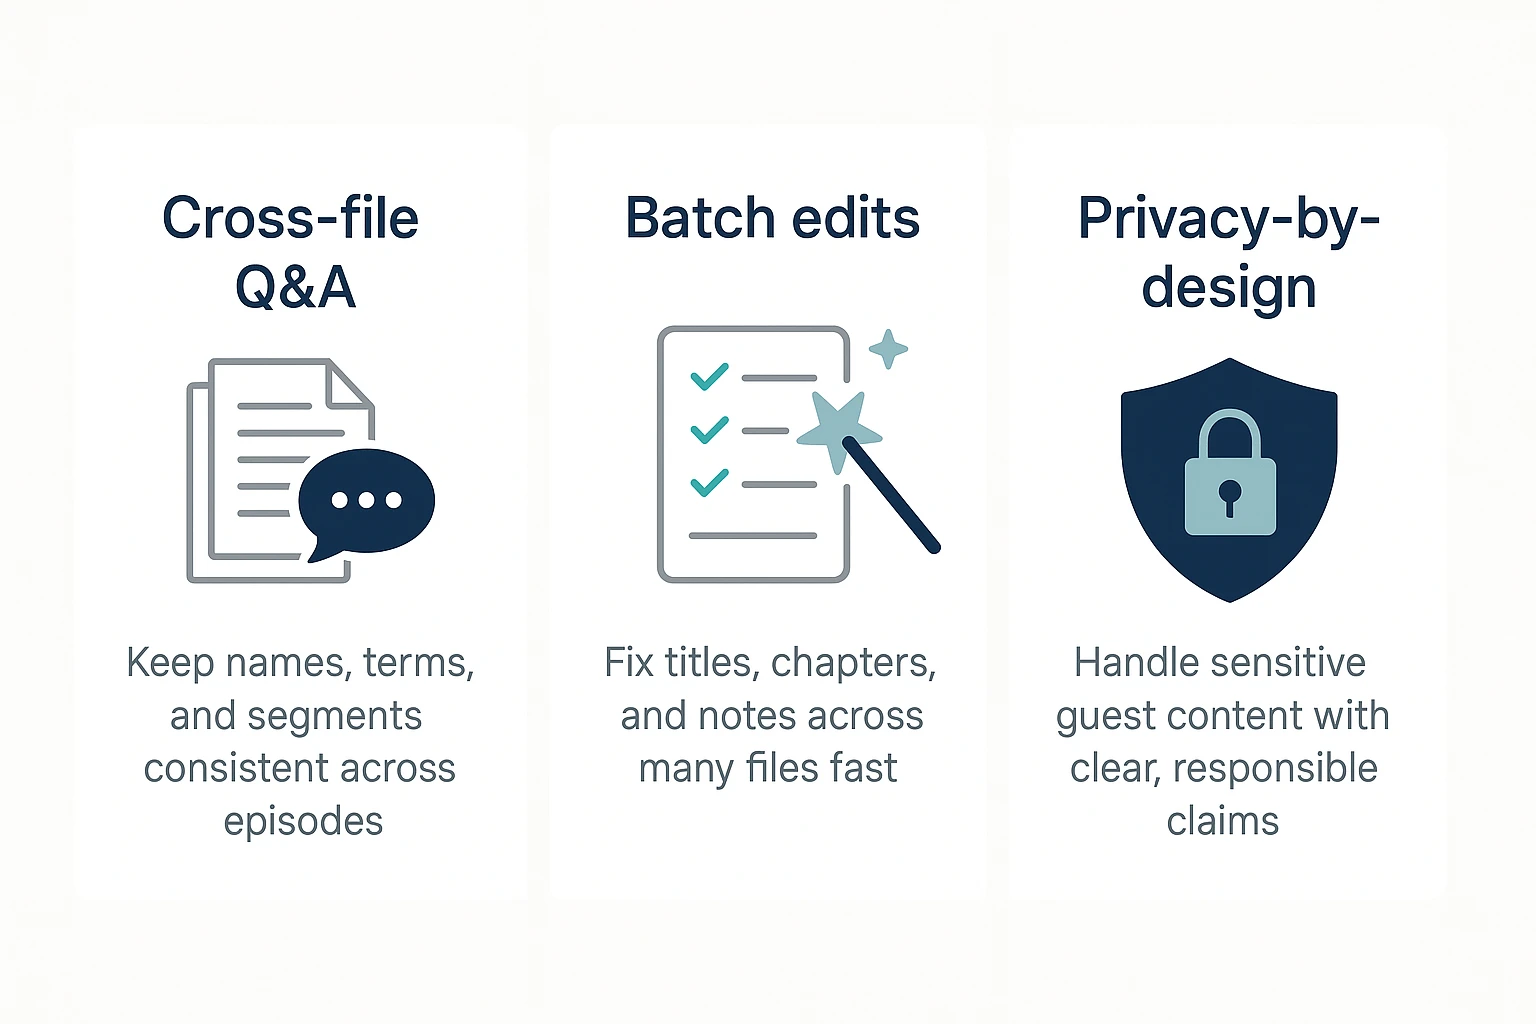
Cross-file Q&A to keep your series consistent
If you publish weekly, drift creeps in. Segment names change. Guest names get misspelled. Your "standard intro" becomes three different versions.
Cross-file Q&A solves that by letting you ask questions across multiple episodes in one workspace, like:
- "What do we call the mid-roll segment in the last 10 episodes?"
- "How do we spell the guest's name in every show note?"
- "Which CTA line did we use most often?"
That kind of cross-episode memory helps keep your titles, chapters, and show notes aligned.
Shadow Agent file edits for batch fixes
Repurposing is messy because the same detail shows up everywhere. A guest's name can appear in the title, description, chapter labels, and summary.
Batch edits are the difference between a quick cleanup and an hour of manual work:
- Fix a name spelling once, then apply it across files in a project
- Standardize chapter formatting (same timestamp style, same label style)
- Normalize recurring parts like "Intro", "Main takeaway", and "Next steps"
Privacy-by-design you can explain to guests
For creator workflows, "privacy" needs plain language. What you can responsibly say is that TicNote Cloud is private by default and your data is not used to train AI models. What you should not say is that it is "100% secure" or "fully compliant" without a formal review.
If you record clients or sensitive guests, keep it simple:
- Get clear permission to republish audio
- Avoid uploading raw files you do not have rights to share
- Store and label sensitive episodes in a dedicated project