

TL;DR: A simple AI podcast workflow from text to published episode
To turn text into a podcast fast, you can sign up for TicNote Cloud, import your doc, generate narration, then do a quick listen and publish via your podcast host RSS feed. It's the simplest way to handle how to turn text into a podcast with AI without building a full studio setup.
You've got content, but turning it into an episode still takes time. If you skip the script edit or audio check, it can sound rough and lose listeners. A tool like TicNote Cloud helps you move from docs and transcripts to usable audio and notes in one place.
- The 6-step checklist: text to script to voice to mix to export to publish
- Pick source text: choose one clean blog, doc, or transcript.
- Adapt to spoken script: shorten lines and add pauses.
- Generate AI narration: create a natural voice track.
- Do light mixing: fix volume, noise, and spacing.
- Export final audio: save a podcast-ready file.
- Publish via hosting: upload to a host that makes RSS.
- What you need (text, cover art, hosting, and 30 minutes)
- A clean source doc
- An episode title
- Cover artwork
- A podcast host with an RSS feed
- A quiet 30-minute block for edits and QA
- When AI narration is a good fit (and when it isn't)
- Good fit: blog or newsletter repurposing, internal updates, multilingual versions, steady weekly cadence.
- Not ideal: personal stories, sensitive topics, or brands built on human authenticity. Try hybrid: record a human intro, keep the AI for the main body.
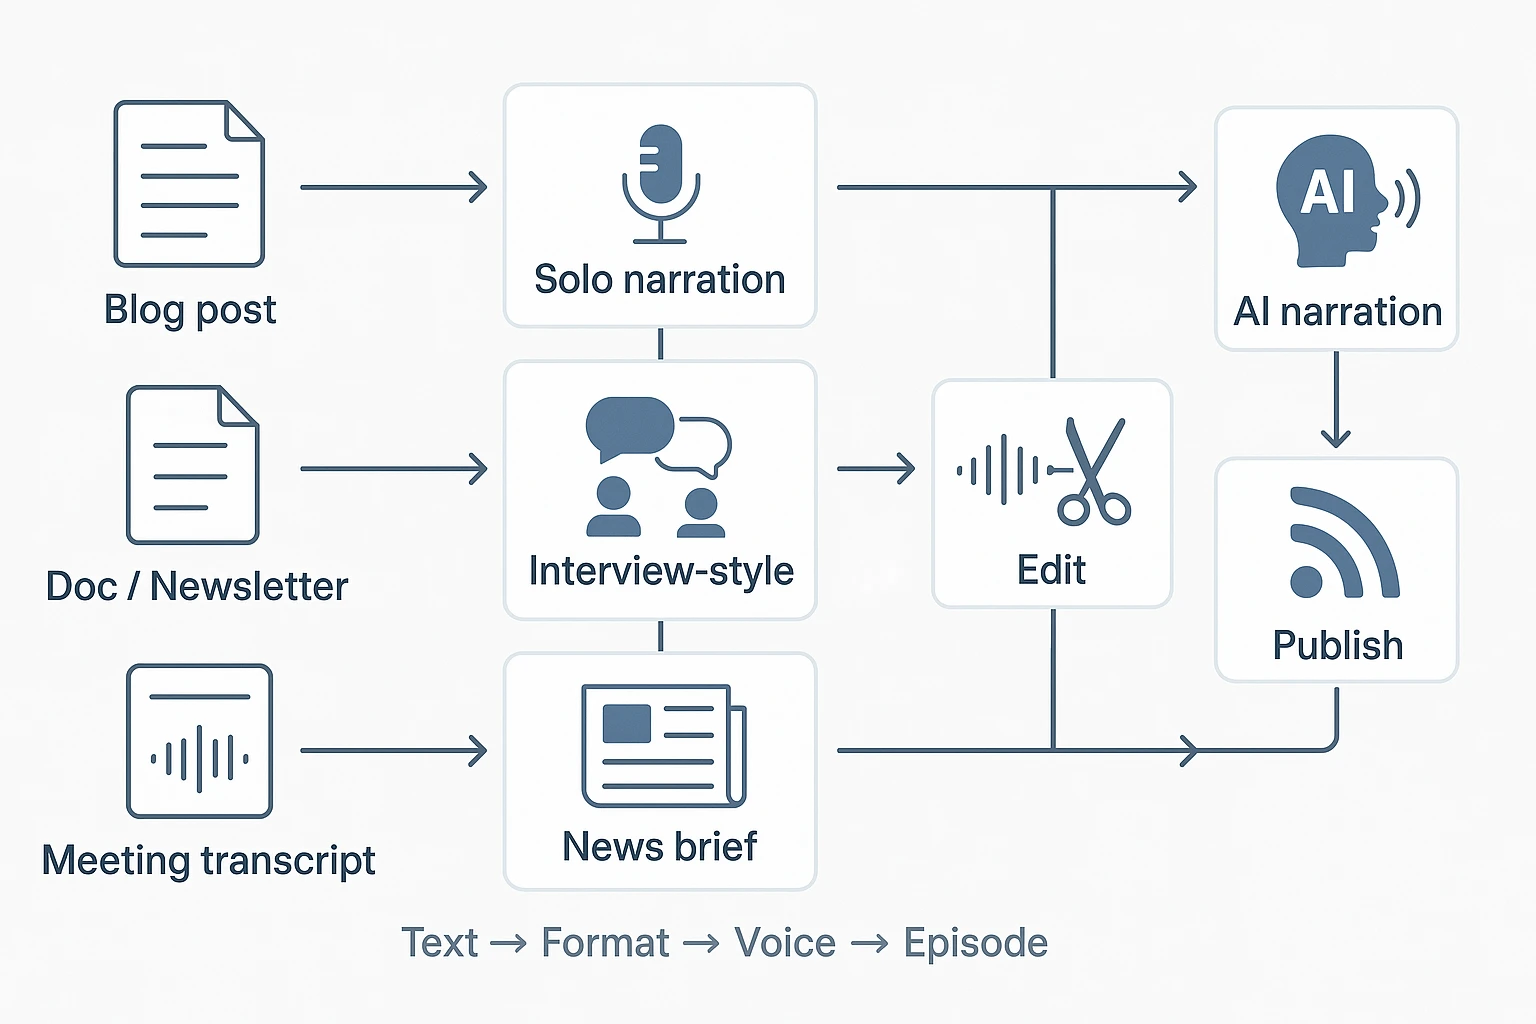
How to turn text into a podcast with AI (without it sounding robotic)
The goal isn't to have an AI read your blog post. It's to create an episode that feels planned, paced, and spoken. When you turn text into a podcast with AI, naturalness comes down to three choices: your source text, your episode format, and your voice plan.
Pick your source text (blog, doc, newsletter, or transcript)
Start with text that has one clear point. If it tries to do five things, your audio will wander. Aim for a length you can explain in 6 to 12 minutes.
Quick cleanup checklist:
- Delete footnotes, long URLs, and bracketed asides.
- Turn headings into spoken transitions like "Next up" or "Here's the key part."
- Fix weird punctuation, broken bullets, and overlong sentences.
Working from meeting notes or transcripts? Pull out 3 to 5 story beats: problem, what changed, the insight, the example, and the next step. If you want a repeatable method, use a quality-checked text to episode workflow to keep structure consistent.
Choose a format: solo narration, interview-style, or "news brief"
Pick a format before you rewrite anything. Format drives pacing.
- Solo narration: easiest for turning a blog into audio. You keep one "host" voice and add simple signposts.
- Interview-style: turn each section into 2 to 4 Q&A prompts. Add short host lines to reset attention.
- News brief: tight and fast. Great for weekly updates, launches, or internal recaps.
Decide your voice plan (one voice vs multi-speaker) and tone
One voice is faster and more consistent. Multi-speaker can work, but only if roles stay the same each episode.
Define your tone in three adjectives, like "calm, friendly, direct." Then set two simple rules: pace (slow, medium, fast) and emphasis (what to stress, and where to pause). Those small choices do more than any "humanize" button.
Try TicNote Cloud for Free to turn docs and transcripts into podcast-ready scripts and exports.
How do you rewrite text so it works as spoken audio?
The script pass is the biggest quality lever in any text to speech workflow. AI voices can sound human, but only if you feed them spoken language. That means cutting what ears can't hold, adding clear signposts, and guiding delivery with simple cues.
If you're starting from a PDF or long doc, it helps to first turn it into a clean outline and sections, then script it for audio. This pairs well with a workflow like turning a PDF into a podcast-ready draft before you generate narration.
Cut what listeners can't process (links, long lists, dense clauses)
Listeners can't scan back. So remove anything that only works on a page.
- Replace URLs with "link in the show notes."
- Turn long lists into 2 to 4 items, then chunk the rest into a later episode.
- Use shorter sentences. Cut parentheses. Avoid stacked clauses.
Quick rule: if a sentence has more than one comma, split it.
Add signposting and cadence ("Here's the point…")
A podcast needs a road map. Tell people where you're going, then guide them there.
- Add a one-line promise: what they'll learn and why it matters.
- Use consistent transitions: "Next," "Quick example," "One caveat."
- Repeat key terms once for retention. Keep jargon out, or define it.
This also gives the AI voice a steadier rhythm.
Add stage directions: pauses, emphasis, and pronunciation notes
AI narration improves fast when you add tiny performance notes.
Use simple brackets:
- [pause]
- [slow]
- [emphasis]
- [say: LUFS "loofs"]
Also add spelling for names and acronyms. And add line breaks where a human would breathe.
Mini before/after example (prose → podcast script)
Prose:
"Podcast audio quality matters because listeners will drop off if the sound is harsh or noisy. Aim for -16 LUFS integrated loudness, keep true peak below -1 dBTP, and reduce background noise. For the full checklist and settings, visit https://example.com/audio-settings and https://example.com/export."
Spoken script:
"Audio quality matters. If your show sounds harsh, people leave. [pause]
Here's the target: aim for [say: LUFS "loofs"] minus sixteen. Keep true peak under minus one dBTP. And keep noise low. [slow]
I'll put the full settings as a link in the show notes. Next, I'll show a simple export workflow."
What changed:
- Cuts: removed the raw URLs
- Chunking: turned one dense sentence into short beats
- Signposts: "Here's the target," "Next"
- Stage directions: [pause], [slow], pronunciation note
Copy this mini-template:
"Today we're talking about {topic}. Here's why it matters: {one benefit}. [pause]
In this episode, you'll learn three things: {point 1}, {point 2}, and {point 3}. Next, let's start with {point 1}. [pause]
Quick example: {example}. One caveat: {caveat}. [emphasis] Here's the key takeaway: {takeaway}."
What tools do you need for AI narration and editing?
You don't need a huge "studio stack" to turn text into audio. For How to Turn Text into a Podcast with AI, think in simple tool categories: a script editor, a voice generator, and an audio editor for cleanup and loudness.
Text-to-speech vs voice cloning vs hybrid workflows
- Text-to-speech (TTS): Fast to ship and easiest to manage. It's also the safest default for most beginners.
- Voice cloning: Can match a real person's voice, but it raises identity risk. Use it only with clear consent and a paper trail.
- Hybrid workflows: Often sound the most natural. Examples: record a human intro and outro, but narrate the main body with AI; or use AI as a draft, then re-record key parts by hand.
What to look for: control, consistency, languages, and licensing
Pick tools based on outcomes, not brand names. These criteria matter most:
- Control: pronunciation, pauses, emphasis, speed, and "style stability" (the voice shouldn't change mood mid-episode).
- Consistency: the same voice across episodes, plus an easy way to fix "voice drift" by re-rendering only the problem lines.
- Languages: if you plan translation or dubbing, confirm your target languages work well.
- Licensing: check commercial use, redistribution rights, and any "voice rights" or training terms.
Here's a light comparison to help you choose:
| Workflow type | Best for | Main risk | What to verify |
| TTS | Speed and repeatability | Slightly flat delivery | Controls for pauses and pronunciation |
| Voice cloning | Strong personal brand | Consent and misuse | Written permission and usage rights |
| Hybrid | Natural sound with speed | More steps | Clear handoff between human and AI parts |
Keeping a natural delivery: speed, pauses, and style settings
Start a bit slower than you think you need. Add short pauses at section breaks. Keep style settings calm and clear, since "over-acting" can sound fake.
Do a quick QA pass: listen once at 1.0x. Mark mispronounced words and awkward lines, then re-render only those lines instead of the whole episode.
How can you produce a clean, podcast-ready audio file?
A clean mix is what makes AI narration sound "real" on Spotify and Apple Podcasts. The goal is simple: keep your export settings consistent, hit a standard loudness target, and fix the few problems that jump out in spoken audio. You don't need studio gear, but you do need a repeatable checklist.
Recommended export settings (WAV, 44.1/48 kHz) and why
Start with high quality files, then compress only at the end.
- Edit in WAV: WAV is uncompressed, so it won't add extra artifacts as you process the voice.
- Sample rate: use 44.1 kHz or 48 kHz. Either is fine. What matters is staying consistent across narration, music, and sound effects.
- Bit depth (for editing): 24-bit if you can. It gives you more headroom for processing.
- Mono vs stereo:
- Mono for voice-only shows. Smaller file, fewer problems.
- Stereo if you use music beds, ambience, or wide sound design.
When you're done, export the final file in the format your host prefers (many accept WAV, and some recommend MP3 or AAC for upload).
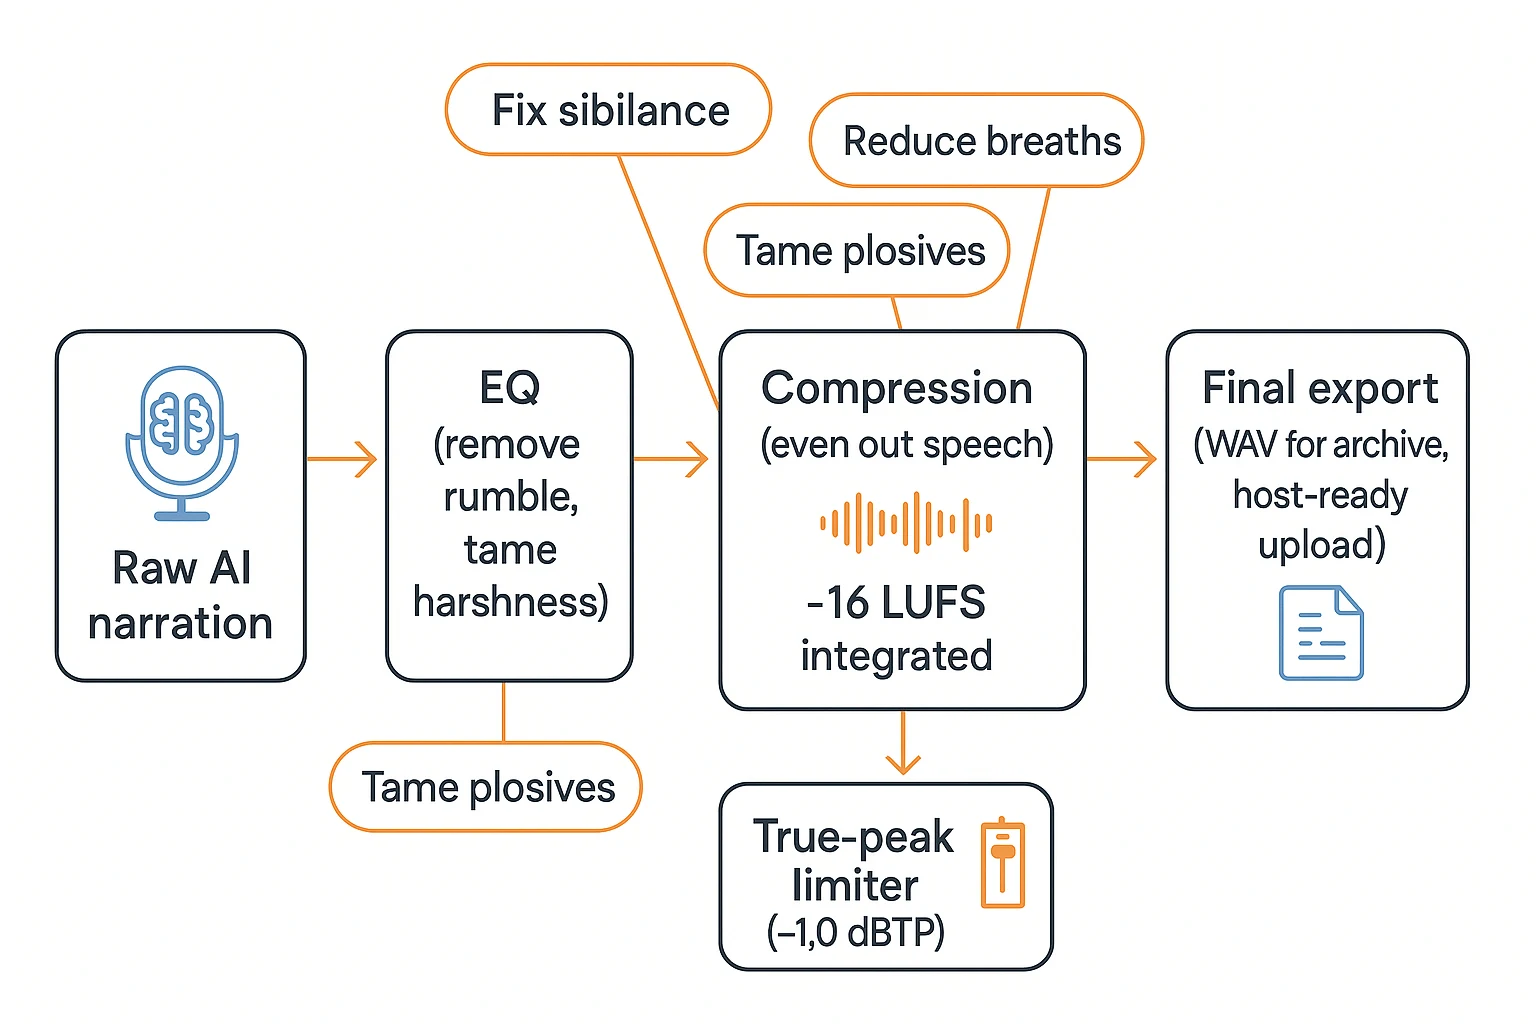
Loudness and mastering targets (aim about -16 LUFS stereo; true peak limit)
Aim for about -16 LUFS integrated for a typical stereo podcast mix. LUFS (Loudness Units relative to Full Scale) is a loudness measure that matches how people hear volume, not just peak meters.
Also set a true peak ceiling around -1.0 dBTP to avoid clipping after encoding.
One key detail: measure loudness after the full mix is done. That means your intro, outro, ads, and music are included. Otherwise, you'll hit the target in the voice track but miss it in the episode.
Basic mastering checklist (EQ, compression, normalize, silence trimming)
Use this short chain for most AI voice tracks:
- High-pass filter: cut low rumble (often 70 to 100 Hz).
- EQ for clarity: reduce "boxy" mids if needed, and avoid boosting highs too much.
- Light compression: even out words and phrases so listeners don't ride the volume.
- Loudness normalize: normalize to your target integrated loudness.
- Limiter: catch stray peaks and enforce your true peak ceiling.
- Trim silence: remove long dead air, but keep short pauses. A little space helps comprehension.
For noise: keep the noise floor low, but don't overdo noise reduction. Aggressive cleanup can cause watery or metallic artifacts that sound worse than light hiss.
Common issues and quick fixes (sibilance, breaths, harsh consonants)
Most "AI voice problems" are fixable in minutes:
- Sibilance (sharp "s" sounds): use a de-esser, or dip a little EQ around 5 to 9 kHz.
- Plosives and harsh consonants ("p", "t", "k" hits): lower clip gain on the worst syllables, then use gentle EQ.
- Breaths: reduce, don't erase. A natural breath keeps the voice human.
Quick QA listen checklist:
- Listen once on headphones for hiss, clicks, and sibilance.
- Listen once on a phone speaker for midrange harshness.
- Skip through the episode to check level jumps between music and voice.
How do you handle intros, outros, music, and multi-speaker episodes?
To make AI narration feel like a real show, you need four things: a repeatable intro and outro, licensed music, clear voice roles, and scripts built for spoken flow. Do that, and your text to audio episode sounds planned, not pasted.
A simple intro/outro structure template (15–30 seconds)
Keep these consistent across your series. You'll save time and build recognition.
Intro (15–30s):
- Who it's for: "If you write blogs for busy buyers…"
- What you'll learn: "Today you'll get a 3-step script fix…"
- Credibility hook: "We've tested this on meeting recaps and newsletters."
- What's next: "First, we'll rewrite for spoken audio…"
Outro (15–30s):
- Recap: "You learned pacing, loudness targets, and publishing."
- One action step: "Pick one post and rewrite the first 60 seconds."
- Subscribe or review ask: quick, one sentence.
- Where links are: "Links and chapters are in the show notes."
Music and SFX licensing basics (what you can and can't reuse)
Don't assume "free on YouTube" means you can use it. Stick to:
- Royalty-free: you pay once (or follow terms) and can reuse.
- Rights-managed: use is limited by time, audience, or platform.
Mixing tips:
- Keep music under the voice.
- Fade in and out. Avoid sudden cuts.
- If words get hard to hear, lower music more.
License notes block (paste in your project):
- Track name:
- Source:
- License type:
- Date downloaded:
- Link or receipt:
Multi-speaker setup: assigning voices, keeping roles consistent
Start with roles, not "cool voices":
- Host: the main guide.
- Guest: expert or story voice.
- Narrator: optional for explainers.
Guardrails:
- One voice per role across episodes.
- Use a naming system like HOST_A, GUEST_FINANCE_01.
- Add speaker tags in the script so rendering doesn't guess.
Short dialogue example to avoid uncanny back-and-forth
Fast ping-pong sounds fake with AI. Use longer turns, fewer swaps, and add [pause].
HOST: Today we're turning a blog into a clean episode. [pause] GUEST: The key is to rewrite for listening, not scanning. HOST: Right. Short sentences and signposts help. [pause] GUEST: And don't stack stats. Pick one and explain it. HOST: Quick recap so far: simplify, then add pauses. GUEST: After that, mix for loudness and export.
Tip: add short "summary interludes" from the host between speakers for clarity.
What legal and ethical rules should you follow with AI podcast voices?
When you turn text into audio, the "easy" part is generation. The safe part is rights, consent, and honesty. If you get these three right, turning text into a podcast with AI is much less risky.
Copyright and permissions for source text (yours vs third-party)
If you wrote the text, you can adapt it into a script. Still check any co-author agreement. Also check your employer or client contract. Some work-for-hire text is not yours to republish.
If the text is third-party, get written permission first. Don't try to "summarize" or "rewrite" to dodge rights. That can still be a derivative work.
If it's public domain or Creative Commons, follow the license terms. Some CC licenses require attribution. Others ban commercial use or edits.
Voice cloning consent and platform policies (what to document)
Only clone a voice with clear, explicit consent. Keep a simple record so you can prove it later:
- Who approved it (name and contact)
- When they approved it (date)
- What you can use it for (show name, channels)
- How long consent lasts (end date or ongoing)
- How they can revoke it (email or form)
Also read your voice tool's rules. Many tools block impersonation, fraud, or political manipulation. Use identity controls if the tool offers them.
Disclosure: how to say AI narration clearly (sample wording)
Say it in plain language. Put it where listeners will notice.
- Intro line: "This episode uses AI narration from a script we wrote."
- Outro line: "Narration in this episode was generated with AI."
- Show notes line: "AI narration was used. Script and edits by our team."
Avoiding misleading impersonation and sensitive content pitfalls
Don't imply endorsement from a real person. Don't mimic public figures. And don't use a "sound-alike" voice to trick listeners.
For health, finance, or legal topics, be extra careful. Cite sources in your notes. Add a short disclaimer (for example: "This is general info, not advice").
Ethics checklist (run before you publish):
- I have rights to the source text.
- I have consent for any cloned voice.
- I disclosed AI narration in audio or notes.
- I didn't imitate a real person to mislead.
- Sensitive claims have sources and a disclaimer.

How do you publish and distribute an AI-generated podcast episode?
Publishing is the part most AI podcasters skip. But it's the part that gets you plays. Here's a simple checklist to ship an episode made from text, with the right hosting, metadata, and show notes for discovery.
Choose a podcast host (RSS), not just a file download
A podcast host stores your audio and creates an RSS feed (the file that podcast apps read). It also gives you analytics and helps you push the show to directories.
Don't use a direct file link from Google Drive or Dropbox. Those links can change, expire, or fail to stream in apps.
Host checklist:
- RSS feed you control (and can move later)
- 301 redirects if you switch hosts
- Reliable storage and bandwidth
- Analytics you can trust
- Dynamic ads (optional, only if you need it)
Metadata that helps discovery (titles, descriptions, keywords, categories)
Metadata is how people find you.
- Titles: make a clear promise plus the specific topic. Good: "Turn Meeting Notes Into a 10-Minute Podcast Episode". Skip vague or clickbait titles.
- Descriptions: the first 1 to 2 lines matter most. Put the core value there, then add 3 to 5 keywords in natural language.
- Categories: pick the closest primary category and keep it consistent.
Artwork basics and episode numbering
Artwork must be readable at thumbnail size. Use high contrast, big type, and one clear visual style.
For numbering, use continuous episode numbers for ongoing shows. Use seasons only when each season has a clear theme or format shift.
Chapters, transcripts, and show notes (what to include for SEO)
Chapters help listeners skim in supported players. Use short labels tied to real moments.
Transcripts help accessibility and search. Clean them up with headers and speaker labels.
Show notes template:
- 2 to 3 sentence summary
- Key points (bullets)
- Links mentioned
- AI voice disclosure (if used)
- Credits and music licenses
If you want a fuller launch checklist, use this podcast hosting and publishing plan to avoid missing setup details.
Submission checklist for Apple Podcasts and Spotify
Before you submit:
- Validate your RSS feed
- Confirm artwork, author, and explicit flag
- Check episode title and description formatting
- Publish one test episode first
After publish, do a quick QA: play the episode from the live feed in at least one app. Don't trust your local export.
Step-by-step: Turn docs or transcripts into an AI-narrated episode
This walkthrough shows How to Turn Text into a Podcast with AI using TicNote Cloud, end to end. You'll start with a blog post, doc, or meeting transcript, pick a simple episode style (solo read, 5 to 10 minutes), and finish with exportable podcast audio plus a clean script and show notes.
Quick setup (what to prep before you click)
Keep these ready so the workflow stays fast:
- Source: PDF, Word doc, TXT/Markdown, or an audio or video file
- Episode format: solo narration, or a two speaker script
- Outputs you want: podcast audio, episode script, and show notes you can paste into your host
Web Studio workflow (detailed)
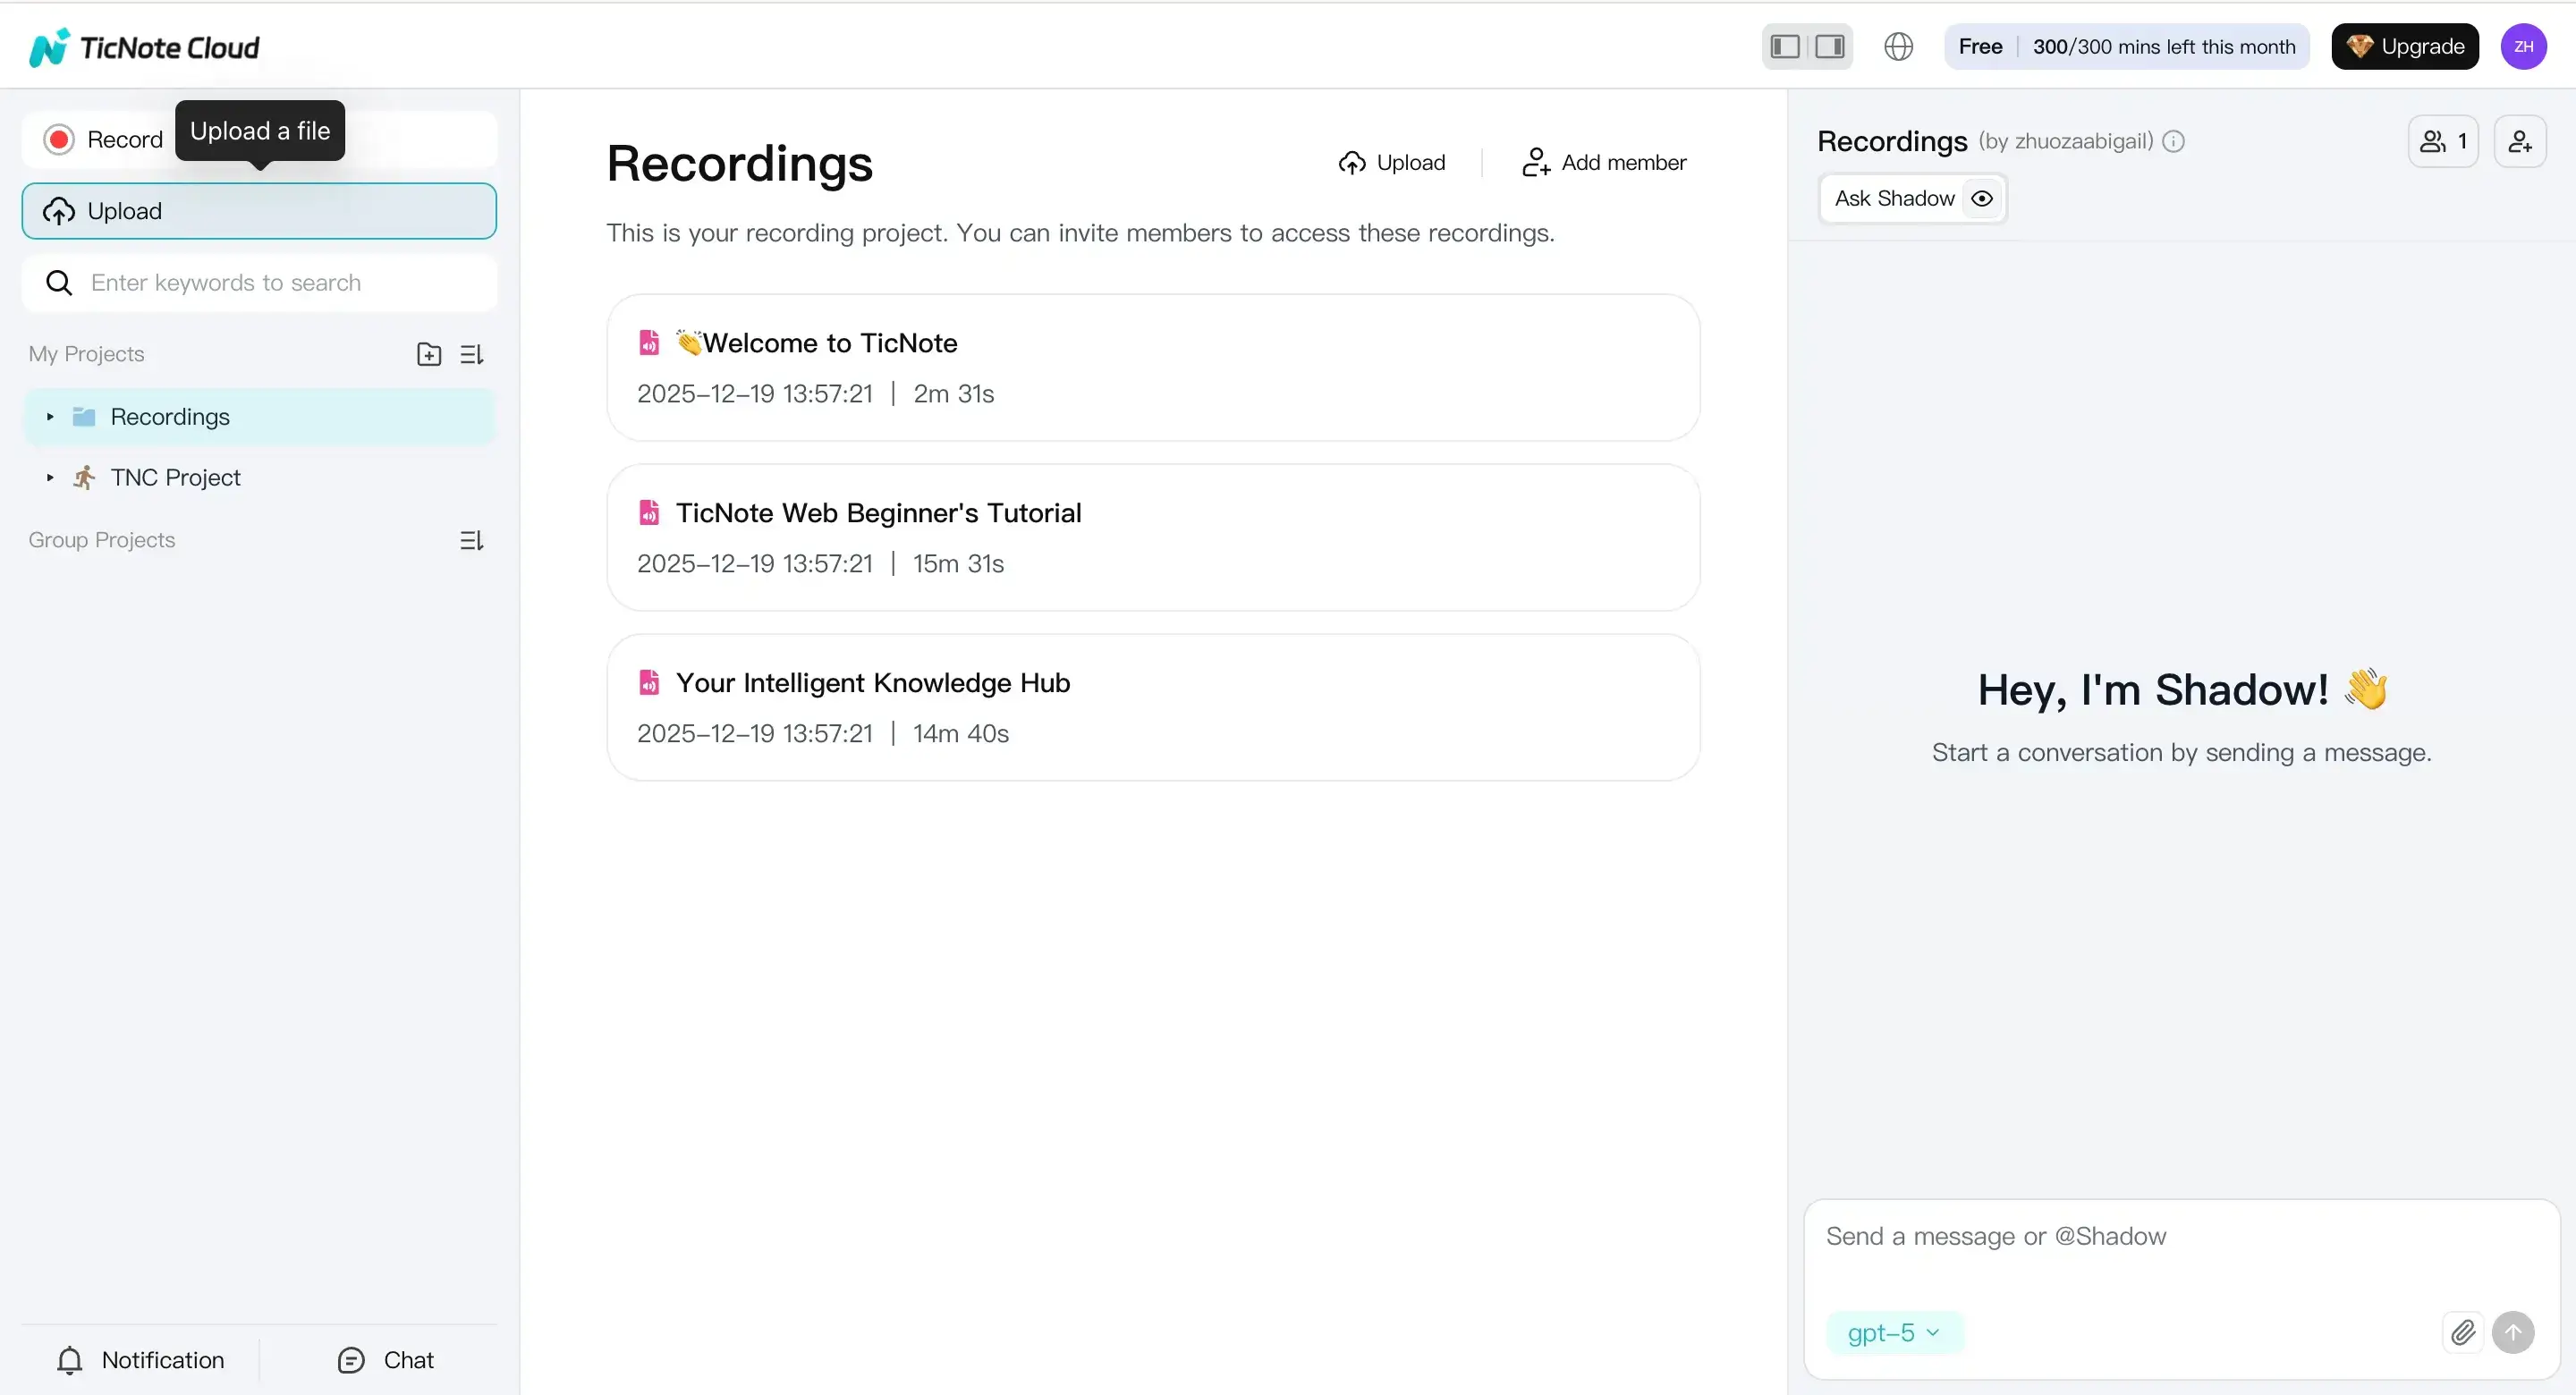
1) Upload your source file into a project
In TicNote Cloud Web Studio, create a new project for your podcast series (or reuse one). Then click Upload at the top and add your file. If it's audio or video, TicNote can also generate the transcript, which gives the AI a clean base to narrate.
Pick the right project now, so drafts, exports, and future episodes stay grouped.
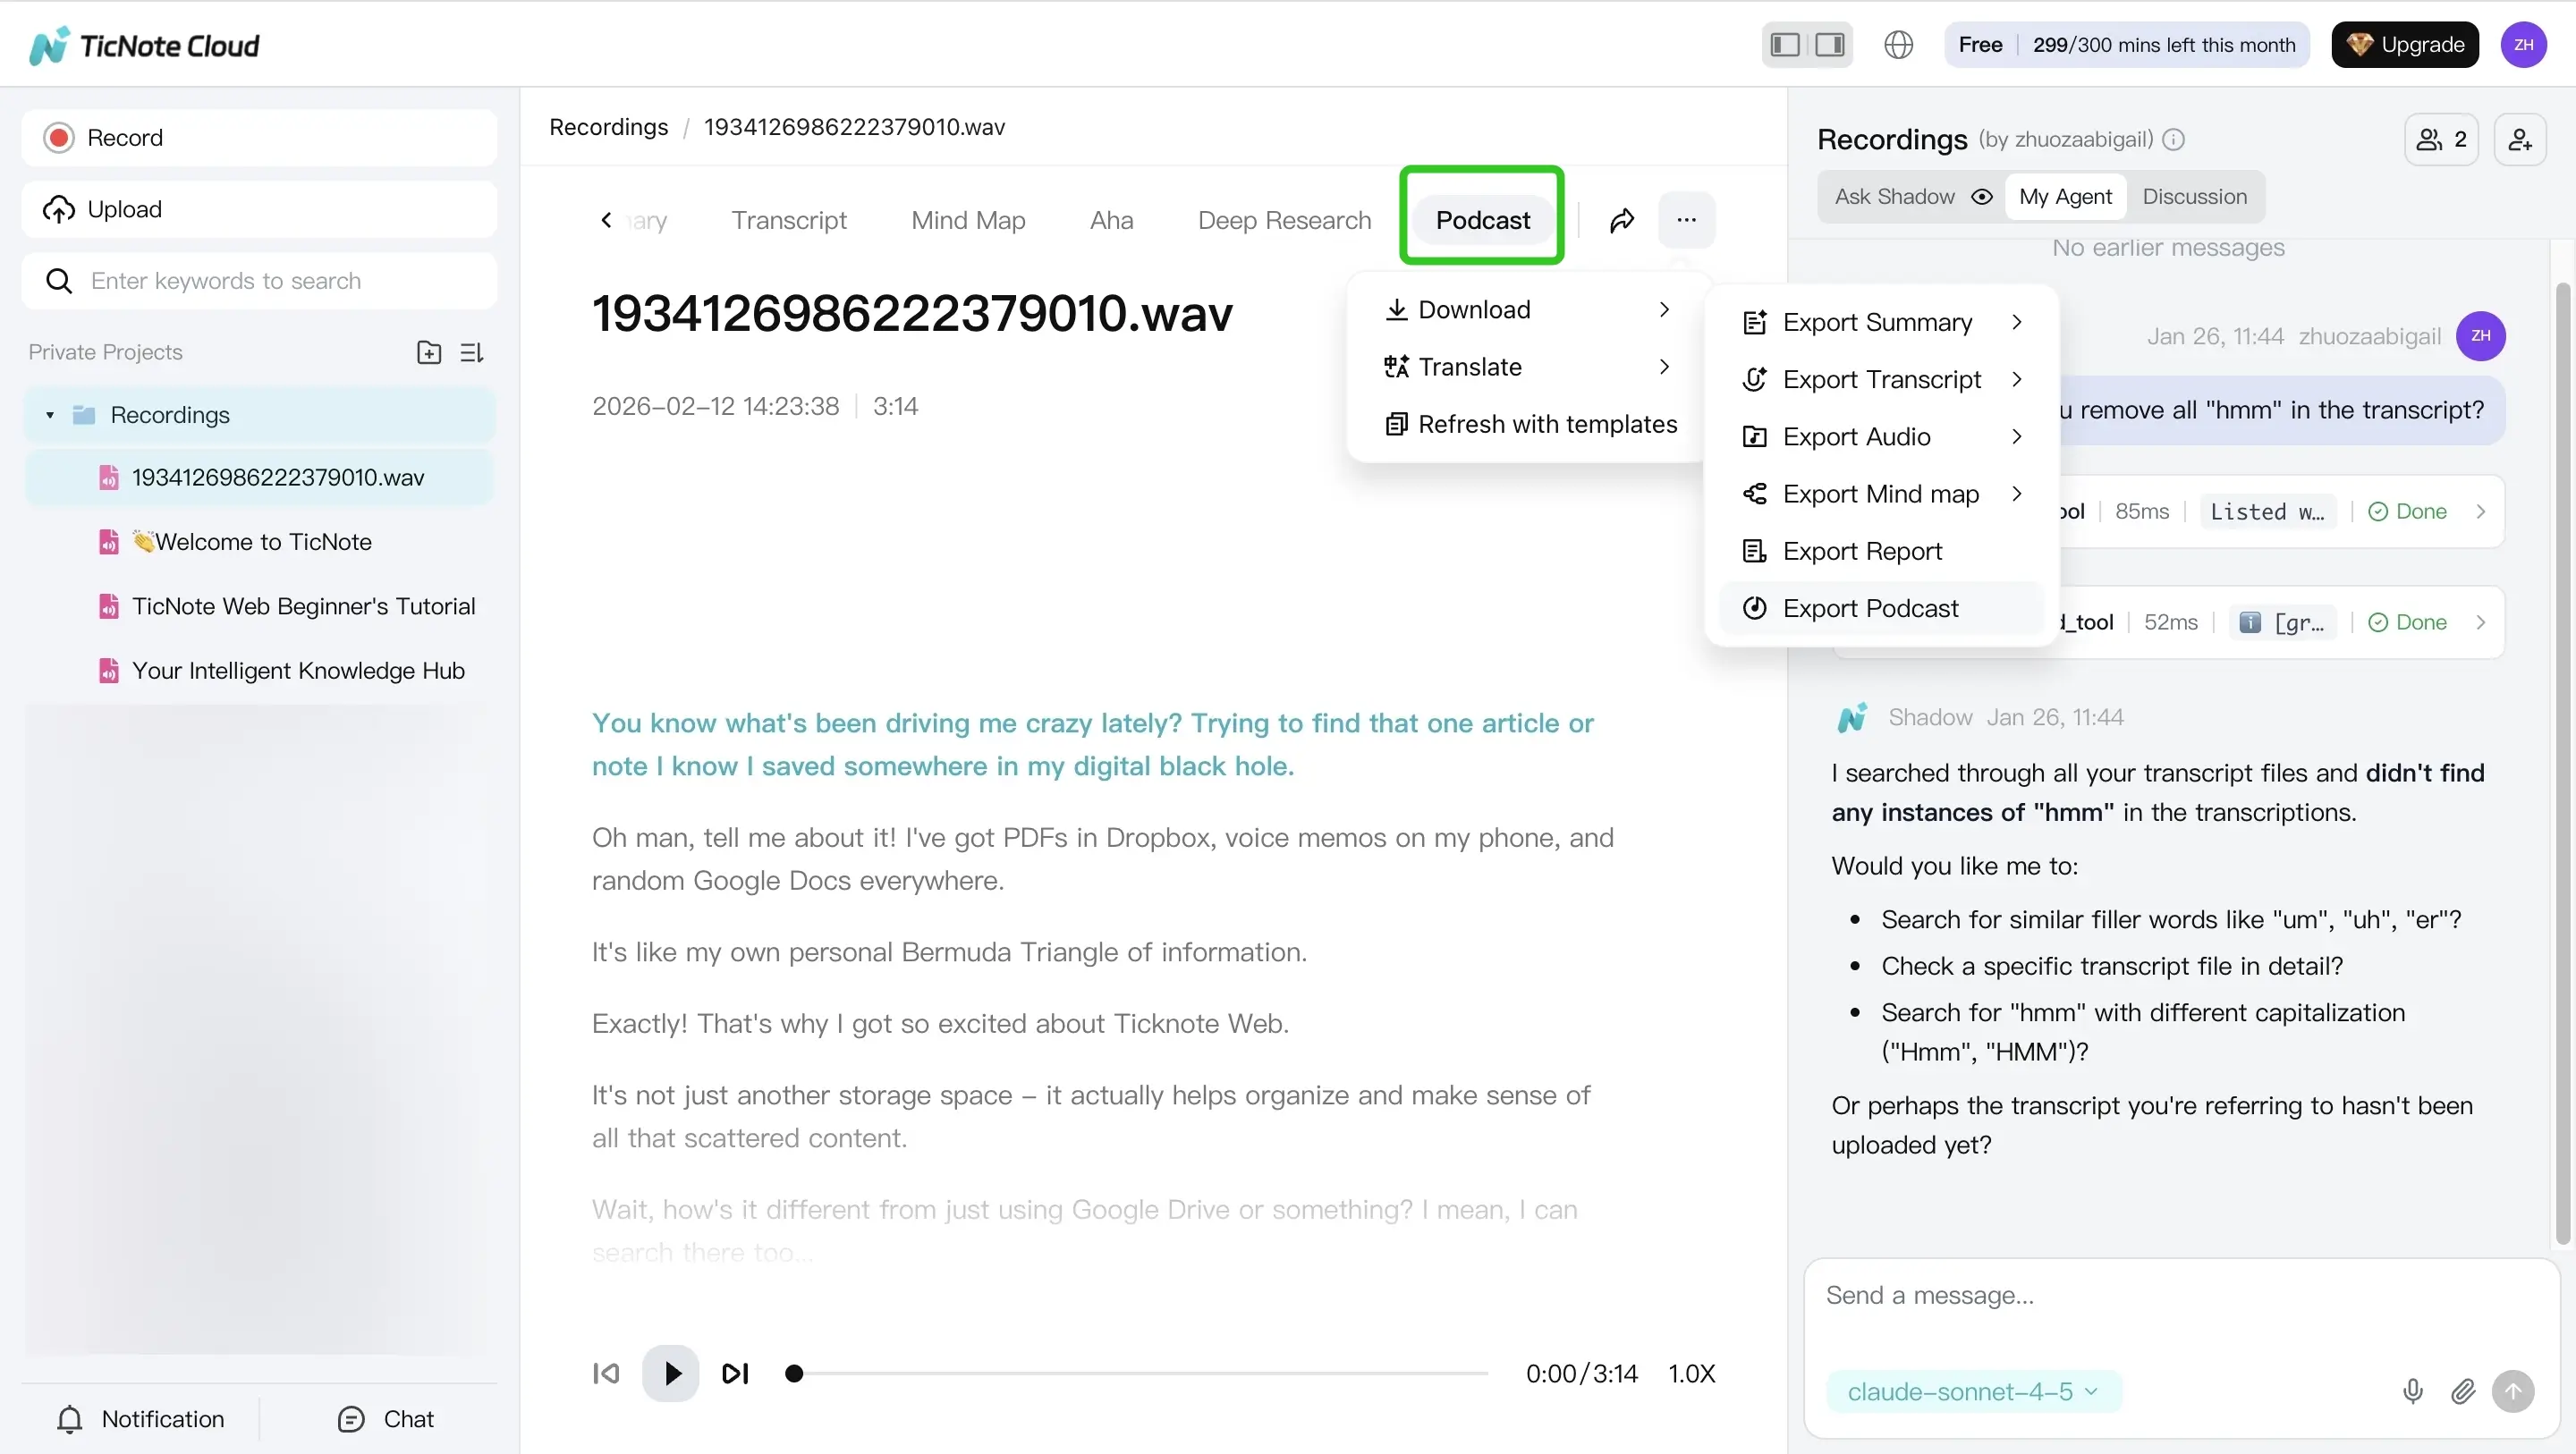
2) Generate the podcast, review, then export
Next, open the Podcast tab. You'll see a generated podcast output based on your file, including the script and the audio narration. Do a fast review pass before you export:
- Read the first minute out loud to check pacing
- Scan for names, acronyms, and brand terms that may need spelling help
- Listen for odd pauses, or lines that feel too "written"
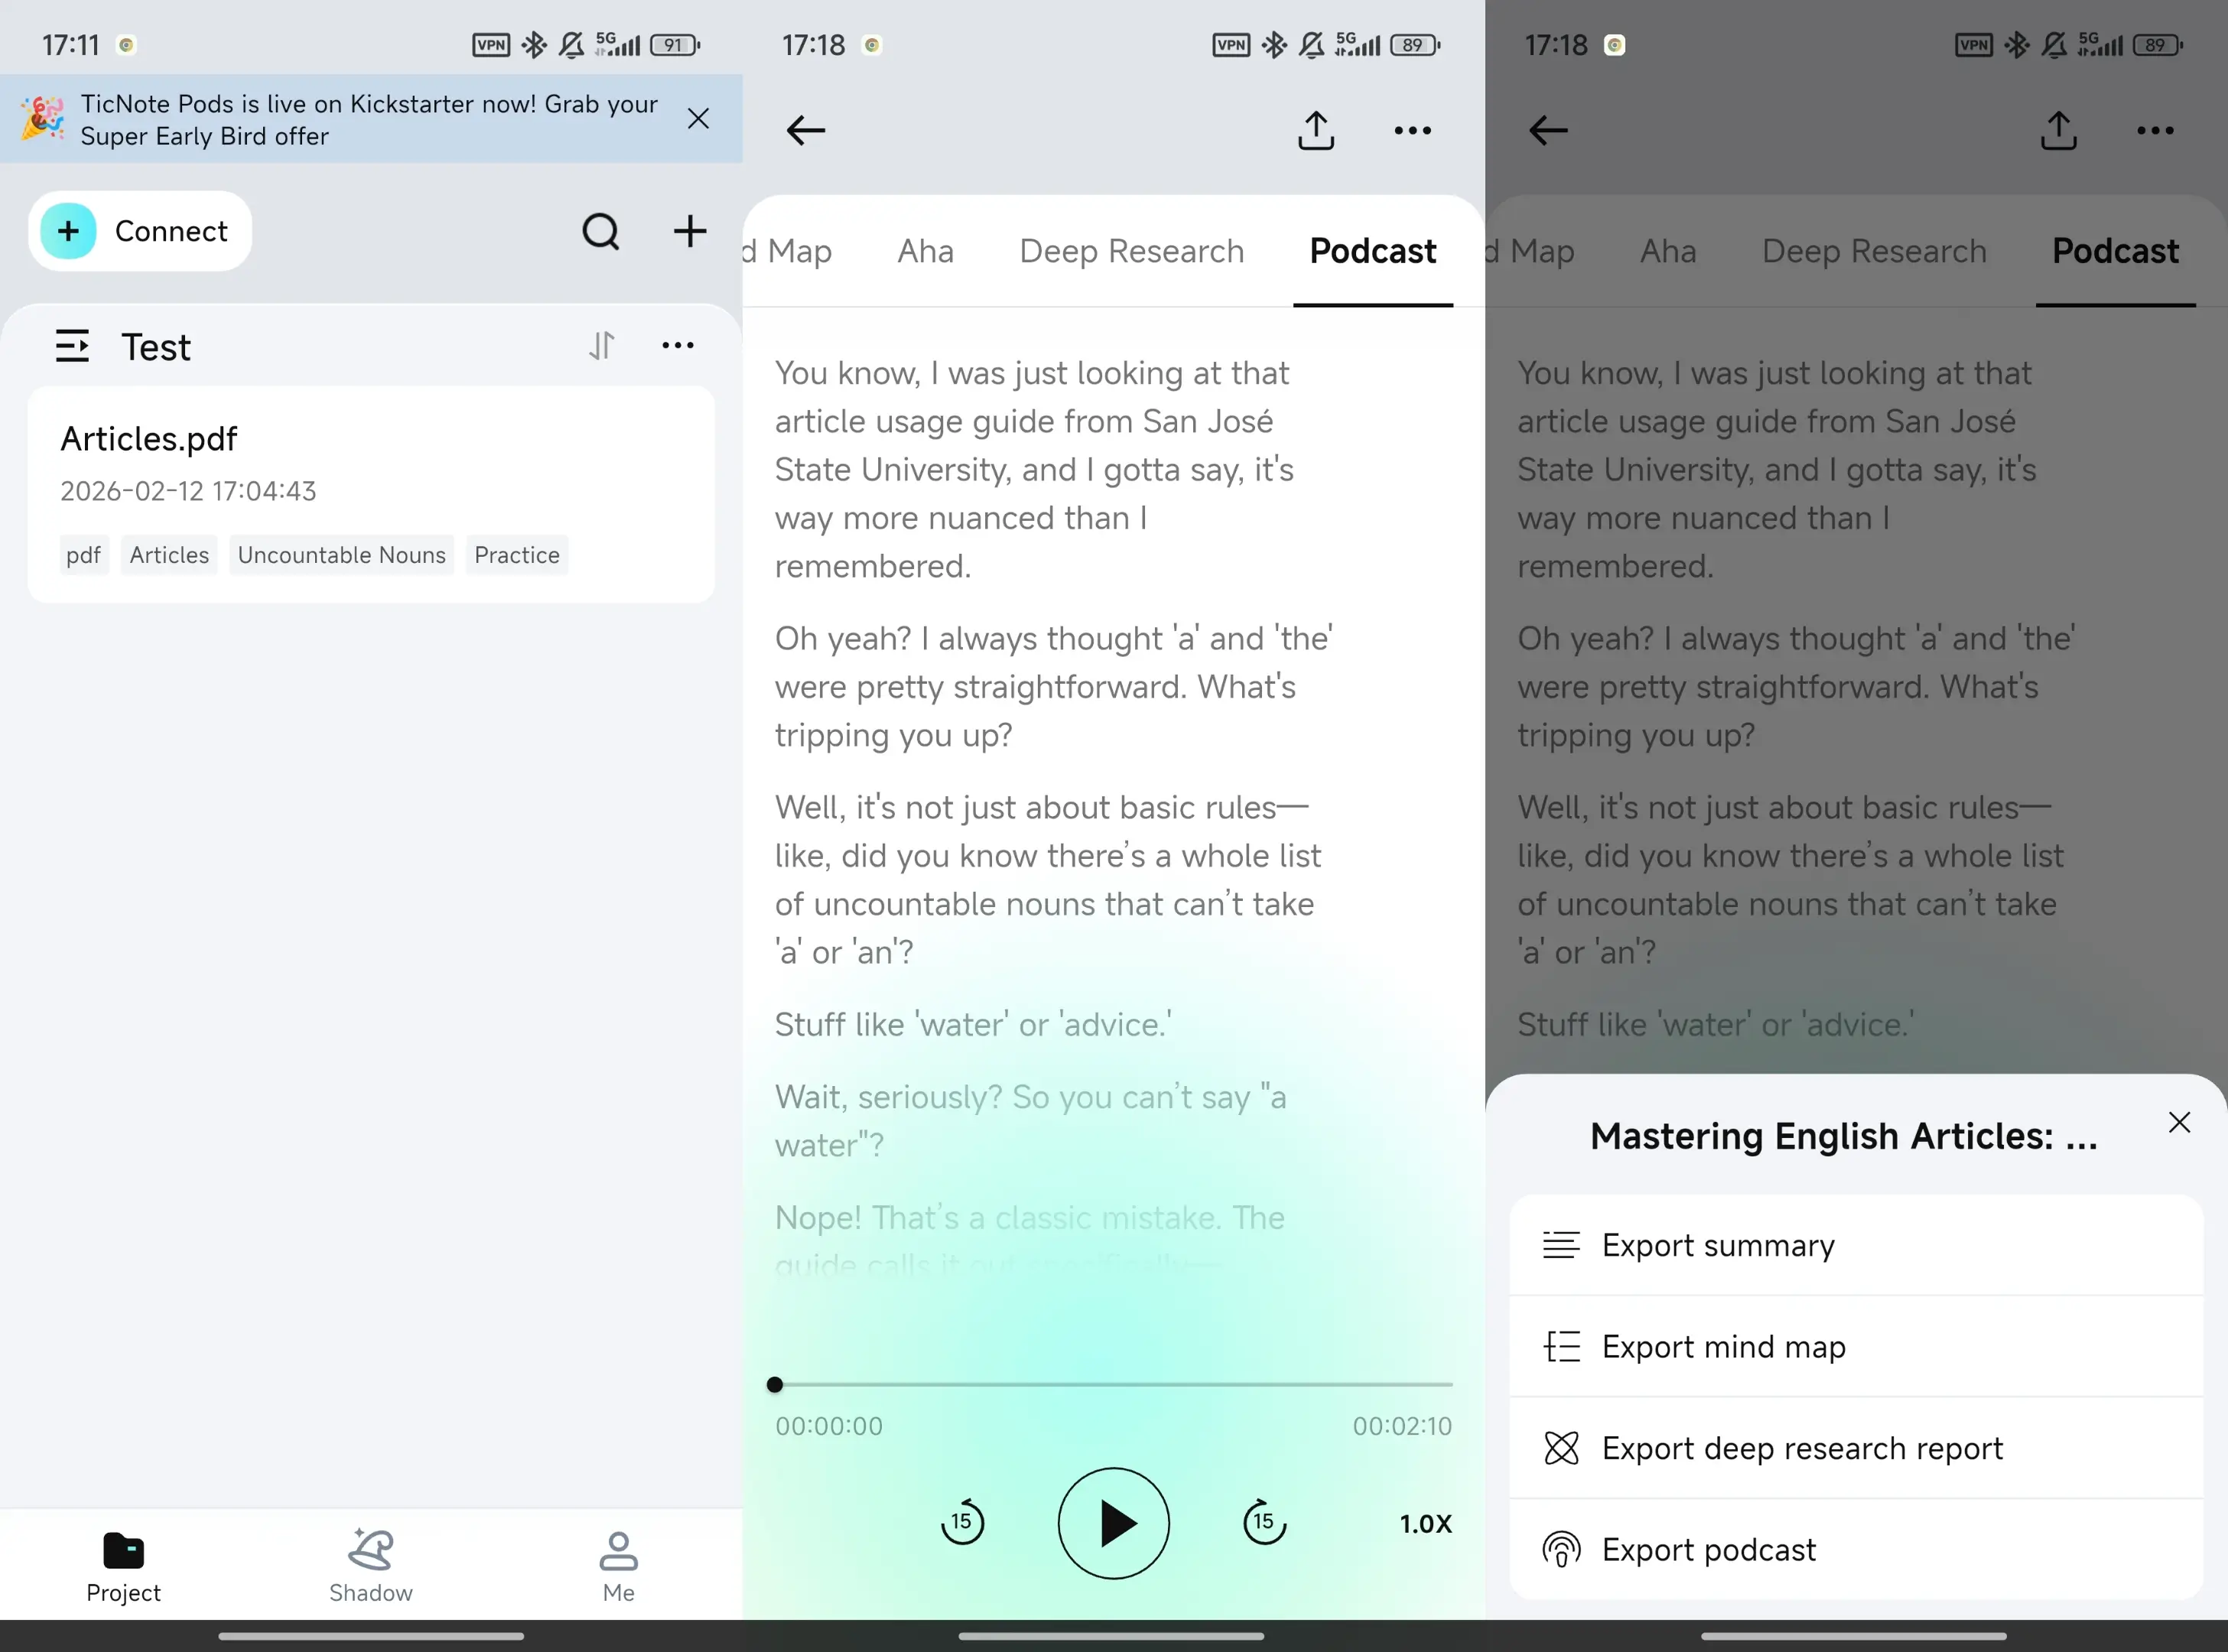
When it sounds right, use the three dots menu to export the result.
If your source is video, this companion guide on turning videos into a podcast automatically helps you keep quality and timing consistent.
Mobile app workflow (same idea, faster on the go)
On the TicNote app, tap the add button to upload your file into a project.
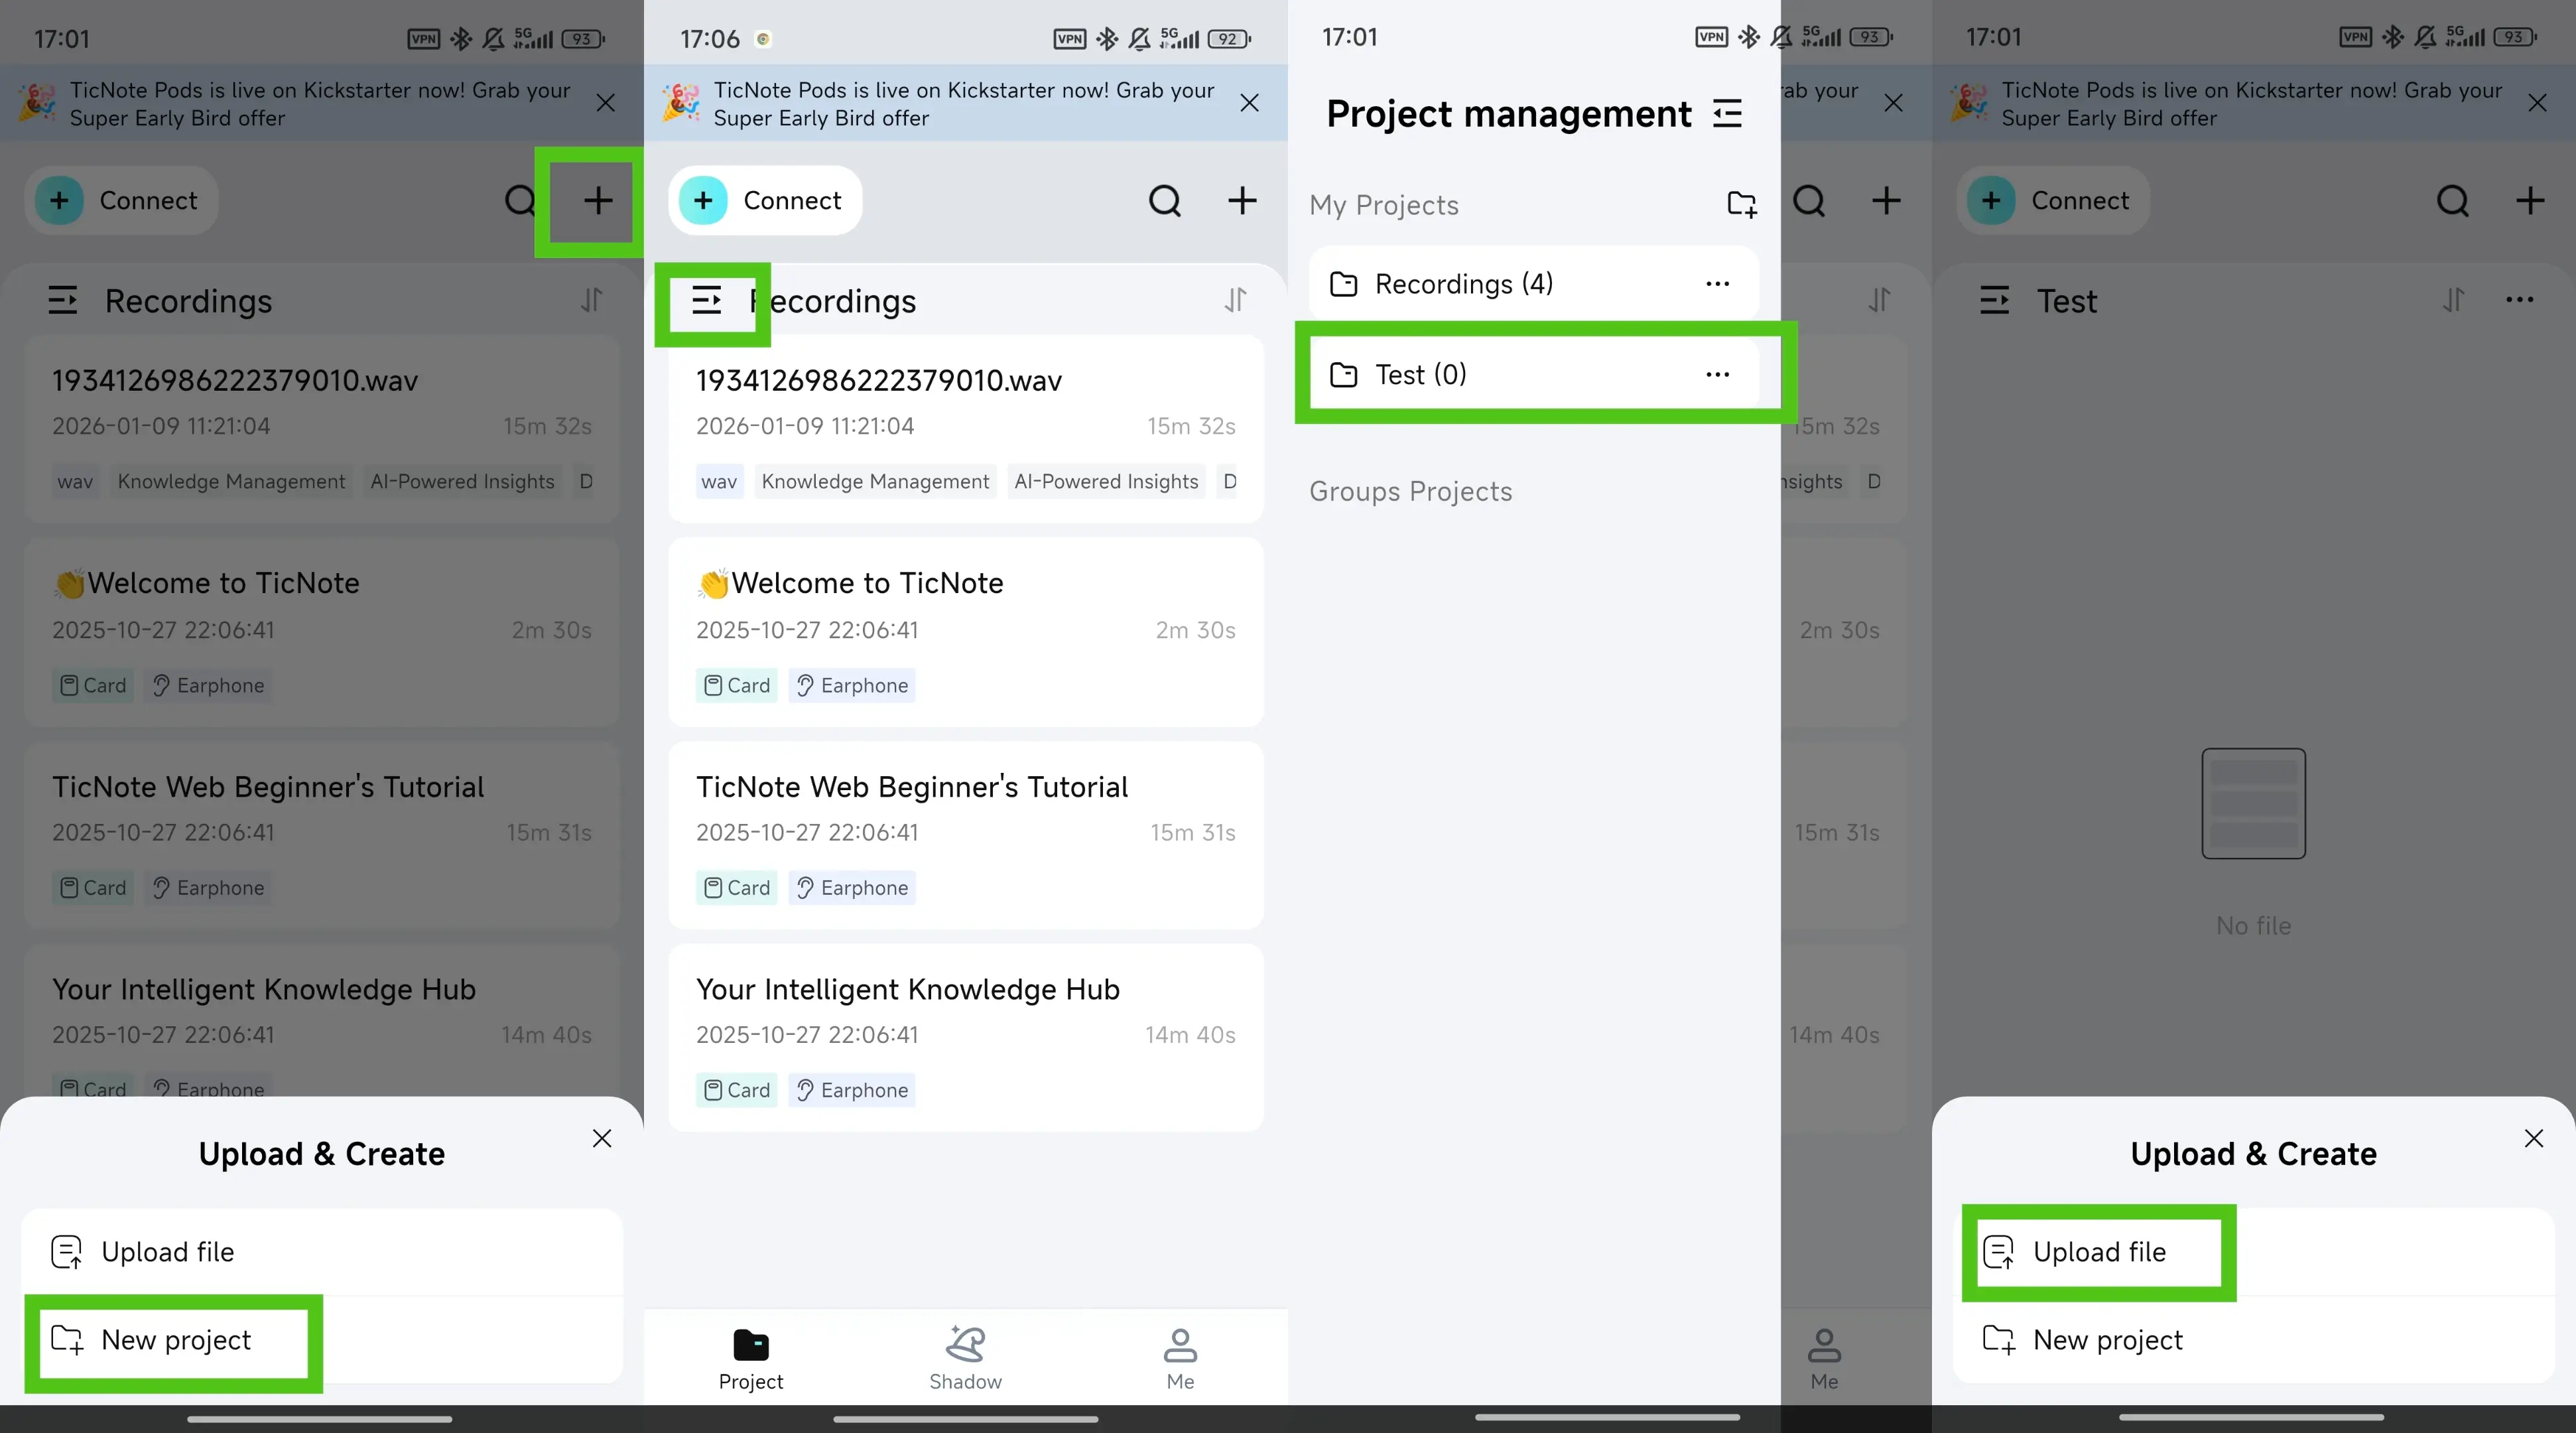
Then open the Podcast tab, do a quick listen, make small text edits if needed, and export the podcast from the three dots menu.
Where TicNote Cloud fits in a full text to podcast workflow
- Import and transcription: turn meetings and recordings into usable text
- Templates: keep intros, sections, and show notes consistent
- Translation: localize episodes for other languages
- Projects: organize by series, reuse outlines, and build a searchable knowledge base
